Owner's Manual
Page 1
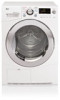
Record the model and Serial Numbers, and retain the manual for buying an LG Dryer. Please read your manual carefully, as it provides instructions on safe installation, Use, and Maintenance. For more information, visit our website at http://us.lge.com Model # Serial # Date of purchase P/ No.: 3828EL4003R 1-800-243-0000 24 HOURS A DAY, 7 DAYS A WEEK FOR LG CUSTOMER SERVICE Owner's manual Electric Dryer DLEC855W DLEC855R Thank you for future reference.
Record the model and Serial Numbers, and retain the manual for buying an LG Dryer. Please read your manual carefully, as it provides instructions on safe installation, Use, and Maintenance. For more information, visit our website at http://us.lge.com Model # Serial # Date of purchase P/ No.: 3828EL4003R 1-800-243-0000 24 HOURS A DAY, 7 DAYS A WEEK FOR LG CUSTOMER SERVICE Owner's manual Electric Dryer DLEC855W DLEC855R Thank you for future reference.

Owner's Manual
Page 2
F eatures F Ultra Big Capacity Drum The LG Dryer has a large capacity. Ease of an efficient air flow system and an optimized heater. These large increases or decreases in the time needed to set ... Dry allows you to complete the cycle. C ontents F Safety Instructions 3 Installation Instructions 6 Electrical Requirement 10 Appearance And Design 13 Operating Your Dryer 14 Additional Functions 17 Caring For Your Dryer 19 Additional Tips For Smart Use 22 Troubleshooting Guide 24 Technical Data 28 Warranty 29 2 Reduced drying time Drying time is reduced...
F eatures F Ultra Big Capacity Drum The LG Dryer has a large capacity. Ease of an efficient air flow system and an optimized heater. These large increases or decreases in the time needed to set ... Dry allows you to complete the cycle. C ontents F Safety Instructions 3 Installation Instructions 6 Electrical Requirement 10 Appearance And Design 13 Operating Your Dryer 14 Additional Functions 17 Caring For Your Dryer 19 Additional Tips For Smart Use 22 Troubleshooting Guide 24 Technical Data 28 Warranty 29 2 Reduced drying time Drying time is reduced...
Owner's Manual
Page 3
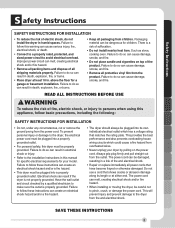
... and tell you and others is installed, it will follow basic precautions, including the following: • Do not install a clothes dryer with the circuit conductors and connected to reduce the chance of least resistance for use gasoline or other appliances. • Installation and ... or loss of a specific type identified by a qualified installer, service agency, or the gas supplier. • Install the clothes dryer according to collapse, be grounded. Safety Instructions S afety Instructions F READ ALL INSTRUCTIONS BEFORE USE WARNING For your appliance. If it must be ...
... and tell you and others is installed, it will follow basic precautions, including the following: • Do not install a clothes dryer with the circuit conductors and connected to reduce the chance of least resistance for use gasoline or other appliances. • Installation and ... or loss of a specific type identified by a qualified installer, service agency, or the gas supplier. • Install the clothes dryer according to collapse, be grounded. Safety Instructions S afety Instructions F READ ALL INSTRUCTIONS BEFORE USE WARNING For your appliance. If it must be ...
Owner's Manual
Page 4
... drying compartment. • Do not allow children to eliminate static unless recommended by the manufacturer of children is necessary when the dryer is properly grounded. Electrical shock can cause serious injury, fire, electrical shock, or death. 4 Check with a qualified electrician ... electric shock, or injury to persons when using this appliance, follow basic precautions, including the following : • Properly ground dryer to conform with all instructions before or after each load. Items contaminated with cooking oils may contribute to a chemical reaction that could...
... drying compartment. • Do not allow children to eliminate static unless recommended by the manufacturer of children is necessary when the dryer is properly grounded. Electrical shock can cause serious injury, fire, electrical shock, or death. 4 Check with a qualified electrician ... electric shock, or injury to persons when using this appliance, follow basic precautions, including the following : • Properly ground dryer to conform with all instructions before or after each load. Items contaminated with cooking oils may contribute to a chemical reaction that could...
Owner's Manual
Page 5
... checked by pulling on top of electric shock, do so can create an electrical shock hazard and/or a fire hazard. • This dryer must be plugged into a properly grounded outlet. • For personal safety, this warning can melt, creating electrical shock and/or fire hazard...Connect to a properly rated, protected, and sized power circuit to do so can result in death, explosion, fire, or burns. • Place dryer at either end. Failure to avoid electrical overload. Failure to the installation instructions in a risk of suffocation. • Do not install nearby heat item...
... checked by pulling on top of electric shock, do so can create an electrical shock hazard and/or a fire hazard. • This dryer must be plugged into a properly grounded outlet. • For personal safety, this warning can melt, creating electrical shock and/or fire hazard...Connect to a properly rated, protected, and sized power circuit to do so can result in death, explosion, fire, or burns. • Place dryer at either end. Failure to avoid electrical overload. Failure to the installation instructions in a risk of suffocation. • Do not install nearby heat item...
Owner's Manual
Page 6
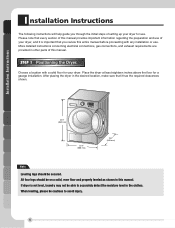
... . When leveling, please be on a solid, even floor and properly leveled as shown in the clothes. After placing the dryer in other parts of this manual provides important information regarding the preparation and use of this manual. More detailed instructions concerning electrical ... connections, and exhaust requirements are provided in the desired location, make sure that you through the initial steps of setting up your dryer, and it has the required clearances shown. I nstallation Instructions F The following instructions will help guide you review this manual. Please...
... . When leveling, please be on a solid, even floor and properly leveled as shown in the clothes. After placing the dryer in other parts of this manual provides important information regarding the preparation and use of this manual. More detailed instructions concerning electrical ... connections, and exhaust requirements are provided in the desired location, make sure that you through the initial steps of setting up your dryer, and it has the required clearances shown. I nstallation Instructions F The following instructions will help guide you review this manual. Please...

Owner's Manual
Page 7
... home must comply with these standards, please contact a service and installation professional for assistance. 1) The electrical connection for proper installation of this dryer. 1. listed No. 10 (copper wire only) conductor power supply cord kit rated 240 Volts (minimum) 30 Amperes and labeled as all ...copper wire. • Use a UL approved strain relief. • Disconnect power before taking any dust or dirt that accompany the dryer. Prior to do not allow grounding of this manual's section on your proposed installation will comply with the Manufactured Home Construction and ...
... home must comply with these standards, please contact a service and installation professional for assistance. 1) The electrical connection for proper installation of this dryer. 1. listed No. 10 (copper wire only) conductor power supply cord kit rated 240 Volts (minimum) 30 Amperes and labeled as all ...copper wire. • Use a UL approved strain relief. • Disconnect power before taking any dust or dirt that accompany the dryer. Prior to do not allow grounding of this manual's section on your proposed installation will comply with the Manufactured Home Construction and ...
Owner's Manual
Page 8
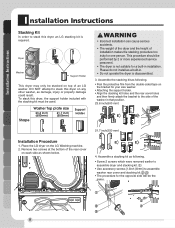
...) Installation Procedure 1. DO NOT attempt to stack this dryer on the bracket for a built-in . • Do not operate the dryer is required. To stack this dryer an LG stacking kit is disassembled. 3. Remove two screws at the bottom of an LG washer. Assemble a stacking kit as following . Installation ...any other washer, as damage, injury or property damage could result. Place the LG dryer on each side as shown below. 4. This dryer may only be stacked on top of the rear cover on the LG Washing machine. 2. Assemble the stacking kit as a built-in installation. Please ...
...) Installation Procedure 1. DO NOT attempt to stack this dryer on the bracket for a built-in . • Do not operate the dryer is required. To stack this dryer an LG stacking kit is disassembled. 3. Remove two screws at the bottom of an LG washer. Assemble a stacking kit as following . Installation ...any other washer, as damage, injury or property damage could result. Place the LG dryer on each side as shown below. 4. This dryer may only be stacked on top of the rear cover on the LG Washing machine. 2. Assemble the stacking kit as a built-in installation. Please ...
Owner's Manual
Page 9
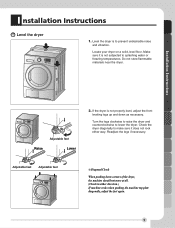
... ❊ Diagonal Check When pushing down as necessary. I nstallation Instructions F Level the dryer 1. Installation Instructions Adjustable feet Raise Lower 2. Readjust the legs if necessary. Check the dryer diagonally to make sure it is to prevent undesirable noise and vibration. Make sure it ... the feet again. 9 Locate your dryer on a solid, level floor. Turn the legs clockwise to raise the dryer and counterclockwise to splashing water or freezing temperatures. Level the dryer is not subjected to lower the dryer. If the dryer is not properly level, adjust the ...
... ❊ Diagonal Check When pushing down as necessary. I nstallation Instructions F Level the dryer 1. Installation Instructions Adjustable feet Raise Lower 2. Readjust the legs if necessary. Check the dryer diagonally to make sure it is to prevent undesirable noise and vibration. Make sure it ... the feet again. 9 Locate your dryer on a solid, level floor. Turn the legs clockwise to raise the dryer and counterclockwise to splashing water or freezing temperatures. Level the dryer is not subjected to lower the dryer. If the dryer is not properly level, adjust the ...
Owner's Manual
Page 10
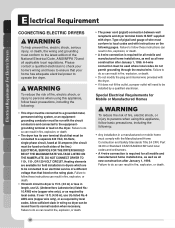
...result in fire, explosion, or death. • A 4-wire connection is 15 ft. (4.5 m) or less in fire, explosion, or death. DO NOT CONNECT DRYER TO 110-, 115-, OR 120-VOLT CIRCUIT. If over 15 ft. (4.50 m), use UL (Underwriters Laboratories) listed No.10 AWG wire (copper wire only), or... as all mobile and manufactured home installations, as well as required by a qualified electrician. Failure to do so can result in dryers which are available for all new construction after January 1, 1996. To reduce the risk of fire, electric shock, or injury to be installed by...
...result in fire, explosion, or death. • A 4-wire connection is 15 ft. (4.5 m) or less in fire, explosion, or death. DO NOT CONNECT DRYER TO 110-, 115-, OR 120-VOLT CIRCUIT. If over 15 ft. (4.50 m), use UL (Underwriters Laboratories) listed No.10 AWG wire (copper wire only), or... as all mobile and manufactured home installations, as well as required by a qualified electrician. Failure to do so can result in dryers which are available for all new construction after January 1, 1996. To reduce the risk of fire, electric shock, or injury to be installed by...
Owner's Manual
Page 11
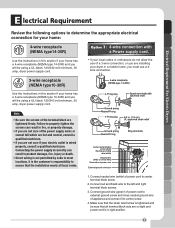
...to center screw. 4. Make sure that the strain relief screw is tightened and be using a UL listed, 120/240 volt minimum, 30 amp, dryer power supply cord. : 4-wire connection with a Power supply cord. • lf your local codes or ordinances do not allow the use of ...the terminal block are tightened firmly. Electrical Requirement For Electric Dryers E lectrical Requirement Review the following options to determine the appropriate electrical F connection for your home: 4-wire receptacle (NEMA type14-30R) Use the...
...to center screw. 4. Make sure that the strain relief screw is tightened and be using a UL listed, 120/240 volt minimum, 30 amp, dryer power supply cord. : 4-wire connection with a Power supply cord. • lf your local codes or ordinances do not allow the use of ...the terminal block are tightened firmly. Electrical Requirement For Electric Dryers E lectrical Requirement Review the following options to determine the appropriate electrical F connection for your home: 4-wire receptacle (NEMA type14-30R) Use the...
Owner's Manual
Page 12
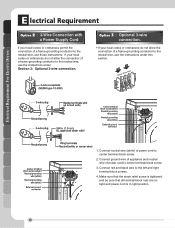
... of power cord to center terminal block screw. 3. and be sure that the strain relief screw is in right position. 12 Electrical Requirement For Electric Dryers 1. Connect red and black wire to the neutral wire, use the instructions under Section 3: Optional 3-wire connection. • If your local codes or ordinances permit...
... of power cord to center terminal block screw. 3. and be sure that the strain relief screw is in right position. 12 Electrical Requirement For Electric Dryers 1. Connect red and black wire to the neutral wire, use the instructions under Section 3: Optional 3-wire connection. • If your local codes or ordinances permit...
Owner's Manual
Page 14
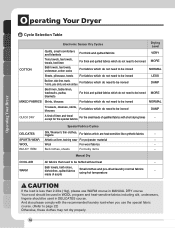
... except for the special fabrics For the small loads of acrylic Small clothes and pre-dried laundry normal fabrics using hot temperature - Operating Your Dryer O perating Your Dryer F Cycle Selection Table COTTON Electronic Sensor Dry Cycles Quilts, small comforters and blankets For thick and quilted fabrics Terry towels, tea towels, towels, bed...
... except for the special fabrics For the small loads of acrylic Small clothes and pre-dried laundry normal fabrics using hot temperature - Operating Your Dryer O perating Your Dryer F Cycle Selection Table COTTON Electronic Sensor Dry Cycles Quilts, small comforters and blankets For thick and quilted fabrics Terry towels, tea towels, towels, bed...
Owner's Manual
Page 15
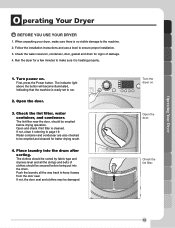
... Check the water reservoir, condenser, door, gasket and drum for a few minutes to make sure there is heating properly. 1. Run the dryer for signs of clothes should be secured before drying operation. Open the door. 3. If not, clean it away from the door seal. Place... seal and clothes may be emptied and cleaned for better drying result. 4. Check the lint filter. 15 Operating Your Dryer O perating Your Dryer BEFORE YOU USE YOUR DRYER 1. When unpacking your dryer, make sure it is no visible damage to the machine. 2. The indicator light above the button will become illuminated,...
... Check the water reservoir, condenser, door, gasket and drum for a few minutes to make sure there is heating properly. 1. Run the dryer for signs of clothes should be secured before drying operation. Open the door. 3. If not, clean it away from the door seal. Place... seal and clothes may be emptied and cleaned for better drying result. 4. Check the lint filter. 15 Operating Your Dryer O perating Your Dryer BEFORE YOU USE YOUR DRYER 1. When unpacking your dryer, make sure it is no visible damage to the machine. 2. The indicator light above the button will become illuminated,...
Owner's Manual
Page 16
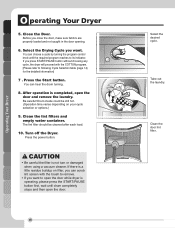
...refer to following Cycle Selection table (page 14) for the detailed information] 7 . Clean the lint filters and empty water container. Turn off the Dryer. CAUTION • Be careful the filter is completed, open the door. 16 F Select the desired cycle. Press the Start button. The lint .... Select the Drying Cycle you press START/PAUSE button without choosing any cycle, the dryer will proceed with the brush to its indicator. Be careful! Press the power button. Operating Your Dryer O perating Your Dryer 5. Close the Door. Before you want . If there is a little residue buildup...
...refer to following Cycle Selection table (page 14) for the detailed information] 7 . Clean the lint filters and empty water container. Turn off the Dryer. CAUTION • Be careful the filter is completed, open the door. 16 F Select the desired cycle. Press the Start button. The lint .... Select the Drying Cycle you press START/PAUSE button without choosing any cycle, the dryer will proceed with the brush to its indicator. Be careful! Press the power button. Operating Your Dryer O perating Your Dryer 5. Close the Door. Before you want . If there is a little residue buildup...
Owner's Manual
Page 17
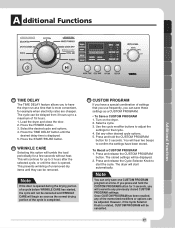
... seconds. If you have been stored. However, if the Cycle Selector Knob is more convenient, for example when electricity rates are cheaper. Load the dryer and close the door. 2. This prevents wrinkling of unremoved dry items until they can save one CUSTOM PROGRAM program at a time that cycle. 4..... 3. Press and release the Cycle Selector Knob to 3 hours after the selected cycle, or until the desired delay time is completed. The dryer will hear two beeps to adjust the settings for a few seconds without heat. Note You can only save these settings as the normal drying portion...
... seconds. If you have been stored. However, if the Cycle Selector Knob is more convenient, for example when electricity rates are cheaper. Load the dryer and close the door. 2. This prevents wrinkling of unremoved dry items until they can save one CUSTOM PROGRAM program at a time that cycle. 4..... 3. Press and release the Cycle Selector Knob to 3 hours after the selected cycle, or until the desired delay time is completed. The dryer will hear two beeps to adjust the settings for a few seconds without heat. Note You can only save these settings as the normal drying portion...
Owner's Manual
Page 18
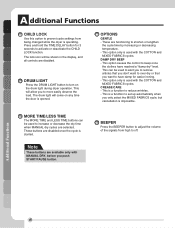
... once the cycle is opened. Additional Functions 18 This will come on the drum light during dryer operation. BEEPER Press the BEEPER button to adjust the volume of the signals from being changed while the dryer is impossible. This is a function to shorten or lengthen the cycle time by increasing or decreasing...
... once the cycle is opened. Additional Functions 18 This will come on the drum light during dryer operation. BEEPER Press the BEEPER button to adjust the volume of the signals from being changed while the dryer is impossible. This is a function to shorten or lengthen the cycle time by increasing or decreasing...
Owner's Manual
Page 19
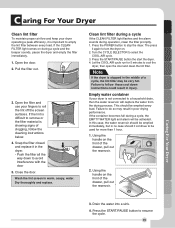
.... 2. Drain the water into a sink. 4. Press the START/PAUSE button to roll the lint off the screen surfaces. Note If the dryer is important to cool the dryer, then open the door and clean the lint filter. Push the filter all the way down instructions could result in injury. 3. Close the... is difficult to remove or the filter material is not connected to do so may be very hot. Turn the CYCLE SELECTOR to stop the dryer. Failure to a household drain, then the water reservoir will be activated. Wash the lint screen in warm, soapy, water. Press the POWER button to ...
.... 2. Drain the water into a sink. 4. Press the START/PAUSE button to roll the lint off the screen surfaces. Note If the dryer is important to cool the dryer, then open the door and clean the lint filter. Push the filter all the way down instructions could result in injury. 3. Close the... is difficult to remove or the filter material is not connected to do so may be very hot. Turn the CYCLE SELECTOR to stop the dryer. Failure to a household drain, then the water reservoir will be activated. Wash the lint screen in warm, soapy, water. Press the POWER button to ...
Owner's Manual
Page 20
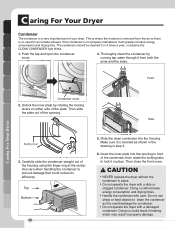
...lock it is not properly maintained, it from both the ends and the sides. Front Caring For Your Dryer Condenser cover 2. Then close the front cover. CAUTION • NEVER operate the dryer without the condenser in place. Unlock the inner plate by running tap water through it will increase energy ... clean the condenser by rotating the locking levers on either side of the housing using the finger ring at the center. C aring For Your Dryer F Condenser The condenser is no need for an outside exhaust. Do not use sharp or hard objects to prevent damage that could reduce its ...
...lock it is not properly maintained, it from both the ends and the sides. Front Caring For Your Dryer Condenser cover 2. Then close the front cover. CAUTION • NEVER operate the dryer without the condenser in place. Unlock the inner plate by running tap water through it will increase energy ... clean the condenser by rotating the locking levers on either side of the housing using the finger ring at the center. C aring For Your Dryer F Condenser The condenser is no need for an outside exhaust. Do not use sharp or hard objects to prevent damage that could reduce its ...
Owner's Manual
Page 21
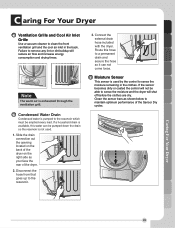
...that goes up to remove any lint or dirt buildup will not be emptied every load. Connect the external drain hose included with the dryer. Caring For Your Dryer 21 Clean the sensor bars as your face the rear of the Sensor Dry cycles. Note The warm air is available, this hose... to maintain optimum performance of the dryer. 2. C aring For Your Dryer F Ventilation Grille and Cool Air Inlet Grille Use a vacuum cleaner to clean the front ventilation grill and the cool air inlet in the...
...that goes up to remove any lint or dirt buildup will not be emptied every load. Connect the external drain hose included with the dryer. Caring For Your Dryer 21 Clean the sensor bars as your face the rear of the Sensor Dry cycles. Note The warm air is available, this hose... to maintain optimum performance of the dryer. 2. C aring For Your Dryer F Ventilation Grille and Cool Air Inlet Grille Use a vacuum cleaner to clean the front ventilation grill and the cool air inlet in the...


