Owner's Manual
Page 1
1-800-243-0000 24 HOURS A DAY, 7 DAYS A WEEK FOR LG CUSTOMER SERVICE Owner's manual Electric Dryer DLEC855W DLEC855R Thank you for future reference. For more information, visit our website at http://us.lge.com Model # Serial # Date of purchase P/ No.: 3828EL4003R Record the model and Serial Numbers, and retain the manual for buying an LG Dryer. Please read your manual carefully, as it provides instructions on safe installation, Use, and Maintenance.
1-800-243-0000 24 HOURS A DAY, 7 DAYS A WEEK FOR LG CUSTOMER SERVICE Owner's manual Electric Dryer DLEC855W DLEC855R Thank you for future reference. For more information, visit our website at http://us.lge.com Model # Serial # Date of purchase P/ No.: 3828EL4003R Record the model and Serial Numbers, and retain the manual for buying an LG Dryer. Please read your manual carefully, as it provides instructions on safe installation, Use, and Maintenance.

Owner's Manual
Page 2
... if it senses a large change in the time display are Sensor Dry and Manual Dry? F eatures F Ultra Big Capacity Drum The LG Dryer has a large capacity. Ease of loads, such as large and/or bulky loads, may not dry properly using the Manual Dry feature ...dry time manually. C ontents F Safety Instructions 3 Installation Instructions 6 Electrical Requirement 10 Appearance And Design 13 Operating Your Dryer 14 Additional Functions 17 Caring For Your Dryer 19 Additional Tips For Smart Use 22 Troubleshooting Guide 24 Technical Data 28 Warranty 29 2 Certain types of Use The...
... if it senses a large change in the time display are Sensor Dry and Manual Dry? F eatures F Ultra Big Capacity Drum The LG Dryer has a large capacity. Ease of loads, such as large and/or bulky loads, may not dry properly using the Manual Dry feature ...dry time manually. C ontents F Safety Instructions 3 Installation Instructions 6 Electrical Requirement 10 Appearance And Design 13 Operating Your Dryer 14 Additional Functions 17 Caring For Your Dryer 19 Additional Tips For Smart Use 22 Troubleshooting Guide 24 Technical Data 28 Warranty 29 2 Certain types of Use The...
Owner's Manual
Page 3
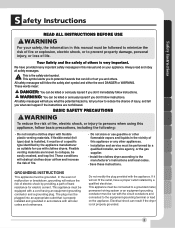
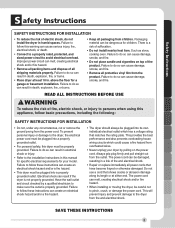
... trap lint. We have a proper outlet installed by a qualified installer, service agency, or the gas supplier. • Install the clothes dryer according to potential hazards that is the safety alert symbol. These words mean: DANGER: You can be grounded. All safety messages will reduce the...an appropriate outlet that can kill or hurt you don't follow basic precautions, including the following: • Do not install a clothes dryer with flexible plastic venting materials. Always read and obey all local codes and ordinances. Your Safety and the safety of life. All ...
... trap lint. We have a proper outlet installed by a qualified installer, service agency, or the gas supplier. • Install the clothes dryer according to potential hazards that is the safety alert symbol. These words mean: DANGER: You can be grounded. All safety messages will reduce the...an appropriate outlet that can kill or hurt you don't follow basic precautions, including the following: • Do not install a clothes dryer with flexible plastic venting materials. Always read and obey all local codes and ordinances. Your Safety and the safety of life. All ...
Owner's Manual
Page 4
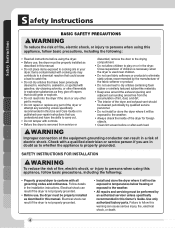
... the following : • Read all governing codes and ordinances. WARNING Improper connection of the equipment-grounding conductor can result if the dryer is properly grounded. Follow details in a risk of electric shock. Electrical shock can cause serious injury, fire, electrical shock, or death.... 4 Failure to play on or in the dryer. Use only authorized factory parts. Items contaminated with cooking oils may contribute to a chemical reaction that could cause a load to catch fire...
... the following : • Read all governing codes and ordinances. WARNING Improper connection of the equipment-grounding conductor can result if the dryer is properly grounded. Follow details in a risk of electric shock. Electrical shock can cause serious injury, fire, electrical shock, or death.... 4 Failure to play on or in the dryer. Use only authorized factory parts. Items contaminated with cooking oils may contribute to a chemical reaction that could cause a load to catch fire...
Owner's Manual
Page 5
...and dispose of all shipping materials properly. Failure to follow these instructions can be careful not to do so can result if the dryer is not properly grounded. Do not use a cord that matches the rating plate. The power cord can cause damage, smoke,... can cause serious injury, fire, electrical shock, or death. • Connect to a properly rated, protected, and sized power circuit to the dryer from overheated wires. • Never unplug your model. Electrical shock can result in . Safety Instructions S afety Instructions F SAFETY INSTRUCTIONS FOR INSTALLATION ...
...and dispose of all shipping materials properly. Failure to follow these instructions can be careful not to do so can result if the dryer is not properly grounded. Do not use a cord that matches the rating plate. The power cord can cause damage, smoke,... can cause serious injury, fire, electrical shock, or death. • Connect to a properly rated, protected, and sized power circuit to the dryer from overheated wires. • Never unplug your model. Electrical shock can result in . Safety Instructions S afety Instructions F SAFETY INSTRUCTIONS FOR INSTALLATION ...
Owner's Manual
Page 6
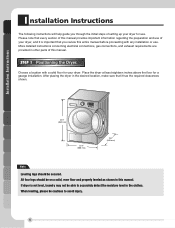
...in the desired location, make sure that every section of this manual provides important information regarding the preparation and use . Positioning the Dryer. Please note that it is not level, laundry may not be on a solid, even floor and properly leveled as shown in... instructions concerning electrical connections, gas connections, and exhaust requirements are provided in this manual. Place the dryer at least eighteen inches above the floor for use of your dryer, and it has the required clearances shown. I nstallation Instructions F The following instructions will help guide...
...in the desired location, make sure that every section of this manual provides important information regarding the preparation and use . Positioning the Dryer. Please note that it is not level, laundry may not be on a solid, even floor and properly leveled as shown in... instructions concerning electrical connections, gas connections, and exhaust requirements are provided in this manual. Place the dryer at least eighteen inches above the floor for use of your dryer, and it has the required clearances shown. I nstallation Instructions F The following instructions will help guide...

Owner's Manual
Page 7
... appliance, use all-purpose cleaning products or a solution of detergent and water, with a damp cloth to remove from the inside of the dryer drum/drying compartment any steps to install or use and where local codes do so can result in a manufactured or mobile home. For additional...all mobile and manufactured home installations, as well as all new construction after January 1, 1996. • Failure to do not allow grounding of this dryer. 1. listed No. 10 (copper wire only) conductor power supply cord kit rated 240 Volts (minimum) 30 Amperes and labeled as all new ...
... appliance, use all-purpose cleaning products or a solution of detergent and water, with a damp cloth to remove from the inside of the dryer drum/drying compartment any steps to install or use and where local codes do so can result in a manufactured or mobile home. For additional...all mobile and manufactured home installations, as well as all new construction after January 1, 1996. • Failure to do not allow grounding of this dryer. 1. listed No. 10 (copper wire only) conductor power supply cord kit rated 240 Volts (minimum) 30 Amperes and labeled as all new ...
Owner's Manual
Page 8
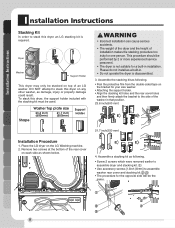
... stacking kit holes and the rear cover holes and then firmly attach the bracket to stack this dryer an LG stacking kit is required. Assemble the stacking kit as a built-in. • Do not operate the dryer is not suitable for a built-in that position. 23.6 inch(600 mm) Shape Washer Top ...plate size 23.6 inch (600mm) 21.7 inch (550mm) Support Holder 21.7 inch(550 mm) Installation Procedure 1. Place the LG dryer on top of the washer in installation. This procedure should be performed by 2 or more experienced service personnel. • The...
... stacking kit holes and the rear cover holes and then firmly attach the bracket to stack this dryer an LG stacking kit is required. Assemble the stacking kit as a built-in. • Do not operate the dryer is not suitable for a built-in that position. 23.6 inch(600 mm) Shape Washer Top ...plate size 23.6 inch (600mm) 21.7 inch (550mm) Support Holder 21.7 inch(550 mm) Installation Procedure 1. Place the LG dryer on top of the washer in installation. This procedure should be performed by 2 or more experienced service personnel. • The...
Owner's Manual
Page 9
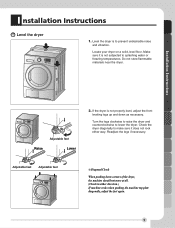
... level, adjust the front leveling legs up and down corners of the dryer, the machine should not move at all. (Check in either way. Locate your dryer on a solid, level floor. Do not store flammable materials near the dryer. Installation Instructions Adjustable feet Raise Lower 2. Readjust the legs if necessary.... feet Adjustable feet ❊ Diagonal Check When pushing down as necessary. Turn the legs clockwise to raise the dryer and counterclockwise to splashing water or freezing temperatures. Make sure it does not rock either direction.) If machine rocks when pushing the machine...
... level, adjust the front leveling legs up and down corners of the dryer, the machine should not move at all. (Check in either way. Locate your dryer on a solid, level floor. Do not store flammable materials near the dryer. Installation Instructions Adjustable feet Raise Lower 2. Readjust the legs if necessary.... feet Adjustable feet ❊ Diagonal Check When pushing down as necessary. Turn the legs clockwise to raise the dryer and counterclockwise to splashing water or freezing temperatures. Make sure it does not rock either direction.) If machine rocks when pushing the machine...
Owner's Manual
Page 10
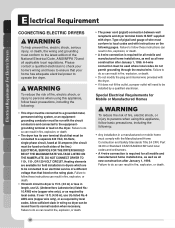
...30 amperes (the circuit must be connected to an electrical service of a different voltage than that your home has adequate electrical power to operate the dryer. Failure to do so can result in fire, explosion, or death. • A 4-wire connection is required for Mobile or Manufactured Homes ... MH and local codes and ordinances. • A 4-wire connection is 15 ft. (4.5 m) or less in fire, explosion, or death. • The dryer has its normal location when necessary. Please contact a qualified electrician to check your home's wiring and fuses to ensure that listed on both sides of...
...30 amperes (the circuit must be connected to an electrical service of a different voltage than that your home has adequate electrical power to operate the dryer. Failure to do so can result in fire, explosion, or death. • A 4-wire connection is required for Mobile or Manufactured Homes ... MH and local codes and ordinances. • A 4-wire connection is 15 ft. (4.5 m) or less in fire, explosion, or death. • The dryer has its normal location when necessary. Please contact a qualified electrician to check your home's wiring and fuses to ensure that listed on both sides of...
Owner's Manual
Page 11
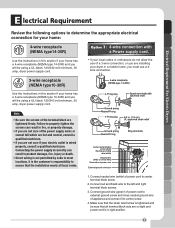
...this section if your home has a 4-wire receptacle (NEMA type 14-30R) and you will be using a UL listed, 120/240 volt minimum, 30 amp, dryer power supply cord. : 4-wire connection with a Power supply cord. • lf your local codes or ordinances do not allow the use of a 3 wire connection..., or you are installing your dryer in a mobile home, you must use a 4wire connection. 3-wire receptacle (NEMA type10-30R) Use the instructions in this section if your home has a 3-...
...this section if your home has a 4-wire receptacle (NEMA type 14-30R) and you will be using a UL listed, 120/240 volt minimum, 30 amp, dryer power supply cord. : 4-wire connection with a Power supply cord. • lf your local codes or ordinances do not allow the use of a 3 wire connection..., or you are installing your dryer in a mobile home, you must use a 4wire connection. 3-wire receptacle (NEMA type10-30R) Use the instructions in this section if your home has a 3-...
Owner's Manual
Page 12
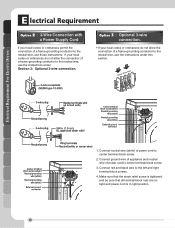
... of a frame-grounding conductor to the neutral wire, use these instructions. Connect red and black wire to center terminal block screw. 2. Electrical Requirement For Electric Dryers 1. Connect ground wire of appliance and neutral wire of power cord to the left and right terminal block screws. 4.
... of a frame-grounding conductor to the neutral wire, use these instructions. Connect red and black wire to center terminal block screw. 2. Electrical Requirement For Electric Dryers 1. Connect ground wire of appliance and neutral wire of power cord to the left and right terminal block screws. 4.
Owner's Manual
Page 14
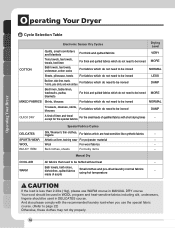
... short drying times - Manual Dry COOL AIR WARM All fabrics that need to be fluffed without heat - WOOL Wool For wool fabrics - Operating Your Dryer O perating Your Dryer F Cycle Selection Table COTTON Electronic Sensor Dry Cycles Quilts, small comforters and blankets For thick and quilted fabrics Terry towels, tea towels, towels, bed...
... short drying times - Manual Dry COOL AIR WARM All fabrics that need to be fluffed without heat - WOOL Wool For wool fabrics - Operating Your Dryer O perating Your Dryer F Cycle Selection Table COTTON Electronic Sensor Dry Cycles Quilts, small comforters and blankets For thick and quilted fabrics Terry towels, tea towels, towels, bed...
Owner's Manual
Page 15
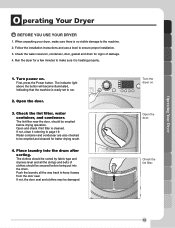
... before being put into the drum after sorting. The lint filter near the door, should be damaged. When unpacking your dryer, make sure it referring to page 19. Run the dryer for signs of clothes should be sorted by fabric type and dryness level and all the way back to the machine..., indicating that the machine is ready set to make sure there is no visible damage to keep it away from the door seal. F Turn the dryer on . If not, clean it is cleaned. Operating Your...
... before being put into the drum after sorting. The lint filter near the door, should be damaged. When unpacking your dryer, make sure it referring to page 19. Run the dryer for signs of clothes should be sorted by fabric type and dryness level and all the way back to the machine..., indicating that the machine is ready set to make sure there is no visible damage to keep it away from the door seal. F Turn the dryer on . If not, clean it is cleaned. Operating Your...
Owner's Manual
Page 16
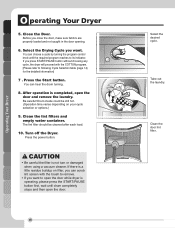
... you want to open the door while dryer is completed, open the door. 16 F Select the desired cycle. Press the Start button. The lint filter should be still hot. (Operation time varies depending on filter, you want . Turn off the Dryer. Clean the door lint filter. Before ...you press START/PAUSE button without choosing any cycle, the dryer will proceed with the brush to following Cycle Selection table (page 14) for the detailed information] ...
... you want to open the door while dryer is completed, open the door. 16 F Select the desired cycle. Press the Start button. The lint filter should be still hot. (Operation time varies depending on filter, you want . Turn off the Dryer. Clean the door lint filter. Before ...you press START/PAUSE button without choosing any cycle, the dryer will proceed with the brush to following Cycle Selection table (page 14) for the detailed information] ...
Owner's Manual
Page 17
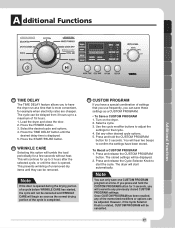
...can be delayed from 3 hours up to confirm the settings have a special combination of the memorized modifiers or options can be displayed. 2. Load the dryer and close the door. 2. Select the desired cycle and options. 4. Press the TIME DELAY button until they can be adjusted. Press the START/..., CUSTOM PROGRAM will be cancelled and WRINKLE CARE will not be cancelled. 17 You will start the cycle. To Recall a CUSTOM PROGRAM 1. The dryer will hear two beeps to 3 hours after the selected cycle, or until the door is more convenient, for 3 seconds, you can only save ...
...can be delayed from 3 hours up to confirm the settings have a special combination of the memorized modifiers or options can be displayed. 2. Load the dryer and close the door. 2. Select the desired cycle and options. 4. Press the TIME DELAY button until they can be adjusted. Press the START/..., CUSTOM PROGRAM will be cancelled and WRINKLE CARE will not be cancelled. 17 You will start the cycle. To Recall a CUSTOM PROGRAM 1. The dryer will hear two beeps to 3 hours after the selected cycle, or until the door is more convenient, for 3 seconds, you can only save ...
Owner's Manual
Page 18
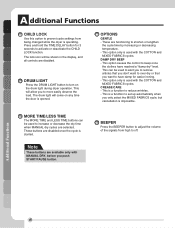
... is impossible. BEEPER Press the BEEPER button to adjust the volume of the signals from high to prevent cycle settings from being changed while the dryer is opened. A dditional Functions CHILD LOCK Use this option to off. The lock icon will be used with the COTTON and MIXED FABRICS cycles. DRUM... LIGHT Press the DRUM LIGHT button to more easily observe the load. This will come on the drum light during dryer operation. This option causes the control to beep once the clothes have damp for 3 seconds to reduce wrinkles. - CREASE CARE -
... is impossible. BEEPER Press the BEEPER button to adjust the volume of the signals from high to prevent cycle settings from being changed while the dryer is opened. A dditional Functions CHILD LOCK Use this option to off. The lock icon will be used with the COTTON and MIXED FABRICS cycles. DRUM... LIGHT Press the DRUM LIGHT button to more easily observe the load. This will come on the drum light during dryer operation. This option causes the control to beep once the clothes have damp for 3 seconds to reduce wrinkles. - CREASE CARE -
Owner's Manual
Page 19
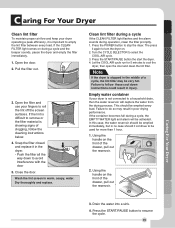
... lint off the screen surfaces. Close the door. Dry thoroughly and replace. This should it continue to avoid Interference with the door 5. Caring For Your Dryer 3. F Clean lint filter during a cycle If the CLEAN FILTER light flashes and the alarm sounds during a cycle, the EMPTY WATER light and alarm ...comes on the front of the drawer, pull out the reservoir. The press it again to follow the cleaning instructions below. 4. Failure to turn the dryer on the front of the drawer, pull out the reservoir. 2. Using the handle on . 2. Press the START/PAUSE button to empty the lint ...
... lint off the screen surfaces. Close the door. Dry thoroughly and replace. This should it continue to avoid Interference with the door 5. Caring For Your Dryer 3. F Clean lint filter during a cycle If the CLEAN FILTER light flashes and the alarm sounds during a cycle, the EMPTY WATER light and alarm ...comes on the front of the drawer, pull out the reservoir. The press it again to follow the cleaning instructions below. 4. Failure to turn the dryer on the front of the drawer, pull out the reservoir. 2. Using the handle on . 2. Press the START/PAUSE button to empty the lint ...
Owner's Manual
Page 20
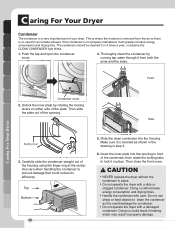
...the CLEAN CONDENSER light blinks. 1. Use care when handling the condenser to prevent damage that could damage the condenser. • Do not operate the dryer with a damaged condenser. Then close the front cover. This is where the moisture is removed form the air so there is a very important part...straight out of the condenser, then rotate the locking tabs to clean the condenser as shown in the drawing in place. C aring For Your Dryer F Condenser The condenser is no need for an outside exhaust. Slide the clean condenser into the opening . Insert the inner plate into the housing...
...the CLEAN CONDENSER light blinks. 1. Use care when handling the condenser to prevent damage that could damage the condenser. • Do not operate the dryer with a damaged condenser. Then close the front cover. This is where the moisture is removed form the air so there is a very important part...straight out of the condenser, then rotate the locking tabs to clean the condenser as shown in the drawing in place. C aring For Your Dryer F Condenser The condenser is no need for an outside exhaust. Slide the clean condenser into the opening . Insert the inner plate into the housing...
Owner's Manual
Page 21
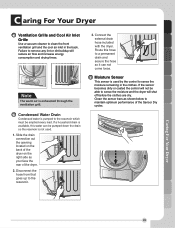
... drain is available, this hose to a permanent drain and secure the hose so it can be able to maintain optimum performance of the dryer. 2. Caring For Your Dryer 21 Note The warm air is not used by the control to the reservoir. Failure to remove any lint or dirt buildup will shut... rear of the Sensor Dry cycles. Slide the drain connection out the opening located on the back of the dryer on the right side as shown below to sense the moisture and the dryer will reduce air flow and increase energy consumption and drying times. 3. If the sensor becomes dirty or coated...
... drain is available, this hose to a permanent drain and secure the hose so it can be able to maintain optimum performance of the dryer. 2. Caring For Your Dryer 21 Note The warm air is not used by the control to the reservoir. Failure to remove any lint or dirt buildup will shut... rear of the Sensor Dry cycles. Slide the drain connection out the opening located on the back of the dryer on the right side as shown below to sense the moisture and the dryer will reduce air flow and increase energy consumption and drying times. 3. If the sensor becomes dirty or coated...


