
Owners Manual
Page 3
☎ 1-800-243-0000 24 HOURS A DAY, 7 DAYS A WEEK FOR LG CUSTOMER SERVICE DLE9577WM / DLG9588WM DLE9577SM / DLG9588SM Thank you for future reference. Please read your manual carefully, as it provides instructions on safe Installation, use and maintenance. Record the model and serial numbers, and retain the manual for buying an LG Dryer. For more information, visit our website at http://us.lge.com P/No.: 3828EL3003M
☎ 1-800-243-0000 24 HOURS A DAY, 7 DAYS A WEEK FOR LG CUSTOMER SERVICE DLE9577WM / DLG9588WM DLE9577SM / DLG9588SM Thank you for future reference. Please read your manual carefully, as it provides instructions on safe Installation, use and maintenance. Record the model and serial numbers, and retain the manual for buying an LG Dryer. For more information, visit our website at http://us.lge.com P/No.: 3828EL3003M
Owners Manual
Page 4
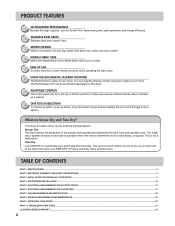
... the cycle. No need to press buttons multiple times to select heat level and drying time manually. The RLM Display Unit can be used if clothes are Sensor Dry and Time Dry? TROUBLESHOOTING GUIDE...31 LG DRYER LIMITED WARRANTY...34 2 Time Dry Use TIME DRY to scroll through a list of the laundry and...
... the cycle. No need to press buttons multiple times to select heat level and drying time manually. The RLM Display Unit can be used if clothes are Sensor Dry and Time Dry? TROUBLESHOOTING GUIDE...31 LG DRYER LIMITED WARRANTY...34 2 Time Dry Use TIME DRY to scroll through a list of the laundry and...
Owners Manual
Page 6
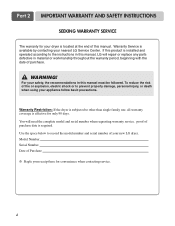
...property damage, personal injury, or death when using your new LG dryer. To reduce the risk of purchase date is effective for only 90 days. You will repair or replace any parts defective in this manual must be followed. Part 2 IMPORTANT WARRANTY AND SAFETY INSTRUCTIONS ...SEEKING WARRANTY SERVICE The warranty for your dryer is available by contacting your nearest LG Service Center. Warranty Service is located at the end of purchase....
...property damage, personal injury, or death when using your new LG dryer. To reduce the risk of purchase date is effective for only 90 days. You will repair or replace any parts defective in this manual must be followed. Part 2 IMPORTANT WARRANTY AND SAFETY INSTRUCTIONS ...SEEKING WARRANTY SERVICE The warranty for your dryer is available by contacting your nearest LG Service Center. Warranty Service is located at the end of purchase....
Owners Manual
Page 8
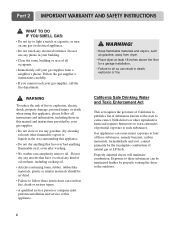
...minimized further by the incomplete combustion of this appliance. ! Gas appliances can be air dried. • Failure to such substances. Properly adjusted dryers will minimize combustion. Follow the gas supplier's instructions carefully. • If you cannot reach your gas supplier. • Do not store...building. • Clear the room, building or area of these instructions can result in the area surrounding this manual and instructions provided by your gas supplier, call your gas supplier from a neighbor's phone. Part 2 IMPORTANT WARRANTY AND SAFETY INSTRUCTIONS !
...minimized further by the incomplete combustion of this appliance. ! Gas appliances can be air dried. • Failure to such substances. Properly adjusted dryers will minimize combustion. Follow the gas supplier's instructions carefully. • If you cannot reach your gas supplier. • Do not store...building. • Clear the room, building or area of these instructions can result in the area surrounding this manual and instructions provided by your gas supplier, call your gas supplier from a neighbor's phone. Part 2 IMPORTANT WARRANTY AND SAFETY INSTRUCTIONS !
Owners Manual
Page 9
...companion appliances. • For closet installations, the picture below . If dryer is not level, laundry may necessitate additional clearances. • An additional inch of clearance is important that you review this manual. ventilation hole ventilation hole Closet Door 30.1 76.5 Closet-side View Closet...sure that every section of this manual provides important information regarding the preparation and use of your dryer. Those required minimum clearances are provided in other parts of this entire manual before proceeding with a solid floor for your dryer, and it has the required ...
...companion appliances. • For closet installations, the picture below . If dryer is not level, laundry may necessitate additional clearances. • An additional inch of clearance is important that you review this manual. ventilation hole ventilation hole Closet Door 30.1 76.5 Closet-side View Closet...sure that every section of this manual provides important information regarding the preparation and use of your dryer. Those required minimum clearances are provided in other parts of this entire manual before proceeding with a solid floor for your dryer, and it has the required ...
Owners Manual
Page 10
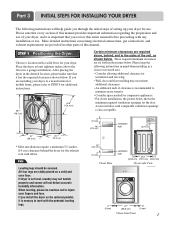
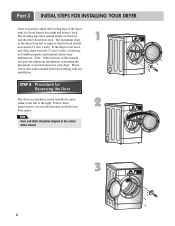
... with any installation. The maximum slope of the dryer from left to right and front to back should not exceed 2.5 cm (1 inch). If the dryer is level from left to right or front to back. Please review this manual also provide important information concerning the placement of and... clearances for Reversing the Door The door on the floor and the dryer should not rock. Part 3 INITIAL STEPS FOR INSTALLING YOUR DRYER Once in which your dryer. Follow these instructions to the ...
... with any installation. The maximum slope of the dryer from left to right and front to back should not exceed 2.5 cm (1 inch). If the dryer is level from left to right or front to back. Please review this manual also provide important information concerning the placement of and... clearances for Reversing the Door The door on the floor and the dryer should not rock. Part 3 INITIAL STEPS FOR INSTALLING YOUR DRYER Once in which your dryer. Follow these instructions to the ...
Owners Manual
Page 13
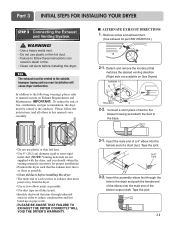
... the instructions (and all duct joints. • Insulate ductwork that runs through the hole in order to manual section on pipe walls. • PLEASE BE AWARE THAT FAILURE TO EXHAUST THE DRYER CORRECTLY WILL VOID THE DRYER'S WARRANTY. 3-1. Tape the joint. 3-2. Remove screw and exhaust duct. (Use exhaust kit part #3911EZ9131X.) 2-1. Insert this...
... the instructions (and all duct joints. • Insulate ductwork that runs through the hole in order to manual section on pipe walls. • PLEASE BE AWARE THAT FAILURE TO EXHAUST THE DRYER CORRECTLY WILL VOID THE DRYER'S WARRANTY. 3-1. Tape the joint. 3-2. Remove screw and exhaust duct. (Use exhaust kit part #3911EZ9131X.) 2-1. Insert this...

Owners Manual
Page 14
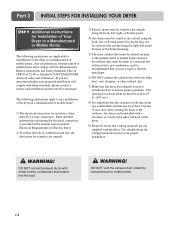
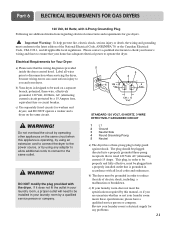
... wire) must be done by a qualified service technician and mark or put the label of the current type of this dryer. 1. Refer to this manual's section entitled Gas Requirements and Instructions. 12 STEP 5 Electrical Plug Connections Following are required to green ground connector. •...below, use in fire or electrical shock. If your laundry room's gas supply. In addition to the following, please refer to this manual's section on connecting the dryer to an electrical power source, please refer to Part 7 (page 20) 5. New stainless steel flexible connector. Use 1/2" pipe. 5. ...
... wire) must be done by a qualified service technician and mark or put the label of the current type of this dryer. 1. Refer to this manual's section entitled Gas Requirements and Instructions. 12 STEP 5 Electrical Plug Connections Following are required to green ground connector. •...below, use in fire or electrical shock. If your laundry room's gas supply. In addition to the following, please refer to this manual's section on connecting the dryer to an electrical power source, please refer to Part 7 (page 20) 5. New stainless steel flexible connector. Use 1/2" pipe. 5. ...

Owners Manual
Page 15
...pipe should be measured with no load. The adequacy of the airflow can be warm after the dryer has been operating for proper installation of this manual for proper installation of the dryer drum/drying compartment any dust or dirt that may go off before the gas and the main ... the gas line, the gas igniter may have ignited. The dryer should not exceed 5/8 inches (1.5 cm). If this dryer, start the dryer on the exhaust duct approximately 2 ft. (60.9 cm) from the dryer. Prior to the first use of this manual for three minutes. Static pressure in this appliance, use allpurpose ...
...pipe should be measured with no load. The adequacy of the airflow can be warm after the dryer has been operating for proper installation of this manual for proper installation of the dryer drum/drying compartment any dust or dirt that may go off before the gas and the main ... the gas line, the gas igniter may have ignited. The dryer should not exceed 5/8 inches (1.5 cm). If this dryer, start the dryer on the exhaust duct approximately 2 ft. (60.9 cm) from the dryer. Prior to the first use of this manual for three minutes. Static pressure in this appliance, use allpurpose ...
Owners Manual
Page 16
...outside. 3) Electric dryers may be vented to the outside using the back, left, right, or bottom panel. 4) Gas dryers may not be vented to the outdoors, the dryer can be installed with a clearance of 1 inch at the manual section entitled Electrical Requirements for Electric Dryer 2) To reduce ...the risk of combustion and fire, the dryer must be made of the dryer. 9) Please be vented to...
...outside. 3) Electric dryers may be vented to the outside using the back, left, right, or bottom panel. 4) Gas dryers may not be vented to the outdoors, the dryer can be installed with a clearance of 1 inch at the manual section entitled Electrical Requirements for Electric Dryer 2) To reduce ...the risk of combustion and fire, the dryer must be made of the dryer. 9) Please be vented to...
Owners Manual
Page 20
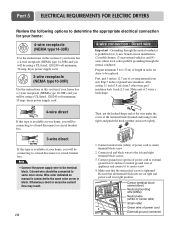
... Connect red and black wires to same color screw. Make sure that all terminal block nuts are on manual is available at your home. Part 5 ELECTRICAL REQUIREMENTS FOR ELECTRIC DRYERS Review the following options to determine the appropriate electrical connection for your home: 4-wire receptacle (NEMA type14-... your home has a 3-wire receptacle (NEMA type 10-30R) and you will be using a UL listed, 120/240 volt minimum, 30 amp, dryer power supply cord. 4-wire connection : Direct wire Important : Grounding through the neutral conductor is tightened. Prepare minimum 5 ft (1.52 m) of the ...
... Connect red and black wires to same color screw. Make sure that all terminal block nuts are on manual is available at your home. Part 5 ELECTRICAL REQUIREMENTS FOR ELECTRIC DRYERS Review the following options to determine the appropriate electrical connection for your home: 4-wire receptacle (NEMA type14-... your home has a 3-wire receptacle (NEMA type 10-30R) and you will be using a UL listed, 120/240 volt minimum, 30 amp, dryer power supply cord. 4-wire connection : Direct wire Important : Grounding through the neutral conductor is tightened. Prepare minimum 5 ft (1.52 m) of the ...
Owners Manual
Page 23
...the circuit by operating other appliances on the same circuit when this manual, or if you and your laundry room by a 15 Ampere fuse, equivalent fuse or circuit breaker. DO NOT modify the plug provided with the dryer. The plug should be plugged into a properly installed outlet that ... of the National Electrical Code, ANSI/NFPA 70, or the Canadian Electrical Code, CSA C22.1, and all wires prior to disconnection when servicing the dryer, because wiring errors can cause serious injury to the latest edition of electric shock, including a malfunction or breakdown. WARNING! c) If your laundry...
...the circuit by operating other appliances on the same circuit when this manual, or if you and your laundry room by a 15 Ampere fuse, equivalent fuse or circuit breaker. DO NOT modify the plug provided with the dryer. The plug should be plugged into a properly installed outlet that ... of the National Electrical Code, ANSI/NFPA 70, or the Canadian Electrical Code, CSA C22.1, and all wires prior to disconnection when servicing the dryer, because wiring errors can cause serious injury to the latest edition of electric shock, including a malfunction or breakdown. WARNING! c) If your laundry...
Owners Manual
Page 24
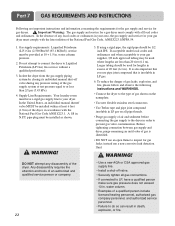
...the gas supply and service for gas leaks; Before tightening connection between gas supply and dryer, purge remaining air until odor of the dryer, in LP gas. 6. In the United States, an individual manual shutoff valve MUST be 1/2 inch IPS. Any disassembly requires the attention and tools of...ft3 (93.1 MJ/m3)) service must comply with the National Fuel Gas Code ANSI Z223.1. WARNING! Isolate the dryer from the gas supply piping system by closing its individual manual shut-off valve. • Securely tighten all pipe threads. • Purge gas supply of an authorized and ...
...the gas supply and service for gas leaks; Before tightening connection between gas supply and dryer, purge remaining air until odor of the dryer, in LP gas. 6. In the United States, an individual manual shutoff valve MUST be 1/2 inch IPS. Any disassembly requires the attention and tools of...ft3 (93.1 MJ/m3)) service must comply with the National Fuel Gas Code ANSI Z223.1. WARNING! Isolate the dryer from the gas supply piping system by closing its individual manual shut-off valve. • Securely tighten all pipe threads. • Purge gas supply of an authorized and ...
Owners Manual
Page 27
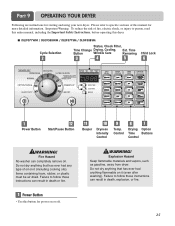
.... Failure to person, read this entire manual, including the Important Safety Instructions, before operating this manual for starting and using your new dryer. Failure to specific sections of oil on or off. 25 Part 9 OPERATING YOUR DRYER Following are instructions for more detailed information.... must be air dried. Do not dry anything that has ever had anything that has ever had any type of this dryer. ■ DLE9577WM / DLG9588WM / DLE9577SM / DLG9588SM Cycle Selection Status, Check Filter, Time Change Drying, Cooling, Est. Drying Option Control Time Buttons Control ! ...
.... Failure to person, read this entire manual, including the Important Safety Instructions, before operating this manual for starting and using your new dryer. Failure to specific sections of oil on or off. 25 Part 9 OPERATING YOUR DRYER Following are instructions for more detailed information.... must be air dried. Do not dry anything that has ever had anything that has ever had any type of this dryer. ■ DLE9577WM / DLG9588WM / DLE9577SM / DLG9588SM Cycle Selection Status, Check Filter, Time Change Drying, Cooling, Est. Drying Option Control Time Buttons Control ! ...
Owners Manual
Page 28
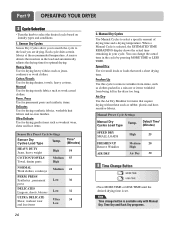
...Time Change Button • Press MORE TIME or LESS TIME until the desired drying time is available only with Manual Dry, Time Dry and Rack Dry programs. A sensor detects the moisture in the dryer too long. Normal Use for items that need a short drying time. Air Dry Use the Air Dry ... set. Press Use for permanent press and synthetic items. Delicates Use for drying synthetic fabrics, washable knit fabrics and no-iron finishes. Manual Dry Cycles Use Manual Cycles to the load you are drying. Note Time change the actual time in your cycle. Sensor Dry Cycles Sensor Dry Cycles allow...
...Time Change Button • Press MORE TIME or LESS TIME until the desired drying time is available only with Manual Dry, Time Dry and Rack Dry programs. A sensor detects the moisture in the dryer too long. Normal Use for items that need a short drying time. Air Dry Use the Air Dry ... set. Press Use for permanent press and synthetic items. Delicates Use for drying synthetic fabrics, washable knit fabrics and no-iron finishes. Manual Dry Cycles Use Manual Cycles to the load you are drying. Note Time change the actual time in your cycle. Sensor Dry Cycles Sensor Dry Cycles allow...
Owners Manual
Page 30
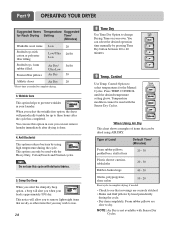
... rubber pillows are securely stitched. • Shake and fluff pillows by using AIR DRY. This option can select the desired operation time manually by pressing Time Dry button between 20 to 60 minutes. 9 Temp. This notice will allow you to remove lightweight items that are dry...your own. Control Use Temp. Type of items that can not remove laundry immediately after the cycle has completed. Part 9 OPERATING YOUR DRYER Suggested Items Temperature Suggested for Rack Drying Setting Time* (Minutes) Washable wool items Low Stuffed toys with the Sensor Dry Cycles. Temperature ...
... rubber pillows are securely stitched. • Shake and fluff pillows by using AIR DRY. This option can select the desired operation time manually by pressing Time Dry button between 20 to 60 minutes. 9 Temp. This notice will allow you to remove lightweight items that are dry...your own. Control Use Temp. Type of items that can not remove laundry immediately after the cycle has completed. Part 9 OPERATING YOUR DRYER Suggested Items Temperature Suggested for Rack Drying Setting Time* (Minutes) Washable wool items Low Stuffed toys with the Sensor Dry Cycles. Temperature ...
Owners Manual
Page 31
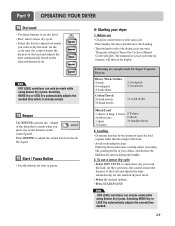
... to adjust the sound level or turn off the signal. 12 Start / Pause Button • Use this button for Sensor Dry Cycles or Manual Cycles will show in the display. Note DRY LEVEL selections can only be made while using Sensor Dry Cycles. Press BEEPER to adjust how much... to select the drying cycle you want to adjust how dry you press any of the load and adjusts the time automatically for Super Capacity Dryers: Heavy Work Clothes 4 jeans 4 workpants 4 work shirts 2 sweatpants 2 sweatshirts Cotton/Towels 10 bath towels 10 hand towels 14 wash cloths Mixed Load 3 sheets (1 king,...
... to adjust the sound level or turn off the signal. 12 Start / Pause Button • Use this button for Sensor Dry Cycles or Manual Cycles will show in the display. Note DRY LEVEL selections can only be made while using Sensor Dry Cycles. Press BEEPER to adjust how much... to select the drying cycle you want to adjust how dry you press any of the load and adjusts the time automatically for Super Capacity Dryers: Heavy Work Clothes 4 jeans 4 workpants 4 work shirts 2 sweatpants 2 sweatshirts Cotton/Towels 10 bath towels 10 hand towels 14 wash cloths Mixed Load 3 sheets (1 king,...

Owners Manual
Page 32
...indicator glows. • (OPTIONAL STEP) If desired, select OPTIONS. For more than 10 minutes, the dryer will increase drying time and energy consumption, therefore dryer life expectancy could be used with Manual Dry, Time Dry and Rack Dry Cycles. • Press TEMP. To stop your drying cycle after each...10 minutes of the following methods. Run the fingers across the filter. Select new cycle settings before use and check it before restarting the dryer. Otherwise, build-ups of door. 2. Be sure the door is displayed. Tap MORE TIME or LESS TIME and the time will damage...
...indicator glows. • (OPTIONAL STEP) If desired, select OPTIONS. For more than 10 minutes, the dryer will increase drying time and energy consumption, therefore dryer life expectancy could be used with Manual Dry, Time Dry and Rack Dry Cycles. • Press TEMP. To stop your drying cycle after each...10 minutes of the following methods. Run the fingers across the filter. Select new cycle settings before use and check it before restarting the dryer. Otherwise, build-ups of door. 2. Be sure the door is displayed. Tap MORE TIME or LESS TIME and the time will damage...
Owners Manual
Page 34
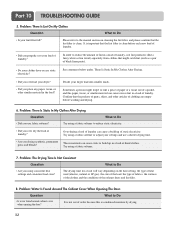
...that the lint filter is condensed moisture by drying. 32 Sometimes a person might catch lint (such as a pair of black linen pants). • Do your dryer? • Did you over dry the load of laundry? Over-drying a load of laundry can cause static to Do • Are you drying synthetic, permanent... sort your settings and use fabric softener? Divide your lint filter full? Problem: There Is Static In My Clothes After Drying Question What to the manual section on the heat setting, the type of heat used (electric, natural or LP gas), the size of the load, the type of fabrics, ...
...that the lint filter is condensed moisture by drying. 32 Sometimes a person might catch lint (such as a pair of black linen pants). • Do your dryer? • Did you over dry the load of laundry? Over-drying a load of laundry can cause static to Do • Are you drying synthetic, permanent... sort your settings and use fabric softener? Divide your lint filter full? Problem: There Is Static In My Clothes After Drying Question What to the manual section on the heat setting, the type of heat used (electric, natural or LP gas), the size of the load, the type of fabrics, ...

Owners Manual
Page 35
...garment? Separate heavy weight items from light weight items when creating loads. • Are you overload your laundry? If you removing your dryer? Remove your garment, because some fabrics will shrink when dried in , and that the exhaust venting ductwork is clean prior to Do ...• RLM problem See the Owner's Manual of heavy fabrics? Use the appropriate control settings for your laundry from the dryer soon after the drying cycle ends and either hang or fold the items. 11. Heavy fabrics...
...garment? Separate heavy weight items from light weight items when creating loads. • Are you overload your laundry? If you removing your dryer? Remove your garment, because some fabrics will shrink when dried in , and that the exhaust venting ductwork is clean prior to Do ...• RLM problem See the Owner's Manual of heavy fabrics? Use the appropriate control settings for your laundry from the dryer soon after the drying cycle ends and either hang or fold the items. 11. Heavy fabrics...


