
Owners Manual
Page 1
...; 완료일 : MANUAL,OWNER'S GIANT(D)-PJT 1/1 3828EL3003M 가 나 P/NO. 다 3828EL3003M SEC. 가 WORK BRAND 나 MODEL 다 P/NO. REVISION DESCRIPTION AWCL604388 06.07.12 REF. DWG. No. Exterier size on LG design film. 3. TRIG. PRINTING DEGREE EXTERIER INTERIER MATERIAL AND PRINTING DESCRIPTION LG MODEL 명 DLE9577WM / DLG9588WM M LG DLE9577SM / DLG9588SM 3828EL3003M 1 1 SNOW...
...; 완료일 : MANUAL,OWNER'S GIANT(D)-PJT 1/1 3828EL3003M 가 나 P/NO. 다 3828EL3003M SEC. 가 WORK BRAND 나 MODEL 다 P/NO. REVISION DESCRIPTION AWCL604388 06.07.12 REF. DWG. No. Exterier size on LG design film. 3. TRIG. PRINTING DEGREE EXTERIER INTERIER MATERIAL AND PRINTING DESCRIPTION LG MODEL 명 DLE9577WM / DLG9588WM M LG DLE9577SM / DLG9588SM 3828EL3003M 1 1 SNOW...
Owners Manual
Page 3
Record the model and serial numbers, and retain the manual for buying an LG Dryer. Please read your manual carefully, as it provides instructions on safe Installation, use and maintenance. For more information, visit our website at http://us.lge.com P/No.: 3828EL3003M ☎ 1-800-243-0000 24 HOURS A DAY, 7 DAYS A WEEK FOR LG CUSTOMER SERVICE DLE9577WM / DLG9588WM DLE9577SM / DLG9588SM Thank you for future reference.
Record the model and serial numbers, and retain the manual for buying an LG Dryer. Please read your manual carefully, as it provides instructions on safe Installation, use and maintenance. For more information, visit our website at http://us.lge.com P/No.: 3828EL3003M ☎ 1-800-243-0000 24 HOURS A DAY, 7 DAYS A WEEK FOR LG CUSTOMER SERVICE DLE9577WM / DLG9588WM DLE9577SM / DLG9588SM Thank you for future reference.
Owners Manual
Page 4
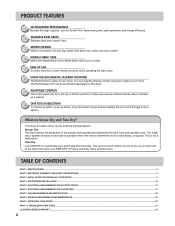
... as you can plug the display unit into any power outlet in the top or bottom position to select heat level and drying time manually. Time Dry Use TIME DRY to allow easy access whether side-by-side or stacked on a washer. 8 ONE TOUCH SELECTIONS To choose...user-friendly functions make operating the dryer easy. 6 USING THE RLM (REMOTE LAUNDRY MONITOR) The RLM monitors status of the cycle. TROUBLESHOOTING GUIDE...31 LG DRYER LIMITED WARRANTY...34 2 You can benefit from faster drying time, quiet operation, and energy efficiency. 2 STAINLESS STEEL DRUM Stainless steel drum doesn't ...
... as you can plug the display unit into any power outlet in the top or bottom position to select heat level and drying time manually. Time Dry Use TIME DRY to allow easy access whether side-by-side or stacked on a washer. 8 ONE TOUCH SELECTIONS To choose...user-friendly functions make operating the dryer easy. 6 USING THE RLM (REMOTE LAUNDRY MONITOR) The RLM monitors status of the cycle. TROUBLESHOOTING GUIDE...31 LG DRYER LIMITED WARRANTY...34 2 You can benefit from faster drying time, quiet operation, and energy efficiency. 2 STAINLESS STEEL DRUM Stainless steel drum doesn't ...
Owners Manual
Page 6
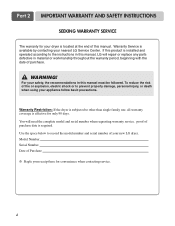
...parts defective in material or workmanship throughout the warranty period, beginning with the date of purchase. ! Model Number. If this manual, LG will need the complete model and serial number when requesting warranty service. WARNING! proof of purchase date is installed and operated according ...; Staple your receipt here for convenience when contacting service. 4 Warranty Restriction: If the dryer is subjected to the instructions in this manual. Warranty Service is effective for only 90 days. For your safety, the recommendations in this product is required. To reduce the risk...
...parts defective in material or workmanship throughout the warranty period, beginning with the date of purchase. ! Model Number. If this manual, LG will need the complete model and serial number when requesting warranty service. WARNING! proof of purchase date is installed and operated according ...; Staple your receipt here for convenience when contacting service. 4 Warranty Restriction: If the dryer is subjected to the instructions in this manual. Warranty Service is effective for only 90 days. For your safety, the recommendations in this product is required. To reduce the risk...
Owners Manual
Page 8
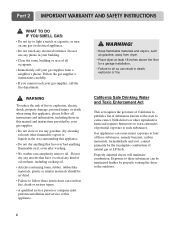
... a match or cigarette, or turn on it, even after washing. • No washer can result in this appliance. ! WARNING To reduce the risk of this manual and instructions provided by the incomplete combustion of oil on them, including cooking oil. • Articles containing foam, rubber, rubber-like materials, plastic or similar...
... a match or cigarette, or turn on it, even after washing. • No washer can result in this appliance. ! WARNING To reduce the risk of this manual and instructions provided by the incomplete combustion of oil on them, including cooking oil. • Articles containing foam, rubber, rubber-like materials, plastic or similar...
Owners Manual
Page 9
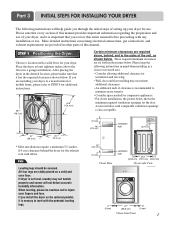
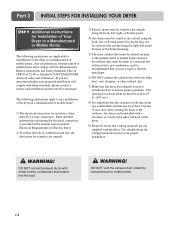
...• For closet installations, the picture below . A louvered door with comparable ventilation openings is important that you review this entire manual before proceeding with a solid floor for your dryer. If dryer is recommended to injure your fingers and toes. More detailed instructions ...concerning electrical connections, gas connections, and exhaust requirements are set forth in other parts of this manual provides important information regarding the preparation and use of your dryer, and it has the required clearances shown below . All...
...• For closet installations, the picture below . A louvered door with comparable ventilation openings is important that you review this entire manual before proceeding with a solid floor for your dryer. If dryer is recommended to injure your fingers and toes. More detailed instructions ...concerning electrical connections, gas connections, and exhaust requirements are set forth in other parts of this manual provides important information regarding the preparation and use of your dryer, and it has the required clearances shown below . All...
Owners Manual
Page 10
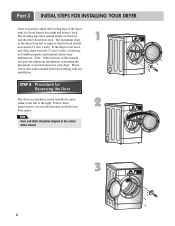
... not tumble properly and internal sensors may malfunction. Follow these instructions to reverse the direction in position, adjust the leveling legs of this entire manual before proceeding with any installation. The leveling legs must remain firmly on your dryer can be aligned at the center when closed. 1 2 ...3 8 If the dryer is level from left or the right. Please review this manual also provide important information concerning the placement of the dryer from left to right and front to back should not exceed 2.5 cm (1 inch). ...
... not tumble properly and internal sensors may malfunction. Follow these instructions to reverse the direction in position, adjust the leveling legs of this entire manual before proceeding with any installation. The leveling legs must remain firmly on your dryer can be aligned at the center when closed. 1 2 ...3 8 If the dryer is level from left or the right. Please review this manual also provide important information concerning the placement of the dryer from left to right and front to back should not exceed 2.5 cm (1 inch). ...
Owners Manual
Page 13
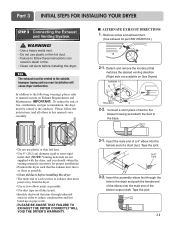
... instructions can result in death or fire. • Clean old ducts before installing this assembly elbow first through unheated areas in order to manual section on all others in the dryer and push the female end of the elbow onto the male end of the blower output shaft. Tape... risk of exhaust duct must point away from the dryer. • Use as few elbow joints as possible. • Clean old ducts before installing this manual) very carefully. ■ ALTERNATE EXHAUST DIRECTIONS 1. Tape the joint. 11 WARNING! • Use a heavy metal vent. • Do not use plastic or thin...
... instructions can result in death or fire. • Clean old ducts before installing this assembly elbow first through unheated areas in order to manual section on all others in the dryer and push the female end of the elbow onto the male end of the blower output shaft. Tape... risk of exhaust duct must point away from the dryer. • Use as few elbow joints as possible. • Clean old ducts before installing this manual) very carefully. ■ ALTERNATE EXHAUST DIRECTIONS 1. Tape the joint. 11 WARNING! • Use a heavy metal vent. • Do not use plastic or thin...

Owners Manual
Page 14
...5 Electrical Plug Connections Following are required to this dryer will not have . Confirm that section and the remainder of this manual, before making the electrical connection for Electric Dryer. For LP (Liquefied Petroleum) gas connection, refer to adjust a four ... 5. 3/8" N.P.T. For instance, using a new flexible stainless steel connector (as suitable for gas leaks with LPG nozzle will result in the manual section entitled Electrical Requirements for electric dryers. Or using LNG with a non-corrosive leak detection fluid. A four-wire cord is located at...
...5 Electrical Plug Connections Following are required to this dryer will not have . Confirm that section and the remainder of this manual, before making the electrical connection for Electric Dryer. For LP (Liquefied Petroleum) gas connection, refer to adjust a four ... 5. 3/8" N.P.T. For instance, using a new flexible stainless steel connector (as suitable for gas leaks with LPG nozzle will result in the manual section entitled Electrical Requirements for electric dryers. Or using LNG with a non-corrosive leak detection fluid. A four-wire cord is located at...

Owners Manual
Page 15
... in Gas Dryers Close the door to the dryer drum/drying compartment and, after approximately two minutes. Warning: If all steps in this manual for proper installation of this dryer, start the dryer on a heat setting. Measuring Static pressure 1Manometer E2xhaust Duct MAXIMUM STATIC PRESSURE IN WATER .... After the dryer starts, the igniter will glow red and the main burner will re-attempt gas ignition after completing all steps in this manual for three minutes. The exhaust air or the exhaust pipe should not exceed 5/8 inches (1.5 cm). The adequacy of the Dryer. Part 3...
... in Gas Dryers Close the door to the dryer drum/drying compartment and, after approximately two minutes. Warning: If all steps in this manual for proper installation of this dryer, start the dryer on a heat setting. Measuring Static pressure 1Manometer E2xhaust Duct MAXIMUM STATIC PRESSURE IN WATER .... After the dryer starts, the igniter will glow red and the main burner will re-attempt gas ignition after completing all steps in this manual for three minutes. The exhaust air or the exhaust pipe should not exceed 5/8 inches (1.5 cm). The adequacy of the Dryer. Part 3...
Owners Manual
Page 16
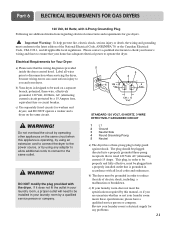
More detailed information concerning the electrical connection is provided at the manual section entitled Electrical Requirements for Electric Dryer 2) To reduce the risk of combustion and fire, the dryer must be vented to the outside. 3) Electric dryers ...
More detailed information concerning the electrical connection is provided at the manual section entitled Electrical Requirements for Electric Dryer 2) To reduce the risk of combustion and fire, the dryer must be vented to the outside. 3) Electric dryers ...
Owners Manual
Page 20
... screw. 2. Connect neutral wire (white) of covering material from 3 other wires peel insulation back 1 inch (2.5 cm). Make sure that all terminal block nuts are on manual is connected to the same color screw in order for dryer to be replaced. Be sure that the strain relief screw is prohibited for (1) new...
... screw. 2. Connect neutral wire (white) of covering material from 3 other wires peel insulation back 1 inch (2.5 cm). Make sure that all terminal block nuts are on manual is connected to the same color screw in order for dryer to be replaced. Be sure that the strain relief screw is prohibited for (1) new...
Owners Manual
Page 23
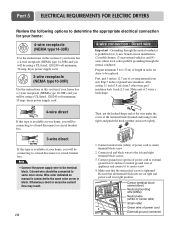
... wiring diagram is rated 120 Volts AC (alternating current) 15 Amps. c) If your home has adequate electrical power to the power source, or by this manual, or if you and your laundry room's electrical supply for washers and dryers, and DO NOT operate a washer and a dryer on a separate branch, polarized, three...
... wiring diagram is rated 120 Volts AC (alternating current) 15 Amps. c) If your home has adequate electrical power to the power source, or by this manual, or if you and your laundry room's electrical supply for washers and dryers, and DO NOT operate a washer and a dryer on a separate branch, polarized, three...
Owners Manual
Page 24
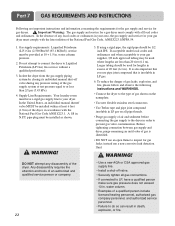
...• Install a shut-off valve during any pressure testing of 20 feet (6.1 m). Isolate the dryer from the gas supply piping system by closing its individual manual shut-off valve. • Securely tighten all gas connections. • If connected to or less than 20 feet (6.1 m). If using a rigid pipe,... National Fuel Gas Code ANSI Z223.1. In the absence of any disassembly of gas is insoluble in . In the United States, an individual manual shutoff valve MUST be used for gas dryers. ! WARNING! pipe plug must have a qualified person make sure gas pressure does not exceed ...
...• Install a shut-off valve during any pressure testing of 20 feet (6.1 m). Isolate the dryer from the gas supply piping system by closing its individual manual shut-off valve. • Securely tighten all gas connections. • If connected to or less than 20 feet (6.1 m). If using a rigid pipe,... National Fuel Gas Code ANSI Z223.1. In the absence of any disassembly of gas is insoluble in . In the United States, an individual manual shutoff valve MUST be used for gas dryers. ! WARNING! pipe plug must have a qualified person make sure gas pressure does not exceed ...
Owners Manual
Page 27
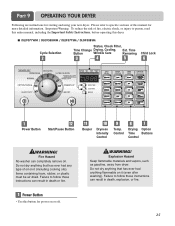
...ever had any type of oil on it (even after washing). WARNING! Important Warning: To reduce the risk of this manual for more detailed information. Do not dry anything flammable on it (including cooking oils). WARNING! Failure to follow these instructions .... 1 Power Button • Use this dryer. ■ DLE9577WM / DLG9588WM / DLE9577SM / DLG9588SM Cycle Selection Status, Check Filter, Time Change Drying, Cooling, Est. Failure to person, read this entire manual, including the Important Safety Instructions, before operating this button for starting and using your new...
...ever had any type of oil on it (even after washing). WARNING! Important Warning: To reduce the risk of this manual for more detailed information. Do not dry anything flammable on it (including cooking oils). WARNING! Failure to follow these instructions .... 1 Power Button • Use this dryer. ■ DLE9577WM / DLG9588WM / DLE9577SM / DLG9588SM Cycle Selection Status, Check Filter, Time Change Drying, Cooling, Est. Failure to person, read this entire manual, including the Important Safety Instructions, before operating this button for starting and using your new...
Owners Manual
Page 28
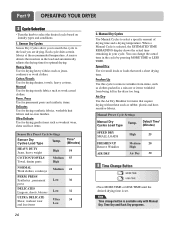
... DUTY Jeans, heavy weight COTTON/TOWELS Towel, denim pants High 54 Medium 55 High NORMAL Medium 41 Work clothes, corduroys PERM. Manual Preset Cycle Settings Manual Dry Temp. Each cycle dries certain fabrics at the recommended temperature. Speed Dry Use for items that need a short drying time...the desired drying time is selected, the ESTIMATED TIME REMAINING display shows the actual time remaining in the dryer too long. When a Manual Cycle is set. PRESS Synthetics , permanent Low 36 press DELICATES Lingerie, sheets, blouses Low 32 ULTRA DELICATE Shear, workout wear and...
... DUTY Jeans, heavy weight COTTON/TOWELS Towel, denim pants High 54 Medium 55 High NORMAL Medium 41 Work clothes, corduroys PERM. Manual Preset Cycle Settings Manual Dry Temp. Each cycle dries certain fabrics at the recommended temperature. Speed Dry Use for items that need a short drying time...the desired drying time is selected, the ESTIMATED TIME REMAINING display shows the actual time remaining in the dryer too long. When a Manual Cycle is set. PRESS Synthetics , permanent Low 36 press DELICATES Lingerie, sheets, blouses Low 32 ULTRA DELICATE Shear, workout wear and...
Owners Manual
Page 30
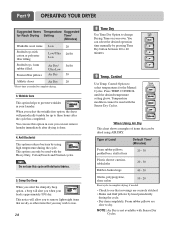
... free option, the dryer will periodically tumble for up to three hours after drying is done. 4. You can select the desired operation time manually by using AIR DRY. Control Option to complete drying. 20 20/30 50/30 50 20 3. Press TEMP. When Using Air Dry This...securely stitched. • Shake and fluff pillows by hand periodically during the cycle. Part 9 OPERATING YOUR DRYER Suggested Items Temperature Suggested for the Manual Cycles. When you can be used with Sensor Dry Cycles. Type of items that you when your laundry. Control Use Temp. Damp Dry Beep...
... free option, the dryer will periodically tumble for up to three hours after drying is done. 4. You can select the desired operation time manually by using AIR DRY. Control Option to complete drying. 20 20/30 50/30 50 20 3. Press TEMP. When Using Air Dry This...securely stitched. • Shake and fluff pillows by hand periodically during the cycle. Part 9 OPERATING YOUR DRYER Suggested Items Temperature Suggested for the Manual Cycles. When you can be used with Sensor Dry Cycles. Type of items that you when your laundry. Control Use Temp. Damp Dry Beep...
Owners Manual
Page 31
... the needed . 29 Before use a sensor dry cycle • Select DRY LEVEL to dry the load. Following are sample loads for Sensor Dry Cycles or Manual Cycles will show in minutes) will glow. As the cycle runs, the control senses the dryness of the load and adjusts the time automatically for...
... the needed . 29 Before use a sensor dry cycle • Select DRY LEVEL to dry the load. Following are sample loads for Sensor Dry Cycles or Manual Cycles will show in minutes) will glow. As the cycle runs, the control senses the dryness of the load and adjusts the time automatically for...

Owners Manual
Page 32
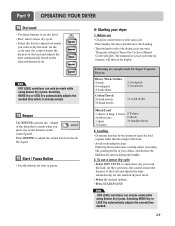
Select new cycle settings before use a manual dry cycle • Select a Manual Dry Cycle. • Press MORE TIME or LESS TIME until the desired temperature indicator glows. • (OPTIONAL STEP) If desired, select OPTIONS. Maintenance Clean lint ... and its opening . For more than 10 minutes, the dryer will increase drying time and energy consumption, therefore dryer life expectancy could be used with Manual Dry, Time Dry and Rack Dry Cycles. • Press TEMP. Note The MORE TIME or LESS TIME feature can be shortened after pressing START/PAUSE...
Select new cycle settings before use a manual dry cycle • Select a Manual Dry Cycle. • Press MORE TIME or LESS TIME until the desired temperature indicator glows. • (OPTIONAL STEP) If desired, select OPTIONS. Maintenance Clean lint ... and its opening . For more than 10 minutes, the dryer will increase drying time and energy consumption, therefore dryer life expectancy could be used with Manual Dry, Time Dry and Rack Dry Cycles. • Press TEMP. Note The MORE TIME or LESS TIME feature can be shortened after pressing START/PAUSE...
Owners Manual
Page 34
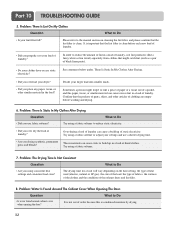
... cotton towel) separately from clothes that the lint filter is clean. These materials can cause a build up in a load of laundry? Question What to the manual section on the heat setting, the type of heat used (electric, natural or LP gas), the size of the load, the type of fabrics, the...
... cotton towel) separately from clothes that the lint filter is clean. These materials can cause a build up in a load of laundry? Question What to the manual section on the heat setting, the type of heat used (electric, natural or LP gas), the size of the load, the type of fabrics, the...


