
Owners Manual
Page 2
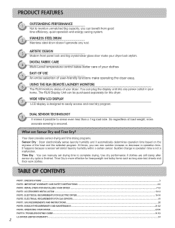
...You can plug the display unit into any rust. J PART1 SPECIFICATIONS ...PART2 IMPORTANT WARRANTY AND SAFETY INSTRUCTIONS ...PART& INITIAL STEPS FOR INSTALLING YOUR DRYER ...PART4 ACCESSORIES INSTALLATION ...PART5. The RLM Display Unit can be purchased separately for heavyweight and bulky items such... load size. Sudden change in operation time is designed to easily access and read dry program. EXHAUST REQUIREMENTS AND MAINTENANCE ...PART9. TROUBLESHOOTING GUIDE ...LG DRYER LiMiTED WARRANTY ...2 3 4-6 7-12 13-14 15-18 19 20 21-22 23-30 31-33 34 USING THE RLM (REMOTELAUNDRY MONITOR) ...
...You can plug the display unit into any rust. J PART1 SPECIFICATIONS ...PART2 IMPORTANT WARRANTY AND SAFETY INSTRUCTIONS ...PART& INITIAL STEPS FOR INSTALLING YOUR DRYER ...PART4 ACCESSORIES INSTALLATION ...PART5. The RLM Display Unit can be purchased separately for heavyweight and bulky items such... load size. Sudden change in operation time is designed to easily access and read dry program. EXHAUST REQUIREMENTS AND MAINTENANCE ...PART9. TROUBLESHOOTING GUIDE ...LG DRYER LiMiTED WARRANTY ...2 3 4-6 7-12 13-14 15-18 19 20 21-22 23-30 31-33 34 USING THE RLM (REMOTELAUNDRY MONITOR) ...
Owners Manual
Page 4
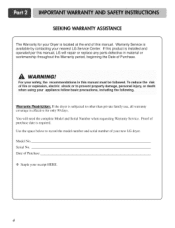
... installed and operated per this manual. Proof of Purchase. SEEKING WARRANTY ASSISTANCE The Warranty for only 90 days. For your new LG dryer. Serial No. Use the space below to other than private family use, all warranty coverage is required. If this manual must be followed.... You will repair or replace any parts defective in this product is located at the end of your safety, the recommendations in material or workmanship throughout the Warranty period, beginning the...
... installed and operated per this manual. Proof of Purchase. SEEKING WARRANTY ASSISTANCE The Warranty for only 90 days. For your new LG dryer. Serial No. Use the space below to other than private family use, all warranty coverage is required. If this manual must be followed.... You will repair or replace any parts defective in this product is located at the end of your safety, the recommendations in material or workmanship throughout the Warranty period, beginning the...
Owners Manual
Page 5
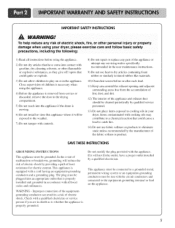
...or in the appliance. SAVE THESE INSTRUCTIONS GROUNDING INSTRUCTIONS This appliance must be run with controls. 8) Do not repair or replace any part of the appliance or attempt any risk of electric shock. This appliance must be connected to a grounded metal, permanent wiring sy ...surrounding areas flee flom the accumulation of lint, dust, and dirt. 12) The interior of the equipmentgrounding conductor can result in your dryer, please exercise care and follow basic safety 1) Read all local codes and ordinances. IMPORTANT SAFETY INSTRUCTIONS WARNING# To help reduce any servicing...
...or in the appliance. SAVE THESE INSTRUCTIONS GROUNDING INSTRUCTIONS This appliance must be run with controls. 8) Do not repair or replace any part of the appliance or attempt any risk of electric shock. This appliance must be connected to a grounded metal, permanent wiring sy ...surrounding areas flee flom the accumulation of lint, dust, and dirt. 12) The interior of the equipmentgrounding conductor can result in your dryer, please exercise care and follow basic safety 1) Read all local codes and ordinances. IMPORTANT SAFETY INSTRUCTIONS WARNING# To help reduce any servicing...
Owners Manual
Page 7
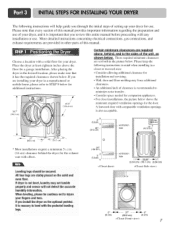
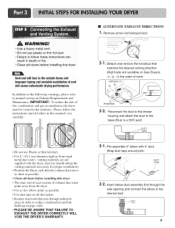
...electrical connections, gas connections, and exhaust requirements are provided in a manufactured or mobile home, please refer to STEP 9 below . After placing the dryer in the desired location, please make sure that it is also acceptable. 3Bt (7.6 cm) ",,; Please keep the t`011owing instructions in mind when installing ... not level, laundry may force additional clearances. • An additional inch of clearance is nessary to injure your dryer in other parts of the unit, as shown below shows the minimum required ventilation openings/`01 the door. if you are set forth in a ...
...electrical connections, gas connections, and exhaust requirements are provided in a manufactured or mobile home, please refer to STEP 9 below . After placing the dryer in the desired location, please make sure that it is also acceptable. 3Bt (7.6 cm) ",,; Please keep the t`011owing instructions in mind when installing ... not level, laundry may force additional clearances. • An additional inch of clearance is nessary to injure your dryer in other parts of the unit, as shown below shows the minimum required ventilation openings/`01 the door. if you are set forth in a ...
Owners Manual
Page 9
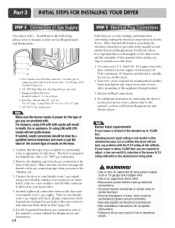
...2- ]. i f PORTION -A,, I Knockout O \ 2-2. Pre-assemble 4" elbow with the dryer, and you should obtain the venting materials necessary for proper installation) • Position the Dryer such that the exhaust duct run is a SVC part) DUCT TAPE f \ 3-1. Insert elbow duct assembly first through unheated areas in this... dryer • The male end of each section of work. N...
...2- ]. i f PORTION -A,, I Knockout O \ 2-2. Pre-assemble 4" elbow with the dryer, and you should obtain the venting materials necessary for proper installation) • Position the Dryer such that the exhaust duct run is a SVC part) DUCT TAPE f \ 3-1. Insert elbow duct assembly first through unheated areas in this... dryer • The male end of each section of work. N...
Owners Manual
Page 10
... or bare wire) must be done by a qualified service technician and mark or put the label of the current type of nozzle on the dryer. 1. Connect the dryer to this appliance through neutral. 3. For LP (Liquefied Petroleum) gas connection, refer to your laundry room's gas supply using LNG with a...stainless steel flexible connector if allowed by local codes. Four-wire cord is proper for gas leaks with LNGnozzle will not have any steps to Part 7(page 20) 5. I. Securely tighten all pipe connections (both internal and external) for the type of connector only if allowed by your ...
... or bare wire) must be done by a qualified service technician and mark or put the label of the current type of nozzle on the dryer. 1. Connect the dryer to this appliance through neutral. 3. For LP (Liquefied Petroleum) gas connection, refer to your laundry room's gas supply using LNG with a...stainless steel flexible connector if allowed by local codes. Four-wire cord is proper for gas leaks with LNGnozzle will not have any steps to Part 7(page 20) 5. I. Securely tighten all pipe connections (both internal and external) for the type of connector only if allowed by your ...
Owners Manual
Page 11
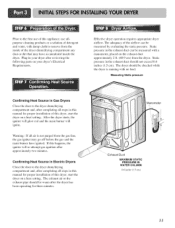
... gas and the main burner have accumulated inside the dryer. Plug-in Electric Dryers Close the door to the dryer drum/drying compartment and, after reviewing the following parts on a heat setting. Confirming Heat Source in your dryer after completing all air is running with no load.... Manometer j_ "Exhaust Duct MAXIMUM STATIC PRESSURE IN WATER COLUMN 0.6 inche (1.5 cm) II The adequacy of this dryer, start the dryer on the exhaust duct...
... gas and the main burner have accumulated inside the dryer. Plug-in Electric Dryers Close the door to the dryer drum/drying compartment and, after reviewing the following parts on a heat setting. Confirming Heat Source in your dryer after completing all air is running with no load.... Manometer j_ "Exhaust Duct MAXIMUM STATIC PRESSURE IN WATER COLUMN 0.6 inche (1.5 cm) II The adequacy of this dryer, start the dryer on the exhaust duct...
Owners Manual
Page 12
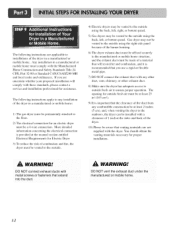
...connection is important that the clearance of the duct from any combustible construction be at least 2 inches (5 cm), and, when venting the dryer to the outdoors, the dryer can be installed with a clearance of 1 inch at the manual section entitled Electrical Requirements for outside fresh air must be at least 25... the manufactured or mobile home. 12 WARNING! DO NOT connect exhaust ducts with the Manufactured Home Construction and Safety Standards Title 24 CFR, Part 32-80 or Standard CAN/CSAOZ240 MH and local codes and ordinances. The following instructions apply to any installation of the...
...connection is important that the clearance of the duct from any combustible construction be at least 2 inches (5 cm), and, when venting the dryer to the outdoors, the dryer can be installed with a clearance of 1 inch at the manual section entitled Electrical Requirements for outside fresh air must be at least 25... the manufactured or mobile home. 12 WARNING! DO NOT connect exhaust ducts with the Manufactured Home Construction and Safety Standards Title 24 CFR, Part 32-80 or Standard CAN/CSAOZ240 MH and local codes and ordinances. The following instructions apply to any installation of the...
Owners Manual
Page 14
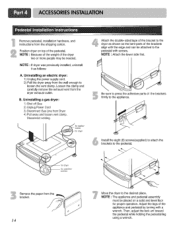
... Remove pedestal, installation hardware, and instructions from the wall enough to loosen the vent clamp. NOTE : If dryer was previously installed, uninstall it as shown so the bent parts of the brackets align with the edge and can be attached to the pedestal with a wrench. Uninstalling a gas.... NOTE : Attach the lower side first. I Be sure to press the adhesive parts of the bracket to the desired place. Position dryer on a solid and level floor for dryer washer/ combo Remove the paper from Dryer 4) Pull away and loosen vent clamp. B. NOTE : The appliance and pedestal assembly...
... Remove pedestal, installation hardware, and instructions from the wall enough to loosen the vent clamp. NOTE : If dryer was previously installed, uninstall it as shown so the bent parts of the brackets align with the edge and can be attached to the pedestal with a wrench. Uninstalling a gas.... NOTE : Attach the lower side first. I Be sure to press the adhesive parts of the bracket to the desired place. Position dryer on a solid and level floor for dryer washer/ combo Remove the paper from Dryer 4) Pull away and loosen vent clamp. B. NOTE : The appliance and pedestal assembly...
Owners Manual
Page 34
...purchaser of the product. CUSTOMERINTER-ACTIVECENTERNUMBERS: To Prove Warranty Coverage Retain your product type (Dryer), model number, serial number, and ZiP Code; To Obtain NearestAuthorizedServiceCenterorSales Dealer,ortoObtainProduct,Customer,...Therefore, the cost of repair or replacement of In-Home Service on all parts including the Drum Tub and Motor. will repair or at its option replace,...Sales Receipt must be submitted at htfp://www.lgservice.com. 34 LG Electronics Inc. LG WiLL NOT BELIABLEFOR ANY CONSEQUENTIAL,iNDiRECT,OR iNCiDENTAL DAMAGES OF ANY KIND, iNCLUDiNG ...
...purchaser of the product. CUSTOMERINTER-ACTIVECENTERNUMBERS: To Prove Warranty Coverage Retain your product type (Dryer), model number, serial number, and ZiP Code; To Obtain NearestAuthorizedServiceCenterorSales Dealer,ortoObtainProduct,Customer,...Therefore, the cost of repair or replacement of In-Home Service on all parts including the Drum Tub and Motor. will repair or at its option replace,...Sales Receipt must be submitted at htfp://www.lgservice.com. 34 LG Electronics Inc. LG WiLL NOT BELIABLEFOR ANY CONSEQUENTIAL,iNDiRECT,OR iNCiDENTAL DAMAGES OF ANY KIND, iNCLUDiNG ...


