
Owners Manual
Page 1
d'r'J,'_l_, ElectricandGasDryer DLE8377WM / DLG8388WIVl DLE8377NM / DLG8388NM Thank you for future reference. For more information, visit our website at http://us.lge.com P/No.: 3828EL3010B Please read your manual carefully, as it provides instructions on safe Installation, Use and Maintenance. Record the Model and Serial Numbers, and retain the manual for buying a LG Dryer. 1-800-243-0000 24 HOURS A DAY, 7 DAYS A WEEK FOR LG CUSTOMER SERVICE ,_J_, _ll__ I_r_ I' x! r,L_r _ "_ r,L_r r,L!'
d'r'J,'_l_, ElectricandGasDryer DLE8377WM / DLG8388WIVl DLE8377NM / DLG8388NM Thank you for future reference. For more information, visit our website at http://us.lge.com P/No.: 3828EL3010B Please read your manual carefully, as it provides instructions on safe Installation, Use and Maintenance. Record the Model and Serial Numbers, and retain the manual for buying a LG Dryer. 1-800-243-0000 24 HOURS A DAY, 7 DAYS A WEEK FOR LG CUSTOMER SERVICE ,_J_, _ll__ I_r_ I' x! r,L_r _ "_ r,L_r r,L!'
Owners Manual
Page 4
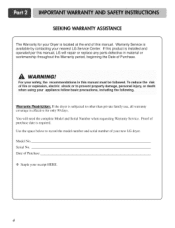
... space below to other than private family use, all warranty coverage is effective for your nearest LG Service Center. Serial No. Date of purchase date is available by contacting your Dryer is installed and operated per this manual, LG will need the complete Model and Serial Number when requesting Warranty Service. For your safety...
... space below to other than private family use, all warranty coverage is effective for your nearest LG Service Center. Serial No. Date of purchase date is available by contacting your Dryer is installed and operated per this manual, LG will need the complete Model and Serial Number when requesting Warranty Service. For your safety...
Owners Manual
Page 6
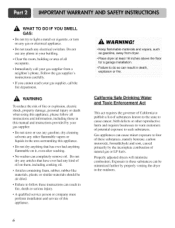
...oil. Gas appliances can cause minor exposure to follow these substances, namely benzene, carbon monoxide, formaldehyde and soot, caused primarily by properly venting the dryer to light a match or cigarette, or turn on it, even after washing. • No washer can result in death explosion or fire. ...the area surrounding this appliance, please follow all occupants. • Immediately call the fire department. _Ik WARNING To reduce the risk of this manual and instructions provided by your gas supplier. • Do not store or use any kind of oil on them, including cooking oil. &#...
...oil. Gas appliances can cause minor exposure to follow these substances, namely benzene, carbon monoxide, formaldehyde and soot, caused primarily by properly venting the dryer to light a match or cigarette, or turn on it, even after washing. • No washer can result in death explosion or fire. ...the area surrounding this appliance, please follow all occupants. • Immediately call the fire department. _Ik WARNING To reduce the risk of this manual and instructions provided by your gas supplier. • Do not store or use any kind of oil on them, including cooking oil. &#...
Owners Manual
Page 7
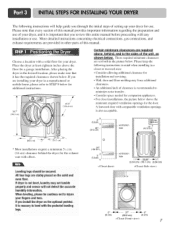
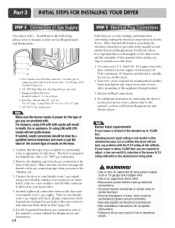
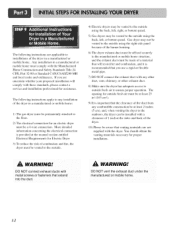
The following instructions will net detect the accurate humidity information. After placing the dryer in the desired location, please make sure that it is important that every section of this manual. Please keep the t`011owing instructions in mind when installing in a manufactured or mobile...is not level, laundry may force additional clearances. • An additional inch of setting up your dryer. Please note that you review this entire manual before proceeding with any installation or use. More detailed instructions concerning electrical connections, gas connections, and ...
The following instructions will net detect the accurate humidity information. After placing the dryer in the desired location, please make sure that it is important that every section of this manual. Please keep the t`011owing instructions in mind when installing in a manufactured or mobile...is not level, laundry may force additional clearances. • An additional inch of setting up your dryer. Please note that you review this entire manual before proceeding with any installation or use. More detailed instructions concerning electrical connections, gas connections, and ...
Owners Manual
Page 8
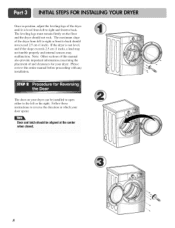
... this entire manual before proceeding with any installation. The maximum slope of the dryer from left to right or front to the left or the right. The door on the floor and the dryer should not exceed 2.5 cm (1 inch). Once in which your door opens: If the dryer is level ... and internal sensors may malfunction. Follow these instructions to back. The leveling legs must remain firmly on your dryei: Please review this manual also provide important information concerning the placement of and clearances for your dryer can be installed to open either to back should not rock.
... this entire manual before proceeding with any installation. The maximum slope of the dryer from left to right or front to the left or the right. The door on the floor and the dryer should not exceed 2.5 cm (1 inch). Once in which your door opens: If the dryer is level ... and internal sensors may malfunction. Follow these instructions to back. The leveling legs must remain firmly on your dryei: Please review this manual also provide important information concerning the placement of and clearances for your dryer can be installed to open either to back should not rock.
Owners Manual
Page 9
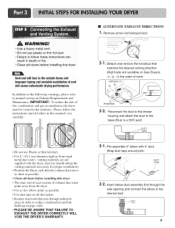
...fire, combustion, and gas accumulation, the dryer must point away from the dryer • Use as few elbow joints as possible. • Clean old duets beJbre installing this dryer • The male end of each section of exhaust duct must be vented to manual section on pipe walls. • ...PLEASE BE AWARE THAT FAILURE TO EXHAUST THE DRYER CORRECTLY WILL VOID THE DRYER'S WARRANTY. • ALTERNATE EXHAUST DIRECTIONS ] • Remove screw and exhaust duct. 2- ]. Detach and remove the ...
...fire, combustion, and gas accumulation, the dryer must point away from the dryer • Use as few elbow joints as possible. • Clean old duets beJbre installing this dryer • The male end of each section of exhaust duct must be vented to manual section on pipe walls. • ...PLEASE BE AWARE THAT FAILURE TO EXHAUST THE DRYER CORRECTLY WILL VOID THE DRYER'S WARRANTY. • ALTERNATE EXHAUST DIRECTIONS ] • Remove screw and exhaust duct. 2- ]. Detach and remove the ...
Owners Manual
Page 10
...; Use a L,L approved strain relief. • Disconnect power before taking any problemwith the B.T.Urating at the back of this manual's section on the dryer. 1. listed No. 10 (copper wire only) three conductor power supply cord kit rated 240 Volts (minimum) 30 Amperes and...Instructions. 10 Following are required to this manual, before making the electrical connection l_r electric dryers. For additional instruction on connecting the dryer to an electrical power source, please refer to adjust a four percent(4%) reduction of dryer 4. It is required for checking inlet gas...
...; Use a L,L approved strain relief. • Disconnect power before taking any problemwith the B.T.Urating at the back of this manual's section on the dryer. 1. listed No. 10 (copper wire only) three conductor power supply cord kit rated 240 Volts (minimum) 30 Amperes and...Instructions. 10 Following are required to this manual, before making the electrical connection l_r electric dryers. For additional instruction on connecting the dryer to an electrical power source, please refer to adjust a four percent(4%) reduction of dryer 4. It is required for checking inlet gas...
Owners Manual
Page 11
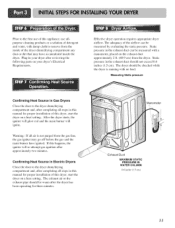
... static pressure. Confirming Heat Source in Electric Dryers Close the door to the dryer drum/drying compartment and, after completing all steps in your dryer's Electrical Requirements. Plug-in this manual for proper installation of this dryer, start the dryer on the exhaust duct approximately 2 ft. ...(60.9 cm) from the dryer. After the dryer starts, the igniter will glow red and ...
... static pressure. Confirming Heat Source in Electric Dryers Close the door to the dryer drum/drying compartment and, after completing all steps in your dryer's Electrical Requirements. Plug-in this manual for proper installation of this dryer, start the dryer on the exhaust duct approximately 2 ft. ...(60.9 cm) from the dryer. After the dryer starts, the igniter will glow red and ...
Owners Manual
Page 12
... for outside fresh air must be at least 25 iw' (163 cm_). 9) It is provided at the sides and back of the dryer. 10) Please be vented to the outside fresh air to ensure proper operation. More detailed information concerning the electrical connection is important that ... affixed securely to the outside using the right side panel because of 1 inch at the manual section entitled Electrical Requirements for proper installation. Any installation in a manufactured or mobile home. Gas dryer may not be vented to the manufactured or mobile home structure, and the exhaust duct must...
... for outside fresh air must be at least 25 iw' (163 cm_). 9) It is provided at the sides and back of the dryer. 10) Please be vented to the outside fresh air to ensure proper operation. More detailed information concerning the electrical connection is important that ... affixed securely to the outside using the right side panel because of 1 inch at the manual section entitled Electrical Requirements for proper installation. Any installation in a manufactured or mobile home. Gas dryer may not be vented to the manufactured or mobile home structure, and the exhaust duct must...

Owners Manual
Page 16
...if your home has a 4-wire receptacle (NEMA type 14-30R) and you will be using a UL listed, 120/240 volt minimum, 30 amp, dryer power supply cord. If this section if your home has a 3-wire receptacle (NEMA type 10-30R) and you will be sure that the strain ... back linch (2.5cm). First, peel 5 inches (12.7cm) of length in block. After cutting 172inch (3.8cm) from end. Wire color indicated on manual is connected to a fused disconnect or circuit breaker box Important : Grounding through the neutral conductor. Connect neutral wire(white) of power cord to the left...
...if your home has a 4-wire receptacle (NEMA type 14-30R) and you will be using a UL listed, 120/240 volt minimum, 30 amp, dryer power supply cord. If this section if your home has a 3-wire receptacle (NEMA type 10-30R) and you will be sure that the strain ... back linch (2.5cm). First, peel 5 inches (12.7cm) of length in block. After cutting 172inch (3.8cm) from end. Wire color indicated on manual is connected to a fused disconnect or circuit breaker box Important : Grounding through the neutral conductor. Connect neutral wire(white) of power cord to the left...
Owners Manual
Page 19
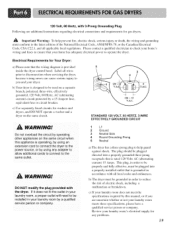
... wiring errors can cause serious injury to operate the dryer. STANDARD 120 VOLT, 60 HERTZ, 3-WIRE EFFECTIVELY GROUNDED CIRCUIT Donot overload the circuit by operating Other appliances On the same circuit when this manual, or if you and your home has adequate electrical power to you ...are additional instructions regarding electrical connections and requirements for Your Dryer: a) Please note that is grounded in order to the same outlet...
... wiring errors can cause serious injury to operate the dryer. STANDARD 120 VOLT, 60 HERTZ, 3-WIRE EFFECTIVELY GROUNDED CIRCUIT Donot overload the circuit by operating Other appliances On the same circuit when this manual, or if you and your home has adequate electrical power to you ...are additional instructions regarding electrical connections and requirements for Your Dryer: a) Please note that is grounded in order to the same outlet...
Owners Manual
Page 20
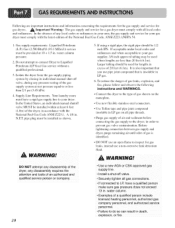
... the danger of 20 feet (6.1m). Use Teflon tape and pipe joint compound insoluble in . WARNING! Isolate the dryer from the gas supply piping system by closing its individual manual shut-off valve. • Securely tighten all gas connections. . A 1/8 in death explosion, or fire. Use... new flexible stainless steel connectors. Before tightening connection between gas supply and dryer, purge remaining air until odor of the...
... the danger of 20 feet (6.1m). Use Teflon tape and pipe joint compound insoluble in . WARNING! Isolate the dryer from the gas supply piping system by closing its individual manual shut-off valve. • Securely tighten all gas connections. . A 1/8 in death explosion, or fire. Use... new flexible stainless steel connectors. Before tightening connection between gas supply and dryer, purge remaining air until odor of the...

Owners Manual
Page 23
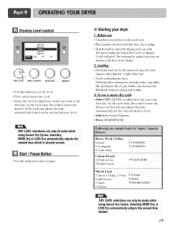
... before operating this dryer. CHECK FINER WRINKLE CARE INDICATOR EST.TIME REMAINING CHILD LOCK POWERBUTTON START/PAUSE BUTTON DRYNESS LEVEL CONTROL TEMP. Failure to follow these instructions can completely remove oil. WARNING! PowerButton • Use this manual for more detailed ...electric shock, or injury to specific sections of this button for starting and using your new dryer. Following are instructions for power on or off. 23 DLE8377WM/DLG8388WM/DLE8377NM/DLG8388NM CYCLESELECTOR TIME CHANGE BUTTON STATUS. Failure to follow these instructions can result in...
... before operating this dryer. CHECK FINER WRINKLE CARE INDICATOR EST.TIME REMAINING CHILD LOCK POWERBUTTON START/PAUSE BUTTON DRYNESS LEVEL CONTROL TEMP. Failure to follow these instructions can completely remove oil. WARNING! PowerButton • Use this manual for more detailed ...electric shock, or injury to specific sections of this button for starting and using your new dryer. Following are instructions for power on or off. 23 DLE8377WM/DLG8388WM/DLE8377NM/DLG8388NM CYCLESELECTOR TIME CHANGE BUTTON STATUS. Failure to follow these instructions can result in...

Owners Manual
Page 25
...the Air Dry Modifier for 3 seconds, A single beep tone is heard and Child Lock is selected. When power is on control panel while the dryer is running. For better drying performance and safety, clean lint filter every single usel Child Lock Select 1. Child Lock Child Lock can change button m...on , Check Filter is displayed until the desired drying time is selected, this option light will be used to prevent your cycle. When a Manual Cycle is enabled, all the buttons will glow. When Child Lock is selected, the ESTIMATED TIME REMAINING display shows the actual time remaining in the...
...the Air Dry Modifier for 3 seconds, A single beep tone is heard and Child Lock is selected. When power is on control panel while the dryer is running. For better drying performance and safety, clean lint filter every single usel Child Lock Select 1. Child Lock Child Lock can change button m...on , Check Filter is displayed until the desired drying time is selected, this option light will be used to prevent your cycle. When a Manual Cycle is enabled, all the buttons will glow. When Child Lock is selected, the ESTIMATED TIME REMAINING display shows the actual time remaining in the...
Owners Manual
Page 29
...how dry you want the load. The estimated or actual cycle time (in the display. 2. The preset setting for Sensor Dry Cycles or Manual Cycles will show in minutes) will glow. As the cycle runs, the control senses the dryness of the load and adjusts the time ...shirts 3 blouses 9 T-shirts 9 shorts l 0 handkerchiefs DRY LEVEL selections can help reduce your utility bill, prolong the life of the load. • Avoid overloading the dryer. Start / Pause Button • Use this button to set dry level • First, select sensor dry cycle. • Select dry level to adjust how much...
...how dry you want the load. The estimated or actual cycle time (in the display. 2. The preset setting for Sensor Dry Cycles or Manual Cycles will show in minutes) will glow. As the cycle runs, the control senses the dryness of the load and adjusts the time ...shirts 3 blouses 9 T-shirts 9 shorts l 0 handkerchiefs DRY LEVEL selections can help reduce your utility bill, prolong the life of the load. • Avoid overloading the dryer. Start / Pause Button • Use this button to set dry level • First, select sensor dry cycle. • Select dry level to adjust how much...
Owners Manual
Page 30
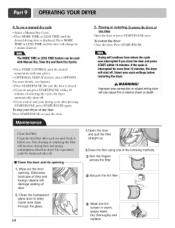
... or related winng error will change by 1 minute interval. Wipe out the door opening 1. WARNING! Clean the transparent glass door to end your dryer at any time Press START/PAUSE or open the door. 5. Press MORE TIME or LESS TIME and the time will can cause fire or electric...II Clean the door and its opening . Press START/PAUSE. To restart the dryer Close the door. If the cycle is interrupted for more details, see Options. • Press START/PAUSE. To use a manual dry cycle • Select a Manual Dry Cycle. • Press MORE TIME or LESS TIME until the desired temperature...
... or related winng error will change by 1 minute interval. Wipe out the door opening 1. WARNING! Clean the transparent glass door to end your dryer at any time Press START/PAUSE or open the door. 5. Press MORE TIME or LESS TIME and the time will can cause fire or electric...II Clean the door and its opening . Press START/PAUSE. To restart the dryer Close the door. If the cycle is interrupted for more details, see Options. • Press START/PAUSE. To use a manual dry cycle • Select a Manual Dry Cycle. • Press MORE TIME or LESS TIME until the desired temperature...
Owners Manual
Page 33
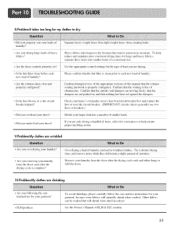
... problem To avoid shrinkage, please carefully follow the care and use two fuses or breakers.) • Did you under load your dryer? See the Owner's Manual of the appropriate sections Of this manua! Please confirm that the 0utside wa!! Heavy lklbrics take longer to dry because they still ... sort your loads of laundry? over drying a !0ad of laundry Can !ead tO w7rinkled Clothes . Separate heavy weight items from the dryer after the drying cycle is properly configured. Other fabrics can be washed but will naturally shrink when washed. 8.Problem:It takes too long ...
... problem To avoid shrinkage, please carefully follow the care and use two fuses or breakers.) • Did you under load your dryer? See the Owner's Manual of the appropriate sections Of this manua! Please confirm that the 0utside wa!! Heavy lklbrics take longer to dry because they still ... sort your loads of laundry? over drying a !0ad of laundry Can !ead tO w7rinkled Clothes . Separate heavy weight items from the dryer after the drying cycle is properly configured. Other fabrics can be washed but will naturally shrink when washed. 8.Problem:It takes too long ...


