
Owners Manual
Page 3
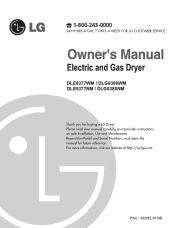
Record the Model and Serial Numbers, and retain the manual for buying a LG Dryer. 1-800-243-0000 24 HOURS A DAY, 7 DAYS A WEEK FOR LG CUSTOMER SERVICE DLE8377WM / DLG8388WM DLE8377NM / DLG8388NM Thank you for future reference. Please read your manual carefully, as it provides instructions on safe Installation, Use and Maintenance. For more information, visit our website at http://us.lge.com P/No.: 3828EL3010B
Record the Model and Serial Numbers, and retain the manual for buying a LG Dryer. 1-800-243-0000 24 HOURS A DAY, 7 DAYS A WEEK FOR LG CUSTOMER SERVICE DLE8377WM / DLG8388WM DLE8377NM / DLG8388NM Thank you for future reference. Please read your manual carefully, as it provides instructions on safe Installation, Use and Maintenance. For more information, visit our website at http://us.lge.com P/No.: 3828EL3010B
Owners Manual
Page 6
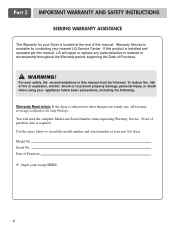
If this manual, LG will need the complete Model and Serial Number when requesting Warranty Service. Use the space below to record the model number and serial number of ... the Warranty period, beginning the Date of Purchase ❈ Staple your new LG dryer. WARNING! You will repair or replace any parts defective in this manual. Date of Purchase. ! To reduce the risk of this manual must be followed. For your nearest LG Service Center. Proof of purchase date is located at the end of...
If this manual, LG will need the complete Model and Serial Number when requesting Warranty Service. Use the space below to record the model number and serial number of ... the Warranty period, beginning the Date of Purchase ❈ Staple your new LG dryer. WARNING! You will repair or replace any parts defective in this manual. Date of Purchase. ! To reduce the risk of this manual must be followed. For your nearest LG Service Center. Proof of purchase date is located at the end of...
Owners Manual
Page 8
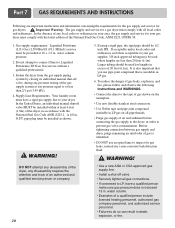
... to publish a list of substances known to the state to cause cancer, birth defects or other flammable vapors or liquids in this manual and instructions provided by the incomplete combustion of fire or explosion, electric shock, property damage, personal injury or death when using this appliance...on any gas or electrical appliance. • Do not touch any electrical switches. Gas appliances can result in your gas supplier from dryer. • Place dryer at least 18 inches above the floor for a garage installation. • Failure to such substances. Do not use any gasoline, dry...
... to publish a list of substances known to the state to cause cancer, birth defects or other flammable vapors or liquids in this manual and instructions provided by the incomplete combustion of fire or explosion, electric shock, property damage, personal injury or death when using this appliance...on any gas or electrical appliance. • Do not touch any electrical switches. Gas appliances can result in your gas supplier from dryer. • Place dryer at least 18 inches above the floor for a garage installation. • Failure to such substances. Do not use any gasoline, dry...

Owners Manual
Page 9
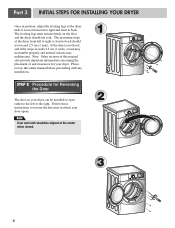
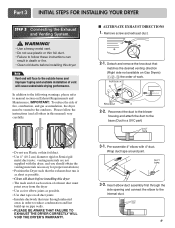
...force additional clearances. • An additional inch of your dryer for your fingers and toes. Please note that every section of this entire manual before proceeding with a solid floor for use. Part 3 INITIAL STEPS FOR INSTALLING YOUR DRYER The following instructions in mind when installing in . (...14 cm) clearance behind , and to injure your dryer. If you review this manual provides important information regarding the preparation and use . ventilation hole 27" (68.6 cm) 29.96" (76.1 cm) * Most installations require a ...
...force additional clearances. • An additional inch of your dryer for your fingers and toes. Please note that every section of this entire manual before proceeding with a solid floor for use. Part 3 INITIAL STEPS FOR INSTALLING YOUR DRYER The following instructions in mind when installing in . (...14 cm) clearance behind , and to injure your dryer. If you review this manual provides important information regarding the preparation and use . ventilation hole 27" (68.6 cm) 29.96" (76.1 cm) * Most installations require a ...
Owners Manual
Page 10
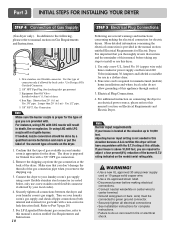
... direction in position, adjust the leveling legs of this entire manual before proceeding with any installation. The leveling legs must remain firmly on your dryer can be aligned at the center when closed. 1 2 3 8 If the dryer is level from left to right or front to back should...exceeds 2.5 cm (1 inch), a load may not tumble properly and internal sensors may malfunction. Please review this manual also provide important information concerning the placement of the dryer from left to right and front to back. The maximum slope of and clearances for Reversing the Door The ...
... direction in position, adjust the leveling legs of this entire manual before proceeding with any installation. The leveling legs must remain firmly on your dryer can be aligned at the center when closed. 1 2 3 8 If the dryer is level from left to right or front to back should...exceeds 2.5 cm (1 inch), a load may not tumble properly and internal sensors may malfunction. Please review this manual also provide important information concerning the placement of the dryer from left to right and front to back. The maximum slope of and clearances for Reversing the Door The ...
Owners Manual
Page 11
...should obtain the venting materials necessary for proper installation) • Position the Dryer such that the exhaust duct run is as short as possible. • Clean old ducts before installing this manual) very carefully. Reconnect the duct to the blower housing and attach the duct... the desired venting direction (Right side not available on Gas Dryers) , , the order of exhaust duct must be vented to manual section on pipe walls. • PLEASE BE AWARE THAT FAILURE TO EXHAUST THE DRYER CORRECTLY WILL VOID THE DRYER'S WARRANTY. 3-1. I ALTERNATE EXHAUST DIRECTIONS 1. Wrap duct tape...
...should obtain the venting materials necessary for proper installation) • Position the Dryer such that the exhaust duct run is as short as possible. • Clean old ducts before installing this manual) very carefully. Reconnect the duct to the blower housing and attach the duct... the desired venting direction (Right side not available on Gas Dryers) , , the order of exhaust duct must be vented to manual section on pipe walls. • PLEASE BE AWARE THAT FAILURE TO EXHAUST THE DRYER CORRECTLY WILL VOID THE DRYER'S WARRANTY. 3-1. I ALTERNATE EXHAUST DIRECTIONS 1. Wrap duct tape...
Owners Manual
Page 12
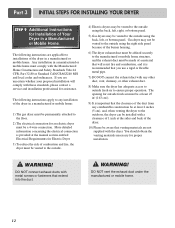
.... 3. Remove the shipping cap from the gas connection at the back of dryer 4. Refer to manual section on Gas Requirements and Instructions. 1 2 5 3 4 1. For additional instruction on connecting the dryer to an electrical power source, please refer to green ground connector. •... that the type of the gas connection pipe when you thoroughly review that you remove the shipping cap. 3. Use this manual's section on Electrical Requirements and Electric Dryer. Equipment Shut-Off Valve- Shorter than 20' (6.1 m) - Gas Connection Note Make sure the burner nozzle is not needed...
.... 3. Remove the shipping cap from the gas connection at the back of dryer 4. Refer to manual section on Gas Requirements and Instructions. 1 2 5 3 4 1. For additional instruction on connecting the dryer to an electrical power source, please refer to green ground connector. •... that the type of the gas connection pipe when you thoroughly review that you remove the shipping cap. 3. Use this manual's section on Electrical Requirements and Electric Dryer. Equipment Shut-Off Valve- Shorter than 20' (6.1 m) - Gas Connection Note Make sure the burner nozzle is not needed...

Owners Manual
Page 13
...cm). Static pressure in the exhaust duct can be measured with a manometer, placed on your dryer's Electrical Requirements. Prior to the first use of this manual for proper installation of the Dryer. After the dryer starts, the igniter will glow red and the main burner will re-attempt gas ignition after ...reviewing the following parts on the exhaust duct approximately 2 ft. (60.9 cm) from the dryer. If this manual for three minutes. The exhaust air or the exhaust pipe should be warm after completing all air is running with damp cloth to...
...cm). Static pressure in the exhaust duct can be measured with a manometer, placed on your dryer's Electrical Requirements. Prior to the first use of this manual for proper installation of the Dryer. After the dryer starts, the igniter will glow red and the main burner will re-attempt gas ignition after ...reviewing the following parts on the exhaust duct approximately 2 ft. (60.9 cm) from the dryer. If this manual for three minutes. The exhaust air or the exhaust pipe should be warm after completing all air is running with damp cloth to...
Owners Manual
Page 14
... manufactured or mobile home. 12 DO NOT connect exhaust ducts with metal screws or fasteners that you are applicable to installations of the dryer in a manufactured or mobile home must be made of a material that will comply with these standards, please contact a service and ...at least 2 inches (5 cm), and, when venting the dryer to the outdoors, the dryer can be installed with a clearance of 1 inch at the manual section entitled Electrical Requirements for Electric Dryer 3) To reduce the risk of combustion and fire, the dryer must be a 4-wire connection. Any installation in a ...
... manufactured or mobile home. 12 DO NOT connect exhaust ducts with metal screws or fasteners that you are applicable to installations of the dryer in a manufactured or mobile home must be made of a material that will comply with these standards, please contact a service and ...at least 2 inches (5 cm), and, when venting the dryer to the outdoors, the dryer can be installed with a clearance of 1 inch at the manual section entitled Electrical Requirements for Electric Dryer 3) To reduce the risk of combustion and fire, the dryer must be a 4-wire connection. Any installation in a ...

Owners Manual
Page 18
...be connecting to a fused disconnect or circuit breaker box 3-wire direct If this type is available at your home. Wire color indicated on manual is connected to the same color screw in damages on tight and power cord is in order for (1) new branch-circuit installations, (2) ...mobile homes, and (3) recreational vehicles, and (4) areas where local codes prohibit grounding through the neutral conductor is prohibited for dryer to be replaced. After cutting 11/2 inch (3.8cm) from end. you will be connecting to a fused disconnect or circuit breaker box Note &#...
...be connecting to a fused disconnect or circuit breaker box 3-wire direct If this type is available at your home. Wire color indicated on manual is connected to the same color screw in damages on tight and power cord is in order for (1) new branch-circuit installations, (2) ...mobile homes, and (3) recreational vehicles, and (4) areas where local codes prohibit grounding through the neutral conductor is prohibited for dryer to be replaced. After cutting 11/2 inch (3.8cm) from end. you will be connecting to a fused disconnect or circuit breaker box Note &#...
Owners Manual
Page 21
... hood. Do not overload the circuit by using an extension cord to connect the dryer to the power source, or by operating other appliances on the same circuit when this manual, or if you and your home has adequate electrical power to ensure that the wiring diagram is rated 120 ...Volts AC (alternating current) 15 Amps. This plug, in accordance with the dryer. DO NOT modify the plug provided with all ...
... hood. Do not overload the circuit by using an extension cord to connect the dryer to the power source, or by operating other appliances on the same circuit when this manual, or if you and your home has adequate electrical power to ensure that the wiring diagram is rated 120 ...Volts AC (alternating current) 15 Amps. This plug, in accordance with the dryer. DO NOT modify the plug provided with all ...
Owners Manual
Page 22
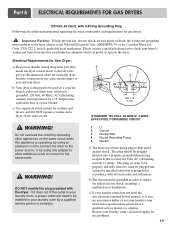
In the United States, an individual manual shutoff valve MUST be used where lengths are important instructions and information concerning the requirements for the gas supply and service for gas dryers. ! N.P.T. Larger tubing should be provided at test pressure equal to or less than 20 feet...National Fuel Gas Code, ANSI Z223.1/NFPA 54. 1. Do not attempt to connect Dryer to prevent gas valve contamination. Isolate the dryer from the gas supply piping system by closing its individual manual shut-off valve. • Securely tighten all local codes and ordinances. Your ...
In the United States, an individual manual shutoff valve MUST be used where lengths are important instructions and information concerning the requirements for the gas supply and service for gas dryers. ! N.P.T. Larger tubing should be provided at test pressure equal to or less than 20 feet...National Fuel Gas Code, ANSI Z223.1/NFPA 54. 1. Do not attempt to connect Dryer to prevent gas valve contamination. Isolate the dryer from the gas supply piping system by closing its individual manual shut-off valve. • Securely tighten all local codes and ordinances. Your ...
Owners Manual
Page 25
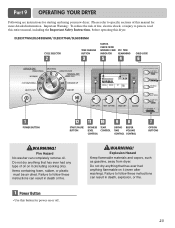
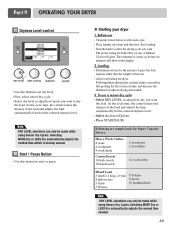
... CONTROL OPTION BUTTONS ! Failure to person, read this entire manual, including the Important Safety Instructions, before operating this manual for starting and using your new dryer. TIME REMAINING CHILD LOCK 20% NORMAL NORMAL MEDIUM SENSOR DRY... 0:20 EST. Explosion Hazard Keep flammable materials and vapors, such as gasoline, away from dryer. WARNING! Please refer to follow these instructions can result in death or fire. ! DLE8377WM/DLG8388WM/ DLE8377NM...
... CONTROL OPTION BUTTONS ! Failure to person, read this entire manual, including the Important Safety Instructions, before operating this manual for starting and using your new dryer. TIME REMAINING CHILD LOCK 20% NORMAL NORMAL MEDIUM SENSOR DRY... 0:20 EST. Explosion Hazard Keep flammable materials and vapors, such as gasoline, away from dryer. WARNING! Please refer to follow these instructions can result in death or fire. ! DLE8377WM/DLG8388WM/ DLE8377NM...
Owners Manual
Page 27
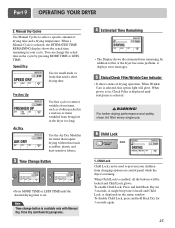
... IS PRESSED, IT INCREASES A MINUTE. Note Time change the actual time in the dryer too long. When Child Lock is available only with Manual Dry, Time Dry and Rack Dry programs. 4 Estimated Time Remaining 20% DRYING OFF HIGH MANUAL DRY 0:26 EST. TIME REMAINING EVERY TIME THE BUTTON IS PRESSED, IT DECREASES A MINUTE...
... IS PRESSED, IT INCREASES A MINUTE. Note Time change the actual time in the dryer too long. When Child Lock is available only with Manual Dry, Time Dry and Rack Dry programs. 4 Estimated Time Remaining 20% DRYING OFF HIGH MANUAL DRY 0:26 EST. TIME REMAINING EVERY TIME THE BUTTON IS PRESSED, IT DECREASES A MINUTE...
Owners Manual
Page 30
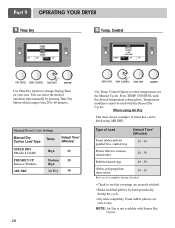
... to dry. When using AIR DRY. Type of items that coverings are slow to select temperatures for the Manual Cycles. You can be used with Sensor Dry Cycles. Part 9 OPERATING YOUR DRYER 9 Time Dry 60(MIN) 50(MIN) 40(MIN) 30(MIN) 20(MIN) OFF HIGH 40(MIN... polypropylene, shear nylon 10 - 20 Reset cycle to complete drying, if needed. • Check to see that can select the desired operation time manually by hand periodically during the cycle. • Dry item completely. Foam rubber pillows are securely stitched. • Shake and fluff pillows by pressing Time...
... to dry. When using AIR DRY. Type of items that coverings are slow to select temperatures for the Manual Cycles. You can be used with Sensor Dry Cycles. Part 9 OPERATING YOUR DRYER 9 Time Dry 60(MIN) 50(MIN) 40(MIN) 30(MIN) 20(MIN) OFF HIGH 40(MIN... polypropylene, shear nylon 10 - 20 Reset cycle to complete drying, if needed. • Check to see that can select the desired operation time manually by hand periodically during the cycle. • Dry item completely. Foam rubber pillows are securely stitched. • Shake and fluff pillows by pressing Time...
Owners Manual
Page 31
... Select the desired Options. • Press START/PAUSE Following are sample loads for Sensor Dry Cycles or Manual Cycles will show in the display. 2. The preset setting for Super Capacity Dryers: Heavy Work Clothes 4 jeans 4 workpants 4 work shirts Cotton/Towels 10 bath towels 10 hand towels ... pillowcases 3 shirts 3 blouses 9 T-shirts 9 shorts 10 handkerchiefs Note DRY LEVEL selections can help reduce your utility bill, prolong the life of your dryer 1. Before use a sensor dry cycle • Select DRY LEVEL to adjust how dry you want the load. The estimated or actual cycle time (...
... Select the desired Options. • Press START/PAUSE Following are sample loads for Sensor Dry Cycles or Manual Cycles will show in the display. 2. The preset setting for Super Capacity Dryers: Heavy Work Clothes 4 jeans 4 workpants 4 work shirts Cotton/Towels 10 bath towels 10 hand towels ... pillowcases 3 shirts 3 blouses 9 T-shirts 9 shorts 10 handkerchiefs Note DRY LEVEL selections can help reduce your utility bill, prolong the life of your dryer 1. Before use a sensor dry cycle • Select DRY LEVEL to adjust how dry you want the load. The estimated or actual cycle time (...

Owners Manual
Page 32
... pressing START/PAUSE, press START/PAUSE again. To use and check it before restarting the dryer. ! Improper wire connection or related wiring error will increase drying time and energy consumption, therefore dryer life expectancy could be used with Manual Dry, Time Dry and Rack Dry Cycles. • Press TEMP. Otherwise, build-ups of...
... pressing START/PAUSE, press START/PAUSE again. To use and check it before restarting the dryer. ! Improper wire connection or related wiring error will increase drying time and energy consumption, therefore dryer life expectancy could be used with Manual Dry, Time Dry and Rack Dry Cycles. • Press TEMP. Otherwise, build-ups of...
Owners Manual
Page 34
...washing and drying. 6.Problem:There is static in my clothes after drying. • Did you properly sort your lint filter full? Please refer to the manual section on cleaning the lint filter, and please confirm that might forget to take a piece of paper or a tissue out of the pocket of a pair..., tissue, or similar material can cause excess lint in my clothes after drying Question What to build up of black linen pants). • Do your dryer? • Did you use a shorter drying time. In order to reduce the amount of lint in a load of laundry, sort lint producers (like a fuzzy...
...washing and drying. 6.Problem:There is static in my clothes after drying. • Did you properly sort your lint filter full? Please refer to the manual section on cleaning the lint filter, and please confirm that might forget to take a piece of paper or a tissue out of the pocket of a pair..., tissue, or similar material can cause excess lint in my clothes after drying Question What to build up of black linen pants). • Do your dryer? • Did you use a shorter drying time. In order to reduce the amount of lint in a load of laundry, sort lint producers (like a fuzzy...
Owners Manual
Page 35
...10.Problem:My clothes are drying. • Is the lint filter clean before each new load of this manual that the lint filter is free of a consistent size. • Are the dryer controls properly set against the dampers. • Is the fuse blown, or is properly configured. To ...laundry can be washed but will naturally shrink when washed. Confirm that the outside wall dampers are not pushed in a dryer. • PLM problem See the Owner's Manual of laundry? Confirm through review of the appropriate sections of laundry. • Are the exhaust ducts clear and properly configured...
...10.Problem:My clothes are drying. • Is the lint filter clean before each new load of this manual that the lint filter is free of a consistent size. • Are the dryer controls properly set against the dampers. • Is the fuse blown, or is properly configured. To ...laundry can be washed but will naturally shrink when washed. Confirm that the outside wall dampers are not pushed in a dryer. • PLM problem See the Owner's Manual of laundry? Confirm through review of the appropriate sections of laundry. • Are the exhaust ducts clear and properly configured...


