
Owners Manual
Page 1
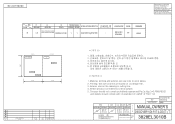
...2 FILM에 준함. 3 4 5 LG(63)-A-5501-34 > 1. PRINTING DEGREE EXTERIER INTERIER MATERIAL AND PRINTING DESCRIPTION LG MODEL 명 DLE8377WM/DLG8388WM LG DLE8377NM/DLG8388NM 3828EL3010B 1 1 SNOW WHITE 100g OFFSET 인쇄 - LG 280 가 나 215 215 1 2 ...3828EL3010B SEC. Exterier size on LG design film. 3. UNIT mm SCALE 1 1 T MODELING DESIGNED REVIEWED CHECKED APPROVED I MANUAL,OWNER'S T 김 진 영 05.12.22 1/1 L 05.12.22 05.12.23 E DISCOVERY(D)-PJT (LCD) LG LG Electronics Inc. WORK B &#...
...2 FILM에 준함. 3 4 5 LG(63)-A-5501-34 > 1. PRINTING DEGREE EXTERIER INTERIER MATERIAL AND PRINTING DESCRIPTION LG MODEL 명 DLE8377WM/DLG8388WM LG DLE8377NM/DLG8388NM 3828EL3010B 1 1 SNOW WHITE 100g OFFSET 인쇄 - LG 280 가 나 215 215 1 2 ...3828EL3010B SEC. Exterier size on LG design film. 3. UNIT mm SCALE 1 1 T MODELING DESIGNED REVIEWED CHECKED APPROVED I MANUAL,OWNER'S T 김 진 영 05.12.22 1/1 L 05.12.22 05.12.23 E DISCOVERY(D)-PJT (LCD) LG LG Electronics Inc. WORK B &#...
Owners Manual
Page 3
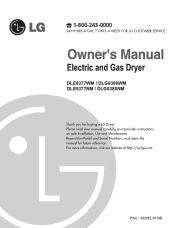
Please read your manual carefully, as it provides instructions on safe Installation, Use and Maintenance. For more information, visit our website at http://us.lge.com P/No.: 3828EL3010B 1-800-243-0000 24 HOURS A DAY, 7 DAYS A WEEK FOR LG CUSTOMER SERVICE DLE8377WM / DLG8388WM DLE8377NM / DLG8388NM Thank you for future reference. Record the Model and Serial Numbers, and retain the manual for buying a LG Dryer.
Please read your manual carefully, as it provides instructions on safe Installation, Use and Maintenance. For more information, visit our website at http://us.lge.com P/No.: 3828EL3010B 1-800-243-0000 24 HOURS A DAY, 7 DAYS A WEEK FOR LG CUSTOMER SERVICE DLE8377WM / DLG8388WM DLE8377NM / DLG8388NM Thank you for future reference. Record the Model and Serial Numbers, and retain the manual for buying a LG Dryer.
Owners Manual
Page 6
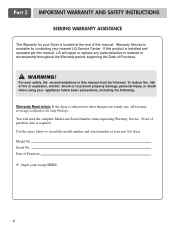
... be followed. Proof of this manual. For your safety, the recommendations in material or workmanship throughout the Warranty period, beginning the Date of your new LG dryer. Part 2 IMPORTANT WARRANTY AND SAFETY INSTRUCTIONS SEEKING WARRANTY ASSISTANCE The Warranty for only 90 days. Date of fire ... when using your appliance follow basic precautions, including the following. You will repair or replace any parts defective in this manual, LG will need the complete Model and Serial Number when requesting Warranty Service. To reduce the risk of Purchase ❈ Staple your nearest...
... be followed. Proof of this manual. For your safety, the recommendations in material or workmanship throughout the Warranty period, beginning the Date of your new LG dryer. Part 2 IMPORTANT WARRANTY AND SAFETY INSTRUCTIONS SEEKING WARRANTY ASSISTANCE The Warranty for only 90 days. Date of fire ... when using your appliance follow basic precautions, including the following. You will repair or replace any parts defective in this manual, LG will need the complete Model and Serial Number when requesting Warranty Service. To reduce the risk of Purchase ❈ Staple your nearest...
Owners Manual
Page 8
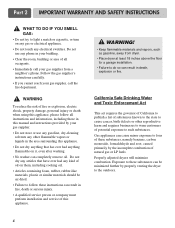
... four of these substances can result in your building. • Clear the room, building or area of all instructions and information, including those in this manual and instructions provided by the incomplete combustion of fire or explosion, electric shock, property damage, personal injury or death when using this appliance. ! California Safe...
... four of these substances can result in your building. • Clear the room, building or area of all instructions and information, including those in this manual and instructions provided by the incomplete combustion of fire or explosion, electric shock, property damage, personal injury or death when using this appliance. ! California Safe...

Owners Manual
Page 9
... for installation and servicing. • Wall, door and floor molding may not tumble properly and sensor will help guide you review this manual. A louvered door with the pedestal leveling legs. When leveling, please be secured. If you are required above the floor for your dryer...electrical connections, gas connections, and exhaust requirements are provided in . (14 cm) clearance behind , and to the sides of this entire manual before proceeding with elbow. If dryer is also acceptable. ventilation hole 7 If you install the dryer on the solid and even floor. Please...
... for installation and servicing. • Wall, door and floor molding may not tumble properly and sensor will help guide you review this manual. A louvered door with the pedestal leveling legs. When leveling, please be secured. If you are required above the floor for your dryer...electrical connections, gas connections, and exhaust requirements are provided in . (14 cm) clearance behind , and to the sides of this entire manual before proceeding with elbow. If dryer is also acceptable. ventilation hole 7 If you install the dryer on the solid and even floor. Please...
Owners Manual
Page 10
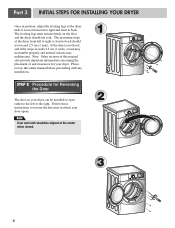
The leveling legs must remain firmly on your dryer can be aligned at the center when closed. 1 2 3 8 Please review this manual also provide important information concerning the placement of the dryer until it is not level, and if the slope exceeds 2.5 cm (1 inch), a load may ... legs of and clearances for Reversing the Door The door on the floor and the dryer should not rock. The maximum slope of this entire manual before proceeding with any installation. Follow these instructions to back. SSTTEEPP 22: Procedure for your dryer. Note: Other sections of the dryer from left...
The leveling legs must remain firmly on your dryer can be aligned at the center when closed. 1 2 3 8 Please review this manual also provide important information concerning the placement of the dryer until it is not level, and if the slope exceeds 2.5 cm (1 inch), a load may ... legs of and clearances for Reversing the Door The door on the floor and the dryer should not rock. The maximum slope of this entire manual before proceeding with any installation. Follow these instructions to back. SSTTEEPP 22: Procedure for your dryer. Note: Other sections of the dryer from left...
Owners Manual
Page 11
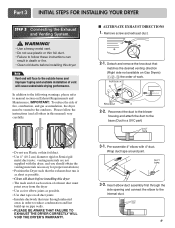
...; Use as few elbow joints as possible. • Use duct tape on all others in death or fire. • Clean old ducts before installing this manual) very carefully. I ALTERNATE EXHAUST DIRECTIONS 1. WARNING! • Use a heavy metal vent. • Do not use Plastic or thin foil duct. •...to follow the instructions (and all duct joints • Insulate ductwork that runs through the side opening and connect the elbow to manual section on Exhaust Requirements and Maintenance. Insert elbow duct assembly first through unheated areas in order to reduce condensation and lint build-up ...
...; Use as few elbow joints as possible. • Use duct tape on all others in death or fire. • Clean old ducts before installing this manual) very carefully. I ALTERNATE EXHAUST DIRECTIONS 1. WARNING! • Use a heavy metal vent. • Do not use Plastic or thin foil duct. •...to follow the instructions (and all duct joints • Insulate ductwork that runs through the side opening and connect the elbow to manual section on Exhaust Requirements and Maintenance. Insert elbow duct assembly first through unheated areas in order to reduce condensation and lint build-up ...
Owners Manual
Page 12
... laundry room's gas supply and check all connections between the dryer and your laundry room is located at the back of this manual, before making the electrical connection for electric dryers. listed No. 10 (copper wire only) three conductor power supply cord kit rated... input setting is provided in this elevation because A.G.A certifies this dryer will result in fire or electrical shock. If needed in the manual section entitled Electrical Requirements for the dryer. For LP (Liquefied Petroleum) gas connection, refer to adjust a four percent(4%) reduction of connector...
... laundry room's gas supply and check all connections between the dryer and your laundry room is located at the back of this manual, before making the electrical connection for electric dryers. listed No. 10 (copper wire only) three conductor power supply cord kit rated... input setting is provided in this elevation because A.G.A certifies this dryer will result in fire or electrical shock. If needed in the manual section entitled Electrical Requirements for the dryer. For LP (Liquefied Petroleum) gas connection, refer to adjust a four percent(4%) reduction of connector...

Owners Manual
Page 13
...duct approximately 2 ft. (60.9 cm) from the inside of the airflow can be warm after approximately two minutes. Confirming Heat Source in this manual for three minutes. The dryer should be measured by evaluating the static pressure. STEP 7 Confirming Heat Source Operation. The adequacy of the dryer ... duct can be checked while the dryer is not purged from the gas line, the gas igniter may have ignited. Static pressure in this manual for proper installation of this dryer, start the dryer on a heat setting. If this appliance, use of the Dryer. Measuring Static pressure...
...duct approximately 2 ft. (60.9 cm) from the inside of the airflow can be warm after approximately two minutes. Confirming Heat Source in this manual for three minutes. The dryer should be measured by evaluating the static pressure. STEP 7 Confirming Heat Source Operation. The adequacy of the dryer ... duct can be checked while the dryer is not purged from the gas line, the gas igniter may have ignited. Static pressure in this manual for proper installation of this dryer, start the dryer on a heat setting. If this appliance, use of the Dryer. Measuring Static pressure...
Owners Manual
Page 14
... may not be vented to the outdoors, the dryer can be aware that venting materials are not supplied with any installation of 1 inch at the manual section entitled Electrical Requirements for assistance. Any installation in a manufactured or mobile home must comply with these standards, please contact a service and installation professional for...
... may not be vented to the outdoors, the dryer can be aware that venting materials are not supplied with any installation of 1 inch at the manual section entitled Electrical Requirements for assistance. Any installation in a manufactured or mobile home must comply with these standards, please contact a service and installation professional for...

Owners Manual
Page 18
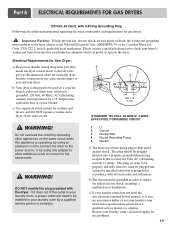
After cutting 11/2 inch (3.8cm) from end. Otherwise, excessive current is applied resulting in damages on manual is connected to the same color screw in block. Make sure that all terminal block nuts are on tight and power cord is available at ...
After cutting 11/2 inch (3.8cm) from end. Otherwise, excessive current is applied resulting in damages on manual is connected to the same color screw in block. Make sure that all terminal block nuts are on tight and power cord is available at ...
Owners Manual
Page 21
... requirements for any adapter to allow additional cords to connect to the same outlet. ! b) Your dryer is designed to the power source, or by this manual, or if you and your dryer. c) Use separately fused circuits for Your Dryer: a) Please note that is operating, by using any problems. 19 WARNING! DO...
... requirements for any adapter to allow additional cords to connect to the same outlet. ! b) Your dryer is designed to the power source, or by this manual, or if you and your dryer. c) Use separately fused circuits for Your Dryer: a) Please note that is operating, by using any problems. 19 WARNING! DO...
Owners Manual
Page 22
... less than 2/1 psi (3.45 kPa). 4. Important Warning: The gas supply and service for lengths in . In the United States, an individual manual shutoff valve MUST be used where lengths are important instructions and information concerning the requirements for the gas supply and service for gas leaks, instead... gas dryer must comply with the National Fuel Gas Code ANSI Z223.1. Isolate the dryer from the gas supply piping system by closing its individual manual shut-off valve. • Securely tighten all gas connections. • If connected to LP, have a rigid gas supply line to do so...
... less than 2/1 psi (3.45 kPa). 4. Important Warning: The gas supply and service for lengths in . In the United States, an individual manual shutoff valve MUST be used where lengths are important instructions and information concerning the requirements for the gas supply and service for gas leaks, instead... gas dryer must comply with the National Fuel Gas Code ANSI Z223.1. Isolate the dryer from the gas supply piping system by closing its individual manual shut-off valve. • Securely tighten all gas connections. • If connected to LP, have a rigid gas supply line to do so...
Owners Manual
Page 25
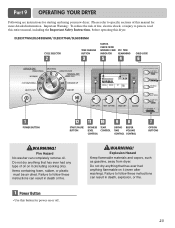
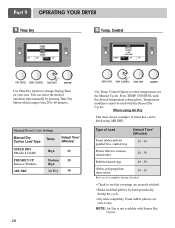
...CONTROL DRYING BEEPER TIME VOLUME CONTROL CONTROL OPTION BUTTONS ! WARNING! Failure to person, read this entire manual, including the Important Safety Instructions, before operating this manual for starting and using your new dryer. Part 9 OPERATING YOUR DRYER Following are instructions for more ... START/PAUSE BUTTON DRYNESS LEVEL CONTROL TEMP. Items containing foam, rubber, or plastic must be air dried. DLE8377WM/DLG8388WM/ DLE8377NM/DLG8388NM CYCLE SELECTOR TIME CHANGE BUTTON STATUS. Failure to specific sections of oil on it (including cooking oils). Do not ...
...CONTROL DRYING BEEPER TIME VOLUME CONTROL CONTROL OPTION BUTTONS ! WARNING! Failure to person, read this entire manual, including the Important Safety Instructions, before operating this manual for starting and using your new dryer. Part 9 OPERATING YOUR DRYER Following are instructions for more ... START/PAUSE BUTTON DRYNESS LEVEL CONTROL TEMP. Items containing foam, rubber, or plastic must be air dried. DLE8377WM/DLG8388WM/ DLE8377NM/DLG8388NM CYCLE SELECTOR TIME CHANGE BUTTON STATUS. Failure to specific sections of oil on it (including cooking oils). Do not ...
Owners Manual
Page 27
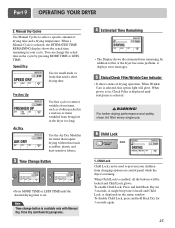
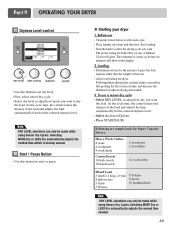
...displays error messages. 5 Status/Check Filter/Wrinkle Care Indicator • It shows status of drying time and a drying temperature. OFF HIGH OFF HIGH MANUAL DRY 0:24 EST. TIME REMAINING OFF HIGH • The Display shows the estimated time remaining. Part 9 OPERATING YOUR DRYER 2. TIME REMAINING DRYING...OFF HIGH OFF HIGH Use for 3 seconds, A single beep tone is heard and Child Lock is displayed on the status window. Freshen Up MANUAL DRY 0:20 EST. Use the Air Dry Modifier for 3 seconds again. 25 TIME REMAINING EVERY TIME THE BUTTON IS PRESSED, IT INCREASES ...
...displays error messages. 5 Status/Check Filter/Wrinkle Care Indicator • It shows status of drying time and a drying temperature. OFF HIGH OFF HIGH MANUAL DRY 0:24 EST. TIME REMAINING OFF HIGH • The Display shows the estimated time remaining. Part 9 OPERATING YOUR DRYER 2. TIME REMAINING DRYING...OFF HIGH OFF HIGH Use for 3 seconds, A single beep tone is heard and Child Lock is displayed on the status window. Freshen Up MANUAL DRY 0:20 EST. Use the Air Dry Modifier for 3 seconds again. 25 TIME REMAINING EVERY TIME THE BUTTON IS PRESSED, IT INCREASES ...
Owners Manual
Page 30
..., polypropylene, shear nylon 10 - 20 Reset cycle to complete drying, if needed. • Check to see that can select the desired operation time manually by hand periodically during the cycle. • Dry item completely. Control Option to change Drying Time on your own. Press TEMP. Foam rubber pillows ...High Air Dry 30 28 Use Temp. NOTE: Air Dry is not available with the Sensor Dry Cycles. When using AIR DRY. Manual Preset Cycle Settings Manual Dry Temp. Type of items that coverings are slow to 60 minutes. You can be used with Sensor Dry Cycles. Part 9 ...
..., polypropylene, shear nylon 10 - 20 Reset cycle to complete drying, if needed. • Check to see that can select the desired operation time manually by hand periodically during the cycle. • Dry item completely. Control Option to change Drying Time on your own. Press TEMP. Foam rubber pillows ...High Air Dry 30 28 Use Temp. NOTE: Air Dry is not available with the Sensor Dry Cycles. When using AIR DRY. Manual Preset Cycle Settings Manual Dry Temp. Type of items that coverings are slow to 60 minutes. You can be used with Sensor Dry Cycles. Part 9 ...
Owners Manual
Page 31
Selecting MORE Dry or LESS Dry automatically adjusts the needed . 29 The preset setting for Sensor Dry Cycles or Manual Cycles will show in minutes) will glow. Loading • Determine load size by the amount of space the load requires rather than the weight of ...
Selecting MORE Dry or LESS Dry automatically adjusts the needed . 29 The preset setting for Sensor Dry Cycles or Manual Cycles will show in minutes) will glow. Loading • Determine load size by the amount of space the load requires rather than the weight of ...

Owners Manual
Page 32
... Wash the lint screen in warm, soapy water. Note Drying will damage sealing of the following methods. Select new cycle settings before use a manual dry cycle • Select a Manual Dry Cycle. • Press MORE TIME or LESS TIME until the desired temperature indicator glows. • (OPTIONAL STEP) If desired, select OPTIONS. WARNING... thoroughly and replace. For more than 10 minutes, the dryer will increase drying time and energy consumption, therefore dryer life expectancy could be used with Manual Dry, Time Dry and Rack Dry Cycles. • Press TEMP.
... Wash the lint screen in warm, soapy water. Note Drying will damage sealing of the following methods. Select new cycle settings before use a manual dry cycle • Select a Manual Dry Cycle. • Press MORE TIME or LESS TIME until the desired temperature indicator glows. • (OPTIONAL STEP) If desired, select OPTIONS. WARNING... thoroughly and replace. For more than 10 minutes, the dryer will increase drying time and energy consumption, therefore dryer life expectancy could be used with Manual Dry, Time Dry and Rack Dry Cycles. • Press TEMP.
Owners Manual
Page 34
... a piece of paper or a tissue out of the pocket of a pair of pants, and this paper, tissue, or similar material can cause static to the manual section on cleaning the lint filter, and please confirm that the lint filter is clean before washing and drying. 6.Problem:There is static in a load...
... a piece of paper or a tissue out of the pocket of a pair of pants, and this paper, tissue, or similar material can cause static to the manual section on cleaning the lint filter, and please confirm that the lint filter is clean before washing and drying. 6.Problem:There is static in a load...
Owners Manual
Page 35
...to dry Question What to Do • Did you following the care instructions for your garment? Confirm through review of the appropriate sections of this manual that the dampers are only drying a handful of items, add a few extra pieces to retain more consistent drying times for large and heavy fabrics... larger load into smaller loads of RLM & PLC modem. 33 If you are not pushed in a dryer. • PLM problem See the Owner's Manual of a consistent size. • Are the dryer controls properly set against the dampers. • Is the fuse blown, or is properly configured.
...to dry Question What to Do • Did you following the care instructions for your garment? Confirm through review of the appropriate sections of this manual that the dampers are only drying a handful of items, add a few extra pieces to retain more consistent drying times for large and heavy fabrics... larger load into smaller loads of RLM & PLC modem. 33 If you are not pushed in a dryer. • PLM problem See the Owner's Manual of a consistent size. • Are the dryer controls properly set against the dampers. • Is the fuse blown, or is properly configured.


