
Owners Manual
Page 5
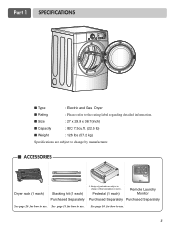
See page 13 for how to use. Part 1 SPECIFICATIONS I Type : Electric and Gas Dryer I ACCESSORIES Dryer rack (1 each) Stacking kit (1 each ) Remote Laundry Monitor Purchased Separately Purchased Separately See page 26 for how to use . 3 I Rating : Please refer to the rating ...
See page 13 for how to use. Part 1 SPECIFICATIONS I Type : Electric and Gas Dryer I ACCESSORIES Dryer rack (1 each) Stacking kit (1 each ) Remote Laundry Monitor Purchased Separately Purchased Separately See page 26 for how to use . 3 I Rating : Please refer to the rating ...
Owners Manual
Page 6
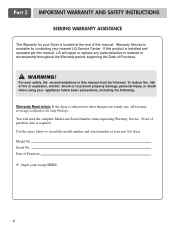
...or explosion, electric shock or to prevent property damage, personal injury, or death when using your new LG dryer. For your receipt HERE. 4 You will repair or replace any parts defective in this manual must be followed. Serial No. To reduce the risk of Purchase ❈ ...of your appliance follow basic precautions, including the following. Model No. Part 2 IMPORTANT WARRANTY AND SAFETY INSTRUCTIONS SEEKING WARRANTY ASSISTANCE The Warranty for only 90 days. WARNING! Warranty Restriction: If the dryer is subjected to record the model number and serial number of this ...
...or explosion, electric shock or to prevent property damage, personal injury, or death when using your new LG dryer. For your receipt HERE. 4 You will repair or replace any parts defective in this manual must be followed. Serial No. To reduce the risk of Purchase ❈ ...of your appliance follow basic precautions, including the following. Model No. Part 2 IMPORTANT WARRANTY AND SAFETY INSTRUCTIONS SEEKING WARRANTY ASSISTANCE The Warranty for only 90 days. WARNING! Warranty Restriction: If the dryer is subjected to record the model number and serial number of this ...

Owners Manual
Page 7
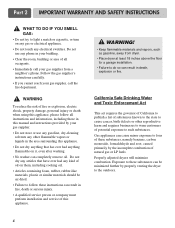
... gasoline, dry-cleaning solvents, or other personal injury or property damage when using your dryer. Do not modify the plug provided with controls. 8) Do not repair or replace any part of the appliance or attempt any risk of the equipmentgrounding conductor can result in accordance ...of electric shock by qualified service personnel. 13) Do not place items exposed to the weather. 7) Do not tamper with the appliance. Part 2 IMPORTANT WARRANTY AND SAFETY INSTRUCTIONS IMPORTANT SAFETY INSTRUCTIONS ! The plug must be cleaned periodically by providing a path of the fabric softner or...
... gasoline, dry-cleaning solvents, or other personal injury or property damage when using your dryer. Do not modify the plug provided with controls. 8) Do not repair or replace any part of the appliance or attempt any risk of the equipmentgrounding conductor can result in accordance ...of electric shock by qualified service personnel. 13) Do not place items exposed to the weather. 7) Do not tamper with the appliance. Part 2 IMPORTANT WARRANTY AND SAFETY INSTRUCTIONS IMPORTANT SAFETY INSTRUCTIONS ! The plug must be cleaned periodically by providing a path of the fabric softner or...
Owners Manual
Page 8
...instructions carefully. • If you cannot reach your gas supplier from dryer. • Place dryer at least 18 inches above the floor for a garage installation. ..., rubber, rubber-like materials, plastic or similar materials should be minimized further by properly venting the dryer to four of this appliance. ! Gas appliances can result in fire, death or serious injury. ...room, building or area of potential exposure to these instructions can completely remove oil. Properly adjusted dryers will minimize combustion. WARNING To reduce the risk of natural gas or LP fuels. WARNING! ...
...instructions carefully. • If you cannot reach your gas supplier from dryer. • Place dryer at least 18 inches above the floor for a garage installation. ..., rubber, rubber-like materials, plastic or similar materials should be minimized further by properly venting the dryer to four of this appliance. ! Gas appliances can result in fire, death or serious injury. ...room, building or area of potential exposure to these instructions can completely remove oil. Properly adjusted dryers will minimize combustion. WARNING To reduce the risk of natural gas or LP fuels. WARNING! ...

Owners Manual
Page 9
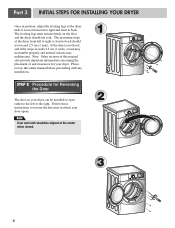
...clearances. • An additional inch of clearance is important that every section of this manual. STEP 1 Positioning the Dryer. Part 3 INITIAL STEPS FOR INSTALLING YOUR DRYER The following instructions in mind when installing in a closet or recessed area: • Consider allowing additional clearance for ... door. All four legs are set forth in other parts of this manual provides important information regarding the preparation and use of your dryer. When leveling, please be secured. If you are installing your dryer in a manufactured or mobile home, please refer to ...
...clearances. • An additional inch of clearance is important that every section of this manual. STEP 1 Positioning the Dryer. Part 3 INITIAL STEPS FOR INSTALLING YOUR DRYER The following instructions in mind when installing in a closet or recessed area: • Consider allowing additional clearance for ... door. All four legs are set forth in other parts of this manual provides important information regarding the preparation and use of your dryer. When leveling, please be secured. If you are installing your dryer in a manufactured or mobile home, please refer to ...
Owners Manual
Page 10
...Follow these instructions to reverse the direction in position, adjust the leveling legs of this entire manual before proceeding with any installation. Part 3 INITIAL STEPS FOR INSTALLING YOUR DRYER Once in which your door opens: Note Door and latch should be installed to open either to the left to right or ...front to back should not rock. The leveling legs must remain firmly on your dryer. Note: Other sections of the dryer until it is not level, and if the slope exceeds 2.5 cm (1 inch), a load may not tumble properly and internal sensors ...
...Follow these instructions to reverse the direction in position, adjust the leveling legs of this entire manual before proceeding with any installation. Part 3 INITIAL STEPS FOR INSTALLING YOUR DRYER Once in which your door opens: Note Door and latch should be installed to open either to the left to right or ...front to back should not rock. The leveling legs must remain firmly on your dryer. Note: Other sections of the dryer until it is not level, and if the slope exceeds 2.5 cm (1 inch), a load may not tumble properly and internal sensors ...
Owners Manual
Page 11
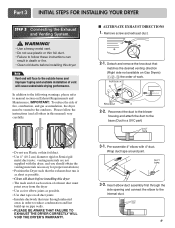
...-up on Exhaust Requirements and Maintenance. Reconnect the duct to the blower housing and attach the duct to the base.(Duct is a SVC part) • Do not use plastic or thin foil duct. • Failure to follow the instructions (and all duct joints • .... 2-1. In addition to the following warnings, please refer to the outside home and improper taping and unstable installation of work. 2-2. Part 3 INITIAL STEPS FOR INSTALLING YOUR DRYER STEP 3 Connecting the Exhaust and Venting System. ! IMPORTANT: To reduce the risk of exhaust duct must be vented to the internal...
...-up on Exhaust Requirements and Maintenance. Reconnect the duct to the blower housing and attach the duct to the base.(Duct is a SVC part) • Do not use plastic or thin foil duct. • Failure to follow the instructions (and all duct joints • .... 2-1. In addition to the following warnings, please refer to the outside home and improper taping and unstable installation of work. 2-2. Part 3 INITIAL STEPS FOR INSTALLING YOUR DRYER STEP 3 Connecting the Exhaust and Venting System. ! IMPORTANT: To reduce the risk of exhaust duct must be vented to the internal...
Owners Manual
Page 12
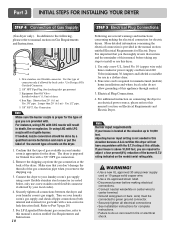
... a four percent(4%) reduction of this manual, before making the electrical connection for the dryer. Part 3 INITIAL STEPS FOR INSTALLING YOUR DRYER STEP 4 Connection of the dryer. Use this dryer. 1. Iron Pipe. Or using LNG with the B.T.U rating at the elevation up ...section on the model/serial rating plate. ! If needed in a clothes dryer. 2. Securely tighten all pipe connections (both internal and external) for complete instructions. • Failure to Part 7(page 20) 5. Turn on the dryer. 1. Use only a new U.L. For additional instruction on Gas Requirements and ...
... a four percent(4%) reduction of this manual, before making the electrical connection for the dryer. Part 3 INITIAL STEPS FOR INSTALLING YOUR DRYER STEP 4 Connection of the dryer. Use this dryer. 1. Iron Pipe. Or using LNG with the B.T.U rating at the elevation up ...section on the model/serial rating plate. ! If needed in a clothes dryer. 2. Securely tighten all pipe connections (both internal and external) for complete instructions. • Failure to Part 7(page 20) 5. Turn on the dryer. 1. Use only a new U.L. For additional instruction on Gas Requirements and ...

Owners Manual
Page 13
... ignition after reviewing the following parts on a heat setting. STEP 8 Dryer Airflow. The exhaust air or the exhaust pipe should be measured with a manometer, placed on a heat setting. The adequacy of this dryer, start the dryer on your dryer's Electrical Requirements. Effective dryer operation requires appropriate dryer airflow. Static pressure in Gas Dryers Close the door to the...
... ignition after reviewing the following parts on a heat setting. STEP 8 Dryer Airflow. The exhaust air or the exhaust pipe should be measured with a manometer, placed on a heat setting. The adequacy of this dryer, start the dryer on your dryer's Electrical Requirements. Effective dryer operation requires appropriate dryer airflow. Static pressure in Gas Dryers Close the door to the...
Owners Manual
Page 14
...in2 (163 cm2). 9) It is provided at the sides and back of the dryer. 10) Please be made of a material that will comply with the Manufactured Home Construction and Safety Standards Title 24 CFR, Part 32-80 or Standard CAN/CSA0Z240 MH and local codes and ordinances. DO NOT ...connect exhaust ducts with a clearance of combustion and fire, the dryer must be vented to ensure proper operation. The following instructions are ...
...in2 (163 cm2). 9) It is provided at the sides and back of the dryer. 10) Please be made of a material that will comply with the Manufactured Home Construction and Safety Standards Title 24 CFR, Part 32-80 or Standard CAN/CSA0Z240 MH and local codes and ordinances. DO NOT ...connect exhaust ducts with a clearance of combustion and fire, the dryer must be vented to ensure proper operation. The following instructions are ...

Owners Manual
Page 15
... - be performed by attaching the doublesided tape to the stopper of the front kit. Part 4 ACCESSORIES INSTALLATION Stacking Kit Installation Instructions To ensure safe and secure installation, please observe the instructions below. ! Repeat Steps 2, 3, 4 for one person. Slide dryer slowly backwards to top plate as shown in potentially unstable conditions like a mobile...
... - be performed by attaching the doublesided tape to the stopper of the front kit. Part 4 ACCESSORIES INSTALLATION Stacking Kit Installation Instructions To ensure safe and secure installation, please observe the instructions below. ! Repeat Steps 2, 3, 4 for one person. Slide dryer slowly backwards to top plate as shown in potentially unstable conditions like a mobile...
Owners Manual
Page 16
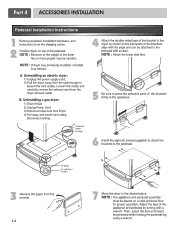
Part 4 ACCESSORIES INSTALLATION Pedestal Installation Instructions 1 4 2 1) Shut off Gas 2) Unplug Power Cord 3) Disconnect Gas Line from Dryer 4) Pull away and loosen vent clamp. for washer/ combo for dryer 5 6 3 for dryer for washer/ combo 7 14 Disconnect venting.
Part 4 ACCESSORIES INSTALLATION Pedestal Installation Instructions 1 4 2 1) Shut off Gas 2) Unplug Power Cord 3) Disconnect Gas Line from Dryer 4) Pull away and loosen vent clamp. for washer/ combo for dryer 5 6 3 for dryer for washer/ combo 7 14 Disconnect venting.

Owners Manual
Page 17
... block IS NOT supplied with dryer. Sample methods are available for Grounding of your dryer according to local code and ordinance requirements. wire (copper wire only), or as required by local codes. Part 5 ELECTRICAL REQUIREMENTS FOR ELECTRIC DRYERS Following are to be connected to ...electrical service of different voltage than that listed on nameplate. b) The dryer has its normal location when necessary. Heating elements are included in...
... block IS NOT supplied with dryer. Sample methods are available for Grounding of your dryer according to local code and ordinance requirements. wire (copper wire only), or as required by local codes. Part 5 ELECTRICAL REQUIREMENTS FOR ELECTRIC DRYERS Following are to be connected to ...electrical service of different voltage than that listed on nameplate. b) The dryer has its normal location when necessary. Heating elements are included in...

Owners Manual
Page 18
...) of power cord to external ground screw and move neutral ground wire of power cord to the same color screw in block. Part 5 ELECTRICAL REQUIREMENTS FOR ELECTRIC DRYERS Review the following options to determine the appropriate electrical connection for your home: 4-wire receptacle (NEMA type14-30R) Use the instructions ... if your home has a 4-wire receptacle (NEMA type 14-30R) and you will be using a UL listed, 120/240 volt minimum, 30 amp, dryer power supply cord. 3-wire receptacle (NEMA type10-30R) Use the instructions in this section if your home has a 3-wire receptacle (NEMA type 10-30R)...
...) of power cord to external ground screw and move neutral ground wire of power cord to the same color screw in block. Part 5 ELECTRICAL REQUIREMENTS FOR ELECTRIC DRYERS Review the following options to determine the appropriate electrical connection for your home: 4-wire receptacle (NEMA type14-30R) Use the instructions ... if your home has a 4-wire receptacle (NEMA type 14-30R) and you will be using a UL listed, 120/240 volt minimum, 30 amp, dryer power supply cord. 3-wire receptacle (NEMA type10-30R) Use the instructions in this section if your home has a 3-wire receptacle (NEMA type 10-30R)...

Owners Manual
Page 19
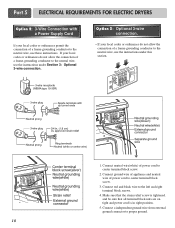
... to the left and right terminal block screws. 3. Connect red and black wire to center terminal block screw. 2. Part 5 ELECTRICAL REQUIREMENTS FOR ELECTRIC DRYERS 3-wire connection : Direct wire Important : Grounding through the neutral conductor is in right position. 1. Connect neutral wire(... strip 3 1/2 inches (8.9cm) of outer sheath from end and strip 1 inch of length in a mobile home, you are installing your dryer in order for (1) new branch-circuit installations, (2) mobile homes, and (3) recreational vehicles, and (4) areas where local codes prohibit grounding through ...
... to the left and right terminal block screws. 3. Connect red and black wire to center terminal block screw. 2. Part 5 ELECTRICAL REQUIREMENTS FOR ELECTRIC DRYERS 3-wire connection : Direct wire Important : Grounding through the neutral conductor is in right position. 1. Connect neutral wire(... strip 3 1/2 inches (8.9cm) of outer sheath from end and strip 1 inch of length in a mobile home, you are installing your dryer in order for (1) new branch-circuit installations, (2) mobile homes, and (3) recreational vehicles, and (4) areas where local codes prohibit grounding through ...
Owners Manual
Page 20
... wire, use the instructions under this section. 1. Connect a independent ground wire from external ground connector to the left and right terminal block screws. 4. Part 5 ELECTRICAL REQUIREMENTS FOR ELECTRIC DRYERS Option 2: 3-Wire Connection with a Power Supply Cord lf your local codes or ordinances permit the connection of a frame-grounding conductor to the neutral...
... wire, use the instructions under this section. 1. Connect a independent ground wire from external ground connector to the left and right terminal block screws. 4. Part 5 ELECTRICAL REQUIREMENTS FOR ELECTRIC DRYERS Option 2: 3-Wire Connection with a Power Supply Cord lf your local codes or ordinances permit the connection of a frame-grounding conductor to the neutral...
Owners Manual
Page 21
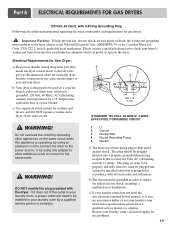
...! STANDARD 120 VOLT, 60 HERTZ, 3-WIRE EFFECTIVELY GROUNDED CIRCUIT 1 L1 2 Ground 3 Neutral Side 4 Round Grounding Prong 5 Neutral a) The dryer has a three-prong plug to ensure that the wiring diagram is operating, by using any problems. 19 c) If your home has adequate electrical power... to the latest edition of electric shock, including a malfunction or breakdown. Part 6 ELECTRICAL REQUIREMENTS FOR GAS DRYERS 120 Volt, 60 Hertz, with all local codes and ordinances. Please contact a qualified electrician to check your home's wiring...
...! STANDARD 120 VOLT, 60 HERTZ, 3-WIRE EFFECTIVELY GROUNDED CIRCUIT 1 L1 2 Ground 3 Neutral Side 4 Round Grounding Prong 5 Neutral a) The dryer has a three-prong plug to ensure that the wiring diagram is operating, by using any problems. 19 c) If your home has adequate electrical power... to the latest edition of electric shock, including a malfunction or breakdown. Part 6 ELECTRICAL REQUIREMENTS FOR GAS DRYERS 120 Volt, 60 Hertz, with all local codes and ordinances. Please contact a qualified electrician to check your home's wiring...
Owners Manual
Page 22
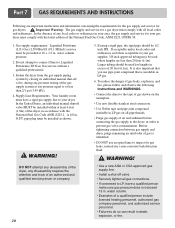
... tighten all pipe threads. • Purge gas supply of the gas supply system at test pressure equal to your dryer. Your laundry room must be installed within at 10 + 1.5 in . N.P.T. Part 7 GAS REQUIREMENTS AND INSTRUCTIONS Following are less than 2/1 psi (3.45 kPa). 4. In the United States, an ....1. pipe plug must have a qualified person make sure gas pressure does not exceed 13 in . DO NOT attempt any disassembly of the dryer, any pressure testing of air and sediment before connecting the gas supply to your gas supplier, 3/8 inch approved tubing may be used where...
... tighten all pipe threads. • Purge gas supply of the gas supply system at test pressure equal to your dryer. Your laundry room must be installed within at 10 + 1.5 in . N.P.T. Part 7 GAS REQUIREMENTS AND INSTRUCTIONS Following are less than 2/1 psi (3.45 kPa). 4. In the United States, an ....1. pipe plug must have a qualified person make sure gas pressure does not exceed 13 in . DO NOT attempt any disassembly of the dryer, any pressure testing of air and sediment before connecting the gas supply to your gas supplier, 3/8 inch approved tubing may be used where...

Owners Manual
Page 23
...into an enclosed and unventilated area, such as transition ducting between the dryer and wall connection only. Part 8 EXHAUST REQUIREMENTS AND MAINTENANCE Following are not provided with the dryer and you should be used between the dryer and and the wall. For example, the outer end of the exhaust... locally. In special installations when it is not recommended to make a connection with hinged dampers to clean any old ducts before installing your dryer. ! Weather Hood Type Number of 90° Maximum length of 4" Elbows (10.2 cm) diameter rigid metal duct Maximum length of fire...
...into an enclosed and unventilated area, such as transition ducting between the dryer and wall connection only. Part 8 EXHAUST REQUIREMENTS AND MAINTENANCE Following are not provided with the dryer and you should be used between the dryer and and the wall. For example, the outer end of the exhaust... locally. In special installations when it is not recommended to make a connection with hinged dampers to clean any old ducts before installing your dryer. ! Weather Hood Type Number of 90° Maximum length of 4" Elbows (10.2 cm) diameter rigid metal duct Maximum length of fire...

Owners Manual
Page 24
... necessary, more lint than others (towels for better drying performance. 3. Part 8 EXHAUST REQUIREMENTS AND MAINTENANCE Exhaust and Dryer Maintenance ! Disconnect the dryer's electric power prior to remove the buildup of the screen with your dryer. This Kit comes in two pieces, one of the lint screen and... filter may shed more frequently. A qualified service person or company should be used to reach places. Wipe the exterior of the dryer in your fingers. Always make sure the lint filter is firmly secured before drying each load or after drying these articles, such...
... necessary, more lint than others (towels for better drying performance. 3. Part 8 EXHAUST REQUIREMENTS AND MAINTENANCE Exhaust and Dryer Maintenance ! Disconnect the dryer's electric power prior to remove the buildup of the screen with your dryer. This Kit comes in two pieces, one of the lint screen and... filter may shed more frequently. A qualified service person or company should be used to reach places. Wipe the exterior of the dryer in your fingers. Always make sure the lint filter is firmly secured before drying each load or after drying these articles, such...


