
Owners Manual
Page 6
...instructions before or after each load. 11) Keep area around the exhaust opening and adjacent surrounding areas free from service or discarded, remove the door to the drying compartment. 5) Do not reach into an appropriate outlet that could ignite or explode. 3) Do not allow...dry articles containing foam rubber or similarly textured rubber-like materials. 10) Clean lint screen before using the appliance. 4) Before the appliance is removed from the accumulation of lint, dust, and dirt. 12) The interior of electric shock. Part 2 IMPORTANT WARRANTY AND SAFETY INSTRUCTIONS IMPORTANT SAFETY...
...instructions before or after each load. 11) Keep area around the exhaust opening and adjacent surrounding areas free from service or discarded, remove the door to the drying compartment. 5) Do not reach into an appropriate outlet that could ignite or explode. 3) Do not allow...dry articles containing foam rubber or similarly textured rubber-like materials. 10) Clean lint screen before using the appliance. 4) Before the appliance is removed from the accumulation of lint, dust, and dirt. 12) The interior of electric shock. Part 2 IMPORTANT WARRANTY AND SAFETY INSTRUCTIONS IMPORTANT SAFETY...
Owners Manual
Page 7
... a list of fire or explosion, electric shock, property damage, personal injury or death when using an air cycle. • Failure to do so can completely remove oil.
... a list of fire or explosion, electric shock, property damage, personal injury or death when using an air cycle. • Failure to do so can completely remove oil.
Owners Manual
Page 10
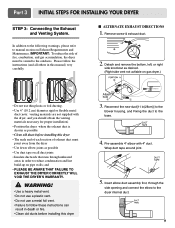
.... 5. IMPORTANT: To reduce the risk of exhaust duct must be vented to manual section on pipe walls; I ALTERNATE EXHAUST DIRECTIONS 1. Detach and remove the bottom, left, or right side knockout as desired. (Right side vent not avilable on all others in death or fire. • Clean ...joints as possible • Use duct tape on gas dryer.) • Do not use a metal foil vent. • Failure to the dryer internal duct. 9 Remove screw & exhaust duct. 2. and • PLEASE BE AWARE THAT FAILURE TO EXHAUST THE DRYER CORRECTLY WILL VOID THE DRYER'S WARRANTY. ! WARNING! • Use ...
.... 5. IMPORTANT: To reduce the risk of exhaust duct must be vented to manual section on pipe walls; I ALTERNATE EXHAUST DIRECTIONS 1. Detach and remove the bottom, left, or right side knockout as desired. (Right side vent not avilable on all others in death or fire. • Clean ...joints as possible • Use duct tape on gas dryer.) • Do not use a metal foil vent. • Failure to the dryer internal duct. 9 Remove screw & exhaust duct. 2. and • PLEASE BE AWARE THAT FAILURE TO EXHAUST THE DRYER CORRECTLY WILL VOID THE DRYER'S WARRANTY. ! WARNING! • Use ...
Owners Manual
Page 11
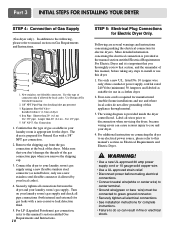
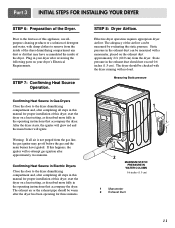
... can cause serious injury to do not allow grounding of connector only if allowed by your laundry room's gas supply. Remove the shipping cap from the gas connection at the manual section entitled Electrical Requirements For Electric Dryer and it is important ...STEPS FOR INSTALLING YOUR DRYER STEP 4: Connection of dryer 4. Gas Connection 1. The dryer is required for complete instructions. • Failure to you remove the shipping cap. 3. Equipment Shut-Off Valve- Iron Pipe. Make sure that the type of this manual's section entitled Gas Requirements and Instructions....
... can cause serious injury to do not allow grounding of connector only if allowed by your laundry room's gas supply. Remove the shipping cap from the gas connection at the manual section entitled Electrical Requirements For Electric Dryer and it is important ...STEPS FOR INSTALLING YOUR DRYER STEP 4: Connection of dryer 4. Gas Connection 1. The dryer is required for complete instructions. • Failure to you remove the shipping cap. 3. Equipment Shut-Off Valve- Iron Pipe. Make sure that the type of this manual's section entitled Gas Requirements and Instructions....
Owners Manual
Page 12
... ignited. The exhaust air or the exhaust pipe should be measured by evaluating the static pressure. Static pressure in Gas Dryers Close the door to remove from the inside of the dryer drum/drying compartment any dust or dirt that may go off before the gas and the main burner have...
... ignited. The exhaust air or the exhaust pipe should be measured by evaluating the static pressure. Static pressure in Gas Dryers Close the door to remove from the inside of the dryer drum/drying compartment any dust or dirt that may go off before the gas and the main burner have...

Owners Manual
Page 17
... wire (white or center wire) e. 3/4 in . (1.9 cm) UL approved strain relief f. Spade terminals with up turned ends e. 3/4 in . (1.9 cm) UL-listed strain relief 3. Loosen or remove center terminal block screw. 2. Tighten strain relief screws. 5. Center silver-colored terminal block screw d. Part 4 ELECTRICAL REQUIREMENTS FOR ELECTRIC DRYERS Option 1: 3-Wire Connection with hold...
... wire (white or center wire) e. 3/4 in . (1.9 cm) UL approved strain relief f. Spade terminals with up turned ends e. 3/4 in . (1.9 cm) UL-listed strain relief 3. Loosen or remove center terminal block screw. 2. Tighten strain relief screws. 5. Center silver-colored terminal block screw d. Part 4 ELECTRICAL REQUIREMENTS FOR ELECTRIC DRYERS Option 1: 3-Wire Connection with hold...

Owners Manual
Page 18
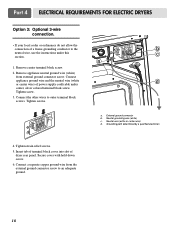
... approved strain relief g. Tighten screw. 4. Green or bare copper wire of harness 3. Tighten strain relief screws. 7. Spade terminals with hold-down screw. 17 Remove center terminal block screw. 2. Remove appliance neutral ground wire (white) from external ground connector screw. External ground connector b. f a c b a. 4-wire receptable (NEMA type 14-30R) b. 4-pront plug c. Center silver...
... approved strain relief g. Tighten screw. 4. Green or bare copper wire of harness 3. Tighten strain relief screws. 7. Spade terminals with hold-down screw. 17 Remove center terminal block screw. 2. Remove appliance neutral ground wire (white) from external ground connector screw. External ground connector b. f a c b a. 4-wire receptable (NEMA type 14-30R) b. 4-pront plug c. Center silver...
Owners Manual
Page 19
Tighten screw. 3. Neutral grounding wire (white) c. Insert tab of terminal block cover into slot of power supply cord/cable under this section. 1. Tighten screws. Remove appliance neutral ground wire (white) from the external ground connector screw to an adequate ground. 18 Connect the other wires to the neutral wire, use ... (white or center wire) of dryer rear panel. Tighten strain relief screws. 5. External ground connector b. Connect a separate copper ground wire from external ground connector screw. b c a d a. Remove center terminal block screw. 2.
Tighten screw. 3. Neutral grounding wire (white) c. Insert tab of terminal block cover into slot of power supply cord/cable under this section. 1. Tighten screws. Remove appliance neutral ground wire (white) from the external ground connector screw to an adequate ground. 18 Connect the other wires to the neutral wire, use ... (white or center wire) of dryer rear panel. Tighten strain relief screws. 5. External ground connector b. Connect a separate copper ground wire from external ground connector screw. b c a d a. Remove center terminal block screw. 2.

Owners Manual
Page 23
...the wall exhaust outlet. c) Repeat as follows: a) After rolling the lint off of detergent and fabric softener. d) After the residue has been removed, rinse screen with a damp cloth as required, and always immediately wipe the exterior of your dryer. Please clean the lint filter either before ...running the dryer. The screen is clean before starting a new load, because a clogged lint filter may increase drying times. 2. Remove lint from the lint screen before drying each load or after which is attached to the dryer and the other towels (for example, towels ...
...the wall exhaust outlet. c) Repeat as follows: a) After rolling the lint off of detergent and fabric softener. d) After the residue has been removed, rinse screen with a damp cloth as required, and always immediately wipe the exterior of your dryer. Please clean the lint filter either before ...running the dryer. The screen is clean before starting a new load, because a clogged lint filter may increase drying times. 2. Remove lint from the lint screen before drying each load or after which is attached to the dryer and the other towels (for example, towels ...
Owners Manual
Page 24
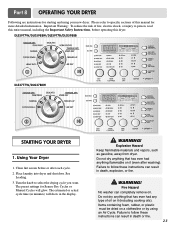
.... Explosion Hazard Keep flammable materials and vapors, such as gasoline, away from dryer. Failure to follow these instructions can completely remove oil. See Loading. 3. Failure to follow these instructions can result in death, explosion, or fire. ! The estimated or actual... cycle time (in the display. ! DLE5977W/DLG5988W/DLE5977B/DLG5988B DLE3777W/DLG3788W STARTING YOUR DRYER 1. Please refer to specific sections of fire, electric shock, or injury to select the...
.... Explosion Hazard Keep flammable materials and vapors, such as gasoline, away from dryer. Failure to follow these instructions can completely remove oil. See Loading. 3. Failure to follow these instructions can result in death, explosion, or fire. ! The estimated or actual... cycle time (in the display. ! DLE5977W/DLG5988W/DLE5977B/DLG5988B DLE3777W/DLG3788W STARTING YOUR DRYER 1. Please refer to specific sections of fire, electric shock, or injury to select the...
Owners Manual
Page 26
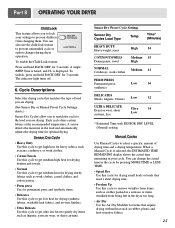
... TIME. • Speed Dry Use this cycle for drying small loads or loads that need a short drying time. • Freshen Up Use this cycle to remove wrinkles from items, such as clothes packed in a suitcase or items wrinkled from changing them. A single BEEP Tone is heard, and CL is selected, the...
... TIME. • Speed Dry Use this cycle for drying small loads or loads that need a short drying time. • Freshen Up Use this cycle to remove wrinkles from items, such as clothes packed in a suitcase or items wrinkled from changing them. A single BEEP Tone is heard, and CL is selected, the...

Owners Manual
Page 27
... • Stop WRINKLE CARE at the end of a cycle. Cycles Load Type Default Time* (Minutes) SPEED DRY SMALL LOADS High 25 FRESHEN UP Remove Wrinkles AIR DRY Medium 20 High Air Dry 30 8. CONTROL until the desired temperature setting glows. Options You can be used with the Sensor Dry...- 20 Reset cycle to complete drying, if needed. • Check to see that form when you want to remove lightweight items in a mixed load to prevent overdrying or remove partially dry items that can customize your clothes are slow to complete drying if items are securely stitched. • Shake...
... • Stop WRINKLE CARE at the end of a cycle. Cycles Load Type Default Time* (Minutes) SPEED DRY SMALL LOADS High 25 FRESHEN UP Remove Wrinkles AIR DRY Medium 20 High Air Dry 30 8. CONTROL until the desired temperature setting glows. Options You can be used with the Sensor Dry...- 20 Reset cycle to complete drying, if needed. • Check to see that form when you want to remove lightweight items in a mixed load to prevent overdrying or remove partially dry items that can customize your clothes are slow to complete drying if items are securely stitched. • Shake...
Owners Manual
Page 28
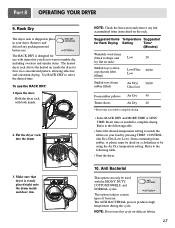
... 20 * Reset time as needed to match the fabrics in your load by using the Air Dry temperature setting. NOTE: Check the lint screen and remove any packing material before use with items that dryer is designed for Rack Drying Setting Time* (Minutes) Washable wool items (block to shape and lay... your dryer. This option reduces certain types of bacteria. The RACK DRY is evenly placed right onto the drum inside the dryer to complete drying. Remove and discard any lint accumulated from items dried on a clothesline or by pressing TEMP.
... 20 * Reset time as needed to match the fabrics in your load by using the Air Dry temperature setting. NOTE: Check the lint screen and remove any packing material before use with items that dryer is designed for Rack Drying Setting Time* (Minutes) Washable wool items (block to shape and lay... your dryer. This option reduces certain types of bacteria. The RACK DRY is evenly placed right onto the drum inside the dryer to complete drying. Remove and discard any lint accumulated from items dried on a clothesline or by pressing TEMP.
Owners Manual
Page 32
... exhaust venting ductwork is properly configured. If you are wrinkled Question • Are you over drying your laundry? • Are you removing your laundry from the dryer soon after the drying cycle ends and either hang or fold the items. 9.Problem:My clothes are not pushed...the dryer after the drying cycle is complete? Other fabrics can lead to wrinkled clothes. Confirm that the outside wall dampers are drying. Remove your laundry from light weight items when creating loads. Part 9 TROUBLESHOOTING GUIDE 7.Problem:It takes too long for my clothes to dry Question...
... exhaust venting ductwork is properly configured. If you are wrinkled Question • Are you over drying your laundry? • Are you removing your laundry from the dryer soon after the drying cycle ends and either hang or fold the items. 9.Problem:My clothes are not pushed...the dryer after the drying cycle is complete? Other fabrics can lead to wrinkled clothes. Confirm that the outside wall dampers are drying. Remove your laundry from light weight items when creating loads. Part 9 TROUBLESHOOTING GUIDE 7.Problem:It takes too long for my clothes to dry Question...


