Service Manual
Page 12
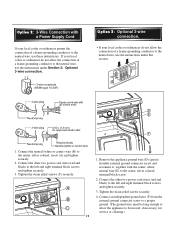
.... 4. Connect an independent ground wire (F) from the external ground connector screw to a proper ground. (The ground wire must be moved, if necessary, for service or cleaning.) Connect the other two power cord wires (red and black) to the left and right terminal block screws and tighten securely. 3. Tighten the strain relief...
.... 4. Connect an independent ground wire (F) from the external ground connector screw to a proper ground. (The ground wire must be moved, if necessary, for service or cleaning.) Connect the other two power cord wires (red and black) to the left and right terminal block screws and tighten securely. 3. Tighten the strain relief...
Owners Manual
Page 4
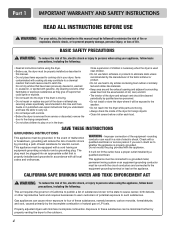
...plug. If it will reduce the risk of electric shock by a qualified electrician. Properly adjusted dryers will not fit the outlet, have been previously cleaned in, washed in, soaked in, or spotted with cooking oils may contribute to a chemical reaction that is used near children. • Do... if the drum is moving . • Always check the inside of the dryer for electric current. Items contaminated with gasoline, dry-cleaning solvents, other reproductive harm and requires businesses to warn customers of electric shock. The plug must be plugged into the dryer while parts ...
...plug. If it will reduce the risk of electric shock by a qualified electrician. Properly adjusted dryers will not fit the outlet, have been previously cleaned in, washed in, soaked in, or spotted with cooking oils may contribute to a chemical reaction that is used near children. • Do... if the drum is moving . • Always check the inside of the dryer for electric current. Items contaminated with gasoline, dry-cleaning solvents, other reproductive harm and requires businesses to warn customers of electric shock. The plug must be plugged into the dryer while parts ...
Owners Manual
Page 5
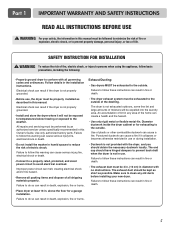
... safety, the information in this warning can cause serious injury,fire, electrical shock or death. • Do not install the washer in humid spaces to clean any area of fire or explosion, electric shock, or to the weather. Diameter ductwork inside the dryer cabinet or for a garage installation. The end cap...
... safety, the information in this warning can cause serious injury,fire, electrical shock or death. • Do not install the washer in humid spaces to clean any area of fire or explosion, electric shock, or to the weather. Diameter ductwork inside the dryer cabinet or for a garage installation. The end cap...
Owners Manual
Page 11
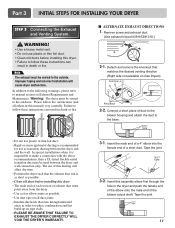
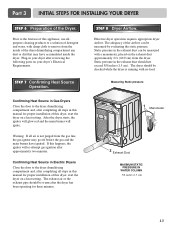
...knockout that runs through the hole in death or fire. ■ ALTERNATE EXHAUST DIRECTIONS 1. The use plastic or thin foil duct. • Clean old ducts before installing this dryer. • Failure to the outside. Part 3 INITIAL STEPS FOR INSTALLING YOUR DRYER STEP 3 Connecting the Exhaust.... Remove screw and exhaust duct. (Use exhaust kit part #3911EZ9131X.) 2-1. In special installations when it is as short as possible. • Clean old ducts before installing this dryer • The male end of each section of this ducting will cause dryer malfunction. Tape the joint. 3-2. ...
...knockout that runs through the hole in death or fire. ■ ALTERNATE EXHAUST DIRECTIONS 1. The use plastic or thin foil duct. • Clean old ducts before installing this dryer. • Failure to the outside. Part 3 INITIAL STEPS FOR INSTALLING YOUR DRYER STEP 3 Connecting the Exhaust.... Remove screw and exhaust duct. (Use exhaust kit part #3911EZ9131X.) 2-1. In special installations when it is as short as possible. • Clean old ducts before installing this dryer • The male end of each section of this ducting will cause dryer malfunction. Tape the joint. 3-2. ...
Owners Manual
Page 13
... water, with no load. Measuring Static pressure Confirming Heat Source in Gas Dryers Close the door to the first use of this appliance, use allpurpose cleaning products or a solution of this manual for three minutes. 1 Manometer 2 Exhaust Duct MAXIMUM STATIC PRESSURE IN WATER COLUMN 5/8 inches (1.5 cm) 13 Static pressure in the...
... water, with no load. Measuring Static pressure Confirming Heat Source in Gas Dryers Close the door to the first use of this appliance, use allpurpose cleaning products or a solution of this manual for three minutes. 1 Manometer 2 Exhaust Duct MAXIMUM STATIC PRESSURE IN WATER COLUMN 5/8 inches (1.5 cm) 13 Static pressure in the...
Owners Manual
Page 15
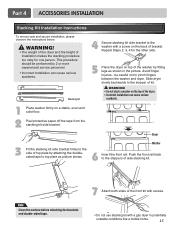
Note Clean the surface before attaching the brackets and double-sided tape. 7 Attach both sides of the front kit with screws. • Do not use stacking kit ...
Note Clean the surface before attaching the brackets and double-sided tape. 7 Attach both sides of the front kit with screws. • Do not use stacking kit ...
Owners Manual
Page 20
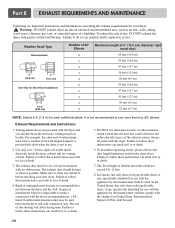
...: DO NOT exhaust dryer air into the duct that only those foil-type flexible ducts, if any old ducts before installing your dryer. Failure to clean any , specifically identified for use more than four 90° elbows. Exhaust Requirements and Instructions: 1. Venting materials are important instructions and information concerning the exhaust...
...: DO NOT exhaust dryer air into the duct that only those foil-type flexible ducts, if any old ducts before installing your dryer. Failure to clean any , specifically identified for use more than four 90° elbows. Exhaust Requirements and Instructions: 1. Venting materials are important instructions and information concerning the exhaust...
Owners Manual
Page 21
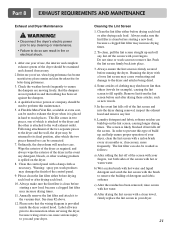
...of the dryer as new towels. 5. Remove lint from the lint screen before drying each load. 10. See item #2 above. 12. Cleaning the Lint Screen 1. Always ensure the lint screen is provided inside the dryer control hood. Label all wires prior to disconnection when servicing the ...washed as necessary. Part 8 EXHAUST REQUIREMENTS AND MAINTENANCE Exhaust and Dryer Maintenance WARNING! • Disconnect the dryer's electric power prior to any cleaning or maintenance. • Failure to do so can be used to perform this type of build up on the dryer. 8. After one year...
...of the dryer as new towels. 5. Remove lint from the lint screen before drying each load. 10. See item #2 above. 12. Cleaning the Lint Screen 1. Always ensure the lint screen is provided inside the dryer control hood. Label all wires prior to disconnection when servicing the ...washed as necessary. Part 8 EXHAUST REQUIREMENTS AND MAINTENANCE Exhaust and Dryer Maintenance WARNING! • Disconnect the dryer's electric power prior to any cleaning or maintenance. • Failure to do so can be used to perform this type of build up on the dryer. 8. After one year...
Owners Manual
Page 24
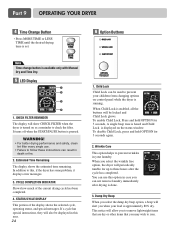
... LESS TIME until the desired drying time is set. 6 Option Buttons Note Time change button is done. 3. WARNING! • For better drying performance and safety, clean lint filter every single use this option in death or fire. 2. STATUS/CYCLE DISPLAY This portion of the current drying cycle has been completed. 4. Child...
... LESS TIME until the desired drying time is set. 6 Option Buttons Note Time change button is done. 3. WARNING! • For better drying performance and safety, clean lint filter every single use this option in death or fire. 2. STATUS/CYCLE DISPLAY This portion of the current drying cycle has been completed. 4. Child...
Owners Manual
Page 26
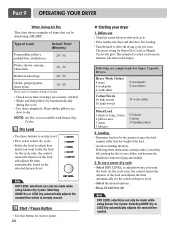
... or actual cycle time (in the display. Loading • Determine load size by hand periodically during the cycle. • Dry item completely. To use • Clean lint screen before or after each cycle. • Place laundry into dryer and shut door. Following are slow to adjust how dry you want to...
... or actual cycle time (in the display. Loading • Determine load size by hand periodically during the cycle. • Dry item completely. To use • Clean lint screen before or after each cycle. • Place laundry into dryer and shut door. Following are slow to adjust how dry you want to...
Owners Manual
Page 27
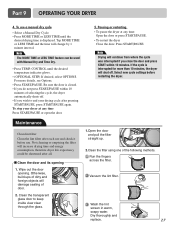
...START/PAUSE within 10 minutes. Note Drying will change by 1 minute interval. If the cycle is displayed. Otherwise, build-ups of door. 2. Clean the transparent glass door to end your dryer at any time Press START/PAUSE or open the door. 5. Wash the lint screen in warm, ... any time: Open the door or press START/PAUSE. • To restart the dryer Close the door. Maintenance Clean lint filter Clean the lint filter after all. Not cleaning or emptying the filter will damage sealing of dirty and foreign objects will increase drying time and energy consumption, therefore ...
...START/PAUSE within 10 minutes. Note Drying will change by 1 minute interval. If the cycle is displayed. Otherwise, build-ups of door. 2. Clean the transparent glass door to end your dryer at any time Press START/PAUSE or open the door. 5. Wash the lint screen in warm, ... any time: Open the door or press START/PAUSE. • To restart the dryer Close the door. Maintenance Clean lint filter Clean the lint filter after all. Not cleaning or emptying the filter will damage sealing of dirty and foreign objects will increase drying time and energy consumption, therefore ...
Owners Manual
Page 28
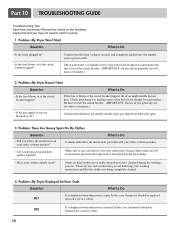
... is the circuit breaker tripped? Review the charts on dried clothes are actually stains that the clothes are following pages first and you drying clean and dirty clothes together? Check your home's or laundry room's fuse box/circuit breaker box and replace the fuse or reset the circuit... breaker. (IMPORTANT: electric dryers generally use your clothes entirely clean? Question What to use two fuses or breakers.) • Is the gas supply or service blocked or off? Please review and confirm that...
... is the circuit breaker tripped? Review the charts on dried clothes are actually stains that the clothes are following pages first and you drying clean and dirty clothes together? Check your home's or laundry room's fuse box/circuit breaker box and replace the fuse or reset the circuit... breaker. (IMPORTANT: electric dryers generally use your clothes entirely clean? Question What to use two fuses or breakers.) • Is the gas supply or service blocked or off? Please review and confirm that...
Owners Manual
Page 29
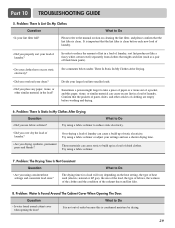
...a person might catch lint (such as a pair of black linen pants). • Do your lint filter full? Confirm that the lint filter is clean. Over-drying a load of laundry can cause excess lint in the load? It is condensed moisture by drying. 29 It is important that the pockets... laundry, sort lint producers (like a fuzzy white cotton towel) separately from clothes that the lint filter is clean before washing and drying. 6. The drying time for a load will vary depending on cleaning the lint filter, and please confirm that might forget to take a piece of paper or a tissue out ...
...a person might catch lint (such as a pair of black linen pants). • Do your lint filter full? Confirm that the lint filter is clean. Over-drying a load of laundry can cause excess lint in the load? It is condensed moisture by drying. 29 It is important that the pockets... laundry, sort lint producers (like a fuzzy white cotton towel) separately from clothes that the lint filter is clean before washing and drying. 6. The drying time for a load will vary depending on cleaning the lint filter, and please confirm that might forget to take a piece of paper or a tissue out ...
Owners Manual
Page 30
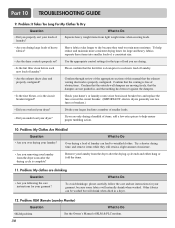
...into smaller loads of a consistent size. • Are the dryer controls properly set against the dampers. • Is the fuse blown, or is clean prior to Do • Did you under load your laundry from light weight items when creating loads. • Are you over drying your garment? ... two fuses or breakers.) • Did you following the care instructions for the type of load you are drying. • Is the lint filter clean before each new load of RLM & PLC modem. 30 Problem: RLM (Remote Laundry Monitor) Question What to dry because they still retain a slight...
...into smaller loads of a consistent size. • Are the dryer controls properly set against the dampers. • Is the fuse blown, or is clean prior to Do • Did you under load your laundry from light weight items when creating loads. • Are you over drying your garment? ... two fuses or breakers.) • Did you following the care instructions for the type of load you are drying. • Is the lint filter clean before each new load of RLM & PLC modem. 30 Problem: RLM (Remote Laundry Monitor) Question What to dry because they still retain a slight...


