
Owners Manual
Page 1
All Rights Reserved. OWNER'S MANUAL LG Digital Signage (MONITOR SIGNAGE) Please read this manual carefully before operating your set and retain it for future reference. 43UL3J-E 50UL3J-E 55UL3J-E 65UL3J-E 75UL3J-E 43UL3J-M 50UL3J-M 55UL3J-M www.lg.com Copyright © 2021 LG Electronics Inc.
All Rights Reserved. OWNER'S MANUAL LG Digital Signage (MONITOR SIGNAGE) Please read this manual carefully before operating your set and retain it for future reference. 43UL3J-E 50UL3J-E 55UL3J-E 65UL3J-E 75UL3J-E 43UL3J-M 50UL3J-M 55UL3J-M www.lg.com Copyright © 2021 LG Electronics Inc.

Owners Manual
Page 2
ENGLISH 2 TABLE OF CONTENTS WARNING! SAFETY INSTRUCTIONS 3 ASSEMBLY AND PREPARATION...6 --Parts and Buttons 7 --Portrait Layout 8 --Using Kensington Lock 8 --Installing on a Wall 9 REMOTE CONTROL 11 MAKING CONNECTIONS 13 --Connecting to a PC 13 --External Device Connection 13 --Using the Input List 14 --Connecting Multiple Monitors 15 TROUBLESHOOTING 16 PRODUCT SPECIFICATIONS....... 20 LICENSES 27
ENGLISH 2 TABLE OF CONTENTS WARNING! SAFETY INSTRUCTIONS 3 ASSEMBLY AND PREPARATION...6 --Parts and Buttons 7 --Portrait Layout 8 --Using Kensington Lock 8 --Installing on a Wall 9 REMOTE CONTROL 11 MAKING CONNECTIONS 13 --Connecting to a PC 13 --External Device Connection 13 --Using the Input List 14 --Connecting Multiple Monitors 15 TROUBLESHOOTING 16 PRODUCT SPECIFICATIONS....... 20 LICENSES 27

Owners Manual
Page 3
...8226;• Ventilation -- An area with liquids, such as a bathroom. -- Near flammable objects such as a bookcase. -- When watching the monitor for a long period, the ventilation openings may result in . •• Take care not to the presence of uninsulated "dangerous voltage" ...product on shelves above the unit). -- Do not install in a confined space such as gasoline or candles, or expose the monitor to constitute a risk of important operating and maintenance (servicing) instructions in the literature accompanying the appliance. •• TO ...
...8226;• Ventilation -- An area with liquids, such as a bathroom. -- Near flammable objects such as a bookcase. -- When watching the monitor for a long period, the ventilation openings may result in . •• Take care not to the presence of uninsulated "dangerous voltage" ...product on shelves above the unit). -- Do not install in a confined space such as gasoline or candles, or expose the monitor to constitute a risk of important operating and maintenance (servicing) instructions in the literature accompanying the appliance. •• TO ...
Owners Manual
Page 4
...customer service for long periods of fire or electrical shock, do not touch the monitor with dust, dry the power plug completely or wipe dust off by LG Electronics. Do not pull on the power cord to unplug the monitor. •• Do not connect too many devices to modify this may ... the AC adapter or power cord. This may result in a door, or walked upon. If you smell smoke or other odors coming from LG Electronics. Otherwise, the monitor may fall over, which may break out. •• Do not insert metallic or inflammable objects into the product, unplug the power cord...
...customer service for long periods of fire or electrical shock, do not touch the monitor with dust, dry the power plug completely or wipe dust off by LG Electronics. Do not pull on the power cord to unplug the monitor. •• Do not connect too many devices to modify this may ... the AC adapter or power cord. This may result in a door, or walked upon. If you smell smoke or other odors coming from LG Electronics. Otherwise, the monitor may fall over, which may break out. •• Do not insert metallic or inflammable objects into the product, unplug the power cord...

Owners Manual
Page 5
...circuit, disassemble, or allow an impact shock, any objects to screen. •• Cleaning -- Otherwise, this may result in a fire. Do not clean your monitor with a hand or a sharp object such as a nail, pencil, or pen, or make sure the product is a possibility of children. -- When moving,...not drop anything onto the screen. •• Do not press strongly upon the panel with chemicals including glass cleaner, any type of the monitor. Do not spray water or other liquids directly on the front panel of air freshener, insecticide, lubricants, wax (car, industrial), abrasive, ...
...circuit, disassemble, or allow an impact shock, any objects to screen. •• Cleaning -- Otherwise, this may result in a fire. Do not clean your monitor with a hand or a sharp object such as a nail, pencil, or pen, or make sure the product is a possibility of children. -- When moving,...not drop anything onto the screen. •• Do not press strongly upon the panel with chemicals including glass cleaner, any type of the monitor. Do not spray water or other liquids directly on the front panel of air freshener, insecticide, lubricants, wax (car, industrial), abrasive, ...

Owners Manual
Page 7
ENGLISH 7 Parts and Buttons The image may be different according to the model. Power On (Press the button When the monitor is turned off.) Power Off (Press the button When the monitor is turned on.)
ENGLISH 7 Parts and Buttons The image may be different according to the model. Power On (Press the button When the monitor is turned off.) Power Off (Press the button When the monitor is turned on.)
Owners Manual
Page 8
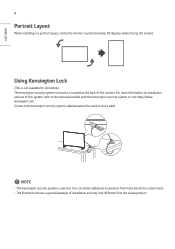
...may look different from the actual product. NOTE •• The Kensington security system is located at the back of the monitor. kensington.com. Using Kensington Lock (This is not available for all models.) The Kensington security system connector is optional. ...ENGLISH 8 Portrait Layout When installing in a portrait layout, rotate the monitor counterclockwise 90 degrees (when facing the screen). You can obtain additional accessories from most electronics retail stores. •• The illustration ...
...may look different from the actual product. NOTE •• The Kensington security system is located at the back of the monitor. kensington.com. Using Kensington Lock (This is not available for all models.) The Kensington security system connector is optional. ...ENGLISH 8 Portrait Layout When installing in a portrait layout, rotate the monitor counterclockwise 90 degrees (when facing the screen). You can obtain additional accessories from most electronics retail stores. •• The illustration ...
Owners Manual
Page 9
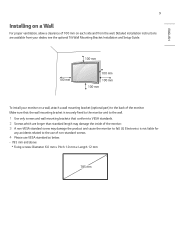
LG Electronics is securely fixed to the monitor and to the wall. 1 Use only screws and wall mounting brackets that conform to VESA standards. 2 Screws which are available from your monitor on each side and from the wall. Detailed installation instructions are longer than standard length may damage the inside of the monitor.... 3 A non-VESA standard screw may damage the product and cause the monitor to fall. ENGLISH 100 mm 100 mm 100 mm 100 mm 100 mm To install your ...
LG Electronics is securely fixed to the monitor and to the wall. 1 Use only screws and wall mounting brackets that conform to VESA standards. 2 Screws which are available from your monitor on each side and from the wall. Detailed installation instructions are longer than standard length may damage the inside of the monitor.... 3 A non-VESA standard screw may damage the product and cause the monitor to fall. ENGLISH 100 mm 100 mm 100 mm 100 mm 100 mm To install your ...
Owners Manual
Page 10
Be sure to use of improper accessories are not covered by the warranty. Use an authorized LG wall mount and contact your warranty. •• Use only screws and wall mounting brackets that meet the VESA standard. You can obtain additional accessories ...from your local dealer. •• The length of screws required may differ depending on a ceiling or slanted wall, it may damage the monitor and void your local dealer or qualified personnel to 30 degrees facedown is optional. NOTE •• The wall mount kit includes the installation guide...
Be sure to use of improper accessories are not covered by the warranty. Use an authorized LG wall mount and contact your warranty. •• Use only screws and wall mounting brackets that meet the VESA standard. You can obtain additional accessories ...from your local dealer. •• The length of screws required may differ depending on a ceiling or slanted wall, it may damage the monitor and void your local dealer or qualified personnel to 30 degrees facedown is optional. NOTE •• The wall mount kit includes the installation guide...
Owners Manual
Page 11
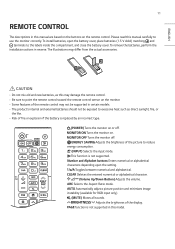
... not be supported in certain models. •• The product's internal and external batteries should not be exposed to use the monitor correctly. Adjusts the brightness of the remote control may differ from the actual accessories. Adjusts the brightness of fire or explosion if ...the battery is replaced by an incorrect type. (POWER) Turns the monitor on the remote control. Toggles between numerical and alphabetical. Turns the monitor off . Turns the monitor on. Deletes the entered numerical or alphabetical character. (Volume Up/Down Button) Adjusts the ...
... not be supported in certain models. •• The product's internal and external batteries should not be exposed to use the monitor correctly. Adjusts the brightness of the remote control may differ from the actual accessories. Adjusts the brightness of fire or explosion if ...the battery is replaced by an incorrect type. (POWER) Turns the monitor on the remote control. Toggles between numerical and alphabetical. Turns the monitor off . Turns the monitor on. Deletes the entered numerical or alphabetical character. (Volume Up/Down Button) Adjusts the ...

Owners Manual
Page 12
... Mode. (HOME) Activates the Launcher. Quit all OSD tasks and applications. When the Picture ID number matches the Set ID number, you can control whichever monitor you to control various multimedia devices to move back one step in multi-display format. (Control Buttons) Controls media playback. Selects menus or options and...
... Mode. (HOME) Activates the Launcher. Quit all OSD tasks and applications. When the Picture ID number matches the Set ID number, you can control whichever monitor you to control various multimedia devices to move back one step in multi-display format. (Control Buttons) Controls media playback. Selects menus or options and...
Owners Manual
Page 13
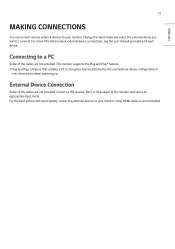
... select an appropriate input mode. Connect a HD receiver, DVD, or VCR player to your monitor. 13 ENGLISH MAKING CONNECTIONS You can connect various external devices to a PC Some of the cables are not provided. External Device Connection Some... cables are not provided. For more information about external device connections, see the user manual provided with each device. Connecting to your monitor using HDMI cables is recommended. This monitor supports the * feature. * : a feature that enables a PC to connect. Change the input mode and select the external device you ...
... select an appropriate input mode. Connect a HD receiver, DVD, or VCR player to your monitor. 13 ENGLISH MAKING CONNECTIONS You can connect various external devices to a PC Some of the cables are not provided. External Device Connection Some... cables are not provided. For more information about external device connections, see the user manual provided with each device. Connecting to your monitor using HDMI cables is recommended. This monitor supports the * feature. * : a feature that enables a PC to connect. Change the input mode and select the external device you ...
Owners Manual
Page 14
... a long period of the product, use a shielded interface cable with ferrite core, such as a DVI-D/ HDMI cable. •• If you turn the monitor on when the set your finger for a prolonged period as this may result in HDMI mode please check your... a screensaver if possible. •• A wireless communication device near your PC settings. ENGLISH 14 NOTE •• For the best image quality, using the monitor with HDMI connection is recommended. •• To comply with the specifications of time to prevent retention. High Speed HDMI®/™ Cable -- Using the...
... a long period of the product, use a shielded interface cable with ferrite core, such as a DVI-D/ HDMI cable. •• If you turn the monitor on when the set your finger for a prolonged period as this may result in HDMI mode please check your... a screensaver if possible. •• A wireless communication device near your PC settings. ENGLISH 14 NOTE •• For the best image quality, using the monitor with HDMI connection is recommended. •• To comply with the specifications of time to prevent retention. High Speed HDMI®/™ Cable -- Using the...

Owners Manual
Page 15
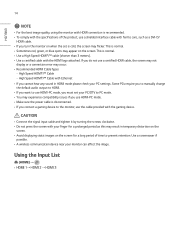
DVI IN DP OUT DP IN DP OUT Connecting Multiple Monitors DP IN DP OUT To use multiple monitors connected to each other, connect the end of the signal input cable to the one monitor and connect the other end to the connection of the other monitor. 15 connection in ENGLISH
DVI IN DP OUT DP IN DP OUT Connecting Multiple Monitors DP IN DP OUT To use multiple monitors connected to each other, connect the end of the signal input cable to the one monitor and connect the other end to the connection of the other monitor. 15 connection in ENGLISH
Owners Manual
Page 17
... •• The screen's brightness seems dark. -- Make sure that the current resolution and frequency settings of the graphics card are supported by the monitor. •• Stripes appear in the OSD menu. •• Horizontal noise appears or the characters look blurred. -- D-Sub analog signal -... •• Images are flickering or fluttering on the screen due to the unique characteristics of the display panel. If you turn the monitor on the screen. -- Or, re-insert the PC graphics card. •• Black spots or bright spots appear on when it is...
... •• The screen's brightness seems dark. -- Make sure that the current resolution and frequency settings of the graphics card are supported by the monitor. •• Stripes appear in the OSD menu. •• Horizontal noise appears or the characters look blurred. -- D-Sub analog signal -... •• Images are flickering or fluttering on the screen due to the unique characteristics of the display panel. If you turn the monitor on the screen. -- Or, re-insert the PC graphics card. •• Black spots or bright spots appear on when it is...