Owners Manual
Page 1
OWNER'S MANUAL LED TV * LG LED TV applies LCD screen with LED backlights. Please read this manual carefully before operating your set and retain it for future reference. 42LA6200 47LA6200 50LA6200 55LA6200 60LA6200 42LA6205 47LA6205 50LA6205 55LA6205 60LA6205 P/NO : MFL67711002 (1302-REV01) www.lg.com
OWNER'S MANUAL LED TV * LG LED TV applies LCD screen with LED backlights. Please read this manual carefully before operating your set and retain it for future reference. 42LA6200 47LA6200 50LA6200 55LA6200 60LA6200 42LA6205 47LA6205 50LA6205 55LA6205 60LA6205 P/NO : MFL67711002 (1302-REV01) www.lg.com
Owners Manual
Page 5
... aspect ratio of the TV is provided to call the CATV system installer's attention to 4:3 for help. NOTE TO CABLE/TV INSTALLER This reminder is set to Article 820-40 of the device. In a very few cases, you could void the user's authority to temperature and humidity. Operation is subject to...
... aspect ratio of the TV is provided to call the CATV system installer's attention to 4:3 for help. NOTE TO CABLE/TV INSTALLER This reminder is set to Article 820-40 of the device. In a very few cases, you could void the user's authority to temperature and humidity. Operation is subject to...
Owners Manual
Page 8
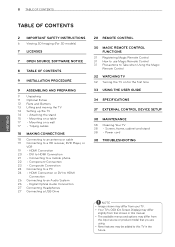
... SOFTWARE NOTICE 8 TABLE OF CONTENTS 9 INSTALLATION PROCEDURE 9 ASSEMBLING AND PREPARING 9 Unpacking 11 Optional Extras 12 Parts and Buttons 13 Lifting and moving the TV 14 Setting up the TV 14 - Tidying cables 18 MAKING CONNECTIONS 18 Connecting to an antenna or cable 19 Connecting to Take when Using the Magic Remote...
... SOFTWARE NOTICE 8 TABLE OF CONTENTS 9 INSTALLATION PROCEDURE 9 ASSEMBLING AND PREPARING 9 Unpacking 11 Optional Extras 12 Parts and Buttons 13 Lifting and moving the TV 14 Setting up the TV 14 - Tidying cables 18 MAKING CONNECTIONS 18 Connecting to an antenna or cable 19 Connecting to Take when Using the Magic Remote...
Owners Manual
Page 9
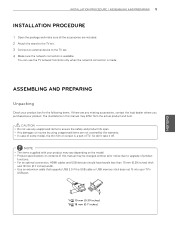
... AND PREPARING 9 INSTALLATION PROCEDURE 1 Open the package and make sure all the accessories are included. 2 Attach the stand to the TV set. 3 Connect an external device to the TV set. 4 Make sure the network connection is made. The illustrations in this manual may be changed without prior notice due to upgrade of...
... AND PREPARING 9 INSTALLATION PROCEDURE 1 Open the package and make sure all the accessories are included. 2 Attach the stand to the TV set. 3 Connect an external device to the TV set. 4 Make sure the network connection is made. The illustrations in this manual may be changed without prior notice due to upgrade of...

Owners Manual
Page 12
Description Selects the highlighted menu option or confirms an input. Changes the input source. Adjusts the volume level. Turns the power on the surrounding environment. Adjusts the image quality and brightness based on or off. 1 Intelligent Sensor - 12 ASSEMBLING AND PREPARING Parts and Buttons Screen ENGLISH OK SETTINGS INPUT Speakers Power Indicator Remote control Sensor and Intelligent Sensor1 Buttons Button / (^ / v OK ) (SETTINGS) (INPUT ) ( / I) Scrolls through the saved channels. Accesses the main menus, or saves your input and exits the menus.
Description Selects the highlighted menu option or confirms an input. Changes the input source. Adjusts the volume level. Turns the power on the surrounding environment. Adjusts the image quality and brightness based on or off. 1 Intelligent Sensor - 12 ASSEMBLING AND PREPARING Parts and Buttons Screen ENGLISH OK SETTINGS INPUT Speakers Power Indicator Remote control Sensor and Intelligent Sensor1 Buttons Button / (^ / v OK ) (SETTINGS) (INPUT ) ( / I) Scrolls through the saved channels. Accesses the main menus, or saves your input and exits the menus.
Owners Manual
Page 14
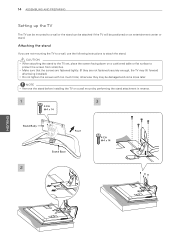
.... (If they may tilt forward after being installed.) yyDo not tighten the screws with too much force; CAUTION yyWhen attaching the stand to the TV set, place the screen facing down on a cushioned table or flat surface to attach the stand. Attaching the stand If you are not fastened securely enough... or stand. otherwise they are not mounting the TV to a wall, use the following instructions to protect the screen from scratches. 14 ASSEMBLING AND PREPARING Setting up the TV The TV can be mounted to a wall or the stand can be attached if the TV will be damaged and come loose...
.... (If they may tilt forward after being installed.) yyDo not tighten the screws with too much force; CAUTION yyWhen attaching the stand to the TV set, place the screen facing down on a cushioned table or flat surface to attach the stand. Attaching the stand If you are not fastened securely enough... or stand. otherwise they are not mounting the TV to a wall, use the following instructions to protect the screen from scratches. 14 ASSEMBLING AND PREPARING Setting up the TV The TV can be mounted to a wall or the stand can be attached if the TV will be damaged and come loose...
Owners Manual
Page 21
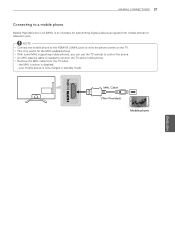
... High-definition Link (MHL) is an interface for the MHL-enabled phone. NOTE yyConnect the mobile phone to the HDMI IN 3 (MHL) port to television sets.
... High-definition Link (MHL) is an interface for the MHL-enabled phone. NOTE yyConnect the mobile phone to the HDMI IN 3 (MHL) port to television sets.

Owners Manual
Page 24
... is present, change the refresh rate to be noise associated with the resolution, vertical pattern, contrast or brightness. yyDepending on the graphics card, some resolution settings may be positioned on the screen properly. yyIf you are using the HDMI/DVI cable, Single link is separate. It does not matter which port...
... is present, change the refresh rate to be noise associated with the resolution, vertical pattern, contrast or brightness. yyDepending on the graphics card, some resolution settings may be positioned on the screen properly. yyIf you are using the HDMI/DVI cable, Single link is separate. It does not matter which port...

Owners Manual
Page 29
... or options. Color buttons These access special functions in some menus. ( : Red, : Green, : Yellow, : Blue) Control buttons Controls the SIMPLINK compatible devices (USB,SIMPLINK). SLEEP Sets the sleep timer. ENGLISH BACK Returns to TV viewing. EXIT Clears all on the current program. Accesses the AV devices connected to the TV; MY.... REMOTE CONTROL 29 RATIO INPUT TV 123 456 789 0 FLASHBK LIST FAV VOL MUTE P CH A G E Q.MENU INFO SMART MY APPS OK AV MODE EXIT BACK SETTINGS SLEEP INFO Shows information on -screen displays and returns to the previous level...
... or options. Color buttons These access special functions in some menus. ( : Red, : Green, : Yellow, : Blue) Control buttons Controls the SIMPLINK compatible devices (USB,SIMPLINK). SLEEP Sets the sleep timer. ENGLISH BACK Returns to TV viewing. EXIT Clears all on the current program. Accesses the AV devices connected to the TV; MY.... REMOTE CONTROL 29 RATIO INPUT TV 123 456 789 0 FLASHBK LIST FAV VOL MUTE P CH A G E Q.MENU INFO SMART MY APPS OK AV MODE EXIT BACK SETTINGS SLEEP INFO Shows information on -screen displays and returns to the previous level...
Owners Manual
Page 32
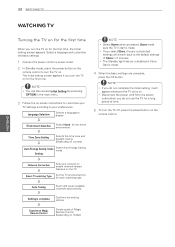
...) NOTE yySelect Home when prompted. Experience Magic Remote Control Simple guide of Store in Store Demo mode. 4 When the basic settings are complete, press the OK button. The Initial setting screen appears if you turn the TV off, press the power button on the remote control. Time Zone... daylight saving. (Depending on country) Auto Energy Saving mode Select Auto Energy Saving mode. Set the TV and set-top box for the home environment. yyIf you select Store, the any customized settings will appear whenever the TV turns on. yyDisconnect the power cord from the power outlet when...
...) NOTE yySelect Home when prompted. Experience Magic Remote Control Simple guide of Store in Store Demo mode. 4 When the basic settings are complete, press the OK button. The Initial setting screen appears if you turn the TV off, press the power button on the remote control. Time Zone... daylight saving. (Depending on country) Auto Energy Saving mode Select Auto Energy Saving mode. Set the TV and set-top box for the home environment. yyIf you select Store, the any customized settings will appear whenever the TV turns on. yyDisconnect the power cord from the power outlet when...

Owners Manual
Page 33
...topics in the User Guide. You can use input device To set time options CHANNEL Setting PICTURE, SOUND Setting OPTION LG SMART Function Advanced Function Information To set TV lock options To set language To set caption To set language SMART Settings OPTION Language Selects Menu Language and Audio...between pages. 4 An index of key words present in the current category. 3 You can select the language you want. OPTION > To set other options Index 23 4 Online User Guide 5 (Depending on the country/ language.) USING THE USER GUIDE 33 USING THE USER GUIDE User...
...topics in the User Guide. You can use input device To set time options CHANNEL Setting PICTURE, SOUND Setting OPTION LG SMART Function Advanced Function Information To set TV lock options To set language To set caption To set language SMART Settings OPTION Language Selects Menu Language and Audio...between pages. 4 An index of key words present in the current category. 3 You can select the language you want. OPTION > To set other options Index 23 4 Online User Guide 5 (Depending on the country/ language.) USING THE USER GUIDE 33 USING THE USER GUIDE User...
Owners Manual
Page 35
....5 dBm yyBecause band channel used by the country could be different, the user can not change or adjust the operating frequency and this product is set for the regional frequency table.
....5 dBm yyBecause band channel used by the country could be different, the user can not change or adjust the operating frequency and this product is set for the regional frequency table.

Owners Manual
Page 38
.... No image display and no signal while the TV is turned on the power cord regularly. yyCheck if there is activated in the Time settings. yyCheck if the product is on, the TV will turn the power off and disconnect the power cord and all other products. The power... wall outlet to prevent possible damage from lightning or power surges. The TV turns off automatically after 15 minutes of inactivity. yyCheck the power control settings. yyCheck if the batteries are still working and properly installed ( to , to a wall outlet. yyCheck if the Auto sleep feature is any chemicals, ...
.... No image display and no signal while the TV is turned on the power cord regularly. yyCheck if there is activated in the Time settings. yyCheck if the product is on, the TV will turn the power off and disconnect the power cord and all other products. The power... wall outlet to prevent possible damage from lightning or power surges. The TV turns off automatically after 15 minutes of inactivity. yyCheck the power control settings. yyCheck if the batteries are still working and properly installed ( to , to a wall outlet. yyCheck if the Auto sleep feature is any chemicals, ...

Owners Manual
Page 39
... use of drawers. • Remember that they cannot be heavy. Some wall mounts are not designed to be mounted to walls with furniture and television sets. • Don't allow place flat panel displays on furniture that has been recommended by the display manufacturer and/or listed by an independent laboratory (such...
... use of drawers. • Remember that they cannot be heavy. Some wall mounts are not designed to be mounted to walls with furniture and television sets. • Don't allow place flat panel displays on furniture that has been recommended by the display manufacturer and/or listed by an independent laboratory (such...

Owners Manual
Page 40
..., Consumer User 1-888-865-3026 USA, Commercial User 1-888-542-2623 CANADA Register your product Online! Record it below should you ever need service. www.lg.com This product qualiies for ENERGY STAR. The model and serial number of the TV is located on the back and one side of the... TV. Changing the factory default settings or enabling other features may increase power consumption that could exceed the limits necessary to quality for ENERGY STAR in the "factory default (Home Use...
..., Consumer User 1-888-865-3026 USA, Commercial User 1-888-542-2623 CANADA Register your product Online! Record it below should you ever need service. www.lg.com This product qualiies for ENERGY STAR. The model and serial number of the TV is located on the back and one side of the... TV. Changing the factory default settings or enabling other features may increase power consumption that could exceed the limits necessary to quality for ENERGY STAR in the "factory default (Home Use...

Owners Manual
Page 41
OWNER'S MANUAL EXTERNAL CONTROL DEVICE SETUP Please read this manual carefully before operating the set and retain it for future reference. www.lg.com
OWNER'S MANUAL EXTERNAL CONTROL DEVICE SETUP Please read this manual carefully before operating the set and retain it for future reference. www.lg.com

Owners Manual
Page 42
... R/C Button R/C Button R/C Button R/C Button R/C Button R/C Button R/C Button R/C Button R/C Button 40 (Arrow Key / Cursor Up) R/C Button 41 V (Arrow Key / Cursor Down) 42 My Apps 43 Menu / Settings 44 OK / Enter R/C Button R/C Button R/C Button R/C Button Code (Hexa) Function 45 Q.Menu 4C List, - (ATSC Only) 53 List 5B Exit 61 Blue 63 Yellow 71...
... R/C Button R/C Button R/C Button R/C Button R/C Button R/C Button R/C Button R/C Button R/C Button 40 (Arrow Key / Cursor Up) R/C Button 41 V (Arrow Key / Cursor Down) 42 My Apps 43 Menu / Settings 44 OK / Enter R/C Button R/C Button R/C Button R/C Button Code (Hexa) Function 45 Q.Menu 4C List, - (ATSC Only) 53 List 5B Exit 61 Blue 63 Yellow 71...
Owners Manual
Page 44
... 1 5 PC TV RXD 2 2 TXD TXD 3 GND 5 1 RXD 3 GND 6 9 RS-232C (Serial port) RXD TXD GND OR 3 2 5 D-Sub 9 2 1 3 Phone TXD RXD GND Set ID For Set ID number, see "Real Data Mapping" on p.6 1. Scroll left or right to OPTION and press OK. 3. When you are finished, press EXIT. Press the... Navigation buttons to scroll to select a set ID number and select CLOSE. SERVICE ONLY 1 3 (PC) (TV) 2 - This connection can only be used for the following models: 42/50PN4500-UA, ...
... 1 5 PC TV RXD 2 2 TXD TXD 3 GND 5 1 RXD 3 GND 6 9 RS-232C (Serial port) RXD TXD GND OR 3 2 5 D-Sub 9 2 1 3 Phone TXD RXD GND Set ID For Set ID number, see "Real Data Mapping" on p.6 1. Scroll left or right to OPTION and press OK. 3. When you are finished, press EXIT. Press the... Navigation buttons to scroll to select a set ID number and select CLOSE. SERVICE ONLY 1 3 (PC) (TV) 2 - This connection can only be used for the following models: 42/50PN4500-UA, ...

Owners Manual
Page 46
...to 99) on menu and as Hexadecimal (0x00 to choose desired monitor ID number in option menu. If [Set ID] value is selected to '0', every connected set can adjust the [Set ID] to 0x63) on transmission/receiving protocol. [DATA] : To transmit command data (hexadecimal). At this ...Step 255 ... 01 00 : Step 256 ... 27 0E : Step 9998 27 0F : Step 9999 ... ASCII code '0x20' OK Acknowledgement [Command2][ ][Set ID][ ][OK][Data][x] * The set transmits ACK (acknowledgement) based on this time, if the data is data write mode, it indicates present status data. Error Acknowledgement [Command2...
...to 99) on menu and as Hexadecimal (0x00 to choose desired monitor ID number in option menu. If [Set ID] value is selected to '0', every connected set can adjust the [Set ID] to 0x63) on transmission/receiving protocol. [DATA] : To transmit command data (hexadecimal). At this ...Step 255 ... 01 00 : Step 256 ... 27 0E : Step 9998 27 0F : Step 9999 ... ASCII code '0x20' OK Acknowledgement [Command2][ ][Set ID][ ][OK][Data][x] * The set transmits ACK (acknowledgement) based on this time, if the data is data write mode, it indicates present status data. Error Acknowledgement [Command2...

Owners Manual
Page 47
...select either 16:9 or 4:3 screen aspect ratio. * In DTV/HDMI/Component mode (high-definition), Just Scan is On Only) Transmission [k][a][ ][Set ID][ ][FF][Cr] Ack [a][ ][Set ID][ ][OK][01][x] * Similarly, if other functions transmit 'FF' data based on this format, Acknowledgement feedback presents status about each function. ... using the MUTE button on model and is supported for DTV fully, and ATV, AV partially. 03. Transmission[k][a][ ][Set ID][ ][Data][Cr] Data 00 : Power Off Ack [a][ ][Set ID][ ][OK/NG][Data][x] To Show Power On. (Works TV is available. * Full wide mode may work...
...select either 16:9 or 4:3 screen aspect ratio. * In DTV/HDMI/Component mode (high-definition), Just Scan is On Only) Transmission [k][a][ ][Set ID][ ][FF][Cr] Ack [a][ ][Set ID][ ][OK][01][x] * Similarly, if other functions transmit 'FF' data based on this format, Acknowledgement feedback presents status about each function. ... using the MUTE button on model and is supported for DTV fully, and ATV, AV partially. 03. Transmission[k][a][ ][Set ID][ ][Data][Cr] Data 00 : Power Off Ack [a][ ][Set ID][ ][OK/NG][Data][x] To Show Power On. (Works TV is available. * Full wide mode may work...


