
Owners Manual
Page 6
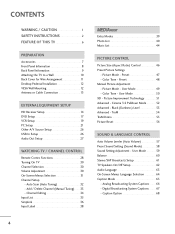
...Screen Menus Language Selection 64 Caption Mode 65 - Picture Mode - TruM 54 TruM Demo 55 Picture Reset 56 SOUND & LANGUAGE CONTROL Auto Volume Leveler (Auto Volume 57 Preset Sound Setting (Sound Mode 58 Sound Setting Adjustment - Channel Editing 34 Input List 35 ...SimpLink 36 Input Label 38 MEDIAHOST MEDIAHOST Entry Modes 39 Photo List 40 Music List 44 PICTURE CONTROL Picture Size (Aspect Ratio) Control 46 Preset Picture Settings - Digital Broadcasting System Captions 67 - User Mode 49 - Caption Option 68 4 Add / Delete Channel (Manual...
...Screen Menus Language Selection 64 Caption Mode 65 - Picture Mode - TruM 54 TruM Demo 55 Picture Reset 56 SOUND & LANGUAGE CONTROL Auto Volume Leveler (Auto Volume 57 Preset Sound Setting (Sound Mode 58 Sound Setting Adjustment - Channel Editing 34 Input List 35 ...SimpLink 36 Input Label 38 MEDIAHOST MEDIAHOST Entry Modes 39 Photo List 40 Music List 44 PICTURE CONTROL Picture Size (Aspect Ratio) Control 46 Preset Picture Settings - Digital Broadcasting System Captions 67 - User Mode 49 - Caption Option 68 4 Add / Delete Channel (Manual...
Owners Manual
Page 10
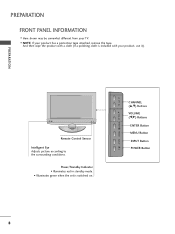
And then wipe the product with a cloth (If a polishing cloth is switched on. PREPARATION Remote Control Sensor Intelligent Eye Adjusts picture according to the surrounding conditions. VOL ENTER MENU INPUT /I Here shown may be somewhat different from your TV. PREPARATION FRONT PANEL INFORMATION I CH CH CHANNEL ... Button INPUT Button POWER Button 8 I NOTE: If your product, use it). Power/Standby Indicator • Illuminates red in standby mode. • Illuminates green when the set is included with your product has a protection tape attached, remove the tape.
And then wipe the product with a cloth (If a polishing cloth is switched on. PREPARATION Remote Control Sensor Intelligent Eye Adjusts picture according to the surrounding conditions. VOL ENTER MENU INPUT /I Here shown may be somewhat different from your TV. PREPARATION FRONT PANEL INFORMATION I CH CH CHANNEL ... Button INPUT Button POWER Button 8 I NOTE: If your product, use it). Power/Standby Indicator • Illuminates red in standby mode. • Illuminates green when the set is included with your product has a protection tape attached, remove the tape.

Owners Manual
Page 12
...in a forward direction, potentially causing injury or damaging the product. Ensure the eye-bolts or brackets are tightened securely. Caution: Please make sure that you set up the TV close to a wall so it cannot be somewhat different from the TV. I Use a sturdy rope (not provided as parts of ... recommend that children don't climb on the wall to tie the product. Secure the wall brackets with the bolts (not provided as shown in the picture. *Insert the eye-bolts and tighten them securely in the product. Additionally, we recommend that is mounted on or hang from your TV. I...
...in a forward direction, potentially causing injury or damaging the product. Ensure the eye-bolts or brackets are tightened securely. Caution: Please make sure that you set up the TV close to a wall so it cannot be somewhat different from the TV. I Use a sturdy rope (not provided as parts of ... recommend that children don't climb on the wall to tie the product. Secure the wall brackets with the bolts (not provided as shown in the picture. *Insert the eye-bolts and tighten them securely in the product. Additionally, we recommend that is mounted on or hang from your TV. I...

Owners Manual
Page 19
...SETUP EXTERNAL EQUIPMENT SETUP When connecting Component cable 1. How to use I If connected to the component input ports as shown below. I Turn on the set . VI IN RGB(PC) AUDIO (RGB/DVI) COMPONENT IN 2 REM CONT RS (CONTR 2 Connect the audio outputs of the DVD to the ...DVD player, insert a DVD. I Refer to the DVD player's manual for operating instructions. 1 2 Y PB PR L R Component Input ports To get better picture quality, connect a DVD player to COMPONENT IN 2 input, select Component 2 input source. Component ports on the TV Y PB PR Video output ports on the ...
...SETUP EXTERNAL EQUIPMENT SETUP When connecting Component cable 1. How to use I If connected to the component input ports as shown below. I Turn on the set . VI IN RGB(PC) AUDIO (RGB/DVI) COMPONENT IN 2 REM CONT RS (CONTR 2 Connect the audio outputs of the DVD to the ...DVD player, insert a DVD. I Refer to the DVD player's manual for operating instructions. 1 2 Y PB PR L R Component Input ports To get better picture quality, connect a DVD player to COMPONENT IN 2 input, select Component 2 input source. Component ports on the TV Y PB PR Video output ports on the ...
Owners Manual
Page 21
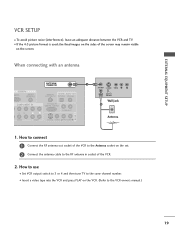
.... 2. How to connect 1 Connect the RF antenna out socket of the VCR to the Antenna socket on the set. 2 Connect the antenna cable to the same channel number. How to use I If the 4:3 picture format is used; EXTERNAL EQUIPMENT SETUP VCR SETUP I Insert a video tape into the VCR and press PLAY on... the VCR. (Refer to the VCR owner's manual.) ( ) 19 I To avoid picture noise (interference), leave an adequate distance between the VCR and TV. I Set VCR output switch to 3 or 4 and then tune TV to the RF antenna in socket of the screen may remain...
.... 2. How to connect 1 Connect the RF antenna out socket of the VCR to the Antenna socket on the set. 2 Connect the antenna cable to the same channel number. How to use I If the 4:3 picture format is used; EXTERNAL EQUIPMENT SETUP VCR SETUP I Insert a video tape into the VCR and press PLAY on... the VCR. (Refer to the VCR owner's manual.) ( ) 19 I To avoid picture noise (interference), leave an adequate distance between the VCR and TV. I Set VCR output switch to 3 or 4 and then tune TV to the RF antenna in socket of the screen may remain...
Owners Manual
Page 22
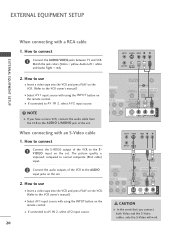
... 1 When connecting with an S-Video cable ANT IN S-VIDEO VIDEO L R 1. I Select A V 1 input source with using the INPUT button on the set . How to connect 1 Connect the S-VIDEO output of the VCR to the AUDIO L/MONO jack of the VCR to AV IN 2, select AV2 input source...AUDIO S-VIDEO VIDEO (MONO) AUDIO I If connected to the AUDIO input jacks on the remote control. The picture quality is improved; compared to normal composite (RCA cable) input. 2 Connect the audio outputs of the set . 2. How to AV IN 2, select A V 2 input source. I Select AV1 input source with using...
... 1 When connecting with an S-Video cable ANT IN S-VIDEO VIDEO L R 1. I Select A V 1 input source with using the INPUT button on the set . How to connect 1 Connect the S-VIDEO output of the VCR to the AUDIO L/MONO jack of the VCR to AV IN 2, select AV2 input source...AUDIO S-VIDEO VIDEO (MONO) AUDIO I If connected to the AUDIO input jacks on the remote control. The picture quality is improved; compared to normal composite (RCA cable) input. 2 Connect the audio outputs of the set . 2. How to AV IN 2, select A V 2 input source. I Select AV1 input source with using...
Owners Manual
Page 23
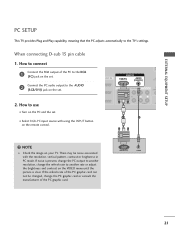
...to the AUDIO (RGB/DVI) jack on the set. 2 Connect the PC audio output to use I Select RGB-PC input source with the resolution, vertical pattern, contrast or brightness in PC mode. If noise is clear. I Turn on the VIDEO menu until the picture is present, change the PC output to the... TV's settings. If the refresh rate of the PC graphic card. A C RGB IN DVI IN RGB(PC) AUDIO (RGB/DVI) R CO ...
...to the AUDIO (RGB/DVI) jack on the set. 2 Connect the PC audio output to use I Select RGB-PC input source with the resolution, vertical pattern, contrast or brightness in PC mode. If noise is clear. I Turn on the VIDEO menu until the picture is present, change the PC output to the... TV's settings. If the refresh rate of the PC graphic card. A C RGB IN DVI IN RGB(PC) AUDIO (RGB/DVI) R CO ...
Owners Manual
Page 24
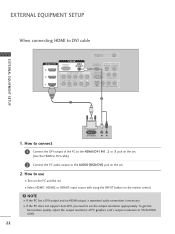
... the PC has a DVI output and no HDMI output, a separated audio connection is necessary. G If the PC does not support Auto DVI, you need to set . 2. How to connect 1 Connect the DVI output of PC graphics card's output resolution to the AUDIO (RGB/DVI) jack on the remote control. To get... the best picture quality, adjust the output resolution of the PC to the HDMI/DVI IN1, 2 or 3 jack on the set. (Use the HDMI to DVI cable) 2 Connect the PC audio output to 1920x1080, 60Hz. 22 EXTERNAL...
... the PC has a DVI output and no HDMI output, a separated audio connection is necessary. G If the PC does not support Auto DVI, you need to set . 2. How to connect 1 Connect the DVI output of PC graphics card's output resolution to the AUDIO (RGB/DVI) jack on the remote control. To get... the best picture quality, adjust the output resolution of the PC to the HDMI/DVI IN1, 2 or 3 jack on the set. (Use the HDMI to DVI cable) 2 Connect the PC audio output to 1920x1080, 60Hz. 22 EXTERNAL...

Owners Manual
Page 26
...RGB input of the set is connected to enter the screen adjustment menu. When you to the screen adjustment menu. 24 Picture Mode Color Temperature XD Advanced Aspect Ratio Picture Reset Screen TruM Demo : User1 : Cool : 16:9 Picture Mode Color Temperature XD Advanced Aspect Ratio Picture Reset Screen G ... G or ) leads you change the resolution, select the proper resolution in present input to see the best picture appearance. 1 Press the MENU button and then use D or E button to select the PICTURE menu. 2 Press the G button and then use D or E button to select Screen. 3 Press the...
...RGB input of the set is connected to enter the screen adjustment menu. When you to the screen adjustment menu. 24 Picture Mode Color Temperature XD Advanced Aspect Ratio Picture Reset Screen TruM Demo : User1 : Cool : 16:9 Picture Mode Color Temperature XD Advanced Aspect Ratio Picture Reset Screen G ... G or ) leads you change the resolution, select the proper resolution in present input to see the best picture appearance. 1 Press the MENU button and then use D or E button to select the PICTURE menu. 2 Press the G button and then use D or E button to select Screen. 3 Press the...

Owners Manual
Page 27
...Prev Resolution XGA (1024, 1280, 1360) isn't distinguished because of characters. Yes No Prev Select OK 25 Size This function is to adjust picture to left/right and up/down as you prefer. Initializing (Reset to original factory values) To initialize the adjusted values. 1 Use D ... screen size will also change. Phase This function allows you to select the Default Sync Time. Resolution Position Size Phase Reset G Initialize Settings. Position This function is to minimize any horizontal noise and clear or sharpen the image of having the same H/V Sync Time. I ...
...Prev Resolution XGA (1024, 1280, 1360) isn't distinguished because of characters. Yes No Prev Select OK 25 Size This function is to adjust picture to left/right and up/down as you prefer. Initializing (Reset to original factory values) To initialize the adjusted values. 1 Use D ... screen size will also change. Phase This function allows you to select the Default Sync Time. Resolution Position Size Phase Reset G Initialize Settings. Position This function is to minimize any horizontal noise and clear or sharpen the image of having the same H/V Sync Time. I ...
Owners Manual
Page 32
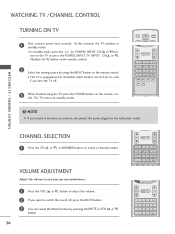
... outlet. At this moment, the TV switches to be away on the remote control. I This TV is programmed to remember which mode it was last set to switch the sound off . WATCHING TV / CHANNEL CONTROL CHANNEL SELECTION TVINPUT 1 Press the CH (D or E) or NUMBER buttons to standby mode. ...WATCHING TV /CHANNEL CONTROL TV INPUT STB MEDIA HOST TURNING ON TV 1 First, connect power cord correctly. BACK PICTURE SOUND SAP CC MARK TV INPUT USB EJECT 3 When finished using the INPUT button on the remote control. I In standby mode, press the (or ...
... outlet. At this moment, the TV switches to be away on the remote control. I This TV is programmed to remember which mode it was last set to switch the sound off . WATCHING TV / CHANNEL CONTROL CHANNEL SELECTION TVINPUT 1 Press the CH (D or E) or NUMBER buttons to standby mode. ...WATCHING TV /CHANNEL CONTROL TV INPUT STB MEDIA HOST TURNING ON TV 1 First, connect power cord correctly. BACK PICTURE SOUND SAP CC MARK TV INPUT USB EJECT 3 When finished using the INPUT button on the remote control. I In standby mode, press the (or ...

Owners Manual
Page 33
... then use D E F G button to display the available menus. SETUP Auto Tuning Manual Tuning Channel Edit PICTURE Picture Mode Color Temperature XD Advanced Aspect Ratio Picture Reset Screen TruM Demo : User1 : Cool : 16:9 LOCK For USA Lock System : Off Set Password Block Channel Movie Rating TV Rating-Children TV Rating-General Downloadable Rating Input Block...
... then use D E F G button to display the available menus. SETUP Auto Tuning Manual Tuning Channel Edit PICTURE Picture Mode Color Temperature XD Advanced Aspect Ratio Picture Reset Screen TruM Demo : User1 : Cool : 16:9 LOCK For USA Lock System : Off Set Password Block Channel Movie Rating TV Rating-Children TV Rating-General Downloadable Rating Input Block...

Owners Manual
Page 37
...to the active external device. HDMI 1-3 : Select it when using the DVD or the Digital set -top box depend on connector. MENU BRIGHT + TIMER RATIO SIMPLINK AV2 Component1 HDMI3 HDMI2 HDMI1 2... Component1 E TV INPUT INPUT STB MEDIA HOST BRIGHT - RGB-PC : Select it when using DVD, PC or Digital set -top box depend on screen. Component 1-2 : Select it when watching the CADTV/CATV. Press the ENTER button to... only to AV 2) Antenna Cable AV2 RGB-PC Component2 PICTURE SOUND SAP CC MARK USB EJECT Antenna : Select it when watching the VCR or external equipment.
...to the active external device. HDMI 1-3 : Select it when using the DVD or the Digital set -top box depend on connector. MENU BRIGHT + TIMER RATIO SIMPLINK AV2 Component1 HDMI3 HDMI2 HDMI1 2... Component1 E TV INPUT INPUT STB MEDIA HOST BRIGHT - RGB-PC : Select it when using DVD, PC or Digital set -top box depend on screen. Component 1-2 : Select it when watching the CADTV/CATV. Press the ENTER button to... only to AV 2) Antenna Cable AV2 RGB-PC Component2 PICTURE SOUND SAP CC MARK USB EJECT Antenna : Select it when watching the VCR or external equipment.

Owners Manual
Page 38
...home theater sup- 36 ported the SimpLink stops and the applicable function is executed after switching the input to TV. tional cables and settings. G When you select or operate the media device with SimpLink, press the TV button among the MODE button on the remote control.... MMEENNUU BRIGHT + TIMER RATIO SIMPLINK Language Input label SimpLink Key Lock Caption Set ID : English : Off : Off : Off : 1 PICTURE SOUND BACK SAP CC MARK USB EJECT Language Input label SimpLink Key Lock Caption Set ID G Off On NOTE G When operating the external device with home theater ...
...home theater sup- 36 ported the SimpLink stops and the applicable function is executed after switching the input to TV. tional cables and settings. G When you select or operate the media device with SimpLink, press the TV button among the MODE button on the remote control.... MMEENNUU BRIGHT + TIMER RATIO SIMPLINK Language Input label SimpLink Key Lock Caption Set ID : English : Off : Off : Off : 1 PICTURE SOUND BACK SAP CC MARK USB EJECT Language Input label SimpLink Key Lock Caption Set ID G Off On NOTE G When operating the external device with home theater ...

Owners Manual
Page 39
... off TV, all connected devices are turned off all devices When you can directly control the devices and play media without additional settings. TV INPUT TV INPUT Select AV device Enables you to select one of AV devices connected to TV andSTBplay it.MEDIAHOST Disc ... , , , , DEF G, ENTER buttons. , , SimpLink Menu 1 TV viewing : Switch to select the desired device and then MARK USBEJECT press the ENTER button. BACK PICTURE SOUND SAP CC 2 Use D E F G button to the previous TV channel regardless of the current mode. 2 DISC playback : Select and play discs. 1 When multiple...
... off TV, all connected devices are turned off all devices When you can directly control the devices and play media without additional settings. TV INPUT TV INPUT Select AV device Enables you to select one of AV devices connected to TV andSTBplay it.MEDIAHOST Disc ... , , , , DEF G, ENTER buttons. , , SimpLink Menu 1 TV viewing : Switch to select the desired device and then MARK USBEJECT press the ENTER button. BACK PICTURE SOUND SAP CC 2 Use D E F G button to the previous TV channel regardless of the current mode. 2 DISC playback : Select and play discs. 1 When multiple...

Owners Manual
Page 40
... Language Input label SimpLink Key Lock Caption Set ID TIMER RATIO SIMPLINK : English : Off : Off : Off : 1 PICTURE SOUND MARK USB EJECT BACK CC Language Input label G AV1 Cable Box SimpLink AV2 VCR Key Lock Component1 DVD Caption Component2 Set Top Box Set ID RGB-PC VCR HDMI1 Game HDMI2 ... / CHANNEL CONTROL WATCHING TV /CHANNEL CONTROL INPUT LABEL TV INPUT TV INPUT Sets a label to each input source which is not in use D or E button to BACK select Input Label. BACK PICTURE SOUND SAP CC PICTURE SAP CC MARK USB EJECT MARK USB EJECT 3 Press the G button and...
... Language Input label SimpLink Key Lock Caption Set ID TIMER RATIO SIMPLINK : English : Off : Off : Off : 1 PICTURE SOUND MARK USB EJECT BACK CC Language Input label G AV1 Cable Box SimpLink AV2 VCR Key Lock Component1 DVD Caption Component2 Set Top Box Set ID RGB-PC VCR HDMI1 Game HDMI2 ... / CHANNEL CONTROL WATCHING TV /CHANNEL CONTROL INPUT LABEL TV INPUT TV INPUT Sets a label to each input source which is not in use D or E button to BACK select Input Label. BACK PICTURE SOUND SAP CC PICTURE SAP CC MARK USB EJECT MARK USB EJECT 3 Press the G button and...
Owners Manual
Page 44
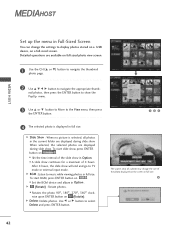
... input mode. Detailed operations are displayed during slide show . I Rotates the photo 90°, 180°, 270°, 360° clock- Slide Show : When no picture is displayed in full size. To start slide show will end and go to select Delete and press ENTER button. nail photos, then press the... ENTER button to show continues for a maximum of 4 hours. BGM : Listen to navigate the appropriate thumb- MEDIA HOST MEDIAHOST MEDIAHOST Set up the menu in Full-Sized Screen You can change the size of the photo displayed on the screen in full size. 42
... input mode. Detailed operations are displayed during slide show . I Rotates the photo 90°, 180°, 270°, 360° clock- Slide Show : When no picture is displayed in full size. To start slide show will end and go to select Delete and press ENTER button. nail photos, then press the... ENTER button to show continues for a maximum of 4 hours. BGM : Listen to navigate the appropriate thumb- MEDIA HOST MEDIAHOST MEDIAHOST Set up the menu in Full-Sized Screen You can change the size of the photo displayed on the screen in full size. 42

Owners Manual
Page 46
.... BRIGHT - PlaybaScTBk of marked musics Current playing time/Total playing time Corresponding buttons on your set. MENU BRIGHT + Screen Components TIMER RATIO SIMPLINK UsableBACUK SB memory PICTURE SOUND SAP MARK USB EJECT BACK SOUND SAP CC MARK USB EJECT Current page/Total pages Total...HOST STB MEDIA HOST The On Screen Display may contain copyright restrictions. Music file on the remote control BACK BACK PICTURE SOUND SAP CC PICTURE SOUND SAP CC PIC MARK USB EJECT MARK USB EJECT M MEDIA HOST 44 MEDIAHOST MEMUDSIICALHISOTST TV INPUT TV INPUT TV...
.... BRIGHT - PlaybaScTBk of marked musics Current playing time/Total playing time Corresponding buttons on your set. MENU BRIGHT + Screen Components TIMER RATIO SIMPLINK UsableBACUK SB memory PICTURE SOUND SAP MARK USB EJECT BACK SOUND SAP CC MARK USB EJECT Current page/Total pages Total...HOST STB MEDIA HOST The On Screen Display may contain copyright restrictions. Music file on the remote control BACK BACK PICTURE SOUND SAP CC PICTURE SOUND SAP CC PIC MARK USB EJECT MARK USB EJECT M MEDIA HOST 44 MEDIAHOST MEMUDSIICALHISOTST TV INPUT TV INPUT TV...

Owners Manual
Page 48
..., you need to specify how the picture is to be displayed. You can also adjust Aspect Ratio in a linear proportion to fill the entire screen. PICTURE CONTROL Set By Program Set By Program 4:3 Choose 4:3 when you want to view the picture without any alteration. MENU BRIGHT + ...MEDIA HOST BRIGHT - BACK BACK PICTURE SOUND SAP CC Set by program MARK USB EJECT PICTURE SOUND SAP CC MARK USB EJECT Selects the proper picture proportion to match the source's image. (4:3 4:3) (16:9 16:9) BACK BACK PICTURE SOUND SAP CC Zoom 1 PICTURE SOUND SAP CC MARK USB EJECT...
..., you need to specify how the picture is to be displayed. You can also adjust Aspect Ratio in a linear proportion to fill the entire screen. PICTURE CONTROL Set By Program Set By Program 4:3 Choose 4:3 when you want to view the picture without any alteration. MENU BRIGHT + ...MEDIA HOST BRIGHT - BACK BACK PICTURE SOUND SAP CC Set by program MARK USB EJECT PICTURE SOUND SAP CC MARK USB EJECT Selects the proper picture proportion to match the source's image. (4:3 4:3) (16:9 16:9) BACK BACK PICTURE SOUND SAP CC Zoom 1 PICTURE SOUND SAP CC MARK USB EJECT...

Owners Manual
Page 56
... to high. * If you have some problem in viewing picture, set to the PC in RGB-PC, HDMI-PC mode. TIMER RATIO SIMPLINK Picture Mode : User1 Color Temperature : Cool XD Advanced Aspect Ratio : 16:9 Picture Reset Screen TruM Demo PICTURE SOUND BACK CC MARK USB EJECT Picture Mode Color Temperature XD Advanced G Cinema 3:2 Mode Off Aspect...
... to high. * If you have some problem in viewing picture, set to the PC in RGB-PC, HDMI-PC mode. TIMER RATIO SIMPLINK Picture Mode : User1 Color Temperature : Cool XD Advanced Aspect Ratio : 16:9 Picture Reset Screen TruM Demo PICTURE SOUND BACK CC MARK USB EJECT Picture Mode Color Temperature XD Advanced G Cinema 3:2 Mode Off Aspect...


