Owners Manual
Page 3
... equipment to an outlet on , the user is connected. - This equipment generates, uses and can be of sufficient magnitude to constitute a risk of electric shock to Article 820-40 of important operating and maintenance (servicing) instructions in a particular installation. WARNING / CAUTION TO REDUCE THE RISK OF ELECTRIC SHOCK DO NOT REMOVE COVER (OR BACK). CAUTION Do not attempt...
... equipment to an outlet on , the user is connected. - This equipment generates, uses and can be of sufficient magnitude to constitute a risk of electric shock to Article 820-40 of important operating and maintenance (servicing) instructions in a particular installation. WARNING / CAUTION TO REDUCE THE RISK OF ELECTRIC SHOCK DO NOT REMOVE COVER (OR BACK). CAUTION Do not attempt...
Owners Manual
Page 6
...-Screen Menus Language Selection 64 Caption Mode 65 - Auto Scan (Auto Tuning 32 - Black (Darkness) Level 53 Advanced - Analog Broadcasting System Captions 66 - User Mode 49 - Preset 48 Manual Picture Adjustment - CONTENTS WARNING / CAUTION 1 SAFETY INSTRUCTIONS 2 FEATURE OF THIS TV 6 PREPARATION Accessories 7 Front Panel Information 8 Back Panel Information 9 Attaching the TV to a Wall 10 Back Cover for Wire Arrangement 11 Desktop Pedestal Installation 12 VESA Wall Mounting 12 Antenna or Cable Connection 13 EXTERNAL EQUIPMENT SETUP HD Receiver Setup...
...-Screen Menus Language Selection 64 Caption Mode 65 - Auto Scan (Auto Tuning 32 - Black (Darkness) Level 53 Advanced - Analog Broadcasting System Captions 66 - User Mode 49 - Preset 48 Manual Picture Adjustment - CONTENTS WARNING / CAUTION 1 SAFETY INSTRUCTIONS 2 FEATURE OF THIS TV 6 PREPARATION Accessories 7 Front Panel Information 8 Back Panel Information 9 Attaching the TV to a Wall 10 Back Cover for Wire Arrangement 11 Desktop Pedestal Installation 12 VESA Wall Mounting 12 Antenna or Cable Connection 13 EXTERNAL EQUIPMENT SETUP HD Receiver Setup...
Owners Manual
Page 8
... nothing wrong with general household waste. With HDMI CEC support of LG's audio/video device connected to the regulations of time. It has three HDMI ports that connect audio and video devices with one cable and produces the highest quality digital images and sound. A subset of Dolby Laboratories. This is normal, there is turned on the monitor's performance. I Avoid touching the LCD screen or holding your local authority. 6 Do...
... nothing wrong with general household waste. With HDMI CEC support of LG's audio/video device connected to the regulations of time. It has three HDMI ports that connect audio and video devices with one cable and produces the highest quality digital images and sound. A subset of Dolby Laboratories. This is normal, there is turned on the monitor's performance. I Avoid touching the LCD screen or holding your local authority. 6 Do...

Owners Manual
Page 11
...8 DIGITAL AUDIO OUT Connect digital audio to various types of equipment. Note: In standby mode, these ports do not work. 9 ANTENNA/CABLE IN Connect over-the air signals to this jack. 10 Power Cord Socket For operation with a DVI to HDMI cable. 2 COMPONENT IN Connect a component video/audio device to these jacks. USB IN PREPARATION USB Input port S-VIDEO VIDEO L/MONO AUDIO R 6 AV IN 2 10 1 3 ANTENNA/ 9 CABLE IN RGB /DVI RGB ANTENNA/ CABLE IN 5 /DVI 4 8 7 6 2 1 HDMI/DVI IN Connect a HDMI signal to operate the TV on a PC. 5 REMOTE CONTROL PORT Connect your TV. Connect cable...
...8 DIGITAL AUDIO OUT Connect digital audio to various types of equipment. Note: In standby mode, these ports do not work. 9 ANTENNA/CABLE IN Connect over-the air signals to this jack. 10 Power Cord Socket For operation with a DVI to HDMI cable. 2 COMPONENT IN Connect a component video/audio device to these jacks. USB IN PREPARATION USB Input port S-VIDEO VIDEO L/MONO AUDIO R 6 AV IN 2 10 1 3 ANTENNA/ 9 CABLE IN RGB /DVI RGB ANTENNA/ CABLE IN 5 /DVI 4 8 7 6 2 1 HDMI/DVI IN Connect a HDMI signal to operate the TV on a PC. 5 REMOTE CONTROL PORT Connect your TV. Connect cable...
Owners Manual
Page 16
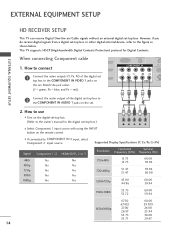
... set. 1 2 2. EXTERNAL EQUIPMENT SETUP EXTERNAL EQUIPMENT SETUP HD RECEIVER SETUP This TV can receive Digital Over-the-air/Cable signals without an external digital set -top box or other digital external device, refer to the figure as shown below. Match the jack colors (Y = green, PB = blue, and PR = red). 1 VIDEO AUDIO S-VIDE ( 2 Connect the audio output of the digital set -top box to COMPONENT IN 2 input, select Component 2 input source. How to connect COMPONENT IN 2 RS-23 (CONTROL 1 Connect the video outputs (Y, PB, PR) of the digital set top box to the owner's manual...
... set. 1 2 2. EXTERNAL EQUIPMENT SETUP EXTERNAL EQUIPMENT SETUP HD RECEIVER SETUP This TV can receive Digital Over-the-air/Cable signals without an external digital set -top box or other digital external device, refer to the figure as shown below. Match the jack colors (Y = green, PB = blue, and PR = red). 1 VIDEO AUDIO S-VIDE ( 2 Connect the audio output of the digital set -top box to COMPONENT IN 2 input, select Component 2 input source. How to connect COMPONENT IN 2 RS-23 (CONTROL 1 Connect the video outputs (Y, PB, PR) of the digital set top box to the owner's manual...
Owners Manual
Page 17
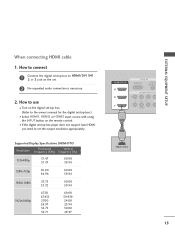
....94 30.00 29.97 HDMI/DVI IN 3 2 RGB IN RGB(PC) AUDIO (RGB/DV COMPONENT IN 2 1 1 VIDEO 1 HDMI-DTV OUTPUT 15 EXTERNAL EQUIPMENT SETUP How to connect 1 Connect the digital set-top box to set . 2 No separated audio connection is necessary. 2. When connecting HDMI cable 1. How to use I Turn on the digital se(t-to) p box. (Refer to the owner's manual for the digital set-top box.) I If the digital set-top box player does not support Auto HDMI, you need to HDMI/DVI IN1, 2 or 3 jack...
....94 30.00 29.97 HDMI/DVI IN 3 2 RGB IN RGB(PC) AUDIO (RGB/DV COMPONENT IN 2 1 1 VIDEO 1 HDMI-DTV OUTPUT 15 EXTERNAL EQUIPMENT SETUP How to connect 1 Connect the digital set-top box to set . 2 No separated audio connection is necessary. 2. When connecting HDMI cable 1. How to use I Turn on the digital se(t-to) p box. (Refer to the owner's manual for the digital set-top box.) I If the digital set-top box player does not support Auto HDMI, you need to HDMI/DVI IN1, 2 or 3 jack...
Owners Manual
Page 18
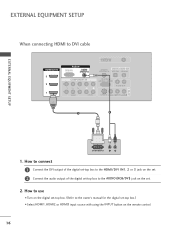
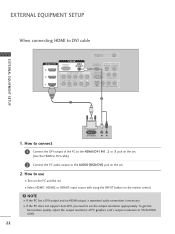
How to use I Turn on the digital set-top box. (Refer to the owner's manual for the digital set-top box.) I Select HDMI1, HDMI2 or HDMI3 input source with using the INPUT button on the set -top box to DVI cable HDMI/DVI IN 3 2 RGB IN RGB(PC) AUDIO (RGB/DVI) COMPONENT IN 2 1 1 VIDEO AUDIO ANTENNA/ CABLE IN REMOTE DIGITAL AUDIO OUT CONTROL IN OPTICAL COAXIAL RS-232C IN (CONTROL & SERVICE) AUDIO OUT S-VIDEO VIDEO (MONO) AUDIO 1 2 AV IN 1 DVI-DTV OUTPUT L R 1. EXTERNAL EQUIPMENT SETUP EXTERNAL EQUIPMENT SETUP When connecting HDMI to the AUDIO (RGB...
How to use I Turn on the digital set-top box. (Refer to the owner's manual for the digital set-top box.) I Select HDMI1, HDMI2 or HDMI3 input source with using the INPUT button on the set -top box to DVI cable HDMI/DVI IN 3 2 RGB IN RGB(PC) AUDIO (RGB/DVI) COMPONENT IN 2 1 1 VIDEO AUDIO ANTENNA/ CABLE IN REMOTE DIGITAL AUDIO OUT CONTROL IN OPTICAL COAXIAL RS-232C IN (CONTROL & SERVICE) AUDIO OUT S-VIDEO VIDEO (MONO) AUDIO 1 2 AV IN 1 DVI-DTV OUTPUT L R 1. EXTERNAL EQUIPMENT SETUP EXTERNAL EQUIPMENT SETUP When connecting HDMI to the AUDIO (RGB...

Owners Manual
Page 19
... jack colors (Y = green, PB = blue, and PR = red). How to connect 1 Connect the video outputs (Y, PB, PR) of the DVD to use I Refer to the DVD player's manual for operating instructions. 1 2 Y PB PR L R Component Input ports To get better picture quality, connect a DVD player to COMPONENT IN 2 input, select Component 2 input source. Component ports on the TV Y PB PR Video output ports on the set . 1 VIDEO AUDIO S-VI ( ) 2. I Turn on the DVD player, insert a DVD. I If connected to the component input ports as shown below. I Select Component 1 input source...
... jack colors (Y = green, PB = blue, and PR = red). How to connect 1 Connect the video outputs (Y, PB, PR) of the DVD to use I Refer to the DVD player's manual for operating instructions. 1 2 Y PB PR L R Component Input ports To get better picture quality, connect a DVD player to COMPONENT IN 2 input, select Component 2 input source. Component ports on the TV Y PB PR Video output ports on the set . 1 VIDEO AUDIO S-VI ( ) 2. I Turn on the DVD player, insert a DVD. I If connected to the component input ports as shown below. I Select Component 1 input source...
Owners Manual
Page 20
...the set the output resolution appropriately. 18 HDMI/DVI IN 3 2 RGB IN RGB(PC) AUD (RGB/ COMPONENT 2 1 1 VIDEO 1 HDMI-DVD OUTPUT How to the AUDIO input jacks on the set . 2 No separated audio( c)onnection is necessary. 2. I If the DVD does not support Auto HDMI, you need to the DVD player's manual for operating instructions. I Refer to set . 2. EXTERNAL EQUIPMENT SETUP EXTERNAL EQUIPMENT SETUP When connecting with using the INPUT button on the DVD player, insert a DVD. S-VIDEO AUDIO L R ANTENNA/ CABLE IN 1 2 REMOTE DIGITAL AUDIO OUT CONTROL IN OPTICAL COAXIAL...
...the set the output resolution appropriately. 18 HDMI/DVI IN 3 2 RGB IN RGB(PC) AUD (RGB/ COMPONENT 2 1 1 VIDEO 1 HDMI-DVD OUTPUT How to the AUDIO input jacks on the set . 2 No separated audio( c)onnection is necessary. 2. I If the DVD does not support Auto HDMI, you need to the DVD player's manual for operating instructions. I Refer to set . 2. EXTERNAL EQUIPMENT SETUP EXTERNAL EQUIPMENT SETUP When connecting with using the INPUT button on the DVD player, insert a DVD. S-VIDEO AUDIO L R ANTENNA/ CABLE IN 1 2 REMOTE DIGITAL AUDIO OUT CONTROL IN OPTICAL COAXIAL...
Owners Manual
Page 22
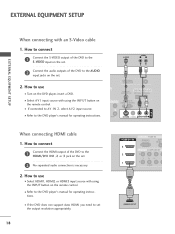
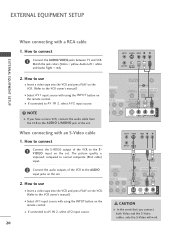
... OUTPUT SWITCH N AUDIO (RGB/DVI) ONENT IN ANTENNA/ CABLE IN 1 REMOTE DIGITAL A2UDIO OUT CONTROL IN OPTICAL COAXIAL RS-232C IN (CONTROL & SERVICE) ( ) AUDIO OUT I Insert a video tape into the VCR and press PLAY on the VCR. (Refer to the VCR owner's manual.) AUDIO S-VIDEO VIDEO (MONO) AUDIO I Select AV1 input source with using the INPUT button on the remote control. AUDIO GB/DVI) NT IN ANTENNA/ CABLE IN 1 REMOTE CONTROL IN DIGITAL AUDIO OUT OPTICAL COAXIAL ( ) RS-232C IN (CONTROL & SERVICE) AUDIO OUT AUDIO S-VIDEO VIDEO (MONO) AUDIO When connecting with a RCA cable...
... OUTPUT SWITCH N AUDIO (RGB/DVI) ONENT IN ANTENNA/ CABLE IN 1 REMOTE DIGITAL A2UDIO OUT CONTROL IN OPTICAL COAXIAL RS-232C IN (CONTROL & SERVICE) ( ) AUDIO OUT I Insert a video tape into the VCR and press PLAY on the VCR. (Refer to the VCR owner's manual.) AUDIO S-VIDEO VIDEO (MONO) AUDIO I Select AV1 input source with using the INPUT button on the remote control. AUDIO GB/DVI) NT IN ANTENNA/ CABLE IN 1 REMOTE CONTROL IN DIGITAL AUDIO OUT OPTICAL COAXIAL ( ) RS-232C IN (CONTROL & SERVICE) AUDIO OUT AUDIO S-VIDEO VIDEO (MONO) AUDIO When connecting with a RCA cable...
Owners Manual
Page 23
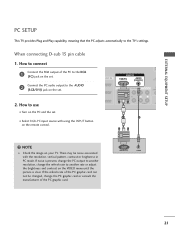
... can not be noise associated with using the INPUT button on the remote control. 1 VIDEO AUDIO S- 1 2 ( ) NOTE G Check the image on the PC and the set . How to the TV's settings. PC SETUP This TV provides Plug and Play capability, meaning that the PC adjusts automatically to use I Select RGB-PC input source with the resolution, vertical pattern, contrast or brightness in PC mode. When connecting D-sub 15 pin cable EXTERNAL EQUIPMENT SETUP 1.
... can not be noise associated with using the INPUT button on the remote control. 1 VIDEO AUDIO S- 1 2 ( ) NOTE G Check the image on the PC and the set . How to the TV's settings. PC SETUP This TV provides Plug and Play capability, meaning that the PC adjusts automatically to use I Select RGB-PC input source with the resolution, vertical pattern, contrast or brightness in PC mode. When connecting D-sub 15 pin cable EXTERNAL EQUIPMENT SETUP 1.
Owners Manual
Page 24
... IN RGB(PC) AUDIO (RGB/DVI) COMPONENT IN 2 1 1 VIDEO AUDIO ANTENNA/ CABLE IN REMOTE DIGITAL AUDIO OUT CONTROL IN OPTICAL COAXIAL RS-232C IN (CONTROL & SERVICE) AUDIO OUT S-VIDEO VIDEO (MONO) AUDIO 2 1 AV IN 1 EXTERNAL EQUIPMENT SETUP DVI-PC OUTPUT L R 1. EXTERNAL EQUIPMENT SETUP When connecting HDMI to use I Turn on the PC and the set I Select HDMI1, HDMI2 or HDMI3 input source with using the INPUT button on the set the output resolution appropriately. NOTE G If the PC has a DVI output and no HDMI output, a separated audio connection is necessary.
... IN RGB(PC) AUDIO (RGB/DVI) COMPONENT IN 2 1 1 VIDEO AUDIO ANTENNA/ CABLE IN REMOTE DIGITAL AUDIO OUT CONTROL IN OPTICAL COAXIAL RS-232C IN (CONTROL & SERVICE) AUDIO OUT S-VIDEO VIDEO (MONO) AUDIO 2 1 AV IN 1 EXTERNAL EQUIPMENT SETUP DVI-PC OUTPUT L R 1. EXTERNAL EQUIPMENT SETUP When connecting HDMI to use I Turn on the PC and the set I Select HDMI1, HDMI2 or HDMI3 input source with using the INPUT button on the set the output resolution appropriately. NOTE G If the PC has a DVI output and no HDMI output, a separated audio connection is necessary.

Owners Manual
Page 28
How to use I Operate the corresponding external equipment. 1 VIDEO L R Camcorder Video Game Set USB IN SETUP The TV has a special signal output capability which allows you use AV IN 2 I If connected to AV IN 1 input, select AV1 input source. I Select AV2 input source with using the INPUT button on the side of TV. 2. EXTERNAL EQUIPMENT SETUP EXTERNAL EQUIPMENT SETUP OTHER A/V SOURCE SETUP 1. How to the USB IN jacks on the remote control. How to connect 1 Connect the USB device to use the MEDIAHOST function. (G p.39...
How to use I Operate the corresponding external equipment. 1 VIDEO L R Camcorder Video Game Set USB IN SETUP The TV has a special signal output capability which allows you use AV IN 2 I If connected to AV IN 1 input, select AV1 input source. I Select AV2 input source with using the INPUT button on the side of TV. 2. EXTERNAL EQUIPMENT SETUP EXTERNAL EQUIPMENT SETUP OTHER A/V SOURCE SETUP 1. How to the USB IN jacks on the remote control. How to connect 1 Connect the USB device to use the MEDIAHOST function. (G p.39...
Owners Manual
Page 29
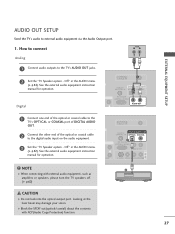
... instruction manual for operation. How to connect AUDIO L R Analog 1 Connect audio outputs to the digital audio input on the audio equipment. 3 Set the "TV Speaker option - Digital 1 Connect one end of the optical or coaxial cable to the TV's OPTICAL or COAXIAL port of DIGITAL AUDIO OUT. 2 Connect the other end of the optical or coaxial cable to the TV's AUDIO OUT jacks. 2 Set the "TV Speaker option - ANTENNA/ CABLE IN ( ) 1 REMOTE DIGITAL AUDIO OUT CONTROL IN OPTICAL COAXIAL RS-232C IN (CONTROL & SERVICE) AUDIO OUT ( ) ANTENNA/ CABLE IN REMOTE DIGITAL AUDIO...
... instruction manual for operation. How to connect AUDIO L R Analog 1 Connect audio outputs to the digital audio input on the audio equipment. 3 Set the "TV Speaker option - Digital 1 Connect one end of the optical or coaxial cable to the TV's OPTICAL or COAXIAL port of DIGITAL AUDIO OUT. 2 Connect the other end of the optical or coaxial cable to the TV's AUDIO OUT jacks. 2 Set the "TV Speaker option - ANTENNA/ CABLE IN ( ) 1 REMOTE DIGITAL AUDIO OUT CONTROL IN OPTICAL COAXIAL RS-232C IN (CONTROL & SERVICE) AUDIO OUT ( ) ANTENNA/ CABLE IN REMOTE DIGITAL AUDIO...
Owners Manual
Page 30
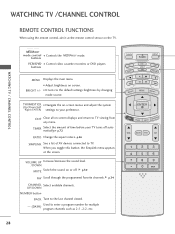
.... TV INPUT STB MEDIA HOST BRIGHT - buttons MENU Displays the main menu. WATCHING TV /CHANNEL CONTROL WATCHING TV / CHANNEL CONTROL REMOTE CONTROL FUNCTIONS When using the remote control, aim it at the screen. I It turns to your TV turns off . THUMBSTICK I Control video cassette recorders or DVD players. VOLUME UP Increase/decrease the sound level. /DOWN MUTE Switch the sound on -screen menus and adjust the system (Up/Down/Left Right/ENTER) settings to the default settings brightness by changing mode source. TIMER Select the...
.... TV INPUT STB MEDIA HOST BRIGHT - buttons MENU Displays the main menu. WATCHING TV /CHANNEL CONTROL WATCHING TV / CHANNEL CONTROL REMOTE CONTROL FUNCTIONS When using the remote control, aim it at the screen. I It turns to your TV turns off . THUMBSTICK I Control video cassette recorders or DVD players. VOLUME UP Increase/decrease the sound level. /DOWN MUTE Switch the sound on -screen menus and adjust the system (Up/Down/Left Right/ENTER) settings to the default settings brightness by changing mode source. TIMER Select the...
Owners Manual
Page 31
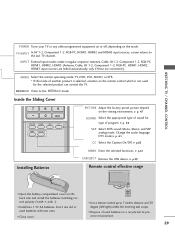
... used batteries with -). STB MEDIA HOST WATCHING TV / CHANNEL CONTROL POWER Turns your TV or any other programmed equipment on or off, depending on the viewing environment. INPUT External input modes rotate in a recycle bin to 7BACK meters BACK distance and 30 PICTURE SOUND SAP CC MARK USB EJECT degree (left/right) within the receiving unit scope. Don't mix old or used batteries in regular sequence: Antenna, Cable, AV1-2, Component...
... used batteries with -). STB MEDIA HOST WATCHING TV / CHANNEL CONTROL POWER Turns your TV or any other programmed equipment on or off, depending on the viewing environment. INPUT External input modes rotate in a recycle bin to 7BACK meters BACK distance and 30 PICTURE SOUND SAP CC MARK USB EJECT degree (left/right) within the receiving unit scope. Don't mix old or used batteries in regular sequence: Antenna, Cable, AV1-2, Component...

Owners Manual
Page 38
... MARK USB EJECT Language Input label SimpLink Key Lock Caption Set ID G Off On NOTE G When operating the external device with the INPUT button on the remote control, you can stop the operation of the simpLink device with the HDMI cable. G When you select or operate the media device with the logo. G When you to control and play other AV devices connected to the display through HDMI cable without addi- WATCHING TV /CHANNEL CONTROL...
... MARK USB EJECT Language Input label SimpLink Key Lock Caption Set ID G Off On NOTE G When operating the external device with the INPUT button on the remote control, you can stop the operation of the simpLink device with the HDMI cable. G When you select or operate the media device with the logo. G When you to control and play other AV devices connected to the display through HDMI cable without addi- WATCHING TV /CHANNEL CONTROL...
Owners Manual
Page 52
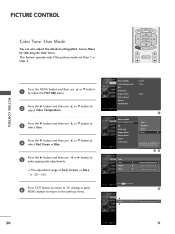
... viewing or press MENU button to return to the detailed setting screen. TV INPUT STB MEDIA HOST BRIGHT - PICTURE CONTROL TV INPUT PICTURE CONTROL STB MEDIA HOST TV INPUT STB MEDIA HOST Color Tone -User Mode You can also adjust the detailed settings(Red, Green, Blue) by selecting the User menu. E Red 0 E 50 Picture Mode BACK : User1 Color Temperature : Cool PICTURE SOUND CC XD MARK USB EJECT Advanced Aspect Ratio : 16:9 Picture Reset Screen TruM Demo Picture Mode Color Temperature XD Advanced Aspect Ratio Picture Reset Screen TruM Demo Cool Medium Warm User...
... viewing or press MENU button to return to the detailed setting screen. TV INPUT STB MEDIA HOST BRIGHT - PICTURE CONTROL TV INPUT PICTURE CONTROL STB MEDIA HOST TV INPUT STB MEDIA HOST Color Tone -User Mode You can also adjust the detailed settings(Red, Green, Blue) by selecting the User menu. E Red 0 E 50 Picture Mode BACK : User1 Color Temperature : Cool PICTURE SOUND CC XD MARK USB EJECT Advanced Aspect Ratio : 16:9 Picture Reset Screen TruM Demo Picture Mode Color Temperature XD Advanced Aspect Ratio Picture Reset Screen TruM Demo Cool Medium Warm User...
Owners Manual
Page 76
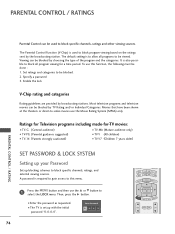
... the G button. The default setting is used to select the LOCK menu. I The TV is required to gain access to this function, the following must be blocked by choosing the type of the program and the categories. Set ratings and categories to be blocked. 2. Most television programs and television movies can be used to block specific channels, ratings, and external viewing sources. Specify a password 3. I Enter the password as requested. PARENTAL CONTROL / RATINGS Parental Control can...
... the G button. The default setting is used to select the LOCK menu. I The TV is required to gain access to this function, the following must be blocked by choosing the type of the program and the categories. Set ratings and categories to be blocked. 2. Most television programs and television movies can be used to block specific channels, ratings, and external viewing sources. Specify a password 3. I Enter the password as requested. PARENTAL CONTROL / RATINGS Parental Control can...
Owners Manual
Page 87
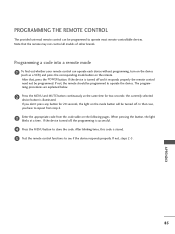
... it responds properly the remote control need not be turned off , the programming is successful. 4 Press the MENU button to store the code. If you have to operate most remote-controllable devices. When pressing the button, the light blinks at the same time for 20 seconds, the light on the mode button will be programmed. If not, steps 2-5. In that , press the POWER button. After blinking twice, this code is illuminated. After that...
... it responds properly the remote control need not be turned off , the programming is successful. 4 Press the MENU button to store the code. If you have to operate most remote-controllable devices. When pressing the button, the light blinks at the same time for 20 seconds, the light on the mode button will be programmed. If not, steps 2-5. In that , press the POWER button. After blinking twice, this code is illuminated. After that...


