Owners Manual
Page 3
...digital device This equipment has been tested and found to correct the interference by turning the equipment off and on a circuit different from LG Electronics. WARNING / CAUTION TO REDUCE THE RISK OF ELECTRIC SHOCK DO NOT REMOVE COVER (OR BACK). The exclamation point within the ... uninsulated "dangerous voltage" within an equilateral triangle is intended to alert the user to the point of important operating and maintenance (servicing) instructions in a particular installation. Consult the dealer or an experienced radio/TV technician for a Class B digital device, pursuant to Part 15 ...
...digital device This equipment has been tested and found to correct the interference by turning the equipment off and on a circuit different from LG Electronics. WARNING / CAUTION TO REDUCE THE RISK OF ELECTRIC SHOCK DO NOT REMOVE COVER (OR BACK). The exclamation point within the ... uninsulated "dangerous voltage" within an equilateral triangle is intended to alert the user to the point of important operating and maintenance (servicing) instructions in a particular installation. Consult the dealer or an experienced radio/TV technician for a Class B digital device, pursuant to Part 15 ...
Owners Manual
Page 4
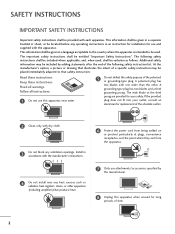
...immediately adjacent to be used , shall be verbatim as radiators, heat registers, stoves, or other . Follow all warnings. The important safety instructions shall be given in a language acceptable to the country where the apparatus is intended to that produce heat. 6 Protect the power cord ...grounding prong, The wide blade or the third prong are provided for your outlet, consult an electrician for use and supplied with the manufacturer's instructions. 4 Do not install near water. 5 Do not defeat the safety purpose of time. 2 If the provided plug does not fit into...
...immediately adjacent to be used , shall be verbatim as radiators, heat registers, stoves, or other . Follow all warnings. The important safety instructions shall be given in a language acceptable to the country where the apparatus is intended to that produce heat. 6 Protect the power cord ...grounding prong, The wide blade or the third prong are provided for your outlet, consult an electrician for use and supplied with the manufacturer's instructions. 4 Do not install near water. 5 Do not defeat the safety purpose of time. 2 If the provided plug does not fit into...
Owners Manual
Page 6
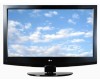
... Auto Volume Leveler (Auto Volume 57 Preset Sound Setting (Sound Mode 58 Sound Setting Adjustment - User Mode 49 - Caption Option 68 4 CONTENTS WARNING / CAUTION 1 SAFETY INSTRUCTIONS 2 FEATURE OF THIS TV 6 PREPARATION Accessories 7 Front Panel Information 8 Back Panel Information 9 Attaching the TV to a Wall 10 Back Cover for Wire Arrangement 11 Desktop...
... Auto Volume Leveler (Auto Volume 57 Preset Sound Setting (Sound Mode 58 Sound Setting Adjustment - User Mode 49 - Caption Option 68 4 CONTENTS WARNING / CAUTION 1 SAFETY INSTRUCTIONS 2 FEATURE OF THIS TV 6 PREPARATION Accessories 7 Front Panel Information 8 Back Panel Information 9 Attaching the TV to a Wall 10 Back Cover for Wire Arrangement 11 Desktop...
Owners Manual
Page 14
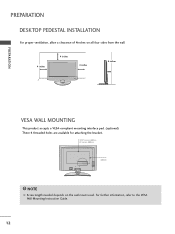
PREPARATION DESKTOP PEDESTAL INSTALLATION For proper ventilation, allow a clearance of 4inches on all four sides from the wall. 4 inches 4 inches 4 inches 4 inches PREPARATION VESA WALL MOUNTING This product accepts a VESA-compliant mounting interface pad. (optional) There 4 threaded holes are available for attaching the bracket. 42/47 inches: 600mm 52 inches: 800mm 400mm NOTE ANTENNA/ G Screw length needed depends on the wall mount used. For furCtAhBLeErINinformation, refer to the VESA Wall Mounting Instruction Guide. RGB /DVI 12
PREPARATION DESKTOP PEDESTAL INSTALLATION For proper ventilation, allow a clearance of 4inches on all four sides from the wall. 4 inches 4 inches 4 inches 4 inches PREPARATION VESA WALL MOUNTING This product accepts a VESA-compliant mounting interface pad. (optional) There 4 threaded holes are available for attaching the bracket. 42/47 inches: 600mm 52 inches: 800mm 400mm NOTE ANTENNA/ G Screw length needed depends on the wall mount used. For furCtAhBLeErINinformation, refer to the VESA Wall Mounting Instruction Guide. RGB /DVI 12

Owners Manual
Page 19
... EXTERNAL EQUIPMENT SETUP When connecting Component cable 1. Match the jack colors (Y = green, PB = blue, and PR = red). I Refer to the DVD player's manual for operating instructions. 1 2 Y PB PR L R Component Input ports To get better picture quality, connect a DVD player to COMPONENT IN 2 input, select Component 2 input source. How to connect 1 Connect...
... EXTERNAL EQUIPMENT SETUP When connecting Component cable 1. Match the jack colors (Y = green, PB = blue, and PR = red). I Refer to the DVD player's manual for operating instructions. 1 2 Y PB PR L R Component Input ports To get better picture quality, connect a DVD player to COMPONENT IN 2 input, select Component 2 input source. How to connect 1 Connect...
Owners Manual
Page 20
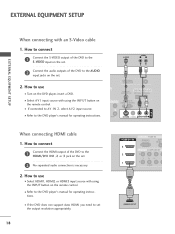
... with using the INPUT button on the DVD player, insert a DVD. How to use I If connected to the DVD player's manual for operating instructions. EXTERNAL EQUIPMENT SETUP EXTERNAL EQUIPMENT SETUP When connecting with an S-Video cable 1. How to use I Refer to AV IN 2, select A V 2 input source...AUDIO input jacks on the remote control. How to connect 1 Connect the HDMI output of the DVD to the DVD player's manual for operating instructions. S-VIDEO AUDIO L R ANTENNA/ CABLE IN 1 2 REMOTE DIGITAL AUDIO OUT CONTROL IN OPTICAL COAXIAL RS-232C IN (CONTROL & SERVICE) AUDIO...
... with using the INPUT button on the DVD player, insert a DVD. How to use I If connected to the DVD player's manual for operating instructions. EXTERNAL EQUIPMENT SETUP EXTERNAL EQUIPMENT SETUP When connecting with an S-Video cable 1. How to use I Refer to AV IN 2, select A V 2 input source...AUDIO input jacks on the remote control. How to connect 1 Connect the HDMI output of the DVD to the DVD player's manual for operating instructions. S-VIDEO AUDIO L R ANTENNA/ CABLE IN 1 2 REMOTE DIGITAL AUDIO OUT CONTROL IN OPTICAL COAXIAL RS-232C IN (CONTROL & SERVICE) AUDIO...
Owners Manual
Page 29
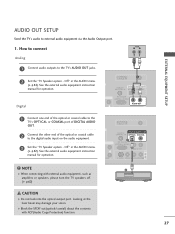
.... (G p.62) AV IN 1 CAUTION G Do not look into the optical output port. See the external audio equipment instruction manual for operation. Looking at the laser beam may damage your vision. See the external audio equipment instruction manual for operation. Off" in the AUDIO menu. (G p.62). ANTENNA/ CABLE IN ( ) 1 REMOTE DIGITAL AUDIO OUT...
.... (G p.62) AV IN 1 CAUTION G Do not look into the optical output port. See the external audio equipment instruction manual for operation. Looking at the laser beam may damage your vision. See the external audio equipment instruction manual for operation. Off" in the AUDIO menu. (G p.62). ANTENNA/ CABLE IN ( ) 1 REMOTE DIGITAL AUDIO OUT...


