User Manual
Page 1
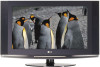
Record model number and serial number of the set . See the label attached on the back cover and quote this manual carefully before operating your dealer when you require service. Retain it for future reference. P/NO : 3828TUL309G (0606-REV04) Printed in Korea LCD TV OWNER'S MANUAL MODELS: 32LX3DC 32LX3DCS 32LX4DC 32LX4DCS Internet Home Page : http://www.lgcommercial.com Please read this information to your set .
Record model number and serial number of the set . See the label attached on the back cover and quote this manual carefully before operating your dealer when you require service. Retain it for future reference. P/NO : 3828TUL309G (0606-REV04) Printed in Korea LCD TV OWNER'S MANUAL MODELS: 32LX3DC 32LX3DCS 32LX4DC 32LX4DCS Internet Home Page : http://www.lgcommercial.com Please read this information to your set .
User Manual
Page 2
...with arrowhead symbol, within an equilateral triangle is provided to call the CATV system installer's attention to persons. NOTE TO CABLE/TV INSTALLER: This reminder is intended to alert the user to modify this product's compliance is no guarantee that to provide reasonable ...by turning the equipment off and on a circuit different from that interference will not occur in any way without written authorization from LG Electronics Corporation. Increase the separation between the equipment and receiver. - Unauthorized modification could void the user's authority to correct the ...
...with arrowhead symbol, within an equilateral triangle is provided to call the CATV system installer's attention to persons. NOTE TO CABLE/TV INSTALLER: This reminder is intended to alert the user to modify this product's compliance is no guarantee that to provide reasonable ...by turning the equipment off and on a circuit different from that interference will not occur in any way without written authorization from LG Electronics Corporation. Increase the separation between the equipment and receiver. - Unauthorized modification could void the user's authority to correct the ...
User Manual
Page 4
Servicing is turned on the screen. If the TV feels cold to be certain. However, they be a small "flicker" when when it is required when the apparatus has been damaged in any way, such ... on . CAUTION concerning the Power Cord Most appliances recommend they have the cord replaced with an exact replacement part by the manufacturer, or sold with TV. - Do not overload wall outlets. Periodically examine the cord of your finger(s) against it , discontinue use caution when moving the cart / apparatus combination to plugs...
Servicing is turned on the screen. If the TV feels cold to be certain. However, they be a small "flicker" when when it is required when the apparatus has been damaged in any way, such ... on . CAUTION concerning the Power Cord Most appliances recommend they have the cord replaced with an exact replacement part by the manufacturer, or sold with TV. - Do not overload wall outlets. Periodically examine the cord of your finger(s) against it , discontinue use caution when moving the cart / apparatus combination to plugs...
User Manual
Page 5
...20~21 Various Installation How to use back cover Swivel Stand Antenna Connection External AV Source Setup Digital Audio Output VCR Setup Cable TV Setup DVD Setup HDSTB Setup PC Setup Installation Operation Screen Setup 22 for PC mode 22 23 23 Basic operation 23 23 24...33 Audio Menu 34 Options 34 35 Adjustments for screen Position, Clock, and Phase Initializing (Reset to original factory values) Turning on the TV Volume Adjustment Channel Selection On-screen Menus Language Selection Screen Menus Selection and Adjustment EZ Scan (Channel Search) Channel Edit DTV Signal Strength ...
...20~21 Various Installation How to use back cover Swivel Stand Antenna Connection External AV Source Setup Digital Audio Output VCR Setup Cable TV Setup DVD Setup HDSTB Setup PC Setup Installation Operation Screen Setup 22 for PC mode 22 23 23 Basic operation 23 23 24...33 Audio Menu 34 Options 34 35 Adjustments for screen Position, Clock, and Phase Initializing (Reset to original factory values) Turning on the TV Volume Adjustment Channel Selection On-screen Menus Language Selection Screen Menus Selection and Adjustment EZ Scan (Channel Search) Channel Edit DTV Signal Strength ...
User Manual
Page 6
... Caption Mode Cinema Mode Setup Demo (Review) Split Zoom Parental Lock Setup Watching PIP/Double Window Selecting an Input Signal Source for PIP/Double Window TV Program Selection for PIP Moving the PIP sub picture Swapping PIP/Double Window Reference 48~53 54 55~56 57~58 59 59 External Control...
... Caption Mode Cinema Mode Setup Demo (Review) Split Zoom Parental Lock Setup Watching PIP/Double Window Selecting an Input Signal Source for PIP/Double Window TV Program Selection for PIP Moving the PIP sub picture Swapping PIP/Double Window Reference 48~53 54 55~56 57~58 59 59 External Control...
User Manual
Page 7
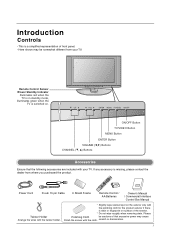
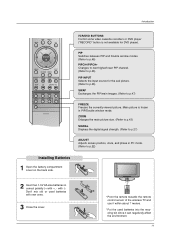
...the twister holder. * Slightly wipe stained spot on surface of front panel. - Introduction Controls - CH VOL ENTER MENU TV/VIDEO ON/OFF ON/OFF Button TV/VIDEO Button MENU Button ENTER Button VOLUME (F,G) Buttons CHANNEL (E, D) Buttons Accessories Ensure that excessive power may be somewhat ... 6 Shield Foams Remote Control / AA Batteries Owner's Manual / Commercial Interface Control Box Manual Twister Holder Arrange the wires with your TV. This is stain or fingerprint on the exterior only with the cloth. Here shown may cause Polish the screen with the polishing cloth...
...the twister holder. * Slightly wipe stained spot on surface of front panel. - Introduction Controls - CH VOL ENTER MENU TV/VIDEO ON/OFF ON/OFF Button TV/VIDEO Button MENU Button ENTER Button VOLUME (F,G) Buttons CHANNEL (E, D) Buttons Accessories Ensure that excessive power may be somewhat ... 6 Shield Foams Remote Control / AA Batteries Owner's Manual / Commercial Interface Control Box Manual Twister Holder Arrange the wires with your TV. This is stain or fingerprint on the exterior only with the cloth. Here shown may cause Polish the screen with the polishing cloth...
User Manual
Page 8
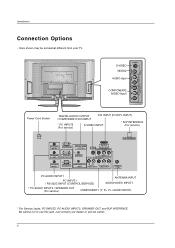
... / AUDIO INPUT) * For Service Jacks: PC INPUT2, PC AUDIO INPUT2, SPEAKER OUT, and RJP INTERFACE Be careful not to use this jack. Just contact your TV. Here shown may be somewhat different from your dealer or service center. 8
... / AUDIO INPUT) * For Service Jacks: PC INPUT2, PC AUDIO INPUT2, SPEAKER OUT, and RJP INTERFACE Be careful not to use this jack. Just contact your TV. Here shown may be somewhat different from your dealer or service center. 8

User Manual
Page 9
...) Used to enter a program number for the remote to the last channel viewed. 9 Remote Control Key Functions Introduction LIGHT MODE POWER TV/VIDEO COMP/RGB/DVI TIMER FLASHBK MUTE VOL SURF CH INFO SAP RATIO CC ENTER MENU SOUND VIDEO EXIT PLAY PAUSE STOP RECORD REW FF...external devices. PIPCH+ PIPINPUT FREEZE ZOOM SIGNAL SWAP ADJUST LIGHT Illuminates the remote control buttons. MODE Selects the remote operating mode: TV, VCR, DVD, CABLE, HDSTB or AUDIO. TV/VIDEO Selects: DTV Analog Video1-2 DVI-DTV / DVI-PC RGB2-DTV / RGB2-PC COMP/RGB/DVI Selects: Component 1-2 ...
...) Used to enter a program number for the remote to the last channel viewed. 9 Remote Control Key Functions Introduction LIGHT MODE POWER TV/VIDEO COMP/RGB/DVI TIMER FLASHBK MUTE VOL SURF CH INFO SAP RATIO CC ENTER MENU SOUND VIDEO EXIT PLAY PAUSE STOP RECORD REW FF...external devices. PIPCH+ PIPINPUT FREEZE ZOOM SIGNAL SWAP ADJUST LIGHT Illuminates the remote control buttons. MODE Selects the remote operating mode: TV, VCR, DVD, CABLE, HDSTB or AUDIO. TV/VIDEO Selects: DTV Analog Video1-2 DVI-DTV / DVI-PC RGB2-DTV / RGB2-PC COMP/RGB/DVI Selects: Component 1-2 ...

User Manual
Page 10
... room. (Refer to p.29) EXIT Clears all on -screen menus and adjust the system settings to the screen. SURF Use to TV viewing from any menu. Introduction LIGHT MODE POWER TV/VIDEO COMP/RGB/DVI TIMER FLASHBK MUTE VOL SURF CH INFO SAP RATIO CC ENTER MENU SOUND VIDEO EXIT PLAY PAUSE... caption mode: Off, CC1, CC2, CC3, CC4, Text1, Text2, Text3, or Text4. (Refer to p.41) THUMBSTICK (Up/Down/Left/Right/ENTER) Allows you watch the TV, displays information on or off.
... room. (Refer to p.29) EXIT Clears all on -screen menus and adjust the system settings to the screen. SURF Use to TV viewing from any menu. Introduction LIGHT MODE POWER TV/VIDEO COMP/RGB/DVI TIMER FLASHBK MUTE VOL SURF CH INFO SAP RATIO CC ENTER MENU SOUND VIDEO EXIT PLAY PAUSE... caption mode: Off, CC1, CC2, CC3, CC4, Text1, Text2, Text3, or Text4. (Refer to p.41) THUMBSTICK (Up/Down/Left/Right/ENTER) Allows you watch the TV, displays information on or off.
User Manual
Page 11
... about 7 meters. * Put the used batteries with new ones. 3 Close the cover. with +, - LIGHT MODE POWER TV/VIDEO COMP/RGB/DVI TIMER FLASHBK * Point the remote towards the remote control sensor of the wireless TV and use it can negatively affect the environment. 11 ZOOM Enlarges the main picture size. (Refer to...
... about 7 meters. * Put the used batteries with new ones. 3 Close the cover. with +, - LIGHT MODE POWER TV/VIDEO COMP/RGB/DVI TIMER FLASHBK * Point the remote towards the remote control sensor of the wireless TV and use it can negatively affect the environment. 11 ZOOM Enlarges the main picture size. (Refer to...
User Manual
Page 13
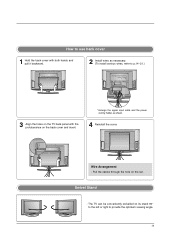
Wire Arrangement - How to use back cover 1 Hold the back cover with both hands and pull it backward. 2 Install wires as shown. 4 Reinstall the cover. Swivel Stand - The TV can be conveniently swivelled on its stand 90° to the left or right to p.14~21.) 3 Align the holes on the TV back panel with the protuberance on the set. Pull the cables through the hole on the back cover and insert. * Arrange the signal input cable and the power cord by holder, as necessary. (To install various wires, refer to provide the optimum viewing angle. 13
Wire Arrangement - How to use back cover 1 Hold the back cover with both hands and pull it backward. 2 Install wires as shown. 4 Reinstall the cover. Swivel Stand - The TV can be conveniently swivelled on its stand 90° to the left or right to p.14~21.) 3 Align the holes on the TV back panel with the protuberance on the set. Pull the cables through the hole on the back cover and insert. * Arrange the signal input cable and the power cord by holder, as necessary. (To install various wires, refer to provide the optimum viewing angle. 13
User Manual
Page 14
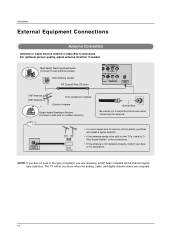
... • In a poor signal area to improve picture quality, purchase and install a signal amplifier. • If the antenna needs to be split for two TV's, install a "2Way Signal Splitter" in the connections. • If the antenna is not installed properly, contact your dealer for outdoor antenna) Bronze Wire Be ... wire when connecting the antenna. For optimum picture quality, adjust antenna direction if needed. Antenna or Cable Service without a Cable Box Connections. - The TV will let you are complete. 14 Outdoor Antenna Single-family Dwellings /Houses (Connect to tighten.
... • In a poor signal area to improve picture quality, purchase and install a signal amplifier. • If the antenna needs to be split for two TV's, install a "2Way Signal Splitter" in the connections. • If the antenna is not installed properly, contact your dealer for outdoor antenna) Bronze Wire Be ... wire when connecting the antenna. For optimum picture quality, adjust antenna direction if needed. Antenna or Cable Service without a Cable Box Connections. - The TV will let you are complete. 14 Outdoor Antenna Single-family Dwellings /Houses (Connect to tighten.
User Manual
Page 15
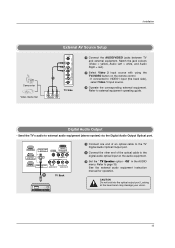
...audio equipment (stereo system) via the Digital Audio Output Optical port. Looking at the laser beam may damage your vision. 15 Send the TV's audio to page 35. See the external audio equipment instruction manual for operation. Refer to the digital audio optical input on the remote ...jack colours (Video = yellow, Audio Left = white, and Audio Right = red). 2 Select Video 2 input source with using the TV/VIDEO button on the audio equipment. 3 Set the " TV Speaker option - PC INPUT2 DIGITAL AUDIO (OPTICAL) DVI INPUT S-VIDEO (PC/DTV INPUT) R AUDIO L/MONO VIDEO RS-232C INPUT (CONTROL...
...audio equipment (stereo system) via the Digital Audio Output Optical port. Looking at the laser beam may damage your vision. 15 Send the TV's audio to page 35. See the external audio equipment instruction manual for operation. Refer to the digital audio optical input on the remote ...jack colours (Video = yellow, Audio Left = white, and Audio Right = red). 2 Select Video 2 input source with using the TV/VIDEO button on the audio equipment. 3 Set the " TV Speaker option - PC INPUT2 DIGITAL AUDIO (OPTICAL) DVI INPUT S-VIDEO (PC/DTV INPUT) R AUDIO L/MONO VIDEO RS-232C INPUT (CONTROL...
User Manual
Page 16
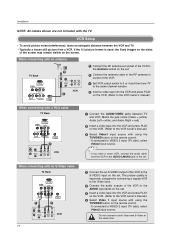
...(R) AUDIO (L) IN VIDEO VCR 1 Connect the an S-VIDEO output of the VCR to the S-VIDEO input on the screen. When connecting with a RCA cable TV Back DVI INPUT (PC/DTV INPUT) S-VIDEO R AUDIO L/MONO VIDEO VIDEO1 COMPONENT1 R L AUDIO INPUT VIDEO INPUT Antenna 1 ANT IN ANT OUT S-VIDEO OUT... quality is used; If connected to both Video and S-Video at the same time. Installation NOTE: All cables shown are not included with an antenna TV Back DVI INPUT (PC/DTV INPUT) S-VIDEO R AUDIO L/MONO VIDEO VIDEO1 COMPONENT1 R L AUDIO INPUT VIDEO INPUT Antenna 2 ANT IN ANT OUT S-...
...(R) AUDIO (L) IN VIDEO VCR 1 Connect the an S-VIDEO output of the VCR to the S-VIDEO input on the screen. When connecting with a RCA cable TV Back DVI INPUT (PC/DTV INPUT) S-VIDEO R AUDIO L/MONO VIDEO VIDEO1 COMPONENT1 R L AUDIO INPUT VIDEO INPUT Antenna 1 ANT IN ANT OUT S-VIDEO OUT... quality is used; If connected to both Video and S-Video at the same time. Installation NOTE: All cables shown are not included with an antenna TV Back DVI INPUT (PC/DTV INPUT) S-VIDEO R AUDIO L/MONO VIDEO VIDEO1 COMPONENT1 R L AUDIO INPUT VIDEO INPUT Antenna 2 ANT IN ANT OUT S-...
User Manual
Page 17
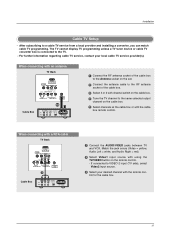
... Left = white, and Audio Right = red) 2 Select Video1 input source with the remote control for the cable box. 17 When connecting with an antenna TV Back DVI INPUT (PC/DTV INPUT) S-VIDEO R AUDIO L/MONO VIDEO VIDEO1 COMPONENT1 R L AUDIO INPUT VIDEO INPUT Antenna 1/2 Cable Box (R) AUDIO (L) VIDEO... Antenna socket on the set. 2 Connect the antenna cable to the RF antenna socket of the cable box. 3 Select 3 or 4 with a RCA cable TV Back DVI INPUT (PC/DTV INPUT) S-VIDEO R AUDIO L/MONO VIDEO VIDEO1 COMPONENT1 R L AUDIO INPUT VIDEO INPUT Antenna 1 Cable Box (R) AUDIO (L) VIDEO...
... Left = white, and Audio Right = red) 2 Select Video1 input source with the remote control for the cable box. 17 When connecting with an antenna TV Back DVI INPUT (PC/DTV INPUT) S-VIDEO R AUDIO L/MONO VIDEO VIDEO1 COMPONENT1 R L AUDIO INPUT VIDEO INPUT Antenna 1/2 Cable Box (R) AUDIO (L) VIDEO... Antenna socket on the set. 2 Connect the antenna cable to the RF antenna socket of the cable box. 3 Select 3 or 4 with a RCA cable TV Back DVI INPUT (PC/DTV INPUT) S-VIDEO R AUDIO L/MONO VIDEO VIDEO1 COMPONENT1 R L AUDIO INPUT VIDEO INPUT Antenna 1 Cable Box (R) AUDIO (L) VIDEO...
User Manual
Page 18
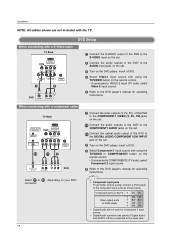
... not work for Component 2 input source. • Digital Audio operation has priority if Digital Audio and AUDIO L/R are not included with the TV DVD Setup When connecting with a S-Video cable TV Back DVI INPUT (PC/DTV INPUT) S-VIDEO R AUDIO L/MONO VIDEO VIDEO1 COMPONENT1 R L AUDIO INPUT VIDEO INPUT Antenna 1 2 DVD S-VIDEO (R) ...to the AUDIO input jacks on the set . 3 Turn on the DVD player, insert a DVD. 4 Select Component 1 input source with using the TV/VIDEO or COMP/RGB/DVI button on the remote control. - Installation NOTE: All cables shown are connected at the same time.
... not work for Component 2 input source. • Digital Audio operation has priority if Digital Audio and AUDIO L/R are not included with the TV DVD Setup When connecting with a S-Video cable TV Back DVI INPUT (PC/DTV INPUT) S-VIDEO R AUDIO L/MONO VIDEO VIDEO1 COMPONENT1 R L AUDIO INPUT VIDEO INPUT Antenna 1 2 DVD S-VIDEO (R) ...to the AUDIO input jacks on the set . 3 Turn on the DVD player, insert a DVD. 4 Select Component 1 input source with using the TV/VIDEO or COMP/RGB/DVI button on the remote control. - Installation NOTE: All cables shown are connected at the same time.
User Manual
Page 19
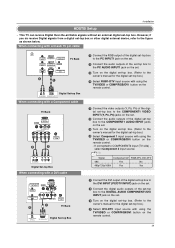
...cable DIGITAL AUDIO (OPTICAL) DVI INPUT (PC/DTV INPUT) S-VIDEO R AUDIO L/MONO VIDEO OUTPUT VIDEO1 COMPONENT1 COMPONENT1/DVI INPUT R L AUDIO INPUT VIDEO INPUT Antenna 2 1 TV Back DIGITAL AUDIO OPTICAL DVI-DTV OUTPUT Digital Set-top Box Signal Component1/2 RGB-DTV, DVI-DTV 480i Yes No 480p/720p/1080i Yes Yes... digital set-top box. (Refer to the owner's manual for the digital set -top box.) 4 Select DVI-DTV input source with using the TV/VIDEO or COMP/RGB/DVI button on the remote control. - When connecting with a D-sub 15 pin cable AC IN PC AUDIO INPUT2 PC INPUT2...
...cable DIGITAL AUDIO (OPTICAL) DVI INPUT (PC/DTV INPUT) S-VIDEO R AUDIO L/MONO VIDEO OUTPUT VIDEO1 COMPONENT1 COMPONENT1/DVI INPUT R L AUDIO INPUT VIDEO INPUT Antenna 2 1 TV Back DIGITAL AUDIO OPTICAL DVI-DTV OUTPUT Digital Set-top Box Signal Component1/2 RGB-DTV, DVI-DTV 480i Yes No 480p/720p/1080i Yes Yes... digital set-top box. (Refer to the owner's manual for the digital set -top box.) 4 Select DVI-DTV input source with using the TV/VIDEO or COMP/RGB/DVI button on the remote control. - When connecting with a D-sub 15 pin cable AC IN PC AUDIO INPUT2 PC INPUT2...
User Manual
Page 20
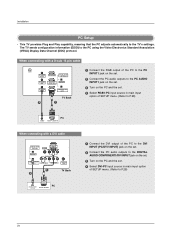
... IN PC AUDIO INPUT2 PC INPUT2 DIGITAL AUDIO (OPTICAL) SPEAKER OUT RS-232C INPUT (CONTROL/SERVICE) OUTPUT PC AUDIO INPUT1 PC INPUT1 COMPONENT1/DVI INPUT TV Back 2 1 1 Connect the RGB output of the PC to the PC INPUT1 jack on the set. 2 Connect the PC audio outputs to the... cable DIGITAL AUDIO (OPTICAL) DVI INPUT S-VIDEO (PC/DTV INPUT) R AUDIO L/MONO VIDEO OUTPUT VIDEO1 COMPONENT1 COMPONENT1/DVI R L INPUT AUDIO INPUT VIDEO INPUT Antenna 1 TV Back 2 DIGITAL AUDIO OPTICAL DVI-PC OUTPUT PC 1 Connect the DVI output of the PC to the DVI INPUT (PC/DTV INPUT) jack on the...
... IN PC AUDIO INPUT2 PC INPUT2 DIGITAL AUDIO (OPTICAL) SPEAKER OUT RS-232C INPUT (CONTROL/SERVICE) OUTPUT PC AUDIO INPUT1 PC INPUT1 COMPONENT1/DVI INPUT TV Back 2 1 1 Connect the RGB output of the PC to the PC INPUT1 jack on the set. 2 Connect the PC audio outputs to the... cable DIGITAL AUDIO (OPTICAL) DVI INPUT S-VIDEO (PC/DTV INPUT) R AUDIO L/MONO VIDEO OUTPUT VIDEO1 COMPONENT1 COMPONENT1/DVI R L INPUT AUDIO INPUT VIDEO INPUT Antenna 1 TV Back 2 DIGITAL AUDIO OPTICAL DVI-PC OUTPUT PC 1 Connect the DVI output of the PC to the DVI INPUT (PC/DTV INPUT) jack on the...
User Manual
Page 21
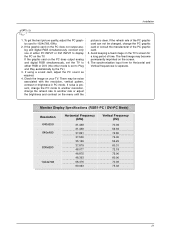
... 72.80 75.00 56.25 60.31 72.18 75.00 60.00 70.06 75.02 21 If the graphic card on your TV. If the graphic card on the PC does not output analog and digital RGB simultaneously, connect only one of time. Check the image on the... on the menu until the picture is separate. The fixed image may be changed, change the refresh rate to Plug and Play automatically by the TV.) 3. The synchronization input form for a long period of either RGB or DVI; (the other mode is present, change the PC mode to 1024x768, 60Hz. 2. If...
... 72.80 75.00 56.25 60.31 72.18 75.00 60.00 70.06 75.02 21 If the graphic card on your TV. If the graphic card on the PC does not output analog and digital RGB simultaneously, connect only one of time. Check the image on the... on the menu until the picture is separate. The fixed image may be changed, change the refresh rate to Plug and Play automatically by the TV.) 3. The synchronization input form for a long period of either RGB or DVI; (the other mode is present, change the PC mode to 1024x768, 60Hz. 2. If...
User Manual
Page 23
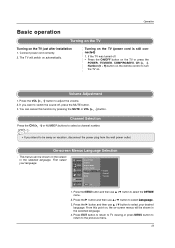
...button to the previous menu. 23 Volume Adjustment 1. The menus can cancel this point on, the on the TV (power cord is still connected) 1. Connect power cord correctly. 2. If the TV was turned off , press the MUTE button. 3. If you intend to select the OPTION menu. 2. Operation... Basic operation Turning on the TV Turning on automatically. Press EXIT button to return to TV viewing or press MENU button to return to select your language. The TV will be shown in the selected language. Press the G button and then ...
...button to the previous menu. 23 Volume Adjustment 1. The menus can cancel this point on, the on the TV (power cord is still connected) 1. Connect power cord correctly. 2. If the TV was turned off , press the MUTE button. 3. If you intend to select the OPTION menu. 2. Operation... Basic operation Turning on the TV Turning on automatically. Press EXIT button to return to TV viewing or press MENU button to return to select your language. The TV will be shown in the selected language. Press the G button and then ...


