Owners Manual
Page 2
Installing onto a table 12 - Installing the wall mount plate 16 - Assembling the stand base 11 - Menu Settings 26 TROUBLESHOOTING 28 SPECIFICATIONS 28 27UK650 29 27UK600 30 Factory Support Mode (Preset Mode, PC) 30 HDMI 30 DisplayPort 31 HDMI Timing (Video) 31 ... Connecting Headphones Using the cable holder 12 - Adjusting the angle 13 - Main Menu Features 21 User Settings 21 - HDMI connection 19 Connecting to a wall 20 USER SETTINGS 20 Activating the Main Menu 20 - Adjusting the Stand Height 14 - 2 ENEGNLGISH CONTENTS 3 LICENSE 4 ASSEMBLING AND PREPARING 4 Product ...
Installing onto a table 12 - Installing the wall mount plate 16 - Assembling the stand base 11 - Menu Settings 26 TROUBLESHOOTING 28 SPECIFICATIONS 28 27UK650 29 27UK600 30 Factory Support Mode (Preset Mode, PC) 30 HDMI 30 DisplayPort 31 HDMI Timing (Video) 31 ... Connecting Headphones Using the cable holder 12 - Adjusting the angle 13 - Main Menu Features 21 User Settings 21 - HDMI connection 19 Connecting to a wall 20 USER SETTINGS 20 Activating the Main Menu 20 - Adjusting the Stand Height 14 - 2 ENEGNLGISH CONTENTS 3 LICENSE 4 ASSEMBLING AND PREPARING 4 Product ...

Owners Manual
Page 12
Place at least 100 mm (3.94 inches) away from the wall to ensure sufficient ventilation. 27UK650 100 mm (3.94 inches) 100 mm (3.94 inches) 100 mm (3.94 inches) 100 mm (3.94 inches) Adjusting the angle 1 Place the monitor in an upright ... onto a table Lift the monitor and place it on the table in an upright position, mounted on the stand base. 2 Adjust the angle of the screen can be adjusted forwards or backwards for a comfortable viewing experience. 27UK650 15° -5° Rear Side Front Side 27UK600 100 mm (3.94 inches) 100 mm (3.94...
Place at least 100 mm (3.94 inches) away from the wall to ensure sufficient ventilation. 27UK650 100 mm (3.94 inches) 100 mm (3.94 inches) 100 mm (3.94 inches) 100 mm (3.94 inches) Adjusting the angle 1 Place the monitor in an upright ... onto a table Lift the monitor and place it on the table in an upright position, mounted on the stand base. 2 Adjust the angle of the screen can be adjusted forwards or backwards for a comfortable viewing experience. 27UK650 15° -5° Rear Side Front Side 27UK600 100 mm (3.94 inches) 100 mm (3.94...
Owners Manual
Page 16
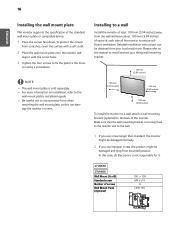
...cloth. 2 Place the wall mount plate onto the monitor and align it . 27UK650 27UK600 Wall Mount (A x B) Standard screw Number of the monitor to the wall. 1 If you use screw longer than standard, the monitor might be obtained from mounted position. 16 ENEGNLGISH Installing the wall mount plate This monitor supports ... careful not to use improper screw, the product might be damaged internally. 227UIKf 6yo5u0 use excessive force when mounting the wall mount plate, as this case, LG Electronics is not responsible for it with the screw holes. 3 Tighten the four screws to fix the plate...
...cloth. 2 Place the wall mount plate onto the monitor and align it . 27UK650 27UK600 Wall Mount (A x B) Standard screw Number of the monitor to the wall. 1 If you use screw longer than standard, the monitor might be obtained from mounted position. 16 ENEGNLGISH Installing the wall mount plate This monitor supports ... careful not to use improper screw, the product might be damaged internally. 227UIKf 6yo5u0 use excessive force when mounting the wall mount plate, as this case, LG Electronics is not responsible for it with the screw holes. 3 Tighten the four screws to fix the plate...

Owners Manual
Page 17
... warranty. For more information, please refer to avoid electric shocks. y yUse the wall mounting bracket and screws that conform to the monitor. Damage caused by the use the genuine LG wall mounting bracket. y yScrew length from outer surface of inappropriate components will not be covered by...Please use or misuse of back cover should be purchased at your local retail store or a qualified installer. The acces- Wall mount Pad Back Cover Wall mount Pad Back Cover Standard screw Max. 8mm(0.31 inches) NOTE y yUse the screws specified by the product warranty. y yFor...
... warranty. For more information, please refer to avoid electric shocks. y yUse the wall mounting bracket and screws that conform to the monitor. Damage caused by the use the genuine LG wall mounting bracket. y yScrew length from outer surface of inappropriate components will not be covered by...Please use or misuse of back cover should be purchased at your local retail store or a qualified installer. The acces- Wall mount Pad Back Cover Wall mount Pad Back Cover Standard screw Max. 8mm(0.31 inches) NOTE y yUse the screws specified by the product warranty. y yFor...


