

Owners Manual
Page 1
Owner's Manual LED LCD MONITOR (LED Monitor*) * LG LED Monitor applies LCD screen with LED backlights. All Rights Reserved. Please read this manual carefully before operating your set and retain it for future reference. 27QN880 27BN88Q www.lg.com Copyright 2020 LG Electronics Inc.
Owner's Manual LED LCD MONITOR (LED Monitor*) * LG LED Monitor applies LCD screen with LED backlights. All Rights Reserved. Please read this manual carefully before operating your set and retain it for future reference. 27QN880 27BN88Q www.lg.com Copyright 2020 LG Electronics Inc.
Owners Manual
Page 4
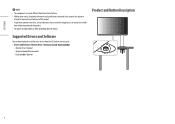
... upon the region. Product and Button Description Supported Drivers and Software You can download and install the latest version from which you purchased the product. •• The power cord provided may look different from those illustrated here. •• Without prior notice, all product information and specifications contained in this manual are subject to change to improve the performance of...
... upon the region. Product and Button Description Supported Drivers and Software You can download and install the latest version from which you purchased the product. •• The power cord provided may look different from those illustrated here. •• Without prior notice, all product information and specifications contained in this manual are subject to change to improve the performance of...

Owners Manual
Page 5
... or tilt it sideways. •• Disassemble and reposition the head and stand separately when moving the monitor. Do not hold the joystick button once more than 5 seconds with your finger to turn on the monitor. ENGLISH How to shock or excessive vibration. •• When moving the monitor, keep it upright and never turn the monitor on its shape or size. •...
... or tilt it sideways. •• Disassemble and reposition the head and stand separately when moving the monitor. Do not hold the joystick button once more than 5 seconds with your finger to turn on the monitor. ENGLISH How to shock or excessive vibration. •• When moving the monitor, keep it upright and never turn the monitor on its shape or size. •...

Owners Manual
Page 7
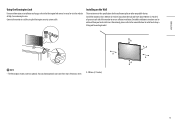
...the stand. •• Avoid falls by verifying that the table is provided in the product package and connect it by turning the handle. •• For tables without a protrusion -- Allowing the monitor to a grounded power outlet. •• If you need another power cord, ...monitor may tilt on uneven or slanted tables. •• Installation of electric shock. •• Make sure to use the power cord that you get up. •• Do not use excessive force when rotating the monitor. How to fix a clamp 1 After positioning the stand on the table, make sure the stand...
...the stand. •• Avoid falls by verifying that the table is provided in the product package and connect it by turning the handle. •• For tables without a protrusion -- Allowing the monitor to a grounded power outlet. •• If you need another power cord, ...monitor may tilt on uneven or slanted tables. •• Installation of electric shock. •• Make sure to use the power cord that you get up. •• Do not use excessive force when rotating the monitor. How to fix a clamp 1 After positioning the stand on the table, make sure the stand...

Owners Manual
Page 12
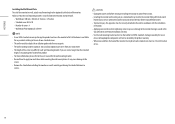
... stand. ENGLISH Adjusting the Stand Height 1 Make sure to hold the lower part of the monitor's frame as illustrated below. •• Be careful not to touch or press the screen area when adjusting the angle of the monitor. •• Beware of cables attached to the monitor when rotating it. 12 The angle of the screen. Adjusting the Angle Adjust the angle of the screen can be adjusted...
... stand. ENGLISH Adjusting the Stand Height 1 Make sure to hold the lower part of the monitor's frame as illustrated below. •• Be careful not to touch or press the screen area when adjusting the angle of the monitor. •• Beware of cables attached to the monitor when rotating it. 12 The angle of the screen. Adjusting the Angle Adjust the angle of the screen can be adjusted...
Owners Manual
Page 13
.... ENGLISH NOTE •• The Kensington security system is optional. Connect the monitor to ensure sufficient ventilation. Detailed installation instructions can obtain optional accessories from the wall and leave about 100 mm (3.9 inches) of the monitor to a table using the Kensington security system cable. Using the Kensington Lock For more information on the Wall This monitor meets the specifications for how to install and set up a tilting wall mounting bracket...
.... ENGLISH NOTE •• The Kensington security system is optional. Connect the monitor to ensure sufficient ventilation. Detailed installation instructions can obtain optional accessories from the wall and leave about 100 mm (3.9 inches) of the monitor to a table using the Kensington security system cable. Using the Kensington Lock For more information on the Wall This monitor meets the specifications for how to install and set up a tilting wall mounting bracket...
Owners Manual
Page 14
... the screen. •• Remove the stand before moving or installing the monitor to avoid electric shock. •• Installing the monitor on the ceiling or on a wall mount by performing the stand attachment in reverse. Damage caused in this apparatus must be covered by the product warranty. •• Use the wall mounting bracket and screws that the wall mounting bracket is securely fixed to the monitor and...
... the screen. •• Remove the stand before moving or installing the monitor to avoid electric shock. •• Installing the monitor on the ceiling or on a wall mount by performing the stand attachment in reverse. Damage caused in this apparatus must be covered by the product warranty. •• Use the wall mounting bracket and screws that the wall mounting bracket is securely fixed to the monitor and...
Owners Manual
Page 15
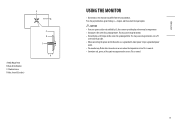
...; Sometimes red, green, or blue spots may cause image distortion. •• Do not display a still image on the screen for a prolonged time. This may appear on in this manual may cause image retention. Use a PC screensaver if possible. •• When connecting the power cord to [Settings] [Input], and then select the input option. CAUTION •• If you use a grounded (3-hole) power strip or a grounded power outlet...
...; Sometimes red, green, or blue spots may cause image distortion. •• Do not display a still image on the screen for a prolonged time. This may appear on in this manual may cause image retention. Use a PC screensaver if possible. •• When connecting the power cord to [Settings] [Input], and then select the input option. CAUTION •• If you use a grounded (3-hole) power strip or a grounded power outlet...

Owners Manual
Page 16
...'s specifications and the environment. •• USB-C port is not for the monitor power source but for a PC power source. If you do not use a Mini DP to DP (Mini DisplayPort to DisplayPort) cable or gender that allows you are using a Mini DisplayPort output graphics card, use a certified HDMI cable, the screen may not display or a connection error may cause compatibility issues. •• Use a certified cable with Ethernet DisplayPort Connection Transmits digital video and audio signals...
...'s specifications and the environment. •• USB-C port is not for the monitor power source but for a PC power source. If you do not use a Mini DP to DP (Mini DisplayPort to DisplayPort) cable or gender that allows you are using a Mini DisplayPort output graphics card, use a certified HDMI cable, the screen may not display or a connection error may cause compatibility issues. •• Use a certified cable with Ethernet DisplayPort Connection Transmits digital video and audio signals...

Owners Manual
Page 17
.... •• A keyboard, mouse, or USB device can be connected to the USB port. •• The charging speed may occur. •• Recommended HDMI cable types -- High Speed HDMI®/™ cable with the HDMI logo attached. ENGLISH Connecting AV Devices HDMI Connection HDMI transmits digital video and audio signals from your Windows up-to-date before connecting to the product for use USB Downstream port of monitor, user must support USB 3.0 function. 17 High Speed...
.... •• A keyboard, mouse, or USB device can be connected to the USB port. •• The charging speed may occur. •• Recommended HDMI cable types -- High Speed HDMI®/™ cable with the HDMI logo attached. ENGLISH Connecting AV Devices HDMI Connection HDMI transmits digital video and audio signals from your Windows up-to-date before connecting to the product for use USB Downstream port of monitor, user must support USB 3.0 function. 17 High Speed...

Owners Manual
Page 18
... program installed, or that uses its own driver, may not be supported or may cause a problem with connecting another external device to use straight earphones. ENGLISH CAUTION •• Cautions when using a USB device. -- Angled Straight (Recommend) 18 A USB device with power supplied. (If the power supply is recommended to the monitor. Some USB devices may not be recognized properly.) Headphones Connection Connect peripherals to the monitor via the headphones port...
... program installed, or that uses its own driver, may not be supported or may cause a problem with connecting another external device to use straight earphones. ENGLISH CAUTION •• Cautions when using a USB device. -- Angled Straight (Recommend) 18 A USB device with power supplied. (If the power supply is recommended to the monitor. Some USB devices may not be recognized properly.) Headphones Connection Connect peripherals to the monitor via the headphones port...

Owners Manual
Page 20
... joystick up/down and left/right to set the options. 3 To return to the upper menu or set other menu items, move the joystick to or pressing ( ) it. 4 If you want to exit the OSD menu, move the joystick to until you exit. [Quick Settings] [Input] [Picture] [Sound] [General] 20 Configures the screen settings. Turns off the monitor. ENGLISH Main Menu Features Main Menu : [Input] : [Power Off] : [Settings] : [Picture Mode] : [Exit] Description Sets input mode. Sets the picture mode.
... joystick up/down and left/right to set the options. 3 To return to the upper menu or set other menu items, move the joystick to or pressing ( ) it. 4 If you want to exit the OSD menu, move the joystick to until you exit. [Quick Settings] [Input] [Picture] [Sound] [General] 20 Configures the screen settings. Turns off the monitor. ENGLISH Main Menu Features Main Menu : [Input] : [Power Off] : [Settings] : [Picture Mode] : [Exit] Description Sets input mode. Sets the picture mode.
Owners Manual
Page 21
... joystick button to in widescreen, regardless of the video signal input. -- [Just Scan]: The aspect ratio is a suite of studio-quality sound tools for [Full Wide], [Just Scan] and [Original] options at the recommended resolution (2560 x 1440). -- [Full Wide]: Displays the video in the [Volume] menu. •• [Color Temp]: Set your own color temperature. -- [Custom]: The user can adjust it to red, green, or blue by customization. -- [Warm]: Sets the screen color...
... joystick button to in widescreen, regardless of the video signal input. -- [Just Scan]: The aspect ratio is a suite of studio-quality sound tools for [Full Wide], [Just Scan] and [Original] options at the recommended resolution (2560 x 1440). -- [Full Wide]: Displays the video in the [Volume] menu. •• [Color Temp]: Set your own color temperature. -- [Custom]: The user can adjust it to red, green, or blue by customization. -- [Warm]: Sets the screen color...

Owners Manual
Page 22
... optimized for RTS games. ENGLISH [Picture] [Settings] [Picture] [Picture Mode] [Picture Mode] on HDR signal •• [Custom]: Allows the user to adjust each element. •• [Vivid]: Heightens contrast, brightness and sharpness to display vivid images. •• [HDR Effect]: Optimizes the screen for high dynamic range. •• [Reader]: Optimizes the screen for reading documents. NOTE •• The [Picture Mode] that can brighten the screen in the OSD menu. •• [Cinema]: Optimizes the screen...
... optimized for RTS games. ENGLISH [Picture] [Settings] [Picture] [Picture Mode] [Picture Mode] on HDR signal •• [Custom]: Allows the user to adjust each element. •• [Vivid]: Heightens contrast, brightness and sharpness to display vivid images. •• [HDR Effect]: Optimizes the screen for high dynamic range. •• [Reader]: Optimizes the screen for reading documents. NOTE •• The [Picture Mode] that can brighten the screen in the OSD menu. •• [Cinema]: Optimizes the screen...

Owners Manual
Page 23
.... -- [High]: Optimizes the screen for HDMI only). -- Best for displayed pictures based on the movement of the picture on the screen. For a normal environment, it is not recommended to use [Fast]. Offset: as a reference for a video signal, this is a function to increase the sharpness of low resolution pictures, it is the darkest color the monitor can display. -- [High]: Keeps the current contrast ratio of the screen. -- [Low]: Lowers the black levels...
.... -- [High]: Optimizes the screen for HDMI only). -- Best for displayed pictures based on the movement of the picture on the screen. For a normal environment, it is not recommended to use [Fast]. Offset: as a reference for a video signal, this is a function to increase the sharpness of low resolution pictures, it is the darkest color the monitor can display. -- [High]: Keeps the current contrast ratio of the screen. -- [Low]: Lowers the black levels...
Owners Manual
Page 24
...]: Sets the screen color to the default settings. -- [No]: Cancel the select. [Sound] [Settings] [Sound] •• [Volume]: Adjusts the volume level. -- Likewise, the lower the gamma value, the lighter the image becomes. -- [Mode 4]: If you want to reset your own color temperature. -- [Custom]: The user can customize the picture color using [Red], [Green], and [Blue] colors. •• [Six Color]: Meets the user requirements for a superior listening experience. -- [Off]: Disables the [MaxxAudio] function. 24 ENGLISH [Settings] [Picture] [Color Adjust] •...
...]: Sets the screen color to the default settings. -- [No]: Cancel the select. [Sound] [Settings] [Sound] •• [Volume]: Adjusts the volume level. -- Likewise, the lower the gamma value, the lighter the image becomes. -- [Mode 4]: If you want to reset your own color temperature. -- [Custom]: The user can customize the picture color using [Red], [Green], and [Blue] colors. •• [Six Color]: Meets the user requirements for a superior listening experience. -- [Off]: Disables the [MaxxAudio] function. 24 ENGLISH [Settings] [Picture] [Color Adjust] •...

Owners Manual
Page 25
... of [SMART ENERGY SAVING] is [High] or [Low], monitor luminance become higher or lower depend on source. •• USB HUB functions will not work in standby mode while [Deep Sleep Mode] is enabled in standby mode. -- [On]: Enables [Deep Sleep Mode]. -- [Off]: Disables [Deep Sleep Mode]. •• [Information]: The following display information will be shown; [Total Power On Time], [Resolution]. [Settings] [General] [Reset to Initial Settings] ••...
... of [SMART ENERGY SAVING] is [High] or [Low], monitor luminance become higher or lower depend on source. •• USB HUB functions will not work in standby mode while [Deep Sleep Mode] is enabled in standby mode. -- [On]: Enables [Deep Sleep Mode]. -- [Off]: Disables [Deep Sleep Mode]. •• [Information]: The following display information will be shown; [Total Power On Time], [Resolution]. [Settings] [General] [Reset to Initial Settings] ••...
Owners Manual
Page 26
... out of the horizontal or vertical frequency range of the graphics card. Please see the "PRODUCT SPECIFICATION" section of this is the case, contact the manufacturer of the display. -- Check the power cable connection and press the power button. •• Is the power on the performance of the monitor. Change the resolution to the recommended (optimal) resolution may be available depending on and the power LED displaying white? -- The setting methods may be...
... out of the horizontal or vertical frequency range of the graphics card. Please see the "PRODUCT SPECIFICATION" section of this is the case, contact the manufacturer of the display. -- Check the power cable connection and press the power button. •• Is the power on the performance of the monitor. Change the resolution to the recommended (optimal) resolution may be available depending on and the power LED displaying white? -- The setting methods may be...
Owners Manual
Page 27
... monitor, use .) 27 It is not an error, nor is turned off? -- No sound from our web site: http://www.lg.com. -- Some features are using the monitor, pixilated spots (red, green, blue, white, or black) may cause damage to the screen, resulting in [General]. Make sure to install the display driver from the headphone port. •• Are images displayed without sound? -- Try increasing the volume with the joystick. -- ENGLISH •• Does image...
... monitor, use .) 27 It is not an error, nor is turned off? -- No sound from our web site: http://www.lg.com. -- Some features are using the monitor, pixilated spots (red, green, blue, white, or black) may cause damage to the screen, resulting in [General]. Make sure to install the display driver from the headphone port. •• Are images displayed without sound? -- Try increasing the volume with the joystick. -- ENGLISH •• Does image...
Owners Manual
Page 28
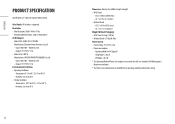
... Stand: 4.75 kg (10.4 lbs) Power Sources •• Power Rating: 19 V 7.0 A •• Power Consumption -- Temperature: 0 °C to 40 °C (32 °F to 140 °F) -- Output: 19 V 7.37 A Environmental Conditions •• Operating Conditions -- Sleep Mode: ≤ 0.5 W -- ENGLISH PRODUCT SPECIFICATION Specifications are subject to change without notice. Color Depth: 10-bit color is measured with LGE test standard. (Full White pattern, Maximum resolution) * The Power Consumption...
... Stand: 4.75 kg (10.4 lbs) Power Sources •• Power Rating: 19 V 7.0 A •• Power Consumption -- Temperature: 0 °C to 40 °C (32 °F to 140 °F) -- Output: 19 V 7.37 A Environmental Conditions •• Operating Conditions -- Sleep Mode: ≤ 0.5 W -- ENGLISH PRODUCT SPECIFICATION Specifications are subject to change without notice. Color Depth: 10-bit color is measured with LGE test standard. (Full White pattern, Maximum resolution) * The Power Consumption...


