

Owners Manual
Page 2
... ENGLISH LICENSE 3 OPEN SOURCE SOFTWARE NOTICE INFORMATION 4 ASSEMBLING AND PREPARING.4 --Supported Drivers and Software 5 --Product and Button Description 5 How to Use the Joystick Button --Moving and Lifting the Monitor 6 Installing on a Table Adjusting the Stand Height Adjusting the Angle Pivot Feature Tidying up Cables Using the Kensington Lock Installing the Wall Mount Plate Installing on the Wall USING THE MONITOR 15 --Connecting to a PC 16 HDMI Connection DisplayPort Connection --Connecting AV Devices 17 HDMI Connection --Connecting Peripherals 17 USB Device connection...
... ENGLISH LICENSE 3 OPEN SOURCE SOFTWARE NOTICE INFORMATION 4 ASSEMBLING AND PREPARING.4 --Supported Drivers and Software 5 --Product and Button Description 5 How to Use the Joystick Button --Moving and Lifting the Monitor 6 Installing on a Table Adjusting the Stand Height Adjusting the Angle Pivot Feature Tidying up Cables Using the Kensington Lock Installing the Wall Mount Plate Installing on the Wall USING THE MONITOR 15 --Connecting to a PC 16 HDMI Connection DisplayPort Connection --Connecting AV Devices 17 HDMI Connection --Connecting Peripherals 17 USB Device connection...
Owners Manual
Page 4
... may be covered by the product warranty. •• Do not carry the monitor upside down by just holding the base. ASSEMBLING AND PREPARING CAUTION •• Always use generic cables not certified by LG, the screen may not display or there may cause the monitor to fall off appearance, it has good durability. ENGLISH 4 OPEN SOURCE SOFTWARE NOTICE INFORMATION To obtain the source code under...
... may be covered by the product warranty. •• Do not carry the monitor upside down by just holding the base. ASSEMBLING AND PREPARING CAUTION •• Always use generic cables not certified by LG, the screen may not display or there may cause the monitor to fall off appearance, it has good durability. ENGLISH 4 OPEN SOURCE SOFTWARE NOTICE INFORMATION To obtain the source code under...

Owners Manual
Page 5
ENGLISH 5 Supported Drivers and Software You can download and install the latest version from the LGE website (www.lg.com). Drivers and Software Monitor Driver OnScreen Control Installation Priority Recommended Recommended Product and Button Description Joystick Button
ENGLISH 5 Supported Drivers and Software You can download and install the latest version from the LGE website (www.lg.com). Drivers and Software Monitor Driver OnScreen Control Installation Priority Recommended Recommended Product and Button Description Joystick Button

Owners Manual
Page 6
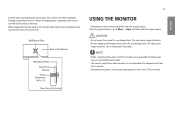
... to turn off once with your finger. NOTE •• The joystick button is located at the bottom of the monitor. Press and hold the panel itself. ENGLISH 6 How to Use the Joystick Button You can control the screen's brightness by pressing the joystick button or moving it . •• Before moving or lifting the monitor, disconnect the power cord and all other cables. •...
... to turn off once with your finger. NOTE •• The joystick button is located at the bottom of the monitor. Press and hold the panel itself. ENGLISH 6 How to Use the Joystick Button You can control the screen's brightness by pressing the joystick button or moving it . •• Before moving or lifting the monitor, disconnect the power cord and all other cables. •...
Owners Manual
Page 9
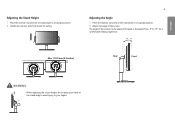
The angle of the screen can be adjusted forward or backward from -5° to 15° for safety. 9 Adjusting the Angle 1 Place the monitor mounted on the stand body to avoid injury to your hand on the stand base in an upright position. 2 Adjust the angle of the screen. ENGLISH Adjusting the Stand Height 1 Place the monitor mounted on the stand base in an upright position. 2 Handle the monitor with both hands for a comfortable viewing experience. Max. 110.0 mm (4.3 inches) Rear Front WARNING •• When adjusting the screen height, do not place your fingers.
The angle of the screen can be adjusted forward or backward from -5° to 15° for safety. 9 Adjusting the Angle 1 Place the monitor mounted on the stand body to avoid injury to your hand on the stand base in an upright position. 2 Adjust the angle of the screen. ENGLISH Adjusting the Stand Height 1 Place the monitor mounted on the stand base in an upright position. 2 Handle the monitor with both hands for a comfortable viewing experience. Max. 110.0 mm (4.3 inches) Rear Front WARNING •• When adjusting the screen height, do not place your fingers.

Owners Manual
Page 11
.... 2 Adjust the angle of the monitor in the direction of the display is not supported. •• The screen can be rotated easily using the screen pivot shortcut key provided with your Windows operating system. NOTE •• Auto Pivot feature of the arrow as shown below. Note that some Windows versions and some graphics card drivers may use different settings for the screen pivot...
.... 2 Adjust the angle of the monitor in the direction of the display is not supported. •• The screen can be rotated easily using the screen pivot shortcut key provided with your Windows operating system. NOTE •• Auto Pivot feature of the arrow as shown below. Note that some Windows versions and some graphics card drivers may use different settings for the screen pivot...

Owners Manual
Page 13
... monitor to ensure sufficient ventilation. Alternatively, please refer to the manual for the wall mount plate or other compatible devices. 1 Place the screen face down. To protect the monitor panel (screen), cover the surface with the screw holes. 4 Tighten the four screws using a screwdriver to fix the plate to install and set up a tilting wall mounting bracket. 100 mm (3.94 inches) 100 mm (3.94 inches) 100 mm (3.94 inches) 100 mm (3.94 inches) ENGLISH...
... monitor to ensure sufficient ventilation. Alternatively, please refer to the manual for the wall mount plate or other compatible devices. 1 Place the screen face down. To protect the monitor panel (screen), cover the surface with the screw holes. 4 Tighten the four screws using a screwdriver to fix the plate to install and set up a tilting wall mounting bracket. 100 mm (3.94 inches) 100 mm (3.94 inches) 100 mm (3.94 inches) 100 mm (3.94 inches) ENGLISH...
Owners Manual
Page 15
.... Wall Mount Plate Back of the Monitor Wall Mount Plate Back of each installed screw must be covered by the use a grounded (3-hole) power strip or a grounded power outlet. •• The monitor may flicker when turned on in this manual may cause image distortion. •• Do not display a still image on the screen. This is normal. This is normal. •• Sometimes red, green, or blue spots may cause image retention. Use...
.... Wall Mount Plate Back of the Monitor Wall Mount Plate Back of each installed screw must be covered by the use a grounded (3-hole) power strip or a grounded power outlet. •• The monitor may flicker when turned on in this manual may cause image distortion. •• Do not display a still image on the screen. This is normal. This is normal. •• Sometimes red, green, or blue spots may cause image retention. Use...

Owners Manual
Page 16
.... •• If you are using a Mini DisplayPort output graphics card, use a Mini DP to DP (Mini DisplayPort to DisplayPort) cable or gender that allows you do not use a certified HDMI cable, the screen may not display or a connection error may cause compatibility issues. •• Use a certified cable with Ethernet DisplayPort Connection Transmits digital video and audio signals from your computer without having to reconfigure anything or install any manual drivers.
.... •• If you are using a Mini DisplayPort output graphics card, use a Mini DP to DP (Mini DisplayPort to DisplayPort) cable or gender that allows you do not use a certified HDMI cable, the screen may not display or a connection error may cause compatibility issues. •• Use a certified cable with Ethernet DisplayPort Connection Transmits digital video and audio signals from your computer without having to reconfigure anything or install any manual drivers.
Owners Manual
Page 17
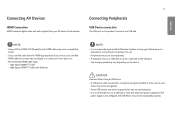
... power supplied. (If the power supply is recommended you do not use . •• Peripheral devices are sold separately. •• A keyboard, mouse, or USB device can be recognized properly.) 17 Connecting AV Devices Connecting Peripherals HDMI Connection HDMI transmits digital video and audio signals from your Windows up-todate before connecting to the monitor. High-Speed HDMI®/TM cable -- ENGLISH NOTE •• Using a DVI to HDMI / DP (DisplayPort) to HDMI cable may not work...
... power supplied. (If the power supply is recommended you do not use . •• Peripheral devices are sold separately. •• A keyboard, mouse, or USB device can be recognized properly.) 17 Connecting AV Devices Connecting Peripherals HDMI Connection HDMI transmits digital video and audio signals from your Windows up-todate before connecting to the monitor. High-Speed HDMI®/TM cable -- ENGLISH NOTE •• Using a DVI to HDMI / DP (DisplayPort) to HDMI cable may not work...
Owners Manual
Page 20
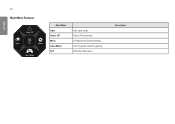
ENGLISH 20 Main Menu Features Power Off Input Exit Menu Game Mode Main Menu Input Power Off Menu Game Mode Exit Sets input mode. Sets the game mode for gaming. Configures the screen settings. Description Turns off the monitor. Exits the main menu.
ENGLISH 20 Main Menu Features Power Off Input Exit Menu Game Mode Main Menu Input Power Off Menu Game Mode Exit Sets input mode. Sets the game mode for gaming. Configures the screen settings. Description Turns off the monitor. Exits the main menu.
Owners Manual
Page 21
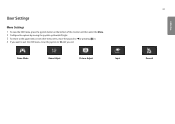
User Settings Menu Settings 1 To view the OSD menu, press the joystick button at the bottom of the monitor and then enter the Menu. 2 Configure the options by moving the joystick up/down/left/right. 3 To return to the upper menu or set other menu items, move the joystick to or pressing ( ) it. 4 If you want to exit the OSD menu, move the joystick to until you exit. Game Mode Game Adjust Picture Adjust Input 21 General ENGLISH
User Settings Menu Settings 1 To view the OSD menu, press the joystick button at the bottom of the monitor and then enter the Menu. 2 Configure the options by moving the joystick up/down/left/right. 3 To return to the upper menu or set other menu items, move the joystick to or pressing ( ) it. 4 If you want to exit the OSD menu, move the joystick to until you exit. Game Mode Game Adjust Picture Adjust Input 21 General ENGLISH

Owners Manual
Page 23
... occur when changing the monitor input or power on/off according to save two sets of Windows. •• When the HDR function is turned on, the characters or picture quality may be poor according to Graphic card performance. •• While the HDR function is on, screen flickering or cracking may not be operated properly depending on HDR signal. This mode is optimized for...
... occur when changing the monitor input or power on/off according to save two sets of Windows. •• When the HDR function is turned on, the characters or picture quality may be poor according to Graphic card performance. •• While the HDR function is on, screen flickering or cracking may not be operated properly depending on HDR signal. This mode is optimized for...
Owners Manual
Page 24
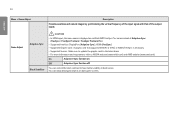
...; Supported Interface: DisplayPort (Adaptive-Sync), HDMI (FreeSync). •• Supported Graphic Card : A graphic card that of the input signal with that supports NVIDIA's G-SYNC or AMD's FreeSync is necessary. •• Supported Version : Make sure to update the graphic card to the latest driver. •• For more information and requirement, refer to have better visibility in dark scenes. 24 ENGLISH Menu > Game Adjust Description Provides seamless and natural images...
...; Supported Interface: DisplayPort (Adaptive-Sync), HDMI (FreeSync). •• Supported Graphic Card : A graphic card that of the input signal with that supports NVIDIA's G-SYNC or AMD's FreeSync is necessary. •• Supported Version : Make sure to update the graphic card to the latest driver. •• For more information and requirement, refer to have better visibility in dark scenes. 24 ENGLISH Menu > Game Adjust Description Provides seamless and natural images...

Owners Manual
Page 26
... then saving the settings. The higher the value, the more saturated and darker the colors become . Manual Adjusts the color temperature in 500K increments. (Note that 9300K is supported instead of the screen. Meets the user requirements for colors by customization. Custom The user can customize the picture color using Red, Green, and Blue colors. Likewise, the lower the gamma value, the lighter 2, Mode 3 the image becomes. ENGLISH 26 Menu > Picture Adjust Brightness Contrast Sharpness Gamma Picture Adjust Color...
... then saving the settings. The higher the value, the more saturated and darker the colors become . Manual Adjusts the color temperature in 500K increments. (Note that 9300K is supported instead of the screen. Meets the user requirements for colors by customization. Custom The user can customize the picture color using Red, Green, and Blue colors. Likewise, the lower the gamma value, the lighter 2, Mode 3 the image becomes. ENGLISH 26 Menu > Picture Adjust Brightness Contrast Sharpness Gamma Picture Adjust Color...

Owners Manual
Page 29
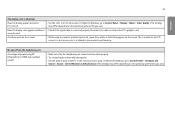
... select HDMI 2.0 resolution in the control panel of the connected external device(1.4,1.2 and 1.1) . General Power LED On The power LED turns on or off . NOTE •• If the connected device does not support HDMI Compatibility Mode, the screen or sound may cause the screen to the desired language. If you can recognize the legacy equipment that does not support HDMI 2.0. 29 ENGLISH Menu > General Description Language SMART ENERGY SAVING Sets the menu screen to appear abnormally. HDMI Compatibility Mode Off Disables HDMI Compatibility Mode...
... select HDMI 2.0 resolution in the control panel of the connected external device(1.4,1.2 and 1.1) . General Power LED On The power LED turns on or off . NOTE •• If the connected device does not support HDMI Compatibility Mode, the screen or sound may cause the screen to the desired language. If you can recognize the legacy equipment that does not support HDMI 2.0. 29 ENGLISH Menu > General Description Language SMART ENERGY SAVING Sets the menu screen to appear abnormally. HDMI Compatibility Mode Off Disables HDMI Compatibility Mode...

Owners Manual
Page 31
... cable and reconnect it. Some features are out of the recommended horizontal or vertical frequency range of this manual to check if the graphics card supports Plug and Play function. Is the power LED on and the power LED displaying white? •• Check that the connected input is enabled (Menu > Input). Go to Menu > General and set OSD Lock to install the display driver from the PC (graphics card) are disabled. Is the power LED blinking? •• If the monitor is in sleep mode...
... cable and reconnect it. Some features are out of the recommended horizontal or vertical frequency range of this manual to check if the graphics card supports Plug and Play function. Is the power LED on and the power LED displaying white? •• Check that the connected input is enabled (Menu > Input). Go to Menu > General and set OSD Lock to install the display driver from the PC (graphics card) are disabled. Is the power LED blinking? •• If the monitor is in sleep mode...

Owners Manual
Page 32
... by kHz. •• Check if the graphics card's resolution or frequency is within the range allowed by the monitor and set it takes to display one horizontal line is called vertical frequency, or refresh rate, and is represented by the horizontal interval, the result is HDMI 1080i 60/50 Hz (interlaced), the screen may cause damage to the recommended (optimal) resolution Control Panel > Display > Menu in Windows. (The settings may differ depending on...
... by kHz. •• Check if the graphics card's resolution or frequency is within the range allowed by the monitor and set it takes to display one horizontal line is called vertical frequency, or refresh rate, and is represented by the horizontal interval, the result is HDMI 1080i 60/50 Hz (interlaced), the screen may cause damage to the recommended (optimal) resolution Control Panel > Display > Menu in Windows. (The settings may differ depending on...
Owners Manual
Page 33
... HDMI input without sound? •• Make sure that the headphone port connections are made properly. •• Try increasing the volume with the joystick. •• Set the audio output of the PC to Control Panel > Hardware and Sound > Sound > set the Monitor as default device. (The settings may differ depending on the screen? •• When using . Does the display appear discolored (16 colors)? •• Set the color to Control Panel > Display > Menu > Color Quality...
... HDMI input without sound? •• Make sure that the headphone port connections are made properly. •• Try increasing the volume with the joystick. •• Set the audio output of the PC to Control Panel > Hardware and Sound > Sound > set the Monitor as default device. (The settings may differ depending on the screen? •• When using . Does the display appear discolored (16 colors)? •• Set the color to Control Panel > Display > Menu > Color Quality...
Owners Manual
Page 35
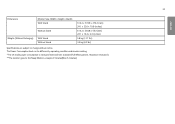
... and monitor setting. * The On mode power consumption is measured with LGE test standard (Full White pattern , Maximum resolution). ** The monitor goes to change without notice. 35 ENGLISH Dimensions Weight (Without Packaging) Monitor Size (Width x Height x Depth) With Stand Without Stand With Stand Without Stand 614.2 x 574.8 x 274.4 (mm) 24.1 x 22.6 x 10.8 (inches) 614.2 x 364.8 x 56.3 (mm) 24.1 x 14.3 x 2.2 (inches) 5.8 kg (12.7 lbs) 3.9 kg (8.5 lbs) Specifications are subject to the Sleep Mode...
... and monitor setting. * The On mode power consumption is measured with LGE test standard (Full White pattern , Maximum resolution). ** The monitor goes to change without notice. 35 ENGLISH Dimensions Weight (Without Packaging) Monitor Size (Width x Height x Depth) With Stand Without Stand With Stand Without Stand 614.2 x 574.8 x 274.4 (mm) 24.1 x 22.6 x 10.8 (inches) 614.2 x 364.8 x 56.3 (mm) 24.1 x 14.3 x 2.2 (inches) 5.8 kg (12.7 lbs) 3.9 kg (8.5 lbs) Specifications are subject to the Sleep Mode...


