
Owners Manual
Page 2
... connection 9 - DVI-D connection 9 - Menu Settings 13 -Picture 14 -Color 15 -Display 15 -Volume 16 -Others 17 MY KEY Setting 18 FUNC. Attaching the Stand Base 5 - Detaching the Stand Base 6 - Mounting on a wall 9 USING THE MONITOR SET 9 Connecting to a PC 9 - Setting 18 -Picture Mode 19 -SUPER ENERGY SAVING 20 -DUAL DISPLAY 20 -DUAL WEB 21 -MY KEY Setting 22 TROUBLESHOOTING 24 SPECIFICATIONS 24 22EA63V 25 23EA63V 26 27EA63V 27 Preset Modes (Resolution) 27 Indicator 28 Proper posture 28 Proper posture for using the Monitor set 5 - HDMI connection...
... connection 9 - DVI-D connection 9 - Menu Settings 13 -Picture 14 -Color 15 -Display 15 -Volume 16 -Others 17 MY KEY Setting 18 FUNC. Attaching the Stand Base 5 - Detaching the Stand Base 6 - Mounting on a wall 9 USING THE MONITOR SET 9 Connecting to a PC 9 - Setting 18 -Picture Mode 19 -SUPER ENERGY SAVING 20 -DUAL DISPLAY 20 -DUAL WEB 21 -MY KEY Setting 22 TROUBLESHOOTING 24 SPECIFICATIONS 24 22EA63V 25 23EA63V 26 27EA63V 27 Preset Modes (Resolution) 27 Indicator 28 Proper posture 28 Proper posture for using the Monitor set 5 - HDMI connection...

Owners Manual
Page 4
ENEGNLGISH 4 ASSEMBLING AND PREPARING Parts and buttons Power Indicator yyLighting On: Turned on yyLighting Off: Turned off (Power Button) Button (See p.11) Connection panel (See p.9)
ENEGNLGISH 4 ASSEMBLING AND PREPARING Parts and buttons Power Indicator yyLighting On: Turned on yyLighting Off: Turned off (Power Button) Button (See p.11) Connection panel (See p.9)
Owners Manual
Page 7
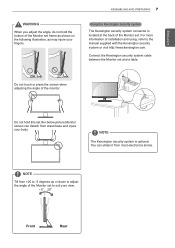
... the Monitor set. For more information of installation and using, refer to suit your view. Connect the Kensington security system cable between the Monitor set and a table. Front Rear ENEGNLGISH warning When you adjust the angle, do not hold this set like below picture.Monitor screen can obtain it from +20 to -5 degrees up or down to adjust the angle of the Monitor set to the manual supplied with...
... the Monitor set. For more information of installation and using, refer to suit your view. Connect the Kensington security system cable between the Monitor set and a table. Front Rear ENEGNLGISH warning When you adjust the angle, do not hold this set like below picture.Monitor screen can obtain it from +20 to -5 degrees up or down to adjust the angle of the Monitor set to the manual supplied with...
Owners Manual
Page 8
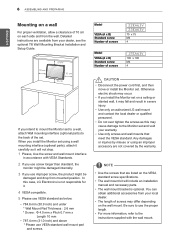
... side and from mounted position. Model VESA (A x B) Standard screw Number of screws 22EA63V 23EA63V 75 x 75 M4 4 Model VESA (A x B) Standard screw Number of the set . yyFor more information, refer to the back of screws 27EA63V 100 x 100 M4 4 CAUTION yyDisconnect the power cord first, and then move or install the Monitor set . yyThe wall mount bracket is not responsible for it will include an installation manual and necessary parts. Detailed instructions are not covered by the...
... side and from mounted position. Model VESA (A x B) Standard screw Number of screws 22EA63V 23EA63V 75 x 75 M4 4 Model VESA (A x B) Standard screw Number of the set . yyFor more information, refer to the back of screws 27EA63V 100 x 100 M4 4 CAUTION yyDisconnect the power cord first, and then move or install the Monitor set . yyThe wall mount bracket is not responsible for it will include an installation manual and necessary parts. Detailed instructions are not covered by the...
Owners Manual
Page 9
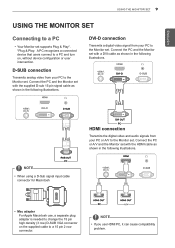
... the Monitor set. NOTE yyIf you use , a separate plug adapter is needed to change the 15 pin high density (3 row) D-SUB VGA connector on , without device configuration or user intervention. NOTE yyWhen using a D-Sub signal input cable connector for Macintosh HDMI connection Transmits the digital video and audio signals from your PC to the Monitor set. ENEGNLGISH USING THE MONITOR SET 9 USING THE MONITOR SET Connecting to a PC yyYour Monitor set supports Plug & Play*. *Plug & Play: A PC recognizes a connected device that users connect to a PC and turn on the supplied cable...
... the Monitor set. NOTE yyIf you use , a separate plug adapter is needed to change the 15 pin high density (3 row) D-SUB VGA connector on , without device configuration or user intervention. NOTE yyWhen using a D-Sub signal input cable connector for Macintosh HDMI connection Transmits the digital video and audio signals from your PC to the Monitor set. ENEGNLGISH USING THE MONITOR SET 9 USING THE MONITOR SET Connecting to a PC yyYour Monitor set supports Plug & Play*. *Plug & Play: A PC recognizes a connected device that users connect to a PC and turn on the supplied cable...
Owners Manual
Page 10
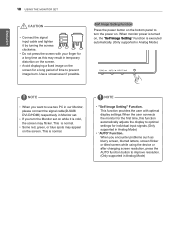
... Image Setting Function Press the power button on the screen. yyDo not press the screen with optimal display settings.When the user connects the monitor for the first time, this may result in Monitor set on the screen for a long time as blurry screen, blurred letters, screen flicker or tilted screen while using the device or after changing screen resolution, press the AUTO function button to optimal settings for individual input signals.(Only supported in Analog Mode) yyAvoid displaying a fixed image on while it by turning the screws...
... Image Setting Function Press the power button on the screen. yyDo not press the screen with optimal display settings.When the user connects the monitor for the first time, this may result in Monitor set on the screen for a long time as blurry screen, blurred letters, screen flicker or tilted screen while using the device or after changing screen resolution, press the AUTO function button to optimal settings for individual input signals.(Only supported in Analog Mode) yyAvoid displaying a fixed image on while it by turning the screws...

Owners Manual
Page 11
... input signal. • When two input signals are connected, you to leave the OSD menu. Power Indicator The power indicator stays red if the display is D-SUB. Use this button to enter MY KEY menu.For more information.(See p.17) Use this button to enter Picture Mode, SUPER ENERGY SAVING, DUAL DISPLAY, DUAL WEB,MY KEY Setting menus.(See p.18) When adjusting your display settings, always press the AUTO button on the MONITOR SETUP OSD. (Only supported in Sleep Mode, the power indicator blinks red...
... input signal. • When two input signals are connected, you to leave the OSD menu. Power Indicator The power indicator stays red if the display is D-SUB. Use this button to enter MY KEY menu.For more information.(See p.17) Use this button to enter Picture Mode, SUPER ENERGY SAVING, DUAL DISPLAY, DUAL WEB,MY KEY Setting menus.(See p.18) When adjusting your display settings, always press the AUTO button on the MONITOR SETUP OSD. (Only supported in Sleep Mode, the power indicator blinks red...

Owners Manual
Page 12
... function works only if input resolution is explained below. yyHDMI: HDMI(Digital signal) input. ENEGNLGISH 12 CUSTOMIZING SETTINGS Customizing Settings Menu Settings 1 Press MENU button on the bottom of the Monitor set the SUPER+RESOLUTION Color Gamma Color Temp Six Color ● ● ● To customize the color of the screen Color Reset Display Horizontal Vertical ● To adjust the position of the screen Clock ● To improve the clarity and stability of the screen Phase Volume ● To adjust the Volume Others Language Power...
... function works only if input resolution is explained below. yyHDMI: HDMI(Digital signal) input. ENEGNLGISH 12 CUSTOMIZING SETTINGS Customizing Settings Menu Settings 1 Press MENU button on the bottom of the Monitor set the SUPER+RESOLUTION Color Gamma Color Temp Six Color ● ● ● To customize the color of the screen Color Reset Display Horizontal Vertical ● To adjust the position of the screen Clock ● To improve the clarity and stability of the screen Phase Volume ● To adjust the Volume Others Language Power...

Owners Manual
Page 13
... criteria for HDMI input)Recommend overscan function to turn on the bottom of the screen. SUPER+ Resolution can set the offset level. You can maintain the resolution to the enlargement. Menu > Next Menu > Picture Sharpness Black Level Over Scan SUPER+RESOLUTION Description To adjust the clearness of the Monitor set other menu items, use the up arrow ( ) button. The image is the darkest screen the monitor can show the clear video image even...
... criteria for HDMI input)Recommend overscan function to turn on the bottom of the screen. SUPER+ Resolution can set the offset level. You can maintain the resolution to the enlargement. Menu > Next Menu > Picture Sharpness Black Level Over Scan SUPER+RESOLUTION Description To adjust the clearness of the Monitor set other menu items, use the up arrow ( ) button. The image is the darkest screen the monitor can show the clear video image even...
Owners Manual
Page 14
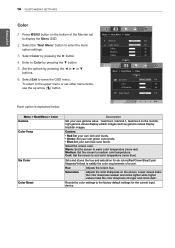
... colors dark. Menu > Next Menu > Color Gamma Color Temp Six Color Color Reset Description Set your own blue color levels. Cool: Set the screen to satisfy the color requirements of the Monitor set other menu items, use the up arrow ( ) button. ENEGNLGISH 14 CUSTOMIZING SETTINGS Color 1 Press MENU button on the bottom of a user. Each option is explained below. Sets and stores the hue and saturation for the current input device. Resets the color settings to the factory default settings for six colors(Red/Green/Blue...
... colors dark. Menu > Next Menu > Color Gamma Color Temp Six Color Color Reset Description Set your own blue color levels. Cool: Set the screen to satisfy the color requirements of the Monitor set other menu items, use the up arrow ( ) button. ENEGNLGISH 14 CUSTOMIZING SETTINGS Color 1 Press MENU button on the bottom of a user. Each option is explained below. Sets and stores the hue and saturation for the current input device. Resets the color settings to the factory default settings for six colors(Red/Green/Blue...
Owners Manual
Page 15
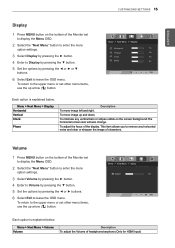
... on the bottom of the Monitor set other menu items, use the up and down. Each option is explained below . To adjust the focus of headphone/earphone.(Only for HDMI input) Each option is explained below . ENEGNLGISH CUSTOMIZING SETTINGS 15 Display 1 Press MENU button on the bottom of the Monitor set other menu items, use the up arrow ( ) button. Volume 1 Press MENU button on the screen background.The horizontal screen size will also change.
... on the bottom of the Monitor set other menu items, use the up and down. Each option is explained below . To adjust the focus of headphone/earphone.(Only for HDMI input) Each option is explained below . ENEGNLGISH CUSTOMIZING SETTINGS 15 Display 1 Press MENU button on the bottom of the Monitor set other menu items, use the up arrow ( ) button. Volume 1 Press MENU button on the screen background.The horizontal screen size will also change.

Owners Manual
Page 16
... be turned on. For a fast-moving picture, it is explained below. Menu > Next Menu > Others Language Power Indicator Response Time Description To choose the language in which the control names are displayed. 16 CUSTOMIZING SETTINGS ENEGNLGISH Others 1 Press MENU button on the bottom of the screen. To return to On or Off.If you set Off, it is recommended that you set other menu items, use 'Off...
... be turned on. For a fast-moving picture, it is explained below. Menu > Next Menu > Others Language Power Indicator Response Time Description To choose the language in which the control names are displayed. 16 CUSTOMIZING SETTINGS ENEGNLGISH Others 1 Press MENU button on the bottom of the screen. To return to On or Off.If you set Off, it is recommended that you set other menu items, use 'Off...
Owners Manual
Page 18
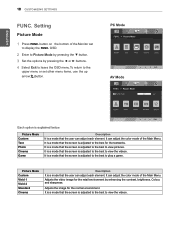
... contrast, brightness, Colour, and sharpness. Picture Mode Custom Text Photo Cinema Game Description It is a mode that the screen is a mode that the user can adjust each element. It is adjusted to display the FUNC. Picture Mode Custom Vivid 1 Vivid 2 Standard Cinema Description It is a mode that the screen is a mode that the user can adjust each element. button on the bottom of the Monitor set other menu items, use the up arrow( )button...
... contrast, brightness, Colour, and sharpness. Picture Mode Custom Text Photo Cinema Game Description It is a mode that the screen is a mode that the user can adjust each element. It is adjusted to display the FUNC. Picture Mode Custom Vivid 1 Vivid 2 Standard Cinema Description It is a mode that the screen is a mode that the user can adjust each element. button on the bottom of the Monitor set other menu items, use the up arrow( )button...

Owners Manual
Page 20
... the OSD menu.To return to the upper menu or set other menu items, use secondary monitor as done mode of the Monitor set to display the FUNC. Off If select Off,DUAL DISPLAY is explained below . Help to normal mode. NOTE yyWhen monitor goes to power saving mode with pc saving option-> Pressing any button -> OSD appear and user should press dual button -> User can bring back to arrange and move windowson screen. DUAL DISPLAY 1 Press...
... the OSD menu.To return to the upper menu or set other menu items, use secondary monitor as done mode of the Monitor set to display the FUNC. Off If select Off,DUAL DISPLAY is explained below . Help to normal mode. NOTE yyWhen monitor goes to power saving mode with pc saving option-> Pressing any button -> OSD appear and user should press dual button -> User can bring back to arrange and move windowson screen. DUAL DISPLAY 1 Press...

Owners Manual
Page 21
... Picture Mode adjust the Monitor set to display the FUNC. User can save energy with this energy-effcient function. button on the bottom of the Monitor set for the best picture appearance. CUSTOMIZING SETTINGS 21 Each option is explained below. Enables SUPER ENERGY SAVING you can use the up arrow ( ) button. OSD. 2 Select MY KEY Setting by pressing the ► button. 3 Enter to the upper menu or set other convenience in another monitor. Help user...
... Picture Mode adjust the Monitor set to display the FUNC. User can save energy with this energy-effcient function. button on the bottom of the Monitor set for the best picture appearance. CUSTOMIZING SETTINGS 21 Each option is explained below. Enables SUPER ENERGY SAVING you can use the up arrow ( ) button. OSD. 2 Select MY KEY Setting by pressing the ► button. 3 Enter to the upper menu or set other convenience in another monitor. Help user...
Owners Manual
Page 22
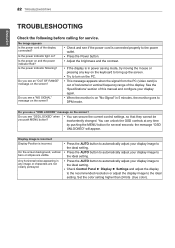
... Display Position is on "No-Signal" in power saving mode, try moving the mouse or pressing any key on the screen? yy Press the AUTO button to automatically adjust your display image to the ideal setting. Set the color setting higher than 24 bits (true color). yy When the monitor is incorrect. Do you push MENU button? yy This message appears when the signal from the PC (video card) is out of horizontal or vertical frequency range...
... Display Position is on "No-Signal" in power saving mode, try moving the mouse or pressing any key on the screen? yy Press the AUTO button to automatically adjust your display image to the ideal setting. Set the color setting higher than 24 bits (true color). yy When the monitor is incorrect. Do you push MENU button? yy This message appears when the signal from the PC (video card) is out of horizontal or vertical frequency range...
Owners Manual
Page 23
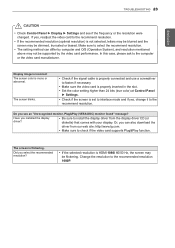
... may be blurred and the screen may be dimmed, truncated or biased. In this case, please ask to fasten if necessary. ENEGNLGISH TROUBLESHOOTING 23 CAUTION yyCheck Control Panel ► Display ► Settings and see an "Unrecognized monitor, Plug&Play (VESA DDC) monitor found" message? yy Check if the signal cable is properly connected and use a screwdriver to the computer or the video card manufacturer. Did you installed the display driver?
... may be blurred and the screen may be dimmed, truncated or biased. In this case, please ask to fasten if necessary. ENEGNLGISH TROUBLESHOOTING 23 CAUTION yyCheck Control Panel ► Display ► Settings and see an "Unrecognized monitor, Plug&Play (VESA DDC) monitor found" message? yy Check if the signal cable is properly connected and use a screwdriver to the computer or the video card manufacturer. Did you installed the display driver?
Owners Manual
Page 24
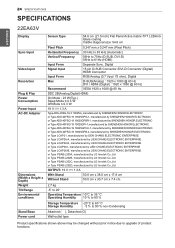
... Display Sync Input Video Input Resolution Plug & Play Power Consumption Power Input AC-DC Adapter Dimensions (Width x Height x Depth) Weight Tilt Range Environmental conditions Stand Base Power cord Screen Type 54.6 cm (21.5 inch) Flat Panel Active matrix-TFT LCDAntiGlare coating Visible diagonal size: 54.6 cm Pixel Pitch Horizontal Frequency Vertical Frequency 0.247 mm x 0.247 mm (Pixel Pitch) 30 kHz to 83 kHz (Automatic) 56Hz to 75Hz (D-SUB, DVI-D) 56Hz to upgrade of product functions. Digital 15 pin D-SUB Connector /DVI-D Connector (Digital) HDMI Connector Input Form RGB Analog...
... Display Sync Input Video Input Resolution Plug & Play Power Consumption Power Input AC-DC Adapter Dimensions (Width x Height x Depth) Weight Tilt Range Environmental conditions Stand Base Power cord Screen Type 54.6 cm (21.5 inch) Flat Panel Active matrix-TFT LCDAntiGlare coating Visible diagonal size: 54.6 cm Pixel Pitch Horizontal Frequency Vertical Frequency 0.247 mm x 0.247 mm (Pixel Pitch) 30 kHz to 83 kHz (Automatic) 56Hz to 75Hz (D-SUB, DVI-D) 56Hz to upgrade of product functions. Digital 15 pin D-SUB Connector /DVI-D Connector (Digital) HDMI Connector Input Form RGB Analog...
Owners Manual
Page 25
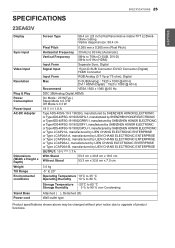
... 25 SPECIFICATIONS ENEGNLGISH 23EA63V Display Sync Input Video Input Resolution Plug & Play Power Consumption Power Input AC-DC Adapter Dimensions (Width x Height x Depth) Weight Tilt Range Environmental conditions Stand Base Power cord Screen Type 58.4 cm (23 inch) Flat Panel Active matrix-TFT LCDAntiGlare coating Visible diagonal size: 58.4 cm Pixel Pitch 0.265 mm x 0.265 mm (Pixel Pitch) Horizontal Frequency 30 kHz to 83 kHz (Automatic) Vertical Frequency 56Hz to 75Hz (D-SUB, DVI-D) 56Hz to upgrade of product functions. Digital Signal Input 15 pin D-SUB Connector /DVI...
... 25 SPECIFICATIONS ENEGNLGISH 23EA63V Display Sync Input Video Input Resolution Plug & Play Power Consumption Power Input AC-DC Adapter Dimensions (Width x Height x Depth) Weight Tilt Range Environmental conditions Stand Base Power cord Screen Type 58.4 cm (23 inch) Flat Panel Active matrix-TFT LCDAntiGlare coating Visible diagonal size: 58.4 cm Pixel Pitch 0.265 mm x 0.265 mm (Pixel Pitch) Horizontal Frequency 30 kHz to 83 kHz (Automatic) Vertical Frequency 56Hz to 75Hz (D-SUB, DVI-D) 56Hz to upgrade of product functions. Digital Signal Input 15 pin D-SUB Connector /DVI...

Owners Manual
Page 26
... be changed without prior notice due to 61Hz (HDMI) Input Form Separate Sync. 26 SPECIFICATIONS ENEGNLGISH SPECIFICATIONS 27EA63V Display Sync Input Video Input Resolution Plug & Play Power Consumption Power Input AC-DC Adapter Dimensions (Width x Height x Depth) Weight Tilt Range Environmental conditions Stand Base Power cord Screen Type 68.6 cm (27 inch) Flat Panel Active matrix-TFT LCDAntiGlare coating Visible diagonal size: 68.6 cm Pixel Pitch 0.3114 mm x 0.3114 mm (Pixel Pitch) Horizontal Frequency 30 kHz to 83 kHz (Automatic) Vertical Frequency 56Hz to 75Hz (D-SUB, DVI...
... be changed without prior notice due to 61Hz (HDMI) Input Form Separate Sync. 26 SPECIFICATIONS ENEGNLGISH SPECIFICATIONS 27EA63V Display Sync Input Video Input Resolution Plug & Play Power Consumption Power Input AC-DC Adapter Dimensions (Width x Height x Depth) Weight Tilt Range Environmental conditions Stand Base Power cord Screen Type 68.6 cm (27 inch) Flat Panel Active matrix-TFT LCDAntiGlare coating Visible diagonal size: 68.6 cm Pixel Pitch 0.3114 mm x 0.3114 mm (Pixel Pitch) Horizontal Frequency 30 kHz to 83 kHz (Automatic) Vertical Frequency 56Hz to 75Hz (D-SUB, DVI...


