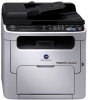
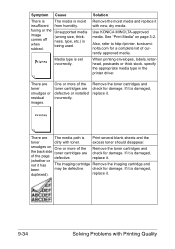
magicolor 1690MF Reference Guide
Page 232
Status Identifies the remaining life of the consumables in pages. Starter, Standard, High Configuring the Machine for User Mode 7-11 Consumable window provides the following information. Consumable The System - Device Information - age. Toner Cartridge and Imaging Cartridge: Percentage Type Identifies the maximum life expectancy of the consumables as a percent- Item Description Consumables Identifies the type of consumables that is being monitored.
magicolor 1690MF Reference Guide
Page 245
age Identifies the maximum life expectancy of consumables that is being monitored. Consumable window provides the following information: Item Consumables Status Type Description Identifies the type of the consumables in pages. Starter, Standard, High 7-24 Configuring the Machine for Administrator Mode Device Information - Indicates the remaining life of the consumables as a percentage. Toner Cartridge and Imaging Cartridge: Percent- Consumable The System -
magicolor 1690MF Printer / Copier / Scanner User Guide
Page 11
... 6-28 Setting the Scan Color 6-28 Specifying the Subject 6-28 Deleting a Queued Transmission Job 6-29 7 Replacing Consumables 7-1 Replacing Consumables 7-2 About Toner Cartridges 7-2 Replacing a Toner Cartridge 7-5 Removing All Toner Cartridges 7-11 Replacing the Imaging Cartridge 7-13 Replacing the Fuser Unit 7-17 8 Maintenance 8-1 Maintaining the Machine 8-2 Cleaning the Machine 8-4 Exterior...8-4 Media Rollers 8-5 Cleaning the Media Feed Roller...
magicolor 1690MF Printer / Copier / Scanner User Guide
Page 19
11-Fuser unit 12-Fuser separator levers 13-Fuser cover lever 14-Imaging cartridge 15-Toner cartridge 16-Front cover 11 13 12 12 11 14 15 Rear View 1-Power switch 2-Power connection 3-TEL (telephone) jack 4-LINE (telephone line) jack 5-USB port 6-10Base-T/100Base-TX Ethernet Interface port 14 16 15 1 3 4 2 5 6 1-6 Getting Acquainted with Your Machine
magicolor 1690MF Printer / Copier / Scanner User Guide
Page 45
... Status and Settings TX/RX RESULT For details, refer to the Facsimile User's Guide on the Documentation CD/DVD. Prints the results of the imaging cartridge as a percentage. " The amounts remaining for queued fax transmissions. C TONER M TONER Y TONER K TONER I/C Displays the remaining amount of... User's Guide on the Documentation CD/DVD. Prints the results of toner in the cyan (C) toner cartridge as a percentage. Displays the remaining amount of the imaging cartridges can be dif- REPORT The machine settings, lists and reports related to the Facsimile User's Guide on...
magicolor 1690MF Printer / Copier / Scanner User Guide
Page 176
...022 A0VU 0Y1 AP A0HF 042 A0VU 0Y1 GC A0HF 082 A0VU 0Y1 " For optimum print quality and performance, use only approved KONICA MINOLTA imaging cartridge for the cyan, black, then yellow toners. 8 Press the Stop/Reset key to reset the machine. put tray before opening... the scanner unit. For optimum print quality and performance, use only the corre- sponded TYPE genuine KONICA MINOLTA imaging cartridge. " You are advised to replace the imaging cartridge when the message I/C LIFE END/REPLACE I/C appears. 1 Open the scanner unit. " If there is paper in the...
magicolor 1690MF Printer / Copier / Scanner User Guide
Page 177
Do not burn the imaging cartridge. 7-14 Replacing Consumables Note Dispose of the used imaging cartridge according to the back, and then slowly pull the imaging cartridge out vertically. Note Do not touch the wires and flat cable shown in the illustration. 2 Grab the handle and lift it up slightly to your local regulations.
magicolor 1690MF Printer / Copier / Scanner User Guide
Page 178
Note Do not touch the PC drum and the transfer belt on the imaging cartridge. 4 Slowly insert the new imaging cartridge vertically, and then push it slightly down toward you to finish installing the imaging cartridge. 5 Carefully close the scanner unit. 3 Prepare the new imaging cartridge. Replacing Consumables 7-15
magicolor 1690MF Printer / Copier / Scanner User Guide
Page 179
If you open the scanner unit or front cover before the machine is closed. 7-16 Replacing Consumables Note Do not touch the wires and flat cable shown in the illustration. " The machine must complete a calibration cycle after the cover is reset, the calibration stops, then starts over again after the imaging cartridge has been replaced.
magicolor 1690MF Printer / Copier / Scanner User Guide
Page 193
... for more than 15 minutes, and do not place the removed imaging cartridge in the illustration at the right. Position the removed imaging cartridge horizontally as sunlight). 8-6 Cleaning the Machine 2 Grab the handle and lift it would be exposed to direct light (such as shown in a location where ...it up slightly to the back, and then slowly pull the imaging cartridge out vertically. Be sure to keep the imaging cartridge horizontal and place it where it will not become dirty. Note Do not touch the PC drum and the transfer belt on...
magicolor 1690MF Printer / Copier / Scanner User Guide
Page 195
Note Decreased print quality may result if the surface of the transfer roller. 4 Slowly insert the imaging car- Be careful not to finish reinstalling the imaging cartridge. 8-8 Cleaning the Machine tridge vertically, and then push it slightly down toward you to touch the surface of the transfer roller is touched.
magicolor 1690MF Printer / Copier / Scanner User Guide
Page 206
...than 15 minutes, and do not place the removed imaging cartridge in the illustration at the right. Cleaning the Machine 8-19 Note Do not touch the PC drum and the transfer belt on the imaging cartridge. Be sure to keep the imaging cartridge horizontal and place it where it would be exposed... to the back, and then slowly pull the imaging cartridge out vertically. 8 Grab the handle and lift it up slightly to direct...
magicolor 1690MF Printer / Copier / Scanner User Guide
Page 208
tridge vertically, and then push it slightly down toward you to touch the surface of the transfer roller is touched. Cleaning the Machine 8-21 Be careful not to finish reinstalling the imaging cartridge. Note Decreased print quality may result if the surface of the transfer roller. 10 Slowly insert the imaging car-
magicolor 1690MF Printer / Copier / Scanner User Guide
Page 216
Document feed tray 1 2 3. Imaging cartridge 6. Understanding the Media Path 9-5 Toner cartridge carousel Document path 7. Duplex (optional) 8 Media path Clearing Media Misfeeds To avoid damage, always remove misfed media gently, without tearing it. Make sure not to touch the printed face when removing the misfed media. ADF media feed rollers 2. Note The image is not fixed...
magicolor 1690MF Printer / Copier / Scanner User Guide
Page 220
...be exposed to direct light (such as shown in the illustration at the right. Do not leave the imaging cartridge removed for more than 15 minutes, and do not place the removed imaging cartridge in a location where it will not become dirty. Note Do not touch the PC drum and the ...transfer belt on the imaging cartridge. Be sure to the back, and then slowly pull the imaging cartridge out vertically. Clearing Media Misfeeds 9-9 Position the ...
magicolor 1690MF Printer / Copier / Scanner User Guide
Page 225
tridge vertically, and then push it slightly down toward you to finish reinstalling the imaging cartridge. 7 Carefully close the scanner unit. 6 Slowly insert the imaging car- Note Do not touch the wires and flat cable shown in the illustration. 9-14 Clearing Media Misfeeds
magicolor 1690MF Printer / Copier / Scanner User Guide
Page 242
blank spots The imaging cartridge Remove the imaging cartridge and on the may be defective. paper or other media, and replace it in the machine. it out, return it . If it . check for damage. ... color. there are Remove the media from humidity. Several sheets are be defective. One or more of the Remove the toner cartridges and toner cartridges may check for damage. The imaging cartridge Remove the imaging cartridge and may be defective. check for damage. Load the correct media in the tray. Entire sheet is printed in the...
magicolor 1690MF Printer / Copier / Scanner User Guide
Page 243
.... For details on positioning the document on the original glass, refer to "Placing a document on the original glass" on page 3-28. replace it . The imaging cartridge Remove the imaging cartridge and may check for damage. Clean the print head window. There is damaged, be defective. replace it . The document was not pressed close enough...
magicolor 1690MF Printer / Copier / Scanner User Guide
Page 244
... One or more of the Remove the toner cartridges and toner cartridges may be defective. The imaging cartridge Remove the imaging cartridge and may check for damage. Use KONICA MINOLTA-approved media. One or more of the Remove the toner cartridges and color density toner cartridges may be defective. The imaging cartridge Remove the imaging cartridge and may check for a complete list of the...
magicolor 1690MF Printer / Copier / Scanner User Guide
Page 245
...check for a complete list of the toner cartridges are toner smudges or residual images. rubbed. konicaminolta.com for damage. There are check for damage. Solution Remove the moist media and replace it has The imaging cartridge Remove the imaging cartridge and been may be defective. When printing...the toner cartridges and the back side toner cartridges are The media path is Print several blank sheets and the toner dirty with toner. fusing or the Unsupported media image (wrong size, thick- If it . 9-34 Solving Problems with new, dry media. Use KONICA MINOLTA-approved ...