Cube3 User Guide
Page 5
... is portable with a plug and print design that may not cause interference, and (2) this equipment not specifically approved by 3D Systems may cause harmful interference to express their creativity like never before. This equipment generates, uses and can be determined by turning...utilisateur de l'appareil doit accepter tout brouillage radioélectrique subi, même si le brouillage est susceptible d'en compromettre le fonctionnement. 3D Systems, Inc. 1 This printer is subject to part 15 of materials, enjoy the freedom to the following measures: -Reorient or relocate ...
... is portable with a plug and print design that may not cause interference, and (2) this equipment not specifically approved by 3D Systems may cause harmful interference to express their creativity like never before. This equipment generates, uses and can be determined by turning...utilisateur de l'appareil doit accepter tout brouillage radioélectrique subi, même si le brouillage est susceptible d'en compromettre le fonctionnement. 3D Systems, Inc. 1 This printer is subject to part 15 of materials, enjoy the freedom to the following measures: -Reorient or relocate ...
Cube3 User Guide
Page 6
...WHETHER THOSE WARRANTIES ARE EXPRESS, IMPLIED OR STATUTORY INCLUDING WARRANTIES OF MERCHANTABILITY AND FITNESS FOR INTENDED OR PARTICULAR PURPOSES. LIMITATION OF LIABILITY 3D SYSTEMS WILL NOT BE RESPONSIBLE FOR CONSEQUENTIAL, EXEMPLARY OR INCIDENTAL DAMAGES (SUCH AS LOSS OF PROFIT OR EMPLOYEE'S TIME) REGARDLESS OF ...the warranty period because of abnormal use or conditions (such as riots, floods, misuse, neglect or improper service by anyone except 3D Systems or its authorized service provider), and (iii) repairs required during the warranty period because of the use of non-integrated, non-...
...WHETHER THOSE WARRANTIES ARE EXPRESS, IMPLIED OR STATUTORY INCLUDING WARRANTIES OF MERCHANTABILITY AND FITNESS FOR INTENDED OR PARTICULAR PURPOSES. LIMITATION OF LIABILITY 3D SYSTEMS WILL NOT BE RESPONSIBLE FOR CONSEQUENTIAL, EXEMPLARY OR INCIDENTAL DAMAGES (SUCH AS LOSS OF PROFIT OR EMPLOYEE'S TIME) REGARDLESS OF ...the warranty period because of abnormal use or conditions (such as riots, floods, misuse, neglect or improper service by anyone except 3D Systems or its authorized service provider), and (iii) repairs required during the warranty period because of the use of non-integrated, non-...
Cube3 User Guide
Page 7
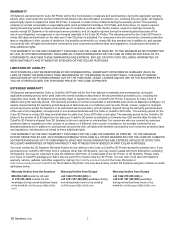
...: HAZARDOUS MOVING PARTS. Caution: Indicates a pinch point hazard that could cause loss of print materials, or 3D prints other than 3D Systems' print materials and genuine 3D Systems' components may happen that could cause personal injury. Wait until the print jet's amber light turns off before...WARNING: INDICATES A POTENTIAL SHOCK HAZARD. SAFETY GUIDELINES • Follow all safety rules in this may damage the Cube. These 3D prints are not accessible to prevent potential safety problems and ensure the Cube's appropriate use. observe children closely and intervene as ...
...: HAZARDOUS MOVING PARTS. Caution: Indicates a pinch point hazard that could cause loss of print materials, or 3D prints other than 3D Systems' print materials and genuine 3D Systems' components may happen that could cause personal injury. Wait until the print jet's amber light turns off before...WARNING: INDICATES A POTENTIAL SHOCK HAZARD. SAFETY GUIDELINES • Follow all safety rules in this may damage the Cube. These 3D prints are not accessible to prevent potential safety problems and ensure the Cube's appropriate use. observe children closely and intervene as ...
Cube3 User Guide
Page 8
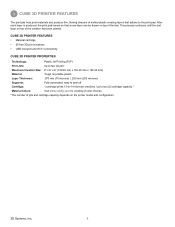
... creations • USB inlet port and Wi-Fi connectivity CUBE 3D PRINTER PROPERTIES Technology: Plastic Jet Printing (PJP) Print Jets: Up to -14 mid-size creations. easy to peel off Cartridge: 1 cartridge prints 13-to two (2) ... Colors: Visit www.cubify.com for a listing of color choices. *The number of jets and cartridge capacity depends on the printer model and configuration. 3D Systems, Inc. 4 3 CUBE 3D PRINTER FEATURES The print jets heat print materials and produce thin, flowing streams of melted plastic creating layers that a new layer can be drawn...
... creations • USB inlet port and Wi-Fi connectivity CUBE 3D PRINTER PROPERTIES Technology: Plastic Jet Printing (PJP) Print Jets: Up to -14 mid-size creations. easy to peel off Cartridge: 1 cartridge prints 13-to two (2) ... Colors: Visit www.cubify.com for a listing of color choices. *The number of jets and cartridge capacity depends on the printer model and configuration. 3D Systems, Inc. 4 3 CUBE 3D PRINTER FEATURES The print jets heat print materials and produce thin, flowing streams of melted plastic creating layers that a new layer can be drawn...

Cube3 User Guide
Page 9
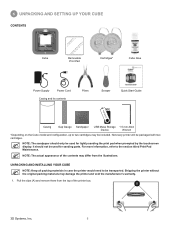
4 AT A GLANCE B C F A G B C J D H H E KI A Print Jets B Print Jet Tubes C Material Cartridges D Print Pad E Print Platform F Touchscreen Display I K G On / Off Button H USB Inlet Port (Mass Storage Device) I Power Inlet J Refuse Bins K USB B Port (for future use) 3D Systems, Inc. 5
4 AT A GLANCE B C F A G B C J D H H E KI A Print Jets B Print Jet Tubes C Material Cartridges D Print Pad E Print Platform F Touchscreen Display I K G On / Off Button H USB Inlet Port (Mass Storage Device) I Power Inlet J Refuse Bins K USB B Port (for future use) 3D Systems, Inc. 5
Cube3 User Guide
Page 10
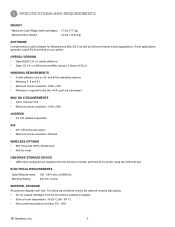
... Rating: 100 - 240 Volts, at room temperature: 16-29° C (60 - 85° F) • Non-condensing relative humidity: 5% - 25% 3D Systems, Inc. 6 5 SPECIFICATIONS AND REQUIREMENTS WEIGHT Maximum Cube Weight (with cartridges): 17 lbs. (7.7 kg) Maximum Box Weight: 23 lbs. (10.43 kg) SOFTWARE ...Complimentary Cubify software for Ad Hoc Wi-Fi print job submission. and 64-bit operating systems • Windows 7, 8 and 8.1 • Minimum screen resolution: 1024 x 768 • Windows is needed. • Store at 50/60 Hz ...
... Rating: 100 - 240 Volts, at room temperature: 16-29° C (60 - 85° F) • Non-condensing relative humidity: 5% - 25% 3D Systems, Inc. 6 5 SPECIFICATIONS AND REQUIREMENTS WEIGHT Maximum Cube Weight (with cartridges): 17 lbs. (7.7 kg) Maximum Box Weight: 23 lbs. (10.43 kg) SOFTWARE ...Complimentary Cubify software for Ad Hoc Wi-Fi print job submission. and 64-bit operating systems • Windows 7, 8 and 8.1 • Minimum screen resolution: 1024 x 768 • Windows is needed. • Store at 50/60 Hz ...
Cube3 User Guide
Page 12
... of the contents may differ from the illustrations. Shipping the printer without the original packing materials may damage the printer and void the manufacturer's warranty. 1. A 3D Systems, Inc. 8 6 UNPACKING AND SETTING UP YOUR CUBE CONTENTS Cube Removable Print Pad Cartridges* Cube Glue Power Supply Power Cord Casing and its contents Pliers Scraper...
... of the contents may differ from the illustrations. Shipping the printer without the original packing materials may damage the printer and void the manufacturer's warranty. 1. A 3D Systems, Inc. 8 6 UNPACKING AND SETTING UP YOUR CUBE CONTENTS Cube Removable Print Pad Cartridges* Cube Glue Power Supply Power Cord Casing and its contents Pliers Scraper...
Cube3 User Guide
Page 13
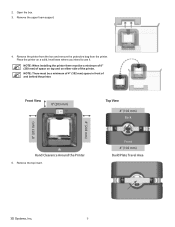
... of 8" (203 mm) of space on top and on a solid, level base where you intend to use it. Front 4" (102 mm) Build Plate Travel Area 3D Systems, Inc. 9 2. Place the printer on either side of and behind the printer. Remove the top insert. Open the box. 3. Remove the printer from the box...
... of 8" (203 mm) of space on top and on a solid, level base where you intend to use it. Front 4" (102 mm) Build Plate Travel Area 3D Systems, Inc. 9 2. Place the printer on either side of and behind the printer. Remove the top insert. Open the box. 3. Remove the printer from the box...
Cube3 User Guide
Page 14
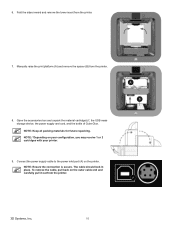
NOTE: *Depending on the outer cable end and carefully pull it out from the printer. A B A 3D Systems, Inc. 10 The cable should lock in place. Manually raise the print platform (A) and remove the spacer (B) from the printer. 7. NOTE: Ensure the connection is ...
NOTE: *Depending on the outer cable end and carefully pull it out from the printer. A B A 3D Systems, Inc. 10 The cable should lock in place. Manually raise the print platform (A) and remove the spacer (B) from the printer. 7. NOTE: Ensure the connection is ...
Cube3 User Guide
Page 15
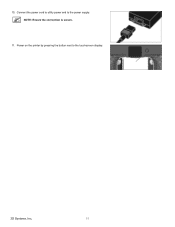
NOTE: Ensure the connection is secure. 11. Power on the printer by pressing the button next to the power supply. 10. Connect the power cord to utility power and to the touchscreen display. 3D Systems, Inc. 11
NOTE: Ensure the connection is secure. 11. Power on the printer by pressing the button next to the power supply. 10. Connect the power cord to utility power and to the touchscreen display. 3D Systems, Inc. 11
Cube3 User Guide
Page 16
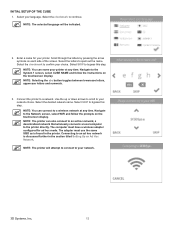
.... The adapter must have a wireless adapter configured for your language. INITIAL SETUP OF THE CUBE 1. Select SKIP to the printer directly. Select SKIP to the System 1 screen, select CUBE NAME and follow the prompts on each side of the screen. Navigate to bypass this step. Connecting to confirm your network choice... section titled Setting Up an Ad Hoc Network. Use the up or down arrows to scroll to a network. NOTE: The printer can name your network. 3D Systems, Inc. 12
.... The adapter must have a wireless adapter configured for your language. INITIAL SETUP OF THE CUBE 1. Select SKIP to the printer directly. Select SKIP to the System 1 screen, select CUBE NAME and follow the prompts on each side of the screen. Navigate to bypass this step. Connecting to confirm your network choice... section titled Setting Up an Ad Hoc Network. Use the up or down arrows to scroll to a network. NOTE: The printer can name your network. 3D Systems, Inc. 12
Cube3 User Guide
Page 17
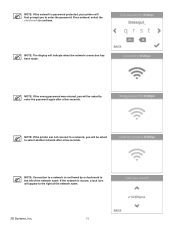
... has been made. NOTE: Connection to a network is confirmed by a checkmark to continue. Once entered, select the checkmark to the left of the network name. 3D Systems, Inc. 13 NOTE: If the network is password protected, your printer will first prompt you will be asked to select another network after a few seconds.
... has been made. NOTE: Connection to a network is confirmed by a checkmark to continue. Once entered, select the checkmark to the left of the network name. 3D Systems, Inc. 13 NOTE: If the network is password protected, your printer will first prompt you will be asked to select another network after a few seconds.
Cube3 User Guide
Page 18
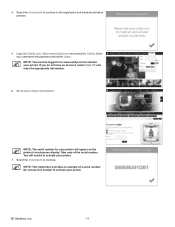
....com/activate. Go to www.cubify.com and select My Cubify. Take note of a serial number. Do not use this number to activate your printer. 3D Systems, Inc. 14 If you do not have an account, select SIGN UP and enter the appropriate information. 6. Enter your printer. NOTE: You must be logged...
....com/activate. Go to www.cubify.com and select My Cubify. Take note of a serial number. Do not use this number to activate your printer. 3D Systems, Inc. 14 If you do not have an account, select SIGN UP and enter the appropriate information. 6. Enter your printer. NOTE: You must be logged...
Cube3 User Guide
Page 19
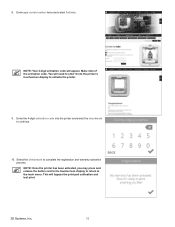
You will bypass the print pad calibration and test print. 3D Systems, Inc. 15 This will need to enter it into the printer and select the checkmark to activate the printer. 9. 8. NOTE: Once the printer has been ...
You will bypass the print pad calibration and test print. 3D Systems, Inc. 15 This will need to enter it into the printer and select the checkmark to activate the printer. 9. 8. NOTE: Once the printer has been ...
Cube3 User Guide
Page 20
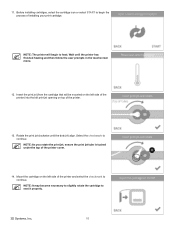
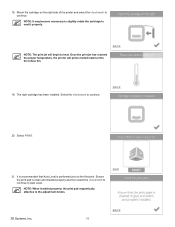
Select the checkmark to seat it properly. 3D Systems, Inc. 16 Rotate the print jet clockwise until the printer has finished heating and then follow the user prompts in the touchscreen menu. 12. NOTE: ...
Select the checkmark to seat it properly. 3D Systems, Inc. 16 Rotate the print jet clockwise until the printer has finished heating and then follow the user prompts in the touchscreen menu. 12. NOTE: ...
Cube3 User Guide
Page 21
... material into the right print jet opening on the right side of the printer) into the refuse bin. 15. The left cartridge has been installed. A 3D Systems, Inc. 17
... material into the right print jet opening on the right side of the printer) into the refuse bin. 15. The left cartridge has been installed. A 3D Systems, Inc. 17
Cube3 User Guide
Page 22
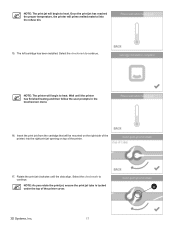
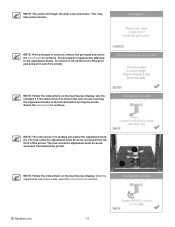
... heat. NOTE: When installed properly, the print pad magnetically attaches to the first print. Ensure the print pad is performed prior to the adjustment knobs. 3D Systems, Inc. 18 NOTE: The print jet will prime melted material into the refuse bin. 19. Select PRINT. 21. NOTE: It may become necessary to slightly...
... heat. NOTE: When installed properly, the print pad magnetically attaches to the first print. Ensure the print pad is performed prior to the adjustment knobs. 3D Systems, Inc. 18 NOTE: The print jet will prime melted material into the refuse bin. 19. Select PRINT. 21. NOTE: It may become necessary to slightly...
Cube3 User Guide
Page 23
... to continue. To remove it, lift up the front of the print pad and pull it out of the printer. Select the checkmark to continue. 2 1 3D Systems, Inc. 19 NOTE: Follow the instructions on the touchscreen display. NOTE: Follow the instructions on the touchscreen display. NOTE: If the print pad is located...
... to continue. To remove it, lift up the front of the print pad and pull it out of the printer. Select the checkmark to continue. 2 1 3D Systems, Inc. 19 NOTE: Follow the instructions on the touchscreen display. NOTE: Follow the instructions on the touchscreen display. NOTE: If the print pad is located...
Cube3 User Guide
Page 24
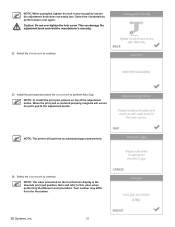
... when performing the Manual Level procedure. NOTE: The printer will secure the print pad to the adjustment knobs. Your number may differ from the illustration. 3D Systems, Inc. 20 Note and refer to ensure the adjustment knob does not easily turn. NOTE: To install the print pad, place it on the touchscreen...
... when performing the Manual Level procedure. NOTE: The printer will secure the print pad to the adjustment knobs. Your number may differ from the illustration. 3D Systems, Inc. 20 Note and refer to ensure the adjustment knob does not easily turn. NOTE: To install the print pad, place it on the touchscreen...

Cube3 User Guide
Page 25
... two thin layers of the installed print cartridges, the printer will begin to bypass this test print at any time. Select the checkmark to the System 1 screen and select TEST PRINT. Once the Plate Maintenance procedure has been performed, perform Auto Level and Auto Gap. Select SKIP to heat and... then begin printing the welcome message test print. 3D Systems, Inc. 21 NOTE: If the color built into the test print does not match a color of one of Cube Glue to the test print....
... two thin layers of the installed print cartridges, the printer will begin to bypass this test print at any time. Select the checkmark to the System 1 screen and select TEST PRINT. Once the Plate Maintenance procedure has been performed, perform Auto Level and Auto Gap. Select SKIP to heat and... then begin printing the welcome message test print. 3D Systems, Inc. 21 NOTE: If the color built into the test print does not match a color of one of Cube Glue to the test print....


