
Cube3 User Guide
Page 2
... 1 COPYRIGHT INFORMATION 1 FCC NOTICE 1 KCC 1 COMPLIANCE 1 WARRANTY 2 LIMITATION OF LIABILITY 2 EXTENDED WARRANTY 2 2 IMPORTANT SAFETY INFORMATION 3 Safety Symbols and Definitions 3 Safety Guidelines 3 3 CUBE 3D PRINTER FEATURES 4 Cube 3D Printer Features 4 Cube 3D Printer Properties 4 4 AT A GLANCE 5 5 SPECIFICATIONS AND REQUIREMENTS 6 Weight 6 Software 6 OpenGL Version 6 Windows Requirements 6 MAC OS X Requirements 6 Android 6 iOS 6 Wireless Options 6 USB Mass...
... 1 COPYRIGHT INFORMATION 1 FCC NOTICE 1 KCC 1 COMPLIANCE 1 WARRANTY 2 LIMITATION OF LIABILITY 2 EXTENDED WARRANTY 2 2 IMPORTANT SAFETY INFORMATION 3 Safety Symbols and Definitions 3 Safety Guidelines 3 3 CUBE 3D PRINTER FEATURES 4 Cube 3D Printer Features 4 Cube 3D Printer Properties 4 4 AT A GLANCE 5 5 SPECIFICATIONS AND REQUIREMENTS 6 Weight 6 Software 6 OpenGL Version 6 Windows Requirements 6 MAC OS X Requirements 6 Android 6 iOS 6 Wireless Options 6 USB Mass...
Cube3 User Guide
Page 5
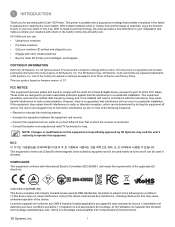
...home use (Class B) electromagnetic wave suitability equipment and to provide reasonable protection against harmful interference in a residential installation. The 3D Systems logo, 3D Systems, Cube and Cubify are designed to be used mainly at Cubify.com. FCC NOTICE This equipment has been tested ... de l'appareil doit accepter tout brouillage radioélectrique subi, même si le brouillage est susceptible d'en compromettre le fonctionnement. 3D Systems, Inc. 1 1 INTRODUCTION Thank you share your creations with others in the Cubify community at home and it up. With ...
...home use (Class B) electromagnetic wave suitability equipment and to provide reasonable protection against harmful interference in a residential installation. The 3D Systems logo, 3D Systems, Cube and Cubify are designed to be used mainly at Cubify.com. FCC NOTICE This equipment has been tested ... de l'appareil doit accepter tout brouillage radioélectrique subi, même si le brouillage est susceptible d'en compromettre le fonctionnement. 3D Systems, Inc. 1 1 INTRODUCTION Thank you share your creations with others in the Cubify community at home and it up. With ...
Cube3 User Guide
Page 6
...and (iii) repairs required during the warranty period because of the use of non-integrated, non-approved or non-licensed materials in the Cube 3D Printer. This warranty excludes (i) normal consumable or expendable parts (such as Material Cartridges, Print Pads, and Cube Glue), (ii) repairs required ...the benefits conferred by our standard warranty are in addition to, and operate concurrently with, all rights and remedies conveyed by anyone except 3D Systems or its authorized service provider), and (iii) repairs required during the warranty period because of the use of non-integrated, non-...
...and (iii) repairs required during the warranty period because of the use of non-integrated, non-approved or non-licensed materials in the Cube 3D Printer. This warranty excludes (i) normal consumable or expendable parts (such as Material Cartridges, Print Pads, and Cube Glue), (ii) repairs required ...the benefits conferred by our standard warranty are in addition to, and operate concurrently with, all rights and remedies conveyed by anyone except 3D Systems or its authorized service provider), and (iii) repairs required during the warranty period because of the use of non-integrated, non-...
Cube3 User Guide
Page 7
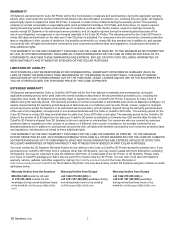
... change a material cartridge during printing; KEEP FINGERS AND OTHER BODY PARTS AWAY. To ensure safety, please exercise caution when operating your Cube 3D Printer to setting up the printer. Caution: Indicates something may damage the print jet. SAFETY GUIDELINES • Follow all safety rules in .... Caution: Read and follow all instructions prior to ensure proper printing and be mindful of print materials, or 3D prints other than 3D Systems' print materials and genuine 3D Systems' components may damage the Cube. SHOCK WARNING: DUE TO RISK OF SHOCK, AVOID CONTACT WITH ALL INTERNAL...
... change a material cartridge during printing; KEEP FINGERS AND OTHER BODY PARTS AWAY. To ensure safety, please exercise caution when operating your Cube 3D Printer to setting up the printer. Caution: Indicates something may damage the print jet. SAFETY GUIDELINES • Follow all safety rules in .... Caution: Read and follow all instructions prior to ensure proper printing and be mindful of print materials, or 3D prints other than 3D Systems' print materials and genuine 3D Systems' components may damage the Cube. SHOCK WARNING: DUE TO RISK OF SHOCK, AVOID CONTACT WITH ALL INTERNAL...
Cube3 User Guide
Page 8
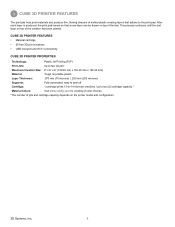
... creations • USB inlet port and Wi-Fi connectivity CUBE 3D PRINTER PROPERTIES Technology: Plastic Jet Printing (PJP) Print Jets: Up to -14 mid-size creations. easy to peel off Cartridge: 1 cartridge prints 13-to two (2) ... mm (70 microns) | .200 mm (200 microns) Supports: Fully automated; This process continues until the last layer on the printer model and configuration. 3D Systems, Inc. 4 3 CUBE 3D PRINTER FEATURES The print jets heat print materials and produce thin, flowing streams of the last. After each layer is produced, the print pad...
... creations • USB inlet port and Wi-Fi connectivity CUBE 3D PRINTER PROPERTIES Technology: Plastic Jet Printing (PJP) Print Jets: Up to -14 mid-size creations. easy to peel off Cartridge: 1 cartridge prints 13-to two (2) ... mm (70 microns) | .200 mm (200 microns) Supports: Fully automated; This process continues until the last layer on the printer model and configuration. 3D Systems, Inc. 4 3 CUBE 3D PRINTER FEATURES The print jets heat print materials and produce thin, flowing streams of the last. After each layer is produced, the print pad...

Cube3 User Guide
Page 9
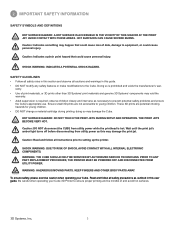
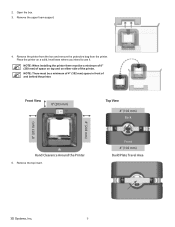
4 AT A GLANCE B C F A G B C J D H H E KI A Print Jets B Print Jet Tubes C Material Cartridges D Print Pad E Print Platform F Touchscreen Display I K G On / Off Button H USB Inlet Port (Mass Storage Device) I Power Inlet J Refuse Bins K USB B Port (for future use) 3D Systems, Inc. 5
4 AT A GLANCE B C F A G B C J D H H E KI A Print Jets B Print Jet Tubes C Material Cartridges D Print Pad E Print Platform F Touchscreen Display I K G On / Off Button H USB Inlet Port (Mass Storage Device) I Power Inlet J Refuse Bins K USB B Port (for future use) 3D Systems, Inc. 5
Cube3 User Guide
Page 10
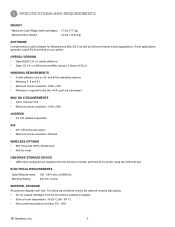
... printer. ELECTRICAL REQUIREMENTS Outlet Requirements Electrical Rating: 100 - 240 Volts, at room temperature: 16-29° C (60 - 85° F) • Non-condensing relative humidity: 5% - 25% 3D Systems, Inc. 6 5 SPECIFICATIONS AND REQUIREMENTS WEIGHT Maximum Cube Weight (with cartridges): 17 lbs. (7.7 kg) Maximum Box Weight: 23 lbs. (10.43 kg) SOFTWARE Complimentary Cubify...
... printer. ELECTRICAL REQUIREMENTS Outlet Requirements Electrical Rating: 100 - 240 Volts, at room temperature: 16-29° C (60 - 85° F) • Non-condensing relative humidity: 5% - 25% 3D Systems, Inc. 6 5 SPECIFICATIONS AND REQUIREMENTS WEIGHT Maximum Cube Weight (with cartridges): 17 lbs. (7.7 kg) Maximum Box Weight: 23 lbs. (10.43 kg) SOFTWARE Complimentary Cubify...
Cube3 User Guide
Page 12
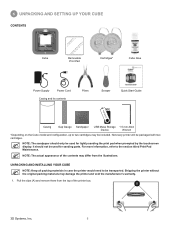
... YOUR CUBE NOTE: Keep all packing materials in case the printer would need to be packaged with two cartridges. Not every printer will be transported. A 3D Systems, Inc. 8 NOTE: The actual appearance of the printer box. 6 UNPACKING AND SETTING UP YOUR CUBE CONTENTS Cube Removable Print Pad Cartridges* Cube Glue Power...
... YOUR CUBE NOTE: Keep all packing materials in case the printer would need to be packaged with two cartridges. Not every printer will be transported. A 3D Systems, Inc. 8 NOTE: The actual appearance of the printer box. 6 UNPACKING AND SETTING UP YOUR CUBE CONTENTS Cube Removable Print Pad Cartridges* Cube Glue Power...
Cube3 User Guide
Page 13
... Clearance Around the Printer 5. NOTE: There must be a minimum of 4" (102 mm) space in front of the printer. Front 4" (102 mm) Build Plate Travel Area 3D Systems, Inc. 9 NOTE: When installing the printer there must be a minimum of 8" (203 mm) of space on top and on a solid, level base where you...
... Clearance Around the Printer 5. NOTE: There must be a minimum of 4" (102 mm) space in front of the printer. Front 4" (102 mm) Build Plate Travel Area 3D Systems, Inc. 9 NOTE: When installing the printer there must be a minimum of 8" (203 mm) of space on top and on a solid, level base where you...
Cube3 User Guide
Page 14
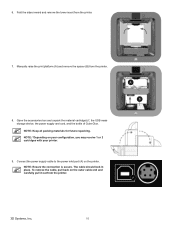
... cable end and carefully pull it out from the printer. The cable should lock in place. To remove the cable, pull back on the printer. A B A 3D Systems, Inc. 10 6. Manually raise the print platform (A) and remove the spacer (B) from the printer. 7. NOTE: *Depending on your configuration, you may receive 1 or 2 cartridges...
... cable end and carefully pull it out from the printer. The cable should lock in place. To remove the cable, pull back on the printer. A B A 3D Systems, Inc. 10 6. Manually raise the print platform (A) and remove the spacer (B) from the printer. 7. NOTE: *Depending on your configuration, you may receive 1 or 2 cartridges...
Cube3 User Guide
Page 15
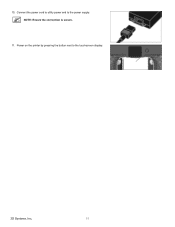
Connect the power cord to utility power and to the touchscreen display. 3D Systems, Inc. 11 Power on the printer by pressing the button next to the power supply. 10. NOTE: Ensure the connection is secure. 11.
Connect the power cord to utility power and to the touchscreen display. 3D Systems, Inc. 11 Power on the printer by pressing the button next to the power supply. 10. NOTE: Ensure the connection is secure. 11.
Cube3 User Guide
Page 16
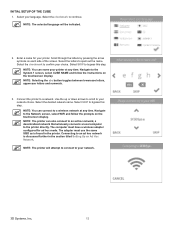
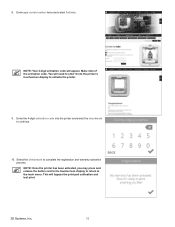
..., select CUBE NAME and follow the prompts on each side of the screen. Use the up or down arrows to scroll to confirm your network. 3D Systems, Inc. 12 INITIAL SETUP OF THE CUBE 1. Select the checkmark to your language.
..., select CUBE NAME and follow the prompts on each side of the screen. Use the up or down arrows to scroll to confirm your network. 3D Systems, Inc. 12 INITIAL SETUP OF THE CUBE 1. Select the checkmark to your language.
Cube3 User Guide
Page 17
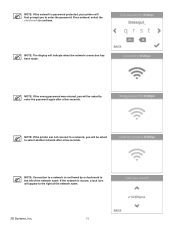
NOTE: If the printer can not connect to a network, you will be asked to the left of the network name. 3D Systems, Inc. 13 If the network is confirmed by a checkmark to select another network after a few seconds. NOTE: The display will first prompt you will ...
NOTE: If the printer can not connect to a network, you will be asked to the left of the network name. 3D Systems, Inc. 13 If the network is confirmed by a checkmark to select another network after a few seconds. NOTE: The display will first prompt you will ...
Cube3 User Guide
Page 18
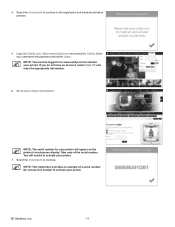
Log in to www.cubify.com to activate your printer. 3D Systems, Inc. 14 Enter your printer. If you do not have an account, select SIGN UP and enter the appropriate information. 6. Select the checkmark to ...
Log in to www.cubify.com to activate your printer. 3D Systems, Inc. 14 Enter your printer. If you do not have an account, select SIGN UP and enter the appropriate information. 6. Select the checkmark to ...
Cube3 User Guide
Page 19
... number twice and select Activate. Make note of the activation code. NOTE: Your 4-digit activation code will bypass the print pad calibration and test print. 3D Systems, Inc. 15
... number twice and select Activate. Make note of the activation code. NOTE: Your 4-digit activation code will bypass the print pad calibration and test print. 3D Systems, Inc. 15
Cube3 User Guide
Page 20
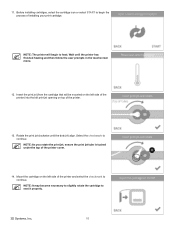
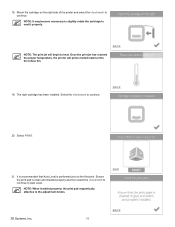
... the print jet, ensure the print jet tube is tucked under the top of installing your print cartridge. Select the checkmark to seat it properly. 3D Systems, Inc. 16
... the print jet, ensure the print jet tube is tucked under the top of installing your print cartridge. Select the checkmark to seat it properly. 3D Systems, Inc. 16
Cube3 User Guide
Page 21
... print jet clockwise until the printer has finished heating and then follow the user prompts in the touchscreen menu. 16. Select the checkmark to continue. A 3D Systems, Inc. 17
... print jet clockwise until the printer has finished heating and then follow the user prompts in the touchscreen menu. 16. Select the checkmark to continue. A 3D Systems, Inc. 17
Cube3 User Guide
Page 22
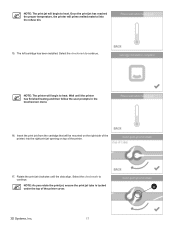
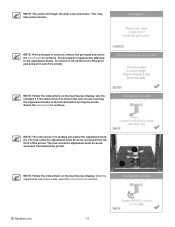
NOTE: The print jet will prime melted material into the refuse bin. 19. Ensure the print pad is performed prior to the adjustment knobs. 3D Systems, Inc. 18 Select PRINT. 21. It is recommended that Auto Level is clean and installed properly and then select the checkmark to continue to ...
NOTE: The print jet will prime melted material into the refuse bin. 19. Ensure the print pad is performed prior to the adjustment knobs. 3D Systems, Inc. 18 Select PRINT. 21. It is recommended that Auto Level is clean and installed properly and then select the checkmark to continue to ...
Cube3 User Guide
Page 23
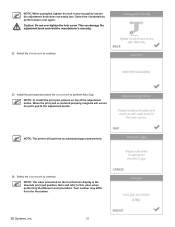
Select the checkmark to continue. 2 1 3D Systems, Inc. 19 The lock screw for adjustment knob B can be accessed from behind the printer. NOTE: Follow the instructions on the touchscreen display. Once ...
Select the checkmark to continue. 2 1 3D Systems, Inc. 19 The lock screw for adjustment knob B can be accessed from behind the printer. NOTE: Follow the instructions on the touchscreen display. Once ...
Cube3 User Guide
Page 24
... and refer to perform Auto Gap. NOTE: The printer will secure the print pad to the adjustment knobs. Your number may differ from the illustration. 3D Systems, Inc. 20 Install the print pad and select the checkmark to this value when performing the Manual Level procedure. NOTE: The value presented on...
... and refer to perform Auto Gap. NOTE: The printer will secure the print pad to the adjustment knobs. Your number may differ from the illustration. 3D Systems, Inc. 20 Install the print pad and select the checkmark to this value when performing the Manual Level procedure. NOTE: The value presented on...