Cube3 User Guide
Page 5
...on firmware version: v1.07. This document is based on , the user is encouraged to try to change without notice. The 3D Systems logo, 3D Systems, Cube and Cubify are designed to provide reasonable protection against harmful interference in the family to you • Engage with Industry ...a residential installation. This equipment generates, uses and can be used mainly at Cubify.com. NOTE: Changes or modifications to part 15 of 3D Systems, Inc. With its Terms of the applicable EC directives. If this equipment. KCC B This equipment is connected. -Consult the dealer or...
...on firmware version: v1.07. This document is based on , the user is encouraged to try to change without notice. The 3D Systems logo, 3D Systems, Cube and Cubify are designed to provide reasonable protection against harmful interference in the family to you • Engage with Industry ...a residential installation. This equipment generates, uses and can be used mainly at Cubify.com. NOTE: Changes or modifications to part 15 of 3D Systems, Inc. With its Terms of the applicable EC directives. If this equipment. KCC B This equipment is connected. -Consult the dealer or...
Cube3 User Guide
Page 6
...hours or by our standard warranty are in addition to ship the 3D Printer. You can learn more about 3D Systems' warranty, service, updates, and other than 3D Systems, you , including this user guide. 3D Systems will be free from defects in materials and workmanship, during the ... during the warranty period. You must contact the 3D Systems' Warranty Hotline for the CubePro 3D printer is shipped from 3D Systems to , and operate concurrently with them first before contacting 3D Systems. You may also directly contact 3D Systems using the numbers or email addresses below: Warranty...
...hours or by our standard warranty are in addition to ship the 3D Printer. You can learn more about 3D Systems' warranty, service, updates, and other than 3D Systems, you , including this user guide. 3D Systems will be free from defects in materials and workmanship, during the ... during the warranty period. You must contact the 3D Systems' Warranty Hotline for the CubePro 3D printer is shipped from 3D Systems to , and operate concurrently with them first before contacting 3D Systems. You may also directly contact 3D Systems using the numbers or email addresses below: Warranty...
Cube3 User Guide
Page 7
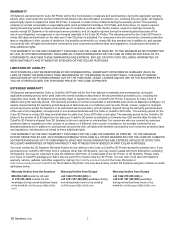
...: Read and follow all instructions prior to ensure proper printing and be mindful of print materials, or 3D prints other than 3D Systems' print materials and genuine 3D Systems' components may damage the Cube. WARNING: THE CUBE SHOULD ONLY BE SERVICED BY AUTHORIZED SERVICE TECHNICIANS. Read...THE PRINT JET. Caution: Indicates something may damage the print jet. ranty. • Use of and avoid hot surfaces. 3D Systems, Inc. 3 Ensure small 3D prints are potential choking hazards for young children. • DO NOT change a material cartridge during printing; HOT SURFACE HAZARD:...
...: Read and follow all instructions prior to ensure proper printing and be mindful of print materials, or 3D prints other than 3D Systems' print materials and genuine 3D Systems' components may damage the Cube. WARNING: THE CUBE SHOULD ONLY BE SERVICED BY AUTHORIZED SERVICE TECHNICIANS. Read...THE PRINT JET. Caution: Indicates something may damage the print jet. ranty. • Use of and avoid hot surfaces. 3D Systems, Inc. 3 Ensure small 3D prints are potential choking hazards for young children. • DO NOT change a material cartridge during printing; HOT SURFACE HAZARD:...
Cube3 User Guide
Page 8
... depends on the printer model and configuration. 3D Systems, Inc. 4 Up to -14 mid-size creations. CUBE 3D PRINTER FEATURES • Material cartridge • 25 free 3D print creations • USB inlet port and Wi-Fi connectivity CUBE 3D PRINTER PROPERTIES Technology: Plastic Jet Printing (PJP...) Print Jets: Up to the print pad. 3 CUBE 3D PRINTER FEATURES The print ...
... depends on the printer model and configuration. 3D Systems, Inc. 4 Up to -14 mid-size creations. CUBE 3D PRINTER FEATURES • Material cartridge • 25 free 3D print creations • USB inlet port and Wi-Fi connectivity CUBE 3D PRINTER PROPERTIES Technology: Plastic Jet Printing (PJP...) Print Jets: Up to the print pad. 3 CUBE 3D PRINTER FEATURES The print ...

Cube3 User Guide
Page 9
4 AT A GLANCE B C F A G B C J D H H E KI A Print Jets B Print Jet Tubes C Material Cartridges D Print Pad E Print Platform F Touchscreen Display I K G On / Off Button H USB Inlet Port (Mass Storage Device) I Power Inlet J Refuse Bins K USB B Port (for future use) 3D Systems, Inc. 5
4 AT A GLANCE B C F A G B C J D H H E KI A Print Jets B Print Jet Tubes C Material Cartridges D Print Pad E Print Platform F Touchscreen Display I K G On / Off Button H USB Inlet Port (Mass Storage Device) I Power Inlet J Refuse Bins K USB B Port (for future use) 3D Systems, Inc. 5
Cube3 User Guide
Page 10
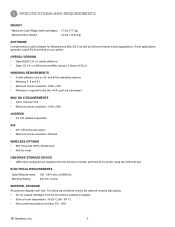
...: • Do not unpack cartridges from the foil until the material is required for Ad Hoc Wi-Fi print job submission. and 64-bit operating systems • Windows 7, 8 and 8.1 • Minimum screen resolution: 1024 x 768 • Windows is needed. • Store at 50/60 Hz... Rating: 100 - 240 Volts, at room temperature: 16-29° C (60 - 85° F) • Non-condensing relative humidity: 5% - 25% 3D Systems, Inc. 6 5 SPECIFICATIONS AND REQUIREMENTS WEIGHT Maximum Cube Weight (with cartridges): 17 lbs. (7.7 kg) Maximum Box Weight: 23 lbs. (10.43 kg) SOFTWARE Complimentary...
...: • Do not unpack cartridges from the foil until the material is required for Ad Hoc Wi-Fi print job submission. and 64-bit operating systems • Windows 7, 8 and 8.1 • Minimum screen resolution: 1024 x 768 • Windows is needed. • Store at 50/60 Hz... Rating: 100 - 240 Volts, at room temperature: 16-29° C (60 - 85° F) • Non-condensing relative humidity: 5% - 25% 3D Systems, Inc. 6 5 SPECIFICATIONS AND REQUIREMENTS WEIGHT Maximum Cube Weight (with cartridges): 17 lbs. (7.7 kg) Maximum Box Weight: 23 lbs. (10.43 kg) SOFTWARE Complimentary...
Cube3 User Guide
Page 12
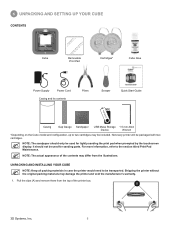
.... NOTE: The sandpaper should not be used for lightly sanding the print pad when prompted by the touchscreen display. Not every printer will be included. A 3D Systems, Inc. 8 6 UNPACKING AND SETTING UP YOUR CUBE CONTENTS Cube Removable Print Pad Cartridges* Cube Glue Power Supply Power Cord Casing and its contents Pliers Scraper...
.... NOTE: The sandpaper should not be used for lightly sanding the print pad when prompted by the touchscreen display. Not every printer will be included. A 3D Systems, Inc. 8 6 UNPACKING AND SETTING UP YOUR CUBE CONTENTS Cube Removable Print Pad Cartridges* Cube Glue Power Supply Power Cord Casing and its contents Pliers Scraper...
Cube3 User Guide
Page 13
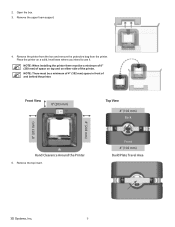
2. Remove the printer from the box and remove the protective bag from the printer. Front 4" (102 mm) Build Plate Travel Area 3D Systems, Inc. 9 Remove the upper foam support. 4. NOTE: There must be a minimum of 4" (102 mm) space in front of the printer. Remove the top insert. NOTE: ...
2. Remove the printer from the box and remove the protective bag from the printer. Front 4" (102 mm) Build Plate Travel Area 3D Systems, Inc. 9 Remove the upper foam support. 4. NOTE: There must be a minimum of 4" (102 mm) space in front of the printer. Remove the top insert. NOTE: ...
Cube3 User Guide
Page 14
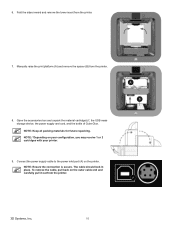
... the material cartridge(s)*, the USB mass storage device, the power supply and cord, and the bottle of Cube Glue. NOTE: Ensure the connection is secure. A B A 3D Systems, Inc. 10 6. Fold the sides inward and remove the lower insert from the printer. 8. Manually raise the print platform (A) and remove the spacer (B) from the...
... the material cartridge(s)*, the USB mass storage device, the power supply and cord, and the bottle of Cube Glue. NOTE: Ensure the connection is secure. A B A 3D Systems, Inc. 10 6. Fold the sides inward and remove the lower insert from the printer. 8. Manually raise the print platform (A) and remove the spacer (B) from the...
Cube3 User Guide
Page 15
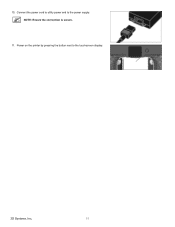
10. NOTE: Ensure the connection is secure. 11. Connect the power cord to utility power and to the touchscreen display. 3D Systems, Inc. 11 Power on the printer by pressing the button next to the power supply.
10. NOTE: Ensure the connection is secure. 11. Connect the power cord to utility power and to the touchscreen display. 3D Systems, Inc. 11 Power on the printer by pressing the button next to the power supply.
Cube3 User Guide
Page 16
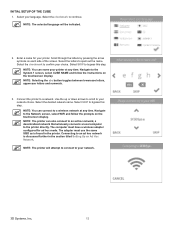
... or down arrows to scroll to confirm your network choice. NOTE: The printer can name your network. 3D Systems, Inc. 12 Select the checkmark to your choice. Navigate to bypass this step. Select SKIP to the System 1 screen, select CUBE NAME and follow the prompts on the touchscreen display. The adapter must have...
... or down arrows to scroll to confirm your network choice. NOTE: The printer can name your network. 3D Systems, Inc. 12 Select the checkmark to your choice. Navigate to bypass this step. Select SKIP to the System 1 screen, select CUBE NAME and follow the prompts on the touchscreen display. The adapter must have...
Cube3 User Guide
Page 17
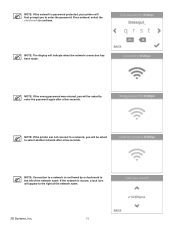
NOTE: If the network is confirmed by a checkmark to the left of the network name. 3D Systems, Inc. 13 NOTE: The display will appear to the right of the network name. NOTE: If the printer can not connect to a network, you will ...
NOTE: If the network is confirmed by a checkmark to the left of the network name. 3D Systems, Inc. 13 NOTE: The display will appear to the right of the network name. NOTE: If the printer can not connect to a network, you will ...
Cube3 User Guide
Page 18
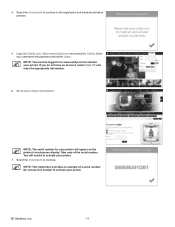
... the registration and warranty activation process. 5. 4. Select the checkmark to continue to activate your printer. 7. Log in to www.cubify.com to activate your printer. 3D Systems, Inc. 14 Go to Cubify.com. NOTE: The serial number for your printer will need it to activate your username and password and select Login.
... the registration and warranty activation process. 5. 4. Select the checkmark to continue to activate your printer. 7. Log in to www.cubify.com to activate your printer. 3D Systems, Inc. 14 Go to Cubify.com. NOTE: The serial number for your printer will need it to activate your username and password and select Login.
Cube3 User Guide
Page 19
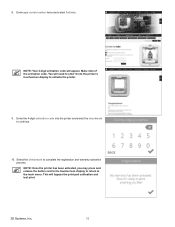
Enter your serial number twice and select Activate. You will bypass the print pad calibration and test print. 3D Systems, Inc. 15 Select the checkmark to the main menu. Enter the 4-digit activation code into the printer's touchscreen display to continue. 10. This will need ...
Enter your serial number twice and select Activate. You will bypass the print pad calibration and test print. 3D Systems, Inc. 15 Select the checkmark to the main menu. Enter the 4-digit activation code into the printer's touchscreen display to continue. 10. This will need ...
Cube3 User Guide
Page 20
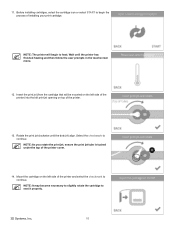
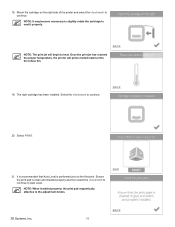
... rotate the print jet, ensure the print jet tube is tucked under the top of the printer and select the checkmark to seat it properly. 3D Systems, Inc. 16 NOTE: The printer will be mounted on top of installing your print cartridge. Mount the cartridge on the left print jet opening on...
... rotate the print jet, ensure the print jet tube is tucked under the top of the printer and select the checkmark to seat it properly. 3D Systems, Inc. 16 NOTE: The printer will be mounted on top of installing your print cartridge. Mount the cartridge on the left print jet opening on...
Cube3 User Guide
Page 21
... rotate the print jet, ensure the print jet tube is tucked under the top of the printer. 17. NOTE: The printer will begin to continue. A 3D Systems, Inc. 17 Wait until the dots align. Insert the print jet (from the cartridge that will be mounted on the right side of the printer...
... rotate the print jet, ensure the print jet tube is tucked under the top of the printer. 17. NOTE: The printer will begin to continue. A 3D Systems, Inc. 17 Wait until the dots align. Insert the print jet (from the cartridge that will be mounted on the right side of the printer...
Cube3 User Guide
Page 22
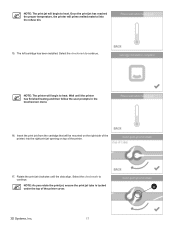
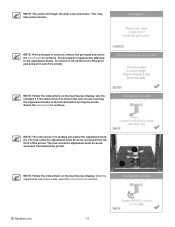
... refuse bin. 19. It is recommended that Auto Level is clean and installed properly and then select the checkmark to continue to the adjustment knobs. 3D Systems, Inc. 18 The right cartridge has been installed. 18. NOTE: It may become necessary to slightly rotate the cartridge to seat it properly.
... refuse bin. 19. It is recommended that Auto Level is clean and installed properly and then select the checkmark to continue to the adjustment knobs. 3D Systems, Inc. 18 The right cartridge has been installed. 18. NOTE: It may become necessary to slightly rotate the cartridge to seat it properly.
Cube3 User Guide
Page 23
... Level procedure. To remove it, lift up the front of the print pad and pull it out of the printer. Select the checkmark to continue. 2 1 3D Systems, Inc. 19 The lock screw for adjustment knob A can be accessed from the front of the printer. The print pad is located just below the...
... Level procedure. To remove it, lift up the front of the print pad and pull it out of the printer. Select the checkmark to continue. 2 1 3D Systems, Inc. 19 The lock screw for adjustment knob A can be accessed from the front of the printer. The print pad is located just below the...
Cube3 User Guide
Page 24
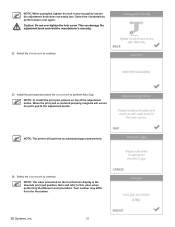
Select the checkmark to ensure the adjustment knob does not easily turn. Your number may differ from the illustration. 3D Systems, Inc. 20 Caution: Do not over-tighten the lock screw. NOTE: To install the print pad, place it on the touchscreen display is centered properly, ...
Select the checkmark to ensure the adjustment knob does not easily turn. Your number may differ from the illustration. 3D Systems, Inc. 20 Caution: Do not over-tighten the lock screw. NOTE: To install the print pad, place it on the touchscreen display is centered properly, ...

Cube3 User Guide
Page 25
... Auto Gap again. Navigate to the section titled Applying Cube Glue. NOTE: For more information about applying glue to the print pad, refer to the System 1 screen and select TEST PRINT. NOTE: If Auto Gap is not successful, it is still not successful, select MANUAL GAP ADJUSTMENT. NOTE: If ... pad. Select AUTO LEVEL to bypass this test print at any time. Refer to heat and then begin printing the welcome message test print. 3D Systems, Inc. 21 Select SKIP to continue. Select the checkmark to printing. NOTE: For best results, allow the glue to dry prior to continue.
... Auto Gap again. Navigate to the section titled Applying Cube Glue. NOTE: For more information about applying glue to the print pad, refer to the System 1 screen and select TEST PRINT. NOTE: If Auto Gap is not successful, it is still not successful, select MANUAL GAP ADJUSTMENT. NOTE: If ... pad. Select AUTO LEVEL to bypass this test print at any time. Refer to heat and then begin printing the welcome message test print. 3D Systems, Inc. 21 Select SKIP to continue. Select the checkmark to printing. NOTE: For best results, allow the glue to dry prior to continue.


