KIP 7100 User Guide
Page 7
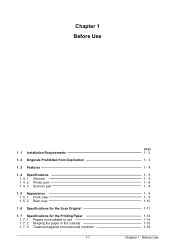
Chapter 1 Before Use 1. 1 Installation Requirements 1. 2 Originals Prohibited from Duplication 1. 3 Features 1. 4 Specifications 1. 4. 1 General 1. 4. 2 Printer part 1. 4. 3 Scanner part 1. 5 Appearance 1. 5. 1 Front view 1. 5. 2 Rear view 1. 6 Specifications for the Scan Original 1. 7 Specifications for the Printing Paper 1. 7. 1 Papers not available to use 1. 7. 2 Keeping the paper in the custody 1. 7. 3 Treatment against environmental condition 1-1 page 1- 2 1- 3 1- 4 1- 5 1- 5 1- 6 1- 8 1- 9 1- 9 1-10 1-11 1-14 1-14 1-15 1-16 Chapter 1 Before Use
Chapter 1 Before Use 1. 1 Installation Requirements 1. 2 Originals Prohibited from Duplication 1. 3 Features 1. 4 Specifications 1. 4. 1 General 1. 4. 2 Printer part 1. 4. 3 Scanner part 1. 5 Appearance 1. 5. 1 Front view 1. 5. 2 Rear view 1. 6 Specifications for the Scan Original 1. 7 Specifications for the Printing Paper 1. 7. 1 Papers not available to use 1. 7. 2 Keeping the paper in the custody 1. 7. 3 Treatment against environmental condition 1-1 page 1- 2 1- 3 1- 4 1- 5 1- 5 1- 6 1- 8 1- 9 1- 9 1-10 1-11 1-14 1-14 1-15 1-16 Chapter 1 Before Use

KIP 7100 User Guide
Page 8
... you open flames, dust or ammonia gases. 2. Keep ample room around the equipment to ensure comfortable operation. (Refer to the following conditions are required for Paper Tray (option) * L + R = 35cm/14" or larger (R must be exposed to the direct sunlight. POWER SOURCE should not be larger than L) (L ... equipment must be leveled and the floor strength must be ample to sustain the weight of the equipment. (Rear) 30cm/12" or larger KIP 7100 L* R* (Front) 80cm/32" or larger 90cm/35.4" or larger for installation of the equipment. 1. The equipment must not be generated...
... you open flames, dust or ammonia gases. 2. Keep ample room around the equipment to ensure comfortable operation. (Refer to the following conditions are required for Paper Tray (option) * L + R = 35cm/14" or larger (R must be exposed to the direct sunlight. POWER SOURCE should not be larger than L) (L ... equipment must be leveled and the floor strength must be ample to sustain the weight of the equipment. (Rear) 30cm/12" or larger KIP 7100 L* R* (Front) 80cm/32" or larger 90cm/35.4" or larger for installation of the equipment. 1. The equipment must not be generated...

KIP 7100 User Guide
Page 10
..., and the minimum is 11" (279mm). The maximum paper length is 6m (with 36" paper) or, and the minimum is a single footprint Multi-Function Printer which can copy, scan and print. 1. 3 Features (1) The KIP 7100 is 8.5" (210mm). (5) Up to use system. (some functions may be optional) (2) KIP HDP technology generates no waste toner. (3) The combination...
..., and the minimum is 11" (279mm). The maximum paper length is 6m (with 36" paper) or, and the minimum is a single footprint Multi-Function Printer which can copy, scan and print. 1. 3 Features (1) The KIP 7100 is 8.5" (210mm). (5) Up to use system. (some functions may be optional) (2) KIP HDP technology generates no waste toner. (3) The combination...

KIP 7100 User Guide
Page 12
..." (roll media) or 210mm / 8.5" (cut sheet) Maximum (Standard) 6,000mm / 19.7ft for 36" / A0 wide (plain paper / bond) or "5 x Standard length" (plain paper / bond) "2 x Standard length" (tracing paper / vellum) "1 x Standard length" (film) (Option) 200,000mm Minimum 210mm / 8.5" NOTE If the print is longer than 4... minutes 30 seconds (At 23oC, 60%RH, the rated voltage, and plain paper is used ) Heat and Pressure Rollers Dry type non-magnetic mono-component toner NOTE The above specifications are subject to change without notice. ...
..." (roll media) or 210mm / 8.5" (cut sheet) Maximum (Standard) 6,000mm / 19.7ft for 36" / A0 wide (plain paper / bond) or "5 x Standard length" (plain paper / bond) "2 x Standard length" (tracing paper / vellum) "1 x Standard length" (film) (Option) 200,000mm Minimum 210mm / 8.5" NOTE If the print is longer than 4... minutes 30 seconds (At 23oC, 60%RH, the rated voltage, and plain paper is used ) Heat and Pressure Rollers Dry type non-magnetic mono-component toner NOTE The above specifications are subject to change without notice. ...
KIP 7100 User Guide
Page 13
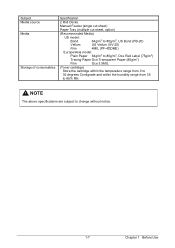
NOTE The above specifications are subject to 85% RH. Subject Media source Media Storage of consumables Specification 2 Roll Decks Manual Feeder (single cut sheet) Paper Tray (multiple cut sheet, option) (Recommended Media) US model: Bond 64g/m2 to 80g/m2, US Bond (PB-20) Vellum US Vellum (XV-...20) Film 4MIL (PF-4DDME) Europe/Asia model: Plain Paper 64g/m2 to 80g/m2, Oce Red Label (75g/m2) Tracing Paper Oce Transparent Paper (80g/m2) Film Oce 3.5MIL (Toner cartridge) Store the cartridge within the temperature range from 0 to 35 degrees...
NOTE The above specifications are subject to 85% RH. Subject Media source Media Storage of consumables Specification 2 Roll Decks Manual Feeder (single cut sheet) Paper Tray (multiple cut sheet, option) (Recommended Media) US model: Bond 64g/m2 to 80g/m2, US Bond (PB-20) Vellum US Vellum (XV-...20) Film 4MIL (PF-4DDME) Europe/Asia model: Plain Paper 64g/m2 to 80g/m2, Oce Red Label (75g/m2) Tracing Paper Oce Transparent Paper (80g/m2) Film Oce 3.5MIL (Toner cartridge) Store the cartridge within the temperature range from 0 to 35 degrees...

KIP 7100 User Guide
Page 15
...Hatch when you would like to stop copying or scanning emergently. 5 Scanner Unit Read the original with this to tap on /off the KIP 7100. 2 Original Guides Feed the original under the Scanner Unit along the Original Guides. 3 User Interface 4 Emergent Stop Button This is a... when you make scan or copy. 7 Engine Unit Open Lever Pull up these levers when you open the Engine Unit. 8 Bypass Feeder Feed a cut sheet paper from the Bypass Feeder. 9 Roll Deck Roll media can be installed here. 5VDC max. 1-9 Chapter 1 Before Use 1. 5 Appearance 1. 5. 1 Front view 10 5 6 2 7 8 9...
...Hatch when you would like to stop copying or scanning emergently. 5 Scanner Unit Read the original with this to tap on /off the KIP 7100. 2 Original Guides Feed the original under the Scanner Unit along the Original Guides. 3 User Interface 4 Emergent Stop Button This is a... when you make scan or copy. 7 Engine Unit Open Lever Pull up these levers when you open the Engine Unit. 8 Bypass Feeder Feed a cut sheet paper from the Bypass Feeder. 9 Roll Deck Roll media can be installed here. 5VDC max. 1-9 Chapter 1 Before Use 1. 5 Appearance 1. 5. 1 Front view 10 5 6 2 7 8 9...

KIP 7100 User Guide
Page 16
Connect the LAN Cable to connect the KIP 7100 to the network. (Do not connect a telephone line) Turn on the Dehumidify Heater with this switch when you would like to shut off supplying the ...: 12VDC max.) For an optional device Service Use. 5VDC max. 1-10 Chapter 1 Before Use Connect the Power Cord here. It is possible to dry the paper in the US) 4 Breaker 5 Inlet Socket 6 COM Port (Optional) 7 USB Port Function Open the Exit Cover when you remove the...
Connect the LAN Cable to connect the KIP 7100 to the network. (Do not connect a telephone line) Turn on the Dehumidify Heater with this switch when you would like to shut off supplying the ...: 12VDC max.) For an optional device Service Use. 5VDC max. 1-10 Chapter 1 Before Use Connect the Power Cord here. It is possible to dry the paper in the US) 4 Breaker 5 Inlet Socket 6 COM Port (Optional) 7 USB Port Function Open the Exit Cover when you remove the...

KIP 7100 User Guide
Page 18
Not square Wet Metal or fabric material Rough surface (Carbon paper for example) Clipped or stapled KIP KIP Metal Wet Fabric KIP KIP Rough surface Clipped Stapled KIP KIP 1-12 Chapter 1 Before Use
Not square Wet Metal or fabric material Rough surface (Carbon paper for example) Clipped or stapled KIP KIP Metal Wet Fabric KIP KIP Rough surface Clipped Stapled KIP KIP 1-12 Chapter 1 Before Use

KIP 7100 User Guide
Page 19
Image quality or the reliability of originals can be read with using a carrier sheet. Patched Punched 1-13 Chapter 1 Before Use The following kinds of paper feeding for them is not guaranteed.
Image quality or the reliability of originals can be read with using a carrier sheet. Patched Punched 1-13 Chapter 1 Before Use The following kinds of paper feeding for them is not guaranteed.

KIP 7100 User Guide
Page 20
1. 7 Specifications for the Printing Paper 1. 7. 1 Papers not available to use Do not use the following kinds of 50 mm or less) Folded Creased Torn Punched 1-14 Chapter 1 Before Use Doing so may damage the print engine. Excessively curled (a diameter of printing paper.
1. 7 Specifications for the Printing Paper 1. 7. 1 Papers not available to use Do not use the following kinds of 50 mm or less) Folded Creased Torn Punched 1-14 Chapter 1 Before Use Doing so may damage the print engine. Excessively curled (a diameter of printing paper.

KIP 7100 User Guide
Page 21
... high humidity. (It must be less than 70%) 3. Keep the paper away from the beginning is very special, such as thermal paper, art paper, aluminium foil, carbon paper and conductive paper. (5) Do not use papers with staple, or do not use the paper with unpacked (exposed in high / low temperature & humidity) in a danger of the following matters...
... high humidity. (It must be less than 70%) 3. Keep the paper away from the beginning is very special, such as thermal paper, art paper, aluminium foil, carbon paper and conductive paper. (5) Do not use papers with staple, or do not use the paper with unpacked (exposed in high / low temperature & humidity) in a danger of the following matters...

KIP 7100 User Guide
Page 22
If you print with the Dehumidify Heater (optional for the US). Remove the paper from the machine and keep it in a polyethylene bag. 1. NOTE (1) KIP 7100 is recommended. "Void of image", "crease of paper" and other problems occurs when you print with tracing paper. Necessary treatment 1. Refer to the environmental condition as shown below. "Void of...
If you print with the Dehumidify Heater (optional for the US). Remove the paper from the machine and keep it in a polyethylene bag. 1. NOTE (1) KIP 7100 is recommended. "Void of image", "crease of paper" and other problems occurs when you print with tracing paper. Necessary treatment 1. Refer to the environmental condition as shown below. "Void of...

KIP 7100 User Guide
Page 27
The same procedure is recommended to be loaded to unlock the Roll Deck. Reference This section describes how to install a roll media to Roll Deck 2, unless otherwise noted. 1. Holding both Flanges (2), lift and remove a roll media or an empty roll core (3). 2 3 3 2 2-5 Chapter 2 Basic Operation Draw out the Roll Deck. 1 2. Pull the blue lever (1) to Roll Deck 1 (front). 2. 3 Replacing Roll Media NOTE (1) A paper mis-feed tends to occur just before out of a roll paper. (2) A tracing roll paper is applied to Roll Deck 1.
The same procedure is recommended to be loaded to unlock the Roll Deck. Reference This section describes how to install a roll media to Roll Deck 2, unless otherwise noted. 1. Holding both Flanges (2), lift and remove a roll media or an empty roll core (3). 2 3 3 2 2-5 Chapter 2 Basic Operation Draw out the Roll Deck. 1 2. Pull the blue lever (1) to Roll Deck 1 (front). 2. 3 Replacing Roll Media NOTE (1) A paper mis-feed tends to occur just before out of a roll paper. (2) A tracing roll paper is applied to Roll Deck 1.

KIP 7100 User Guide
Page 32
NOTE Be sure to make a new straight edge. A paper jam may cause a paper jam. 12 12 Correct Wrong 10. Gently close the Roll Deck fully until it stops at the correct position. Slide the green Cutter Knob (12) fully from one side to the other to close Roll Deck. Remove the cut portion. 12 NOTE Completely slide Cutter Knob (12) until it is not locked firmly. 2-10 Chapter 2 Basic Operation Not doing so may occur if it locks at either end. 9.
NOTE Be sure to make a new straight edge. A paper jam may cause a paper jam. 12 12 Correct Wrong 10. Gently close the Roll Deck fully until it stops at the correct position. Slide the green Cutter Knob (12) fully from one side to the other to close Roll Deck. Remove the cut portion. 12 NOTE Completely slide Cutter Knob (12) until it is not locked firmly. 2-10 Chapter 2 Basic Operation Not doing so may occur if it locks at either end. 9.

KIP 7100 User Guide
Page 37
... the table of Bypass Feeder which indicate possible feed positions. When the leading edge touches the feeding roller, the machine automatically carries and sets the paper at the proper position. And set the sheet in a mis-feed. "Curl up ) (2) Setting a cut sheet to result in "curl down )... Incorrect (curl up " sheets tend to the Bypass Feeder while the printer is processing a print job cause a paper jam. 2-15 Chapter 2 Basic Operation There are several size markings on the table between its concerning size markings then insert it into the Bypass Feeder...
... the table of Bypass Feeder which indicate possible feed positions. When the leading edge touches the feeding roller, the machine automatically carries and sets the paper at the proper position. And set the sheet in a mis-feed. "Curl up ) (2) Setting a cut sheet to result in "curl down )... Incorrect (curl up " sheets tend to the Bypass Feeder while the printer is processing a print job cause a paper jam. 2-15 Chapter 2 Basic Operation There are several size markings on the table between its concerning size markings then insert it into the Bypass Feeder...

KIP 7100 User Guide
Page 42
If the KIP 7100 is installed in such a condition, it may be "crease of paper" and "loss of image". Turn on the rear. (Press its L side to turn on the Dehumidify Heater, press the H side of the Dehumidify Heater Switch ... the media is humidified; To turn off.) H L 2-20 Chapter 2 Basic Operation Defective prints you will experience most will be resolved. NOTE KIP 7100 is humidified; 2. 9 Dehumidifying Roll Media If the roll paper is extremely humidified, it is recommended to use the optional embedded "Dehumidify Heater". Normal Print Crease of image If the media...
If the KIP 7100 is installed in such a condition, it may be "crease of paper" and "loss of image". Turn on the rear. (Press its L side to turn on the Dehumidify Heater, press the H side of the Dehumidify Heater Switch ... the media is humidified; To turn off.) H L 2-20 Chapter 2 Basic Operation Defective prints you will experience most will be resolved. NOTE KIP 7100 is humidified; 2. 9 Dehumidifying Roll Media If the roll paper is extremely humidified, it is recommended to use the optional embedded "Dehumidify Heater". Normal Print Crease of image If the media...

KIP 7100 User Guide
Page 44
Draw out the Roll Deck. 1 3-2 Chapter 3 Error Correction Pull the blue lever (1) to take off your hand. (2) It is recommended to unlock the Roll Deck. 3. 1 Mis-feed Error NOTE (1) Be careful not to get paper cuts on your ring, bracelet or watch when removing a mis-feed media. 3. 1. 1 Deck Jam / Feeding Jam Either of "Deck is jam" or "Feeding Jam" will be indicated when the roll paper is mis-fed in the Roll Deck. 1.
Draw out the Roll Deck. 1 3-2 Chapter 3 Error Correction Pull the blue lever (1) to take off your hand. (2) It is recommended to unlock the Roll Deck. 3. 1 Mis-feed Error NOTE (1) Be careful not to get paper cuts on your ring, bracelet or watch when removing a mis-feed media. 3. 1. 1 Deck Jam / Feeding Jam Either of "Deck is jam" or "Feeding Jam" will be indicated when the roll paper is mis-fed in the Roll Deck. 1.

KIP 7100 User Guide
Page 46
A paper jam may cause a paper jam. 6 6 Correct Wrong 5. Gently close the Roll Deck fully until it is not locked firmly. 3-4 Chapter 3 Error Correction Remove the cut portion. 6 NOTE Completely slide Cutter Knob (6) until it locks at either end. NOTE Be sure to make a new straight edge. Not doing so may occur if it stops at the correct position. Slide the green Cutter Knob (6) fully from one side to the other to close Roll Deck. 4.
A paper jam may cause a paper jam. 6 6 Correct Wrong 5. Gently close the Roll Deck fully until it is not locked firmly. 3-4 Chapter 3 Error Correction Remove the cut portion. 6 NOTE Completely slide Cutter Knob (6) until it locks at either end. NOTE Be sure to make a new straight edge. Not doing so may occur if it stops at the correct position. Slide the green Cutter Knob (6) fully from one side to the other to close Roll Deck. 4.

KIP 7100 User Guide
Page 47
Remove the mis-fed paper pulling frontward. 4. Remove Print Trays (1). 1 1 2. Gently close the Engine Unit firmly until it should be used upside down to keep the damaged edge from been ...
Remove the mis-fed paper pulling frontward. 4. Remove Print Trays (1). 1 1 2. Gently close the Engine Unit firmly until it should be used upside down to keep the damaged edge from been ...

KIP 7100 User Guide
Page 48
Remove the mis-fed paper. 4. Pull up the Engine Unit Open Levers (1) to close the Engine Unit. Jam / Internal Jam 1. Replace Print Trays in the original position. 3-6 Chapter 3 Error Correction 3. 1. 3 Reg. Gently close the Engine Unit firmly until it locks at the correct position. 5. mis-fed media NOTE Be sure to open the Engine Unit. 1 1 3. Remove Print Trays (1). 1 1 2.
Remove the mis-fed paper. 4. Pull up the Engine Unit Open Levers (1) to close the Engine Unit. Jam / Internal Jam 1. Replace Print Trays in the original position. 3-6 Chapter 3 Error Correction 3. 1. 3 Reg. Gently close the Engine Unit firmly until it locks at the correct position. 5. mis-fed media NOTE Be sure to open the Engine Unit. 1 1 3. Remove Print Trays (1). 1 1 2.


