
User guide
Page 3
ENGLISH ᕣ Turn on the camera ᕤ Set the language and date/time Language: to change current field. to change . for previous/next field. Date/Time: At the prompt, press OK. OK to accept. See the Extended user guide www.kodak.com/go/z981support www.kodak.com/go/z981support 3 OK to accept.
ENGLISH ᕣ Turn on the camera ᕤ Set the language and date/time Language: to change current field. to change . for previous/next field. Date/Time: At the prompt, press OK. OK to accept. See the Extended user guide www.kodak.com/go/z981support www.kodak.com/go/z981support 3 OK to accept.
User guide
Page 4
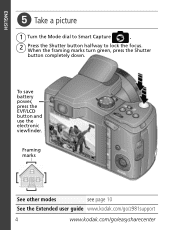
Framing marks See other modes see page 10 See the Extended user guide www.kodak.com/go/z981support 4 www.kodak.com/go/easysharecenter To save battery power, press the EVF/LCD button and use the electronic viewfinder. When the framing marks turn green, press the Shutter button completely down. ENGLISH ᕥ Take a picture 1 Turn the Mode dial to Smart Capture . 2 Press the Shutter button halfway to lock the focus.
Framing marks See other modes see page 10 See the Extended user guide www.kodak.com/go/z981support 4 www.kodak.com/go/easysharecenter To save battery power, press the EVF/LCD button and use the electronic viewfinder. When the framing marks turn green, press the Shutter button completely down. ENGLISH ᕥ Take a picture 1 Turn the Mode dial to Smart Capture . 2 Press the Shutter button halfway to lock the focus.

User guide
Page 6
.../camerasw See the Extended user guide at www.kodak.com/go/z981support 6 www.kodak.com/go/easysharecenter Follow the prompts to download and install KODAK Software. 1 Turn off the camera. 2 Use the KODAK Camera USB Cable, U-8 to connect camera to computer. (Use only the cable included with this camera on the camera. 4 After the software is connected to the computer...
.../camerasw See the Extended user guide at www.kodak.com/go/z981support 6 www.kodak.com/go/easysharecenter Follow the prompts to download and install KODAK Software. 1 Turn off the camera. 2 Use the KODAK Camera USB Cable, U-8 to connect camera to computer. (Use only the cable included with this camera on the camera. 4 After the software is connected to the computer...

User guide
Page 11
... to SCN. 2 Press to choose a mode and read a mode description after it has turned off ) to Video 2 Press the Shutter button completely down, then release it. Take a video Do more with your camera 1 Turn the Mode dial to enter the chosen Scene mode. To read its description. 3 Press OK... (or let the description turn off , press OK. See the Extended user guide www.kodak.com/go/z981support www.kodak.com/go/z981support 11 To stop recording, press...
... to SCN. 2 Press to choose a mode and read a mode description after it has turned off ) to Video 2 Press the Shutter button completely down, then release it. Take a video Do more with your camera 1 Turn the Mode dial to enter the chosen Scene mode. To read its description. 3 Press OK... (or let the description turn off , press OK. See the Extended user guide www.kodak.com/go/z981support www.kodak.com/go/z981support 11 To stop recording, press...

User guide
Page 25
...the Extended user guide www.kodak.com/go/z981support www.kodak.com/go/z981support 25 3 Solve camera problems To access the camera Help system, see page 12). Transfer pictures to the computer (see page 1). Camera buttons and controls do not... function Flash does not fire ■ Check the flash setting, and change as needed (see page 7. You cannot take a picture ■ Turn the camera...
...the Extended user guide www.kodak.com/go/z981support www.kodak.com/go/z981support 25 3 Solve camera problems To access the camera Help system, see page 12). Transfer pictures to the computer (see page 1). Camera buttons and controls do not... function Flash does not fire ■ Check the flash setting, and change as needed (see page 7. You cannot take a picture ■ Turn the camera...
Extended user guide
Page 5
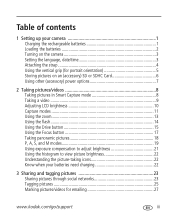
Table of contents 1 1 Setting up your camera 1 Charging the rechargeable batteries 1 Loading the batteries 2 Turning on the camera 3 Setting the language, date/time 3 Attaching the strap 4 Using the vertical grip (for portrait orientation 5 Storing pictures on an (accessory) SD or SDHC Card 6 Using ... batteries need charging 22 3 Sharing and tagging pictures 23 Sharing pictures through social networks 23 Tagging pictures 25 Marking pictures/videos for emailing 27 www.kodak.com/go/support iii
Table of contents 1 1 Setting up your camera 1 Charging the rechargeable batteries 1 Loading the batteries 2 Turning on the camera 3 Setting the language, date/time 3 Attaching the strap 4 Using the vertical grip (for portrait orientation 5 Storing pictures on an (accessory) SD or SDHC Card 6 Using ... batteries need charging 22 3 Sharing and tagging pictures 23 Sharing pictures through social networks 23 Tagging pictures 25 Marking pictures/videos for emailing 27 www.kodak.com/go/support iii

Extended user guide
Page 9
OK to accept. to change. NOTE: To change current field. OK to accept. Turning on the camera Setting up your camera Setting the language, date/time Language: to change language or date/time in the future, use the Setup menu (see page 43). for previous/next field. www.kodak.com/go/support 3 Date/Time: At the prompt, press OK.
OK to accept. to change. NOTE: To change current field. OK to accept. Turning on the camera Setting up your camera Setting the language, date/time Language: to change language or date/time in the future, use the Setup menu (see page 43). for previous/next field. www.kodak.com/go/support 3 Date/Time: At the prompt, press OK.

Extended user guide
Page 11
Use the Vertical Shutter button to zoom. Use to take pictures in the portrait orientation. www.kodak.com/go/support 5 Slide the Vertical Shutter switch. 3 Take pictures in the vertical, portrait orientation. 1 Attach and tighten the grip. 2 Turn on the camera. Setting up your camera Using the vertical grip (for portrait orientation) The vertical grip makes it easier to take pictures.
Use the Vertical Shutter button to zoom. Use to take pictures in the portrait orientation. www.kodak.com/go/support 5 Slide the Vertical Shutter switch. 3 Take pictures in the vertical, portrait orientation. 1 Attach and tighten the grip. 2 Turn on the camera. Setting up your camera Using the vertical grip (for portrait orientation) The vertical grip makes it easier to take pictures.

Extended user guide
Page 12
Inserting or removing a card when the camera is 32 GB.) CAUTION: A card can purchase an SD or SDHC Card to store more pictures and videos. (Maximum supported card size is on an (accessory) SD or SDHC Card Your camera has internal memory. Setting up your camera Storing pictures on may cause damage. You can only be inserted one way; forcing it may damage the pictures, the card, or the camera. 1 Turn off the camera. 2 3 Purchase accessories www.kodak.com/go/z981accessories 6 www.kodak.com/go/support
Inserting or removing a card when the camera is 32 GB.) CAUTION: A card can purchase an SD or SDHC Card to store more pictures and videos. (Maximum supported card size is on an (accessory) SD or SDHC Card Your camera has internal memory. Setting up your camera Storing pictures on may cause damage. You can only be inserted one way; forcing it may damage the pictures, the card, or the camera. 1 Turn off the camera. 2 3 Purchase accessories www.kodak.com/go/z981accessories 6 www.kodak.com/go/support

Extended user guide
Page 14
Framing marks do not appear in Smart Capture mode 1 Turn the Mode dial to Smart Capture . 2 Press the Shutter button halfway to lock the focus. EVF/LCD To save battery power, press the EVF/LCD button and use the electronic viewfinder. NOTE: For more information on Smart Capture and other modes, see page 11. When the framing marks turn green, press the Shutter button completely down. 2 Taking pictures/videos Taking pictures in some SCN (scene) and Video modes. 8 www.kodak.com/go/support
Framing marks do not appear in Smart Capture mode 1 Turn the Mode dial to Smart Capture . 2 Press the Shutter button halfway to lock the focus. EVF/LCD To save battery power, press the EVF/LCD button and use the electronic viewfinder. NOTE: For more information on Smart Capture and other modes, see page 11. When the framing marks turn green, press the Shutter button completely down. 2 Taking pictures/videos Taking pictures in some SCN (scene) and Video modes. 8 www.kodak.com/go/support

Extended user guide
Page 15
... Video . 2 Press the Shutter button completely down and release. (To stop recording, press and release again.) www.kodak.com/go/support 9 Taking a video 1 Turn the Mode dial to take the picture. To access your camera's Help system, see page 51. Taking pictures/videos Using the framing marks Framing marks Framing marks indicate the...
... Video . 2 Press the Shutter button completely down and release. (To stop recording, press and release again.) www.kodak.com/go/support 9 Taking a video 1 Turn the Mode dial to take the picture. To access your camera's Help system, see page 51. Taking pictures/videos Using the framing marks Framing marks Framing marks indicate the...
Extended user guide
Page 18
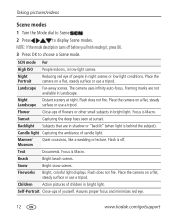
... snow scenes. Fireworks Bright, colorful light displays. The camera uses infinity auto-focus. Backlight Subjects that are not available in night... Capturing the ambiance of yourself. Focus is Macro. Place the camera on a flat, steady surface or use a tripod. Focus is.../videos Scene modes 1 Turn the Mode dial to Scene . 2 Press to choose a Scene mode. NOTE: If the mode description turns off . SCN mode ...For High ISO People indoors, in bright light. Flower Close-ups of children in low-light scenes. Text Documents. Flash does not fire. Place the camera...
... snow scenes. Fireworks Bright, colorful light displays. The camera uses infinity auto-focus. Backlight Subjects that are not available in night... Capturing the ambiance of yourself. Focus is Macro. Place the camera on a flat, steady surface or use a tripod. Focus is.../videos Scene modes 1 Turn the Mode dial to Scene . 2 Press to choose a Scene mode. NOTE: If the mode description turns off . SCN mode ...For High ISO People indoors, in bright light. Flower Close-ups of children in low-light scenes. Text Documents. Flash does not fire. Place the camera...
Extended user guide
Page 19
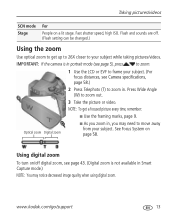
...Press Wide Angle (W) to get a focused picture every time, remember: ■ Use the framing marks, page 9. www.kodak.com/go/support 13 Flash and sounds are off digital zoom, see page 43. (Digital zoom is in portrait mode (see page 5), press to zoom. 1 Use the LCD or EVF to frame your subject.... Taking pictures/videos SCN mode Stage For People on page 58. IMPORTANT: If the camera is not available in , you zoom in Smart Capture mode.) NOTE: You may need to zoom in. Using digital zoom To turn on/off . (Flash setting can be changed.) Using the zoom Use optical zoom to...
...Press Wide Angle (W) to get a focused picture every time, remember: ■ Use the framing marks, page 9. www.kodak.com/go/support 13 Flash and sounds are off digital zoom, see page 43. (Digital zoom is in portrait mode (see page 5), press to zoom. 1 Use the LCD or EVF to frame your subject.... Taking pictures/videos SCN mode Stage For People on page 58. IMPORTANT: If the camera is not available in , you zoom in Smart Capture mode.) NOTE: You may need to zoom in. Using digital zoom To turn on/off . (Flash setting can be changed.) Using the zoom Use optical zoom to...
Extended user guide
Page 24
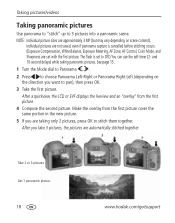
...-Left (depending on scene content). Take 2 or 3 pictures. Individual pictures are automatically stitched together. NOTE: Individual picture sizes are taking panoramic pictures. See page 15. 1 Turn the Mode dial to Panorama . 2 Press to stitch them together. Make the overlay from the first picture. 4 Compose the second picture. Taking pictures/videos Taking... to "stitch" up to pan), then press OK. 3 Take the first picture. After you want to 3 pictures into a panoramic scene. Get 1 panoramic picture. 18 www.kodak.com/go/support
...-Left (depending on scene content). Take 2 or 3 pictures. Individual pictures are automatically stitched together. NOTE: Individual picture sizes are taking panoramic pictures. See page 15. 1 Turn the Mode dial to Panorama . 2 Press to stitch them together. Make the overlay from the first picture. 4 Compose the second picture. Taking pictures/videos Taking... to "stitch" up to pan), then press OK. 3 Take the first picture. After you want to 3 pictures into a panoramic scene. Get 1 panoramic picture. 18 www.kodak.com/go/support
Extended user guide
Page 25
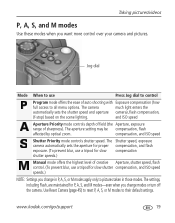
... When to use a tripod for P, A, S, and M modes-even when you change modes or turn off the camera. The camera much light enters the automatically sets the shutter speed and aperture camera), flash compensation, (f-stop) based on the scene lighting. compensation, and ISO speed Shutter Priority mode controls... S, or M modes apply only to their default settings. The aperture setting may be compensation, flash affected by optical zoom. www.kodak.com/go/support 19 Taking pictures/videos P, A, S, and M modes Use these modes when you want more control over your camera and pictures.
... When to use a tripod for P, A, S, and M modes-even when you change modes or turn off the camera. The camera much light enters the automatically sets the shutter speed and aperture camera), flash compensation, (f-stop) based on the scene lighting. compensation, and ISO speed Shutter Priority mode controls... S, or M modes apply only to their default settings. The aperture setting may be compensation, flash affected by optical zoom. www.kodak.com/go/support 19 Taking pictures/videos P, A, S, and M modes Use these modes when you want more control over your camera and pictures.
Extended user guide
Page 26
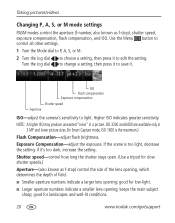
... indicate a smaller lens opening ; good for landscapes and well-lit conditions. 20 www.kodak.com/go/support keeps the main subject sharp; ISO 3200 and 6400 are available only.... Exposure Compensation-adjust the exposure. ISO Flash compensation Exposure compensation Shutter speed Aperture ISO-adjust the camera's sensitivity to save it to light. Taking pictures/videos Changing P, A, S, or M mode ...Use the Menu button to control all other settings. 1 Turn the Mode dial to P, A, S, or M. 2 Turn the Jog dial Turn the Jog dial to choose a setting, then press it 's too ...
... indicate a smaller lens opening ; good for landscapes and well-lit conditions. 20 www.kodak.com/go/support keeps the main subject sharp; ISO 3200 and 6400 are available only.... Exposure Compensation-adjust the exposure. ISO Flash compensation Exposure compensation Shutter speed Aperture ISO-adjust the camera's sensitivity to save it to light. Taking pictures/videos Changing P, A, S, or M mode ...Use the Menu button to control all other settings. 1 Turn the Mode dial to P, A, S, or M. 2 Turn the Jog dial Turn the Jog dial to choose a setting, then press it 's too ...

Extended user guide
Page 27
... +0.3 +1.0 in conjunction with the exposure compensation level. Using exposure compensation with exposure bracketing You can use exposure compensation in the Capture menu (page 42). +0.7, +1.0, +1.3 -1.0 -1.3, -1.0, -0.7 www.kodak.com/go/support 21 If the exposure And if the exposure bracketing Then the exposures compensation is set to: interval is set to 0.3 steps: taken... can be adjusted-that adjustment is applied to the remaining pictures. (For more about the Jog dial and Exposure Compensation, see page 20.) 1 Turn the Jog dial to choose Exposure Compensation, then press it .
... +0.3 +1.0 in conjunction with the exposure compensation level. Using exposure compensation with exposure bracketing You can use exposure compensation in the Capture menu (page 42). +0.7, +1.0, +1.3 -1.0 -1.3, -1.0, -0.7 www.kodak.com/go/support 21 If the exposure And if the exposure bracketing Then the exposures compensation is set to: interval is set to 0.3 steps: taken... can be adjusted-that adjustment is applied to the remaining pictures. (For more about the Jog dial and Exposure Compensation, see page 20.) 1 Turn the Jog dial to choose Exposure Compensation, then press it .

Extended user guide
Page 31
...Press the Menu button. Press to add names to find all pictures from "Dad's 60th Birthday." www.kodak.com/go/support 25 Press to choose Tag People, then press OK. 3 Press to choose Apply ... to add a new one face is detected, a name or question mark is insufficient, then the camera might not detect the face. Tip: Are faces not always detected? To resolve an incorrect name or... Tags, press to picture-taking mode, press the Shutter button halfway down. If a face is turned sideways, is too distant, or if the contrast between face and background is assigned to recognize people...
...Press the Menu button. Press to add names to find all pictures from "Dad's 60th Birthday." www.kodak.com/go/support 25 Press to choose Tag People, then press OK. 3 Press to choose Apply ... to add a new one face is detected, a name or question mark is insufficient, then the camera might not detect the face. Tip: Are faces not always detected? To resolve an incorrect name or... Tags, press to picture-taking mode, press the Shutter button halfway down. If a face is turned sideways, is too distant, or if the contrast between face and background is assigned to recognize people...
Extended user guide
Page 39
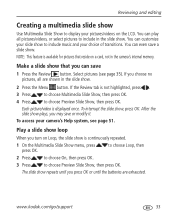
To access your pictures/videos on a card, not in the camera's internal memory. You can save 1 Press the Review button. Play a slide show loop When you turn on Loop, the slide show is available for pictures that you press OK or until the batteries are shown in the slide show... OK. You can play all are exhausted. You can even save or modify it. www.kodak.com/go/support 33 Reviewing and editing Creating a multimedia slide show Use Multimedia Slide Show to display your camera's Help system, see page 35). Select pictures (see page 51. Each picture/video is ...
To access your pictures/videos on a card, not in the camera's internal memory. You can save 1 Press the Review button. Play a slide show loop When you turn on Loop, the slide show is available for pictures that you press OK or until the batteries are shown in the slide show... OK. You can play all are exhausted. You can even save or modify it. www.kodak.com/go/support 33 Reviewing and editing Creating a multimedia slide show Use Multimedia Slide Show to display your camera's Help system, see page 35). Select pictures (see page 51. Each picture/video is ...

Extended user guide
Page 46
... Picture Size Choose a picture resolution. Preset Keyword Tag New Keyword Create keyword names and assign them ; See Camera Specifications, starting on page 58. See page 26. 40 www.kodak.com/go/support and video-taking settings ■ Setup for the most common picture- Using the menu button ...to change settings You can change modes or turn off the camera. 1 Press the Menu button. 2 Press to choose a tab: ■...
... Picture Size Choose a picture resolution. Preset Keyword Tag New Keyword Create keyword names and assign them ; See Camera Specifications, starting on page 58. See page 26. 40 www.kodak.com/go/support and video-taking settings ■ Setup for the most common picture- Using the menu button ...to change settings You can change modes or turn off the camera. 1 Press the Menu button. 2 Press to choose a tab: ■...


