User Manual
Page 2
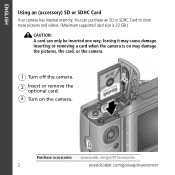
Purchase accessories www.kodak.com/go/z915accessories 2 www.kodak.com/go/easysharecenter forcing it may damage the pictures, the card, or the camera. 1 Turn off the camera. 2 Insert or remove the optional card. 3 Turn on may cause damage. You can purchase an SD or SDHC Card to store more pictures and videos. (Maximum supported card size is on the camera. ENGLISH Using an (accessory) SD or SDHC Card Your camera has internal memory. Inserting or removing a card when the camera is 32 GB.) CAUTION: A card can only be inserted one way;
Purchase accessories www.kodak.com/go/z915accessories 2 www.kodak.com/go/easysharecenter forcing it may damage the pictures, the card, or the camera. 1 Turn off the camera. 2 Insert or remove the optional card. 3 Turn on may cause damage. You can purchase an SD or SDHC Card to store more pictures and videos. (Maximum supported card size is on the camera. ENGLISH Using an (accessory) SD or SDHC Card Your camera has internal memory. Inserting or removing a card when the camera is 32 GB.) CAUTION: A card can only be inserted one way;
User Manual
Page 3
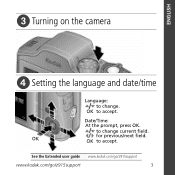
to change . Date/Time: At the prompt, press OK. See the Extended user guide www.kodak.com/go/z915support www.kodak.com/go/z915support 3 OK to accept. ENGLISH ᕣ Turning on the camera ᕤ Setting the language and date/time Language: to change current field. OK for previous/next field. OK to accept.
to change . Date/Time: At the prompt, press OK. See the Extended user guide www.kodak.com/go/z915support www.kodak.com/go/z915support 3 OK to accept. ENGLISH ᕣ Turning on the camera ᕤ Setting the language and date/time Language: to change current field. OK for previous/next field. OK to accept.

User Manual
Page 4
ENGLISH ᕥ Taking a picture 1 Turn the Mode dial to Smart Capture . 2 Press the Shutter button halfway to lock on the subject. Framing marks See the Extended user guide www.kodak.com/go/z915support Learn more about picture-taking modes see page 11 4 www.kodak.com/go/easysharecenter When the framing marks turn green, press the Shutter button completely down.
ENGLISH ᕥ Taking a picture 1 Turn the Mode dial to Smart Capture . 2 Press the Shutter button halfway to lock on the subject. Framing marks See the Extended user guide www.kodak.com/go/z915support Learn more about picture-taking modes see page 11 4 www.kodak.com/go/easysharecenter When the framing marks turn green, press the Shutter button completely down.
User Manual
Page 6
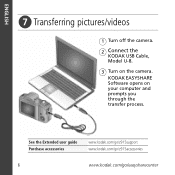
See the Extended user guide Purchase accessories www.kodak.com/go/z915support www.kodak.com/go/z915accessories 6 www.kodak.com/go/easysharecenter ENGLISH ᕧ Transferring pictures/videos 1 Turn off the camera. 2 Connect the KODAK USB Cable, Model U-8. 3 Turn on your computer and prompts you through the transfer process. KODAK EASYSHARE Software opens on the camera.
See the Extended user guide Purchase accessories www.kodak.com/go/z915support www.kodak.com/go/z915accessories 6 www.kodak.com/go/easysharecenter ENGLISH ᕧ Transferring pictures/videos 1 Turn off the camera. 2 Connect the KODAK USB Cable, Model U-8. 3 Turn on your computer and prompts you through the transfer process. KODAK EASYSHARE Software opens on the camera.

User Manual
Page 12
Doing more with your camera Taking a video 1 Turn the Mode dial to Video . 2 Press the Shutter button completely down and release. (To stop recording, press and release again.) Scene modes 1 Turn the Mode dial to Scene . 2 Press to choose a Scene mode. NOTE: If the mode description turns off before you finish reading it, press OK. 3 Press OK to highlight Scene modes. Children Action pictures of people. SCN mode For Portrait Full-frame portraits of children in bright light. 12 www.kodak.com/go/easysharecenter
Doing more with your camera Taking a video 1 Turn the Mode dial to Video . 2 Press the Shutter button completely down and release. (To stop recording, press and release again.) Scene modes 1 Turn the Mode dial to Scene . 2 Press to choose a Scene mode. NOTE: If the mode description turns off before you finish reading it, press OK. 3 Press OK to highlight Scene modes. Children Action pictures of people. SCN mode For Portrait Full-frame portraits of children in bright light. 12 www.kodak.com/go/easysharecenter

User Manual
Page 14
... to get up to 10X closer to your subject. Digital zoom is not available in . (10 x 15 cm) print. 14 www.kodak.com/go/easysharecenter Press Wide Angle (W) to zoom out. 3 Take the picture or video. The slider on /off using digital zoom. NOTE: To get a focused picture every time, remember: ... using the Setup menu (see page 4. ■ As you zoom in . Turn digital zoom on the LCD turns red when the picture quality reaches the limit for an acceptable 4 x 6-in Smart Capture mode. Doing more with your camera Using optical zoom Use optical zoom to get up to 5X beyond optical zoom...
... to get up to 10X closer to your subject. Digital zoom is not available in . (10 x 15 cm) print. 14 www.kodak.com/go/easysharecenter Press Wide Angle (W) to zoom out. 3 Take the picture or video. The slider on /off using digital zoom. NOTE: To get a focused picture every time, remember: ... using the Setup menu (see page 4. ■ As you zoom in . Turn digital zoom on the LCD turns red when the picture quality reaches the limit for an acceptable 4 x 6-in Smart Capture mode. Doing more with your camera Using optical zoom Use optical zoom to get up to 5X beyond optical zoom...
User Manual
Page 16
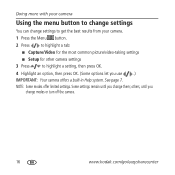
others, until you change modes or turn off the camera. 16 www.kodak.com/go/easysharecenter Doing more with your camera Using the menu button to change settings You can change settings to get the best results from your camera. 1 Press the Menu button. 2 Press to highlight a tab: ■ Capture/Video for the most common picture...
others, until you change modes or turn off the camera. 16 www.kodak.com/go/easysharecenter Doing more with your camera Using the menu button to change settings You can change settings to get the best results from your camera. 1 Press the Menu button. 2 Press to highlight a tab: ■ Capture/Video for the most common picture...
User Manual
Page 22
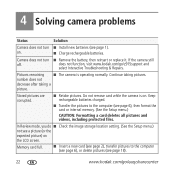
...menu.) CAUTION: Formatting a card deletes all pictures and videos, including protected files. does not function, visit www.kodak.com/go /easysharecenter Pictures remaining ■ The camera is on. Memory card full. ■ Insert a new card (see page 2), transfer pictures to the computer... (see page 18). 22 www.kodak.com/go /z915support and select Interactive Troubleshooting & Repairs. Camera does not turn ■ Install new batteries (see a picture (or the expected picture) on . ■ Charge rechargeable ...
...menu.) CAUTION: Formatting a card deletes all pictures and videos, including protected files. does not function, visit www.kodak.com/go /easysharecenter Pictures remaining ■ The camera is on. Memory card full. ■ Insert a new card (see page 2), transfer pictures to the computer... (see page 18). 22 www.kodak.com/go /z915support and select Interactive Troubleshooting & Repairs. Camera does not turn ■ Install new batteries (see a picture (or the expected picture) on . ■ Charge rechargeable ...
User Manual
Page 25
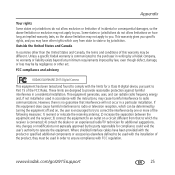
... authority to operate the equipment. www.kodak.com/go/z915support 25 FCC compliance and advisory KODAK EASYSHARE Z915 Digital Camera This equipment has been tested and found to comply with the installation of the product, they must be determined by turning the equipment off and on, the ...Rules. However, there is no warranty or liability exists beyond any minimum requirements imposed by the party responsible for a Class B digital device, pursuant to provide reasonable protection against harmful interference in a particular installation. If this warranty may be by negligence or ...
... authority to operate the equipment. www.kodak.com/go/z915support 25 FCC compliance and advisory KODAK EASYSHARE Z915 Digital Camera This equipment has been tested and found to comply with the installation of the product, they must be determined by turning the equipment off and on, the ...Rules. However, there is no warranty or liability exists beyond any minimum requirements imposed by the party responsible for a Class B digital device, pursuant to provide reasonable protection against harmful interference in a particular installation. If this warranty may be by negligence or ...
User Manual
Page 5
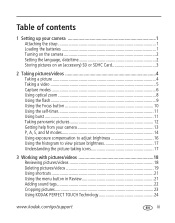
Table of contents 1 1 Setting up your camera 1 Attaching the strap 1 Loading the batteries 1 Turning on the camera 2 Setting the language, date/time 2 Storing pictures on an (accessory) SD or SDHC Card 3 2 Taking pictures/...Using the Focus button 10 Using the self-timer 11 Using burst 11 Taking panoramic pictures 12 Getting help from your camera 13 P, A, S, and M modes 14 Using exposure compensation to adjust brightness 16 Using the histogram to view ... Review 21 Adding sound tags 22 Cropping pictures 23 Using KODAK PERFECT TOUCH Technology 24 www.kodak.com/go/support iii
Table of contents 1 1 Setting up your camera 1 Attaching the strap 1 Loading the batteries 1 Turning on the camera 2 Setting the language, date/time 2 Storing pictures on an (accessory) SD or SDHC Card 3 2 Taking pictures/...Using the Focus button 10 Using the self-timer 11 Using burst 11 Taking panoramic pictures 12 Getting help from your camera 13 P, A, S, and M modes 14 Using exposure compensation to adjust brightness 16 Using the histogram to view ... Review 21 Adding sound tags 22 Cropping pictures 23 Using KODAK PERFECT TOUCH Technology 24 www.kodak.com/go/support iii
User Manual
Page 8
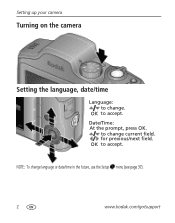
OK to accept. OK to accept. Date/Time: At the prompt, press OK. to change. NOTE: To change current field. Setting up your camera Turning on the camera Setting the language, date/time Language: to change language or date/time in the future, use the Setup menu (see page 37). 2 www.kodak.com/go/support for previous/next field.
OK to accept. OK to accept. Date/Time: At the prompt, press OK. to change. NOTE: To change current field. Setting up your camera Turning on the camera Setting the language, date/time Language: to change language or date/time in the future, use the Setup menu (see page 37). 2 www.kodak.com/go/support for previous/next field.
User Manual
Page 9
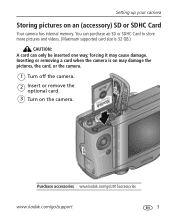
Inserting or removing a card when the camera is 32 GB.) CAUTION: A card can purchase an SD or SDHC Card to store more pictures and videos. (Maximum supported card size is on may cause damage. Purchase accessories www.kodak.com/go/z915accessories www.kodak.com/go/support 3 forcing it may damage the pictures, the card, or the camera. 1 Turn off the camera. 2 Insert or remove the optional card. 3 Turn on an (accessory) SD or SDHC Card Your camera has internal memory. You can only be inserted one way; Setting up your camera Storing pictures on the camera.
Inserting or removing a card when the camera is 32 GB.) CAUTION: A card can purchase an SD or SDHC Card to store more pictures and videos. (Maximum supported card size is on may cause damage. Purchase accessories www.kodak.com/go/z915accessories www.kodak.com/go/support 3 forcing it may damage the pictures, the card, or the camera. 1 Turn off the camera. 2 Insert or remove the optional card. 3 Turn on an (accessory) SD or SDHC Card Your camera has internal memory. You can only be inserted one way; Setting up your camera Storing pictures on the camera.

User Manual
Page 10
... marks Framing marks Framing marks indicate the camera focus area. 1 Press the Shutter button halfway. When the framing marks turn green, press the Shutter button completely down to lock on the subject. If the camera is not focusing on Smart Capture and other... modes, see page 6. Framing marks do not appear in some SCN (scene) and Video modes. NOTE: Framing marks do not appear in all modes. Multiple framing marks may appear when faces are detected. 4 www.kodak.com/go/support 2 Taking pictures/videos Taking a picture 1 Turn...
... marks Framing marks Framing marks indicate the camera focus area. 1 Press the Shutter button halfway. When the framing marks turn green, press the Shutter button completely down to lock on the subject. If the camera is not focusing on Smart Capture and other... modes, see page 6. Framing marks do not appear in some SCN (scene) and Video modes. NOTE: Framing marks do not appear in all modes. Multiple framing marks may appear when faces are detected. 4 www.kodak.com/go/support 2 Taking pictures/videos Taking a picture 1 Turn...

User Manual
Page 11
www.kodak.com/go/support 5 Delete Play a video To review pictures/videos anytime, see page 18. Taking a video Taking pictures/videos 1 Turn the Mode dial to Video . 2 Press the Shutter button completely down and release. (To stop recording, press and release again.) Reviewing the picture/video just taken After you take a picture/video, the LCD displays a quickview for several seconds. (To dismiss the quickview sooner, press the Shutter button halfway.) The picture/video is saved unless you press the Delete button.
www.kodak.com/go/support 5 Delete Play a video To review pictures/videos anytime, see page 18. Taking a video Taking pictures/videos 1 Turn the Mode dial to Video . 2 Press the Shutter button completely down and release. (To stop recording, press and release again.) Reviewing the picture/video just taken After you take a picture/video, the LCD displays a quickview for several seconds. (To dismiss the quickview sooner, press the Shutter button halfway.) The picture/video is saved unless you press the Delete button.

User Manual
Page 13
... the subject). Stage People on a flat, steady surface or use a tripod. Place the camera on a lit stage. Taking pictures/videos Scene modes 1 Turn the Mode dial to Scene . 2 Press to choose a Scene mode. NOTE: If the mode description turns off before you finish reading it, press OK. 3 Press OK to highlight Scene modes... bright light. Children Action pictures of yourself. Framing marks are not available in low-light scenes. Candle light Capturing the ambiance of candle light. www.kodak.com/go/support 7
... the subject). Stage People on a flat, steady surface or use a tripod. Place the camera on a lit stage. Taking pictures/videos Scene modes 1 Turn the Mode dial to Scene . 2 Press to choose a Scene mode. NOTE: If the mode description turns off before you finish reading it, press OK. 3 Press OK to highlight Scene modes... bright light. Children Action pictures of yourself. Framing marks are not available in low-light scenes. Candle light Capturing the ambiance of candle light. www.kodak.com/go/support 7
User Manual
Page 14
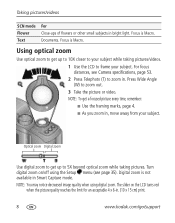
Turn digital zoom on the LCD turns red when the picture quality reaches the limit for an acceptable 4 x 6-in , move...9632; Use the framing marks, page 4. ■ As you zoom in . (10 x 15 cm) print. 8 www.kodak.com/go/support Focus is Macro. Taking pictures/videos SCN mode Flower Text For Close-ups of flowers or other small subjects in... to frame your subject. Digital zoom is not available in bright light. NOTE: You may notice decreased image quality when using the Setup menu (see Camera specifications, page 53. 2 Press Telephoto (T) to zoom in. Using optical zoom Use optical ...
Turn digital zoom on the LCD turns red when the picture quality reaches the limit for an acceptable 4 x 6-in , move...9632; Use the framing marks, page 4. ■ As you zoom in . (10 x 15 cm) print. 8 www.kodak.com/go/support Focus is Macro. Taking pictures/videos SCN mode Flower Text For Close-ups of flowers or other small subjects in... to frame your subject. Digital zoom is not available in bright light. NOTE: You may notice decreased image quality when using the Setup menu (see Camera specifications, page 53. 2 Press Telephoto (T) to zoom in. Using optical zoom Use optical ...
User Manual
Page 18
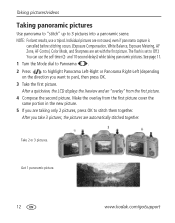
Take 2 or 3 pictures. Get 1 panoramic picture. 12 www.kodak.com/go/support and 10-second delays) while taking only 2 pictures, press OK to stitch them together. After you take 3 pictures, the pictures are taking ... overlay from the first picture. 4 Compose the second picture. Individual pictures are set to pan), then press OK. 3 Take the first picture. See page 11. 1 Turn the Mode dial to Panorama . 2 Press to 3 pictures into a panoramic scene. NOTE: For best results, use the self-timer (2- Taking pictures/videos Taking panoramic pictures...
Take 2 or 3 pictures. Get 1 panoramic picture. 12 www.kodak.com/go/support and 10-second delays) while taking only 2 pictures, press OK to stitch them together. After you take 3 pictures, the pictures are taking ... overlay from the first picture. 4 Compose the second picture. Individual pictures are set to pan), then press OK. 3 Take the first picture. See page 11. 1 Turn the Mode dial to Panorama . 2 Press to 3 pictures into a panoramic scene. NOTE: For best results, use the self-timer (2- Taking pictures/videos Taking panoramic pictures...
User Manual
Page 19
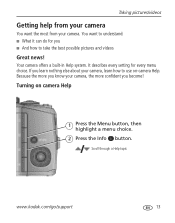
... pictures and videos Great news! You want the most from your camera You want to use on camera Help 1 Press the Menu button, then highlight a menu choice. 2 Press the Info button. Scroll through a Help topic www.kodak.com/go/support 13 Taking pictures/videos Getting help from your... camera. If you learn nothing else about your camera, learn how to understand: ■ What it can do for every menu choice. It describes...
... pictures and videos Great news! You want the most from your camera You want to use on camera Help 1 Press the Menu button, then highlight a menu choice. 2 Press the Info button. Scroll through a Help topic www.kodak.com/go/support 13 Taking pictures/videos Getting help from your... camera. If you learn nothing else about your camera, learn how to understand: ■ What it can do for every menu choice. It describes...

User Manual
Page 20
...The settings, including Flash, are maintained for slow shutter compensation, and ISO speed speeds.) NOTE: Settings you change modes or turn off the camera. The aperture setting may be compensation, flash affected by optical zoom. Mode When to use Press to control Program mode ...offers the ease of auto shooting with full access to its default setting. 14 www.kodak.com/go/support Use Reset Camera (see page 37) to reset P, A, S, or M mode to all menu options. The camera automatically sets the compensation aperture for proper exposure. (To prevent blur, use a tripod for...
...The settings, including Flash, are maintained for slow shutter compensation, and ISO speed speeds.) NOTE: Settings you change modes or turn off the camera. The aperture setting may be compensation, flash affected by optical zoom. Mode When to use Press to control Program mode ...offers the ease of auto shooting with full access to its default setting. 14 www.kodak.com/go/support Use Reset Camera (see page 37) to reset P, A, S, or M mode to all menu options. The camera automatically sets the compensation aperture for proper exposure. (To prevent blur, use a tripod for...
User Manual
Page 21
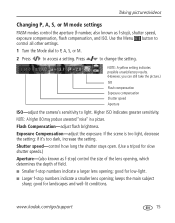
...sensitivity. good for low-light. ■ Larger f-stop numbers indicate a smaller lens opening ; Use the Menu button to control all other settings. 1 Turn the Mode dial to P, A, S, or M. 2 Press to light. NOTE: A higher ISO may produce unwanted "noise" in a picture. Shutter.... (However, you can still take the picture.) ISO Flash compensation Exposure compensation Shutter speed Aperture ISO-adjust the camera's sensitivity to access a setting. www.kodak.com/go/support 15 Flash Compensation-adjust flash brightness. if it's too dark, increase the setting. Press to change...
...sensitivity. good for low-light. ■ Larger f-stop numbers indicate a smaller lens opening ; Use the Menu button to control all other settings. 1 Turn the Mode dial to P, A, S, or M. 2 Press to light. NOTE: A higher ISO may produce unwanted "noise" in a picture. Shutter.... (However, you can still take the picture.) ISO Flash compensation Exposure compensation Shutter speed Aperture ISO-adjust the camera's sensitivity to access a setting. www.kodak.com/go/support 15 Flash Compensation-adjust flash brightness. if it's too dark, increase the setting. Press to change...


