User Manual
Page 2
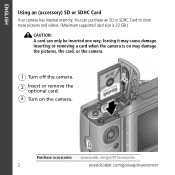
forcing it may damage the pictures, the card, or the camera. 1 Turn off the camera. 2 Insert or remove the optional card. 3 Turn on the camera. Purchase accessories www.kodak.com/go/z915accessories 2 www.kodak.com/go/easysharecenter Inserting or removing a card when the camera is 32 GB.) CAUTION: A card can purchase an SD or SDHC Card to store more pictures and videos. (Maximum supported card size is on may cause damage. You can only be inserted one way; ENGLISH Using an (accessory) SD or SDHC Card Your camera has internal memory.
forcing it may damage the pictures, the card, or the camera. 1 Turn off the camera. 2 Insert or remove the optional card. 3 Turn on the camera. Purchase accessories www.kodak.com/go/z915accessories 2 www.kodak.com/go/easysharecenter Inserting or removing a card when the camera is 32 GB.) CAUTION: A card can purchase an SD or SDHC Card to store more pictures and videos. (Maximum supported card size is on may cause damage. You can only be inserted one way; ENGLISH Using an (accessory) SD or SDHC Card Your camera has internal memory.
User Manual
Page 3
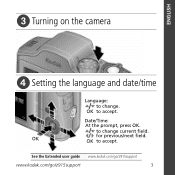
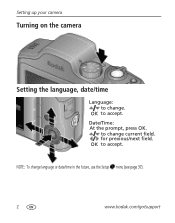
See the Extended user guide www.kodak.com/go/z915support www.kodak.com/go/z915support 3 Date/Time: At the prompt, press OK. to change current field. OK for previous/next field. ENGLISH ᕣ Turning on the camera ᕤ Setting the language and date/time Language: to change . OK to accept. OK to accept.
See the Extended user guide www.kodak.com/go/z915support www.kodak.com/go/z915support 3 Date/Time: At the prompt, press OK. to change current field. OK for previous/next field. ENGLISH ᕣ Turning on the camera ᕤ Setting the language and date/time Language: to change . OK to accept. OK to accept.

User Manual
Page 4
When the framing marks turn green, press the Shutter button completely down. Framing marks See the Extended user guide www.kodak.com/go/z915support Learn more about picture-taking modes see page 11 4 www.kodak.com/go/easysharecenter ENGLISH ᕥ Taking a picture 1 Turn the Mode dial to Smart Capture . 2 Press the Shutter button halfway to lock on the subject.
When the framing marks turn green, press the Shutter button completely down. Framing marks See the Extended user guide www.kodak.com/go/z915support Learn more about picture-taking modes see page 11 4 www.kodak.com/go/easysharecenter ENGLISH ᕥ Taking a picture 1 Turn the Mode dial to Smart Capture . 2 Press the Shutter button halfway to lock on the subject.
User Manual
Page 6
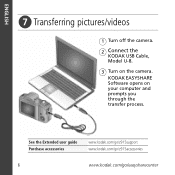
See the Extended user guide Purchase accessories www.kodak.com/go/z915support www.kodak.com/go/z915accessories 6 www.kodak.com/go/easysharecenter ENGLISH ᕧ Transferring pictures/videos 1 Turn off the camera. 2 Connect the KODAK USB Cable, Model U-8. 3 Turn on your computer and prompts you through the transfer process. KODAK EASYSHARE Software opens on the camera.
See the Extended user guide Purchase accessories www.kodak.com/go/z915support www.kodak.com/go/z915accessories 6 www.kodak.com/go/easysharecenter ENGLISH ᕧ Transferring pictures/videos 1 Turn off the camera. 2 Connect the KODAK USB Cable, Model U-8. 3 Turn on your computer and prompts you through the transfer process. KODAK EASYSHARE Software opens on the camera.

User Manual
Page 12
NOTE: If the mode description turns off before you finish reading it, press OK. 3 Press OK to highlight Scene modes. Doing more with your camera Taking a video 1 Turn the Mode dial to Video . 2 Press the Shutter button completely down and release. (To stop recording, press and release again.) Scene modes 1 Turn the Mode dial to Scene . 2 Press to choose a Scene mode. SCN mode For Portrait Full-frame portraits of children in bright light. 12 www.kodak.com/go/easysharecenter Children Action pictures of people.
NOTE: If the mode description turns off before you finish reading it, press OK. 3 Press OK to highlight Scene modes. Doing more with your camera Taking a video 1 Turn the Mode dial to Video . 2 Press the Shutter button completely down and release. (To stop recording, press and release again.) Scene modes 1 Turn the Mode dial to Scene . 2 Press to choose a Scene mode. SCN mode For Portrait Full-frame portraits of children in bright light. 12 www.kodak.com/go/easysharecenter Children Action pictures of people.

User Manual
Page 14
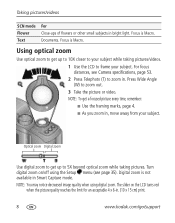
...10X closer to your subject while taking pictures. Digital zoom is not available in . Doing more with your camera Using optical zoom Use optical zoom to get up to zoom out. 3 Take the picture or video. Turn digital zoom on the LCD turns red when the picture quality reaches the limit for... an acceptable 4 x 6-in. (10 x 15 cm) print. 14 www.kodak.com/go/easysharecenter The slider...
...10X closer to your subject while taking pictures. Digital zoom is not available in . Doing more with your camera Using optical zoom Use optical zoom to get up to zoom out. 3 Take the picture or video. Turn digital zoom on the LCD turns red when the picture quality reaches the limit for... an acceptable 4 x 6-in. (10 x 15 cm) print. 14 www.kodak.com/go/easysharecenter The slider...
User Manual
Page 16
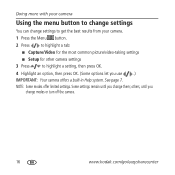
...picture/video-taking settings ■ Setup for other camera settings 3 Press to highlight a setting, then press OK. 4 Highlight an option, then press OK. (Some options let you change modes or turn off the camera. 16 www.kodak.com/go/easysharecenter Some settings remain until you change ...them; See page 7. NOTE: Some modes offer limited settings. others, until you use .) IMPORTANT: Your camera offers a built-in Help system.
...picture/video-taking settings ■ Setup for other camera settings 3 Press to highlight a setting, then press OK. 4 Highlight an option, then press OK. (Some options let you change modes or turn off the camera. 16 www.kodak.com/go/easysharecenter Some settings remain until you change ...them; See page 7. NOTE: Some modes offer limited settings. others, until you use .) IMPORTANT: Your camera offers a built-in Help system.
User Manual
Page 22
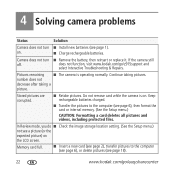
... Setup menu.) not see page 18). 22 www.kodak.com/go /z915support and select Interactive Troubleshooting & Repairs. Pictures remaining ■ The camera is on. does not function, visit www.kodak.com/go /easysharecenter Keep rechargeable batteries charged. ■...; Transfer the pictures to the computer (see page 6), or delete pictures (see a picture (or the expected picture) on . ■ Charge rechargeable batteries. Do not remove card while the camera is operating normally. Camera does not turn...
... Setup menu.) not see page 18). 22 www.kodak.com/go /z915support and select Interactive Troubleshooting & Repairs. Pictures remaining ■ The camera is on. does not function, visit www.kodak.com/go /easysharecenter Keep rechargeable batteries charged. ■...; Transfer the pictures to the computer (see page 6), or delete pictures (see a picture (or the expected picture) on . ■ Charge rechargeable batteries. Do not remove card while the camera is operating normally. Camera does not turn...
User Manual
Page 25
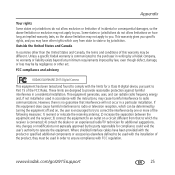
FCC compliance and advisory KODAK EASYSHARE Z915 Digital Camera This equipment has been tested and found to comply with the limits for a Class B digital device, pursuant to Part 15 of incidental or consequential damages, so the above limitation may not apply to you may have been ...dealer or an experienced radio/TV technician for compliance could void the user's authority to you. Any changes or modifications not expressly approved by turning the equipment off and on, the user is encouraged to try to radio communications. Some states or jurisdictions do not allow limitations on ...
FCC compliance and advisory KODAK EASYSHARE Z915 Digital Camera This equipment has been tested and found to comply with the limits for a Class B digital device, pursuant to Part 15 of incidental or consequential damages, so the above limitation may not apply to you may have been ...dealer or an experienced radio/TV technician for compliance could void the user's authority to you. Any changes or modifications not expressly approved by turning the equipment off and on, the user is encouraged to try to radio communications. Some states or jurisdictions do not allow limitations on ...
User Manual
Page 5
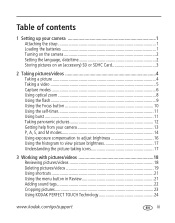
Table of contents 1 1 Setting up your camera 1 Attaching the strap 1 Loading the batteries 1 Turning on the camera 2 Setting the language, date/time 2 Storing pictures on an (accessory) SD or SDHC Card 3 2 Taking pictures/...Using the Focus button 10 Using the self-timer 11 Using burst 11 Taking panoramic pictures 12 Getting help from your camera 13 P, A, S, and M modes 14 Using exposure compensation to adjust brightness 16 Using the histogram to view ... Review 21 Adding sound tags 22 Cropping pictures 23 Using KODAK PERFECT TOUCH Technology 24 www.kodak.com/go/support iii
Table of contents 1 1 Setting up your camera 1 Attaching the strap 1 Loading the batteries 1 Turning on the camera 2 Setting the language, date/time 2 Storing pictures on an (accessory) SD or SDHC Card 3 2 Taking pictures/...Using the Focus button 10 Using the self-timer 11 Using burst 11 Taking panoramic pictures 12 Getting help from your camera 13 P, A, S, and M modes 14 Using exposure compensation to adjust brightness 16 Using the histogram to view ... Review 21 Adding sound tags 22 Cropping pictures 23 Using KODAK PERFECT TOUCH Technology 24 www.kodak.com/go/support iii
User Manual
Page 8
Date/Time: At the prompt, press OK. for previous/next field. OK to change current field. to accept. OK to change language or date/time in the future, use the Setup menu (see page 37). 2 www.kodak.com/go/support Setting up your camera Turning on the camera Setting the language, date/time Language: to accept. NOTE: To change .
Date/Time: At the prompt, press OK. for previous/next field. OK to change current field. to accept. OK to change language or date/time in the future, use the Setup menu (see page 37). 2 www.kodak.com/go/support Setting up your camera Turning on the camera Setting the language, date/time Language: to accept. NOTE: To change .
User Manual
Page 9
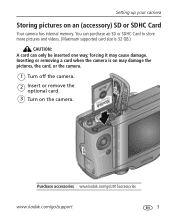
Inserting or removing a card when the camera is 32 GB.) CAUTION: A card can purchase an SD or SDHC Card to store more pictures and videos. (Maximum supported card size is on may cause damage. You can only be inserted one way; Purchase accessories www.kodak.com/go/z915accessories www.kodak.com/go/support 3 forcing it may damage the pictures, the card, or the camera. 1 Turn off the camera. 2 Insert or remove the optional card. 3 Turn on an (accessory) SD or SDHC Card Your camera has internal memory. Setting up your camera Storing pictures on the camera.
Inserting or removing a card when the camera is 32 GB.) CAUTION: A card can purchase an SD or SDHC Card to store more pictures and videos. (Maximum supported card size is on may cause damage. You can only be inserted one way; Purchase accessories www.kodak.com/go/z915accessories www.kodak.com/go/support 3 forcing it may damage the pictures, the card, or the camera. 1 Turn off the camera. 2 Insert or remove the optional card. 3 Turn on an (accessory) SD or SDHC Card Your camera has internal memory. Setting up your camera Storing pictures on the camera.

User Manual
Page 10
...marks Framing marks Framing marks indicate the camera focus area. 1 Press the Shutter button halfway. NOTE: Framing marks do not appear in all modes. Framing marks do not appear in some SCN (scene) and Video modes. When the framing marks turn green, press the Shutter button completely... down to lock on the subject. Multiple framing marks may appear when faces are detected. 4 www.kodak.com/go/support 2 Taking pictures/videos Taking a picture 1 Turn the Mode dial to Smart Capture . 2 Press the Shutter button halfway to take the picture. NOTE: For more...
...marks Framing marks Framing marks indicate the camera focus area. 1 Press the Shutter button halfway. NOTE: Framing marks do not appear in all modes. Framing marks do not appear in some SCN (scene) and Video modes. When the framing marks turn green, press the Shutter button completely... down to lock on the subject. Multiple framing marks may appear when faces are detected. 4 www.kodak.com/go/support 2 Taking pictures/videos Taking a picture 1 Turn the Mode dial to Smart Capture . 2 Press the Shutter button halfway to take the picture. NOTE: For more...

User Manual
Page 11
www.kodak.com/go/support 5 Delete Play a video To review pictures/videos anytime, see page 18. Taking a video Taking pictures/videos 1 Turn the Mode dial to Video . 2 Press the Shutter button completely down and release. (To stop recording, press and release again.) Reviewing the picture/video just taken After you take a picture/video, the LCD displays a quickview for several seconds. (To dismiss the quickview sooner, press the Shutter button halfway.) The picture/video is saved unless you press the Delete button.
www.kodak.com/go/support 5 Delete Play a video To review pictures/videos anytime, see page 18. Taking a video Taking pictures/videos 1 Turn the Mode dial to Video . 2 Press the Shutter button completely down and release. (To stop recording, press and release again.) Reviewing the picture/video just taken After you take a picture/video, the LCD displays a quickview for several seconds. (To dismiss the quickview sooner, press the Shutter button halfway.) The picture/video is saved unless you press the Delete button.

User Manual
Page 13
... a flat, steady surface or use a tripod. Fast shutter speed, high ISO. NOTE: If the mode description turns off . (Flash setting can be changed.) Fireworks Bright, colorful light displays. www.kodak.com/go/support 7 Place the camera on a lit stage. Flash and sounds are not available in low-light scenes. Night Distant scenery at...
... a flat, steady surface or use a tripod. Fast shutter speed, high ISO. NOTE: If the mode description turns off . (Flash setting can be changed.) Fireworks Bright, colorful light displays. www.kodak.com/go/support 7 Place the camera on a lit stage. Flash and sounds are not available in low-light scenes. Night Distant scenery at...
User Manual
Page 14
..., see page 35). Turn digital zoom on the LCD turns red when the picture quality reaches the limit for an acceptable 4 x 6-in . The slider on /off using digital zoom. Press Wide Angle (W) to zoom in . (10 x 15 cm) print. 8 www.kodak.com/go/support Digital zoom is Macro. Focus...quality when using the Setup menu (see Camera specifications, page 53. 2 Press Telephoto (T) to zoom out. 3 Take the picture or video. Using optical zoom Use optical zoom to get up to frame your subject. Documents. Optical zoom Digital zoom Use digital zoom to get a focused picture every...
..., see page 35). Turn digital zoom on the LCD turns red when the picture quality reaches the limit for an acceptable 4 x 6-in . The slider on /off using digital zoom. Press Wide Angle (W) to zoom in . (10 x 15 cm) print. 8 www.kodak.com/go/support Digital zoom is Macro. Focus...quality when using the Setup menu (see Camera specifications, page 53. 2 Press Telephoto (T) to zoom out. 3 Take the picture or video. Using optical zoom Use optical zoom to get up to frame your subject. Documents. Optical zoom Digital zoom Use digital zoom to get a focused picture every...
User Manual
Page 18
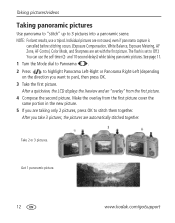
.... (Exposure Compensation, White Balance, Exposure Metering, AF Zone, AF Control, Color Mode, and Sharpness are automatically stitched together. See page 11. 1 Turn the Mode dial to Panorama . 2 Press to highlight Panorama Left-Right or Panorama Right-Left (depending on the direction you are taking panoramic pictures..... and 10-second delays) while taking only 2 pictures, press OK to 3 pictures into a panoramic scene. Get 1 panoramic picture. 12 www.kodak.com/go/support Taking pictures/videos Taking panoramic pictures Use panorama to "stitch" up to stitch them together.
.... (Exposure Compensation, White Balance, Exposure Metering, AF Zone, AF Control, Color Mode, and Sharpness are automatically stitched together. See page 11. 1 Turn the Mode dial to Panorama . 2 Press to highlight Panorama Left-Right or Panorama Right-Left (depending on the direction you are taking panoramic pictures..... and 10-second delays) while taking only 2 pictures, press OK to 3 pictures into a panoramic scene. Get 1 panoramic picture. 12 www.kodak.com/go/support Taking pictures/videos Taking panoramic pictures Use panorama to "stitch" up to stitch them together.
User Manual
Page 19
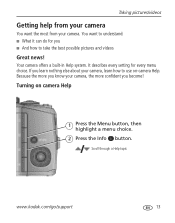
Turning on -camera Help. Scroll through a Help topic www.kodak.com/go/support 13 If you become! Your camera offers a built-in Help system. Because the more you know your camera, the more confident you learn nothing else about your camera, learn how to use on camera Help 1 Press the Menu button, then highlight a menu choice. ...every setting for you ■ And how to take the best possible pictures and videos Great news! You want the most from your camera. Taking pictures/videos Getting help from your camera You want to understand: ■ What it can do for every menu choice.
Turning on -camera Help. Scroll through a Help topic www.kodak.com/go/support 13 If you become! Your camera offers a built-in Help system. Because the more you know your camera, the more confident you learn nothing else about your camera, learn how to use on camera Help 1 Press the Menu button, then highlight a menu choice. ...every setting for you ■ And how to take the best possible pictures and videos Great news! You want the most from your camera. Taking pictures/videos Getting help from your camera You want to understand: ■ What it can do for every menu choice.

User Manual
Page 20
...all menu options. The settings, including Flash, are maintained for slow shutter compensation, and ISO speed speeds.) NOTE: Settings you change modes or turn off the camera. Mode When to use a tripod for P, A, S, and M modes-even when you want more control over your Shutter speed and flash...the ease of creative Aperture, shutter speed, flash control. (To prevent blur, use Press to its default setting. 14 www.kodak.com/go/support The camera automatically sets the shutter speed and aperture (f-stop) based on the scene lighting. The aperture setting may be compensation, flash ...
...all menu options. The settings, including Flash, are maintained for slow shutter compensation, and ISO speed speeds.) NOTE: Settings you change modes or turn off the camera. Mode When to use a tripod for P, A, S, and M modes-even when you want more control over your Shutter speed and flash...the ease of creative Aperture, shutter speed, flash control. (To prevent blur, use Press to its default setting. 14 www.kodak.com/go/support The camera automatically sets the shutter speed and aperture (f-stop) based on the scene lighting. The aperture setting may be compensation, flash ...
User Manual
Page 21
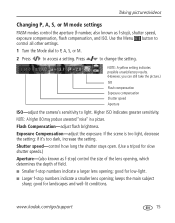
... indicates possible unsatisfactory results. (However, you can still take the picture.) ISO Flash compensation Exposure compensation Shutter speed Aperture ISO-adjust the camera's sensitivity to change the setting. Exposure Compensation-adjust the exposure. keeps the main subject sharp; If the scene is too light, decrease... the setting; www.kodak.com/go/support 15 Press to light. Use the Menu button to control all other settings. 1 Turn the Mode dial to P, A, S, or M. 2 Press to access a setting. NOTE: A ...
... indicates possible unsatisfactory results. (However, you can still take the picture.) ISO Flash compensation Exposure compensation Shutter speed Aperture ISO-adjust the camera's sensitivity to change the setting. Exposure Compensation-adjust the exposure. keeps the main subject sharp; If the scene is too light, decrease... the setting; www.kodak.com/go/support 15 Press to light. Use the Menu button to control all other settings. 1 Turn the Mode dial to P, A, S, or M. 2 Press to access a setting. NOTE: A ...


