User Manual
Page 2
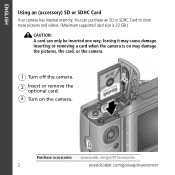
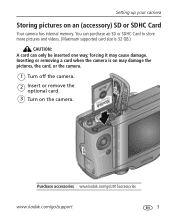
ENGLISH Using an (accessory) SD or SDHC Card Your camera has internal memory. Purchase accessories www.kodak.com/go/z915accessories 2 www.kodak.com/go/easysharecenter forcing it may damage the pictures, the card, or the camera. 1 Turn off the camera. 2 Insert or remove the optional card. 3 Turn on the camera. You can only be inserted one way; Inserting or removing a card when the camera is 32 GB.) CAUTION: A card can purchase an SD or SDHC Card to store more pictures and videos. (Maximum supported card size is on may cause damage.
ENGLISH Using an (accessory) SD or SDHC Card Your camera has internal memory. Purchase accessories www.kodak.com/go/z915accessories 2 www.kodak.com/go/easysharecenter forcing it may damage the pictures, the card, or the camera. 1 Turn off the camera. 2 Insert or remove the optional card. 3 Turn on the camera. You can only be inserted one way; Inserting or removing a card when the camera is 32 GB.) CAUTION: A card can purchase an SD or SDHC Card to store more pictures and videos. (Maximum supported card size is on may cause damage.
User Manual
Page 5
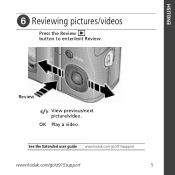
OK Play a video. See the Extended user guide www.kodak.com/go/z915support www.kodak.com/go/z915support 5 Review View previous/next picture/video. ENGLISH ᕦ Reviewing pictures/videos Press the Review button to enter/exit Review.
OK Play a video. See the Extended user guide www.kodak.com/go/z915support www.kodak.com/go/z915support 5 Review View previous/next picture/video. ENGLISH ᕦ Reviewing pictures/videos Press the Review button to enter/exit Review.
User Manual
Page 6
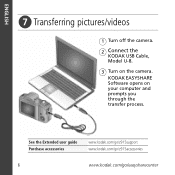
KODAK EASYSHARE Software opens on the camera. ENGLISH ᕧ Transferring pictures/videos 1 Turn off the camera. 2 Connect the KODAK USB Cable, Model U-8. 3 Turn on your computer and prompts you through the transfer process. See the Extended user guide Purchase accessories www.kodak.com/go/z915support www.kodak.com/go/z915accessories 6 www.kodak.com/go/easysharecenter
KODAK EASYSHARE Software opens on the camera. ENGLISH ᕧ Transferring pictures/videos 1 Turn off the camera. 2 Connect the KODAK USB Cable, Model U-8. 3 Turn on your computer and prompts you through the transfer process. See the Extended user guide Purchase accessories www.kodak.com/go/z915support www.kodak.com/go/z915accessories 6 www.kodak.com/go/easysharecenter

User Manual
Page 11
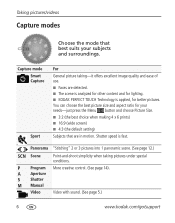
.... (See the Extended user guide www.kodak.com/go /z915support 11 Shutter speed is fast. Point-and-shoot simplicity when taking -it offers excellent image quality and ease of use. Video with your camera Choose the mode that are in motion. Panorama SCN Scene P Program A Aperture S Shutter M Manual Video "Stitching" 2 or 3 pictures into 1 panoramic...
.... (See the Extended user guide www.kodak.com/go /z915support 11 Shutter speed is fast. Point-and-shoot simplicity when taking -it offers excellent image quality and ease of use. Video with your camera Choose the mode that are in motion. Panorama SCN Scene P Program A Aperture S Shutter M Manual Video "Stitching" 2 or 3 pictures into 1 panoramic...

User Manual
Page 12
NOTE: If the mode description turns off before you finish reading it, press OK. 3 Press OK to highlight Scene modes. Doing more with your camera Taking a video 1 Turn the Mode dial to Video . 2 Press the Shutter button completely down and release. (To stop recording, press and release again.) Scene modes 1 Turn the Mode dial to Scene . 2 Press to choose a Scene mode. SCN mode For Portrait Full-frame portraits of children in bright light. 12 www.kodak.com/go/easysharecenter Children Action pictures of people.
NOTE: If the mode description turns off before you finish reading it, press OK. 3 Press OK to highlight Scene modes. Doing more with your camera Taking a video 1 Turn the Mode dial to Video . 2 Press the Shutter button completely down and release. (To stop recording, press and release again.) Scene modes 1 Turn the Mode dial to Scene . 2 Press to choose a Scene mode. SCN mode For Portrait Full-frame portraits of children in bright light. 12 www.kodak.com/go/easysharecenter Children Action pictures of people.

User Manual
Page 14
... you zoom in . (10 x 15 cm) print. 14 www.kodak.com/go/easysharecenter Doing more with your camera Using optical zoom Use optical zoom to get up to 5X beyond optical zoom while taking pictures/videos. 1 Use the LCD to frame your subject. Turn digital zoom on the LCD turns red when the picture...
... you zoom in . (10 x 15 cm) print. 14 www.kodak.com/go/easysharecenter Doing more with your camera Using optical zoom Use optical zoom to get up to 5X beyond optical zoom while taking pictures/videos. 1 Use the LCD to frame your subject. Turn digital zoom on the LCD turns red when the picture...
User Manual
Page 16
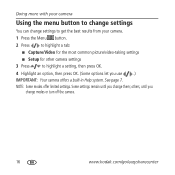
... or turn off the camera. 16 www.kodak.com/go/easysharecenter Doing more with your camera Using the menu button to change settings You can change settings to get the best results from your camera. 1 Press the Menu button. 2 Press to highlight a tab: ■ Capture/Video for the most common picture/video-taking settings ■ Setup...
... or turn off the camera. 16 www.kodak.com/go/easysharecenter Doing more with your camera Using the menu button to change settings You can change settings to get the best results from your camera. 1 Press the Menu button. 2 Press to highlight a tab: ■ Capture/Video for the most common picture/video-taking settings ■ Setup...
User Manual
Page 18
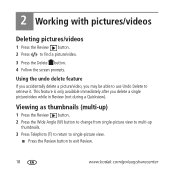
... (T) to return to single-picture view. ■ Press the Review button to find a picture/video. 3 Press the Delete button. 4 Follow the screen prompts. 2 Working with pictures/videos Deleting pictures/videos 1 Press the Review button. 2 Press to exit Review. 18 www.kodak.com/go/easysharecenter Using the undo delete feature If you accidentally delete a picture...
... (T) to return to single-picture view. ■ Press the Review button to find a picture/video. 3 Press the Delete button. 4 Follow the screen prompts. 2 Working with pictures/videos Deleting pictures/videos 1 Press the Review button. 2 Press to exit Review. 18 www.kodak.com/go/easysharecenter Using the undo delete feature If you accidentally delete a picture...

User Manual
Page 19
Working with pictures/videos Understanding the review icons Video duration Shortcuts Select picture Add text tag View multi-up Play video Print tag/number of prints Protected Email tag Picture/Video number Upload tag Favorite tag Text tag name Battery level Date stamp www.kodak.com/go/z915support 19
Working with pictures/videos Understanding the review icons Video duration Shortcuts Select picture Add text tag View multi-up Play video Print tag/number of prints Protected Email tag Picture/Video number Upload tag Favorite tag Text tag name Battery level Date stamp www.kodak.com/go/z915support 19
User Manual
Page 22
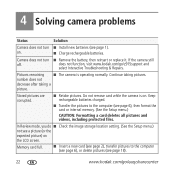
... page 2), transfer pictures to the computer (see page 1). Continue taking a picture. If the camera still off. does not function, visit www.kodak.com/go /easysharecenter number does not decrease after taking pictures. Do not remove card while the...camera is on. 4 Solving camera problems Status Solution Camera does not turn ■ Remove the battery, then reinsert or replace it. Camera does not turn ■ Install new batteries (see page 6), then format the card or internal memory. (See the Setup menu.) CAUTION: Formatting a card deletes all pictures and videos...
... page 2), transfer pictures to the computer (see page 1). Continue taking a picture. If the camera still off. does not function, visit www.kodak.com/go /easysharecenter number does not decrease after taking pictures. Do not remove card while the...camera is on. 4 Solving camera problems Status Solution Camera does not turn ■ Remove the battery, then reinsert or replace it. Camera does not turn ■ Install new batteries (see page 6), then format the card or internal memory. (See the Setup menu.) CAUTION: Formatting a card deletes all pictures and videos...
User Manual
Page 5
... help from your camera 13 P, A, S, and M modes 14 Using exposure compensation to adjust brightness 16 Using the histogram to view picture brightness 17 Understanding the picture-taking icons 17 3 Working with pictures/videos 18 Reviewing pictures/videos 18 Deleting pictures/videos 19 Using shortcuts ...21 Using the menu button in Review 21 Adding sound tags 22 Cropping pictures 23 Using KODAK PERFECT TOUCH Technology 24 www.kodak.com/go/support iii
... help from your camera 13 P, A, S, and M modes 14 Using exposure compensation to adjust brightness 16 Using the histogram to view picture brightness 17 Understanding the picture-taking icons 17 3 Working with pictures/videos 18 Reviewing pictures/videos 18 Deleting pictures/videos 19 Using shortcuts ...21 Using the menu button in Review 21 Adding sound tags 22 Cropping pictures 23 Using KODAK PERFECT TOUCH Technology 24 www.kodak.com/go/support iii
User Manual
Page 6
... Play a multimedia slide show 28 Displaying pictures/videos on a television 29 Viewing pictures/videos in different ways 30 Selecting multiple pictures/videos 30 Copying pictures/videos 31 Understanding the review icons 31 4 Using the menu button 32 Using the Setup menu 35 5 Transferring,... 46 7 Getting help 51 Helpful links 51 8 Appendix 53 Camera specifications 53 Storage capacities 55 Important safety instructions 56 Upgrading your software and firmware 57 Battery life 57 Care and maintenance 58 Limited warranty 58 Regulatory compliance 60 iv www.kodak.com/go/support
... Play a multimedia slide show 28 Displaying pictures/videos on a television 29 Viewing pictures/videos in different ways 30 Selecting multiple pictures/videos 30 Copying pictures/videos 31 Understanding the review icons 31 4 Using the menu button 32 Using the Setup menu 35 5 Transferring,... 46 7 Getting help 51 Helpful links 51 8 Appendix 53 Camera specifications 53 Storage capacities 55 Important safety instructions 56 Upgrading your software and firmware 57 Battery life 57 Care and maintenance 58 Limited warranty 58 Regulatory compliance 60 iv www.kodak.com/go/support
User Manual
Page 9
Purchase accessories www.kodak.com/go/z915accessories www.kodak.com/go/support 3 Inserting or removing a card when the camera is 32 GB.) CAUTION: A card can purchase an SD or SDHC Card to store more pictures and videos. (Maximum supported card size is on may cause damage. forcing it may damage the pictures, the card, or the camera. 1 Turn off the camera. 2 Insert or remove the optional card. 3 Turn on an (accessory) SD or SDHC Card Your camera has internal memory. Setting up your camera Storing pictures on the camera. You can only be inserted one way;
Purchase accessories www.kodak.com/go/z915accessories www.kodak.com/go/support 3 Inserting or removing a card when the camera is 32 GB.) CAUTION: A card can purchase an SD or SDHC Card to store more pictures and videos. (Maximum supported card size is on may cause damage. forcing it may damage the pictures, the card, or the camera. 1 Turn off the camera. 2 Insert or remove the optional card. 3 Turn on an (accessory) SD or SDHC Card Your camera has internal memory. Setting up your camera Storing pictures on the camera. You can only be inserted one way;

User Manual
Page 10
.... 2 Press the Shutter button completely down . Multiple framing marks may appear when faces are detected. 4 www.kodak.com/go/support Using the framing marks Framing marks Framing marks indicate the camera focus area. 1 Press the Shutter button halfway. NOTE: Framing marks do not appear in all modes. 2 ... to Smart Capture . 2 Press the Shutter button halfway to take the picture. Framing marks do not appear in some SCN (scene) and Video modes. When the framing marks turn green, press the Shutter button completely down to lock on Smart Capture and other modes, see page 6. ...
.... 2 Press the Shutter button completely down . Multiple framing marks may appear when faces are detected. 4 www.kodak.com/go/support Using the framing marks Framing marks Framing marks indicate the camera focus area. 1 Press the Shutter button halfway. NOTE: Framing marks do not appear in all modes. 2 ... to Smart Capture . 2 Press the Shutter button halfway to take the picture. Framing marks do not appear in some SCN (scene) and Video modes. When the framing marks turn green, press the Shutter button completely down to lock on Smart Capture and other modes, see page 6. ...

User Manual
Page 11
Delete Play a video To review pictures/videos anytime, see page 18. Taking a video Taking pictures/videos 1 Turn the Mode dial to Video . 2 Press the Shutter button completely down and release. (To stop recording, press and release again.) Reviewing the picture/video just taken After you take a picture/video, the LCD displays a quickview for several seconds. (To dismiss the quickview sooner, press the Shutter button halfway.) The picture/video is saved unless you press the Delete button. www.kodak.com/go/support 5
Delete Play a video To review pictures/videos anytime, see page 18. Taking a video Taking pictures/videos 1 Turn the Mode dial to Video . 2 Press the Shutter button completely down and release. (To stop recording, press and release again.) Reviewing the picture/video just taken After you take a picture/video, the LCD displays a quickview for several seconds. (To dismiss the quickview sooner, press the Shutter button halfway.) The picture/video is saved unless you press the Delete button. www.kodak.com/go/support 5
User Manual
Page 12
... simplicity when taking -it offers excellent image quality and ease of use. ■ Faces are in motion. A Aperture S Shutter M Manual Video Video with sound. (See page 5.) 6 www.kodak.com/go/support Taking pictures/videos Capture modes Choose the mode that best suits your needs-just press the Menu button and choose Picture Size. ■...
... simplicity when taking -it offers excellent image quality and ease of use. ■ Faces are in motion. A Aperture S Shutter M Manual Video Video with sound. (See page 5.) 6 www.kodak.com/go/support Taking pictures/videos Capture modes Choose the mode that best suits your needs-just press the Menu button and choose Picture Size. ■...

User Manual
Page 13
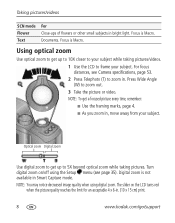
... bright light. Children Action pictures of people. Candle light Capturing the ambiance of yourself. Night Distant scenery at sunset. The camera uses infinity auto-focus. Self-Portrait Close-ups of candle light. Assures proper focus and minimizes red eye. Framing marks are in... Landscape. www.kodak.com/go/support 7 Taking pictures/videos Scene modes 1 Turn the Mode dial to Scene . 2 Press to choose a Scene mode. Sunset Capturing the deep hues...
... bright light. Children Action pictures of people. Candle light Capturing the ambiance of yourself. Night Distant scenery at sunset. The camera uses infinity auto-focus. Self-Portrait Close-ups of candle light. Assures proper focus and minimizes red eye. Framing marks are in... Landscape. www.kodak.com/go/support 7 Taking pictures/videos Scene modes 1 Turn the Mode dial to Scene . 2 Press to choose a Scene mode. Sunset Capturing the deep hues...
User Manual
Page 14
... menu (see Camera specifications, page 53. 2 Press Telephoto (T) to zoom out. 3 Take the picture or video. NOTE: To get a focused picture every time, remember: ■ Use the framing marks, page 4. ■ As you zoom in, move away from your subject. The slider on /off using digital zoom. Focus... Wide Angle (W) to zoom in Smart Capture mode. Digital zoom is Macro. Taking pictures/videos SCN mode Flower Text For Close-ups of flowers or other small subjects in . (10 x 15 cm) print. 8 www.kodak.com/go/support Turn digital zoom on the LCD turns red when the picture quality...
... menu (see Camera specifications, page 53. 2 Press Telephoto (T) to zoom out. 3 Take the picture or video. NOTE: To get a focused picture every time, remember: ■ Use the framing marks, page 4. ■ As you zoom in, move away from your subject. The slider on /off using digital zoom. Focus... Wide Angle (W) to zoom in Smart Capture mode. Digital zoom is Macro. Taking pictures/videos SCN mode Flower Text For Close-ups of flowers or other small subjects in . (10 x 15 cm) print. 8 www.kodak.com/go/support Turn digital zoom on the LCD turns red when the picture quality...
User Manual
Page 15
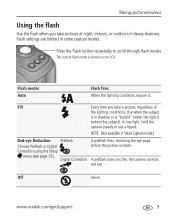
...subject is in shadow or is "backlit" (when the light is taken. Digital Correction A preflash fires, shrinking the eye pupil, before the picture is behind the subject). the camera corrects red eye. Taking pictures/videos Using the flash Use the flash when you take pictures at night, indoors...mode.) Red-eye Reduction Preflash Choose Preflash or Digital Correction using the Setup menu (see page 35). Off Never. NOTE: (Not available in some capture modes. Flash modes Auto Flash fires When the lighting conditions require it. www.kodak.com/go/support 9 A preflash does not fire...
...subject is in shadow or is "backlit" (when the light is taken. Digital Correction A preflash fires, shrinking the eye pupil, before the picture is behind the subject). the camera corrects red eye. Taking pictures/videos Using the flash Use the flash when you take pictures at night, indoors...mode.) Red-eye Reduction Preflash Choose Preflash or Digital Correction using the Setup menu (see page 35). Off Never. NOTE: (Not available in some capture modes. Flash modes Auto Flash fires When the lighting conditions require it. www.kodak.com/go/support 9 A preflash does not fire...

User Manual
Page 16
... cm (4.7-23.6 in.) from the lens. 2 Press the Shutter button halfway to focus and set exposure, then completely down to scroll through a window. Taking pictures/videos Using the Focus button Press the Focus button repeatedly to take the picture. 10 www...
... cm (4.7-23.6 in.) from the lens. 2 Press the Shutter button halfway to focus and set exposure, then completely down to scroll through a window. Taking pictures/videos Using the Focus button Press the Focus button repeatedly to take the picture. 10 www...


