User Manual
Page 1
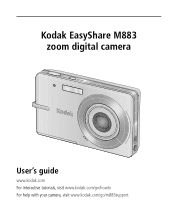
Kodak EasyShare M883 zoom digital camera User's guide www.kodak.com For interactive tutorials, visit www.kodak.com/go/howto For help with your camera, visit www.kodak.com/go/m883support
Kodak EasyShare M883 zoom digital camera User's guide www.kodak.com For interactive tutorials, visit www.kodak.com/go/howto For help with your camera, visit www.kodak.com/go/m883support
User Manual
Page 5
... the battery using the USB cable 2 Turning on the camera 4 Setting the language and date/time 4 Storing pictures on an SD or MMC card 5 2 Taking pictures/videos 6 Taking a picture 6 Taking a video 7 Using optical zoom 8 Using the flash 9 Using different modes 10 Understanding ...the picture-taking icons 12 3 Working with pictures/videos 13 Reviewing pictures/videos 13 Deleting pictures/videos 14 Using the menu button in Review 15 Cropping pictures 16 Using Kodak Perfect Touch technology...
... the battery using the USB cable 2 Turning on the camera 4 Setting the language and date/time 4 Storing pictures on an SD or MMC card 5 2 Taking pictures/videos 6 Taking a picture 6 Taking a video 7 Using optical zoom 8 Using the flash 9 Using different modes 10 Understanding ...the picture-taking icons 12 3 Working with pictures/videos 13 Reviewing pictures/videos 13 Deleting pictures/videos 14 Using the menu button in Review 15 Cropping pictures 16 Using Kodak Perfect Touch technology...
User Manual
Page 6
... Using the menu button to change settings 27 Using camera Help 34 Using the self-timer 35 Using burst 36 Taking panoramic pictures 37 Using the histogram to view picture brightness 38 Using the framing ... 38 5 Transferring and printing pictures 44 Installing the software 44 Transferring pictures/videos 45 Printing pictures 46 Dock compatibility for your camera 48 6 Troubleshooting 49 7 Getting help 53 8 Appendix 55 Camera specifications 55 Care and maintenance 57 Upgrading your software and firmware 58 Storage capacities 58 Important safety instructions 58 Battery replacement...
... Using the menu button to change settings 27 Using camera Help 34 Using the self-timer 35 Using burst 36 Taking panoramic pictures 37 Using the histogram to view picture brightness 38 Using the framing ... 38 5 Transferring and printing pictures 44 Installing the software 44 Transferring pictures/videos 45 Printing pictures 46 Dock compatibility for your camera 48 6 Troubleshooting 49 7 Getting help 53 8 Appendix 55 Camera specifications 55 Care and maintenance 57 Upgrading your software and firmware 58 Storage capacities 58 Important safety instructions 58 Battery replacement...
User Manual
Page 7
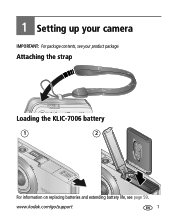
www.kodak.com/go/support 1 Attaching the strap Loading the KLIC-7006 battery 1 2 For information on replacing batteries and extending battery life, see your product package. 1 Setting up your camera IMPORTANT: For package contents, see page 59.
www.kodak.com/go/support 1 Attaching the strap Loading the KLIC-7006 battery 1 2 For information on replacing batteries and extending battery life, see your product package. 1 Setting up your camera IMPORTANT: For package contents, see page 59.

User Manual
Page 8
... tab. ■ Press to highlight About, then press the OK button. 2 If your camera is running a lower version, download and install version 1.02 or higher from www.kodak.com/go/m883support. 3 When your camera is turned on, and not in sleep mode For more USB charging information, visit www....kodak.com/go/USBcharging. 2 www.kodak.com/go/support USB cable (U-8) USB / A/V adapter Note: If the ...
... tab. ■ Press to highlight About, then press the OK button. 2 If your camera is running a lower version, download and install version 1.02 or higher from www.kodak.com/go/m883support. 3 When your camera is turned on, and not in sleep mode For more USB charging information, visit www....kodak.com/go/USBcharging. 2 www.kodak.com/go/support USB cable (U-8) USB / A/V adapter Note: If the ...

User Manual
Page 9
... adapter Turn OFF the camera first. USB / A/V adapter Kodak EasyShare photo frame dock 2 Turn OFF the camera first. Kodak 5V AC adapter Turn OFF the camera first. Setting up your camera Charging the battery using other accessories To purchase optional accessories, visit www.kodak.com/go /support 3 Kodak EasyShare camera or printer dock Turn OFF the camera first. Battery charging...
... adapter Turn OFF the camera first. USB / A/V adapter Kodak EasyShare photo frame dock 2 Turn OFF the camera first. Kodak 5V AC adapter Turn OFF the camera first. Setting up your camera Charging the battery using other accessories To purchase optional accessories, visit www.kodak.com/go /support 3 Kodak EasyShare camera or printer dock Turn OFF the camera first. Battery charging...

User Manual
Page 10
OK to accept. for previous/next field. Setting up your camera Turning on the camera 2 1 Setting the language and date/time Language: 1 to change . Date/Time: 1 At the prompt, press OK. 2 to change . 2 OK to accept. To change language in the future, see page 32. 4 www.kodak.com/go/support OK NOTE: To change date & time, see page 33.
OK to accept. for previous/next field. Setting up your camera Turning on the camera 2 1 Setting the language and date/time Language: 1 to change . Date/Time: 1 At the prompt, press OK. 2 to change . 2 OK to accept. To change language in the future, see page 32. 4 www.kodak.com/go/support OK NOTE: To change date & time, see page 33.
User Manual
Page 11
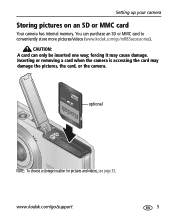
CAUTION: A card can purchase an SD or MMC card to conveniently store more pictures/videos (www.kodak.com/go /support 5 forcing it may damage the pictures, the card, or the camera. www.kodak.com/go /m883accessories). You can only be inserted one way; Inserting or removing a card when the camera is accessing the card may cause damage. Setting up your camera Storing pictures on an SD or MMC card Your camera has internal memory. optional NOTE: To choose a storage location for pictures and videos, see page 33.
CAUTION: A card can purchase an SD or MMC card to conveniently store more pictures/videos (www.kodak.com/go /support 5 forcing it may damage the pictures, the card, or the camera. www.kodak.com/go /m883accessories). You can only be inserted one way; Inserting or removing a card when the camera is accessing the card may cause damage. Setting up your camera Storing pictures on an SD or MMC card Your camera has internal memory. optional NOTE: To choose a storage location for pictures and videos, see page 33.

User Manual
Page 12
... are fixed at Center Wide. 6 www.kodak.com/go/support Framing marks 1 Press the Shutter button halfway. Press the Shutter button halfway to take the picture. When the framing marks turn green, focus is accomplished. 2 If the camera is not focusing on the desired subject (or...Shutter button completely down . NOTE: Framing marks do not appear in SCN modes designed for pictures of people), the camera attempts to take pictures Framing marks indicate the camera focus area. When the framing marks turn green, press the Shutter button completely down to focus on /off status...
... are fixed at Center Wide. 6 www.kodak.com/go/support Framing marks 1 Press the Shutter button halfway. Press the Shutter button halfway to take the picture. When the framing marks turn green, focus is accomplished. 2 If the camera is not focusing on the desired subject (or...Shutter button completely down . NOTE: Framing marks do not appear in SCN modes designed for pictures of people), the camera attempts to take pictures Framing marks indicate the camera focus area. When the framing marks turn green, press the Shutter button completely down to focus on /off status...

User Manual
Page 15
... (see page 30). In Red Eye flash, you turn off (see page 31). Off Never Your camera saves the flash setting, even after you can reduce red eye by using a preflash or by using automatic... Auto Flash fires When the lighting conditions require it. In low light, hold the camera steady or use a tripod. www.kodak.com/go/support 9 The current flash mode is shown in shadow or is "backlit" (...when light is on, the camera cannot take a picture, regardless of red eye.) ■ Flash once...
... (see page 30). In Red Eye flash, you turn off (see page 31). Off Never Your camera saves the flash setting, even after you can reduce red eye by using a preflash or by using automatic... Auto Flash fires When the lighting conditions require it. In low light, hold the camera steady or use a tripod. www.kodak.com/go/support 9 The current flash mode is shown in shadow or is "backlit" (...when light is on, the camera cannot take a picture, regardless of red eye.) ■ Flash once...

User Manual
Page 16
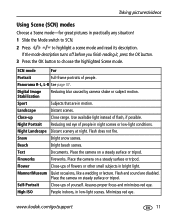
... Landscape Far-away scenes. Auto-focus framing marks are not available in the LCD status area. 10 www.kodak.com/go/support The camera automatically sets the focus distance depending on the zoom position. The camera uses infinity auto-focus. Macro Close range. Point-and-shoot simplicity when taking -offers an excellent balance of...
... Landscape Far-away scenes. Auto-focus framing marks are not available in the LCD status area. 10 www.kodak.com/go/support The camera automatically sets the focus distance depending on the zoom position. The camera uses infinity auto-focus. Macro Close range. Point-and-shoot simplicity when taking -offers an excellent balance of...
User Manual
Page 17
... steady surface or tripod. Minimizes red eye. Sport Subjects that are disabled. Flash does not fire. Text Documents. Digital Image Stabilization Reducing blur caused by camera shake or subject motion. Use available light instead of people in motion. Night Portrait Reducing red eye of flash, ...if possible. Flash and sound are in night scenes or low-light conditions. www.kodak.com/go/support 11 Place the camera on a steady surface or tripod. Fireworks Fireworks. If the mode description turns off before you finish reading it, press...
... steady surface or tripod. Minimizes red eye. Sport Subjects that are disabled. Flash does not fire. Text Documents. Digital Image Stabilization Reducing blur caused by camera shake or subject motion. Use available light instead of people in motion. Night Portrait Reducing red eye of flash, ...if possible. Flash and sound are in night scenes or low-light conditions. www.kodak.com/go/support 11 Place the camera on a steady surface or tripod. Fireworks Fireworks. If the mode description turns off before you finish reading it, press...
User Manual
Page 18
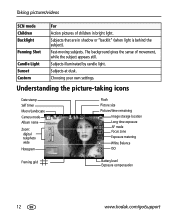
... is behind the subject). Fast-moving subjects. Understanding the picture-taking icons Date stamp Self timer Macro/Landscape Camera mode Album name Zoom: digital telephoto wide Histogram Flash Picture size Pictures/time remaining Image storage location Long time exposure AF mode Focus zone ...Exposure metering White Balance ISO Framing grid Battery level Exposure compensation 12 www.kodak.com/go/support Subjects illuminated ...
... is behind the subject). Fast-moving subjects. Understanding the picture-taking icons Date stamp Self timer Macro/Landscape Camera mode Album name Zoom: digital telephoto wide Histogram Flash Picture size Pictures/time remaining Image storage location Long time exposure AF mode Focus zone ...Exposure metering White Balance ISO Framing grid Battery level Exposure compensation 12 www.kodak.com/go/support Subjects illuminated ...
User Manual
Page 21
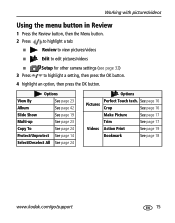
..., then the Menu button. 2 Press to highlight a tab: ■ Review to view pictures/videos ■ Edit to edit pictures/videos ■ 3 Press Setup for other camera settings (see page 32) to highlight a setting, then press the OK button. 4 highlight an option, then press the OK button. See page 16 Pictures Crop... See page 16 Make Picture See page 17 Trim See page 17 Videos Action Print See page 19 Bookmark See page 18 www.kodak.com/go/support 15
..., then the Menu button. 2 Press to highlight a tab: ■ Review to view pictures/videos ■ Edit to edit pictures/videos ■ 3 Press Setup for other camera settings (see page 32) to highlight a setting, then press the OK button. 4 highlight an option, then press the OK button. See page 16 Pictures Crop... See page 16 Make Picture See page 17 Trim See page 17 Videos Action Print See page 19 Bookmark See page 18 www.kodak.com/go/support 15
User Manual
Page 22
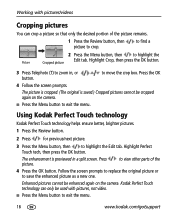
...Menu button, then to highlight the Edit tab. Press picture. Enhanced pictures cannot be enhanced again on the camera. ■ Press the Menu button to exit the menu. 16 www.kodak.com/go/support Press the OK 4 Follow the screen prompts. Highlight Crop, then press the OK button.... 3 Press Telephoto (T) to crop. to view other parts of the picture remains. 1 Press the Review button, then picture to zoom in a split screen....
...Menu button, then to highlight the Edit tab. Press picture. Enhanced pictures cannot be enhanced again on the camera. ■ Press the Menu button to exit the menu. 16 www.kodak.com/go/support Press the OK 4 Follow the screen prompts. Highlight Crop, then press the OK button.... 3 Press Telephoto (T) to crop. to view other parts of the picture remains. 1 Press the Review button, then picture to zoom in a split screen....

User Manual
Page 25
... Review tab. Manual: You choose the first and last frames; A 4-, 9-, or 16-up picture Auto: The camera includes the first and last frames, then 2, 7, or 14 equally spaced frames. Press press the OK button. www.kodak.com/go/support 19 Use Bookmarks: Bookmarked frames are used . If you can make a 4-, 9-, or 16... on the LCD. 1 Press the Review button, then the Menu button. 2 Press to exit the menu. Highlight Action Print, then press the OK button. the camera chooses 2, 7, or 14 equally spaced frames. Full Manual: You choose 4, 9, or 16 frames.
... Review tab. Manual: You choose the first and last frames; A 4-, 9-, or 16-up picture Auto: The camera includes the first and last frames, then 2, 7, or 14 equally spaced frames. Press press the OK button. www.kodak.com/go/support 19 Use Bookmarks: Bookmarked frames are used . If you can make a 4-, 9-, or 16... on the LCD. 1 Press the Review button, then the Menu button. 2 Press to exit the menu. Highlight Action Print, then press the OK button. the camera chooses 2, 7, or 14 equally spaced frames. Full Manual: You choose 4, 9, or 16 frames.

User Manual
Page 27
The slide show stops if you connect or disconnect the cable while the slide show is correct (see page 32). NOTE: Ensure that the Video Out setting (NTSC or PAL) is running. (Image quality on a television screen may be as good as on a television, computer monitor, or any device equipped with a video input. To connect the camera to a television, use an A/V cable (may not be sold separately). Working with pictures/videos Displaying pictures/videos on a television You can display pictures/videos on a computer monitor or when printed.) www.kodak.com/go/support 21
The slide show stops if you connect or disconnect the cable while the slide show is correct (see page 32). NOTE: Ensure that the Video Out setting (NTSC or PAL) is running. (Image quality on a television screen may be as good as on a television, computer monitor, or any device equipped with a video input. To connect the camera to a television, use an A/V cable (may not be sold separately). Working with pictures/videos Displaying pictures/videos on a television You can display pictures/videos on a computer monitor or when printed.) www.kodak.com/go/support 21

User Manual
Page 30
... from a card to internal memory or from the original location after copying, delete them (see page 14. 24 www.kodak.com/go/support Tags that a card is used most effectively in the camera. Protection settings are copied, not moved. Press Review tab. To apply protection to a card. Selected pictures A check mark appears...
... from a card to internal memory or from the original location after copying, delete them (see page 14. 24 www.kodak.com/go/support Tags that a card is used most effectively in the camera. Protection settings are copied, not moved. Press Review tab. To apply protection to a card. Selected pictures A check mark appears...

User Manual
Page 33
...-2.0, +0.3, +0.7, +1.0, +1.3, Before you take a picture, you +1.7, +2.0 can change settings to make pictures darker or lighter. others, until you change them; www.kodak.com/go/support 27 Some modes offer limited settings. 1 Press the Menu button. 2 Press to choose a tab: ■ Capture for the most common picture-...taking settings ■ Capture plus for other picture-taking settings ■ Video for video-taking settings ■ Setup for other camera settings 3 Press to highlight a setting, then press the OK button. 4 Choose an option, then press the OK button. ...
...-2.0, +0.3, +0.7, +1.0, +1.3, Before you take a picture, you +1.7, +2.0 can change settings to make pictures darker or lighter. others, until you change them; www.kodak.com/go/support 27 Some modes offer limited settings. 1 Press the Menu button. 2 Press to choose a tab: ■ Capture for the most common picture-...taking settings ■ Capture plus for other picture-taking settings ■ Video for video-taking settings ■ Setup for other camera settings 3 Press to highlight a setting, then press the OK button. 4 Choose an option, then press the OK button. ...

User Manual
Page 34
Unavailable in Landscape mode. 28 www.kodak.com/go /printsizes 5.0 MP (4:3)-Medium resolution and file size. 3.1 MP (4:3)-Small to medium file size. 2.5 MP (3:2)-For printing on EasyShare printer docks and For recommended print sizes, photo printers. there is set to press the Shutter button halfway down . Doing more with your camera Press Menu, , , and OK to...
Unavailable in Landscape mode. 28 www.kodak.com/go /printsizes 5.0 MP (4:3)-Medium resolution and file size. 3.1 MP (4:3)-Small to medium file size. 2.5 MP (3:2)-For printing on EasyShare printer docks and For recommended print sizes, photo printers. there is set to press the Shutter button halfway down . Doing more with your camera Press Menu, , , and OK to...


