

User Manual
Page 2
Eastman Kodak Company Rochester, NY 14650 © Eastman Kodak Company, 2007 All screen images are trademarks of Eastman Kodak Company. P/N 4J6185_en Kodak, EasyShare, and Perfect Touch are simulated.
Eastman Kodak Company Rochester, NY 14650 © Eastman Kodak Company, 2007 All screen images are trademarks of Eastman Kodak Company. P/N 4J6185_en Kodak, EasyShare, and Perfect Touch are simulated.
User Manual
Page 21
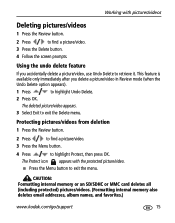
Protecting pictures/videos from deletion 1 Press the Review button. 2 Press to find a picture/video. 3 Press the Delete button. 4 Follow the screen prompts. The Protect icon appears with pictures/videos Deleting pictures/videos 1 Press the Review button. 2 Press to find a picture/video. 3 Press the ...or MMC card deletes all (including protected) pictures/videos. (Formatting internal memory also deletes email addresses, album names, and favorites.) www.kodak.com/go/support 15 Working with the protected picture/video. ■ Press the Menu button to exit the menu.
Protecting pictures/videos from deletion 1 Press the Review button. 2 Press to find a picture/video. 3 Press the Delete button. 4 Follow the screen prompts. The Protect icon appears with pictures/videos Deleting pictures/videos 1 Press the Review button. 2 Press to find a picture/video. 3 Press the ...or MMC card deletes all (including protected) pictures/videos. (Formatting internal memory also deletes email addresses, album names, and favorites.) www.kodak.com/go/support 15 Working with the protected picture/video. ■ Press the Menu button to exit the menu.
User Manual
Page 23
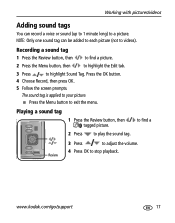
Press the OK button. 4 Choose Record, then press OK. 5 Follow the screen prompts. Playing a sound tag 1 Press the Review button, then tagged picture. 2 Press to exit the menu. NOTE: Only one sound tag can record a voice or ... (up to 1 minute long) to a picture. The sound tag is applied to your picture. ■ Press the Menu button to play the sound tag. www.kodak.com/go/support 17 to find a picture. 2 Press the Menu button, then to highlight the Edit tab. 3 Press to highlight Sound Tag. Recording a sound tag...
Press the OK button. 4 Choose Record, then press OK. 5 Follow the screen prompts. Playing a sound tag 1 Press the Review button, then tagged picture. 2 Press to exit the menu. NOTE: Only one sound tag can record a voice or ... (up to 1 minute long) to a picture. The sound tag is applied to your picture. ■ Press the Menu button to play the sound tag. www.kodak.com/go/support 17 to find a picture. 2 Press the Menu button, then to highlight the Edit tab. 3 Press to highlight Sound Tag. Recording a sound tag...

User Manual
Page 24
... 1 Press the Review button, then picture. Press the OK button. The enhancement is cropped. Press OK. 5 Follow the screen prompts. Using Kodak Perfect Touch technology Kodak Perfect Touch technology helps ensure better, brighter pictures. 1 Press the Review button, then to find a 2 Press the Menu ...button, then to move the crop box. Press picture. Follow the screen prompts to replace the original picture or to highlight Perfect Touch tech. to exit the menu. 18 www.kodak.com/go/support NOTE: You cannot enhance previously enhanced or panorama pictures, or ...
... 1 Press the Review button, then picture. Press the OK button. The enhancement is cropped. Press OK. 5 Follow the screen prompts. Using Kodak Perfect Touch technology Kodak Perfect Touch technology helps ensure better, brighter pictures. 1 Press the Review button, then to find a 2 Press the Menu ...button, then to move the crop box. Press picture. Follow the screen prompts to replace the original picture or to highlight Perfect Touch tech. to exit the menu. 18 www.kodak.com/go/support NOTE: You cannot enhance previously enhanced or panorama pictures, or ...
User Manual
Page 25
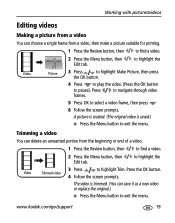
... suitable for printing. 1 Press the Review button, then to find a video. 2 Press the Menu button, then Edit tab. Video Trimmed video 4 Follow the screen prompts. A picture is created. (The original video is trimmed. (You can save it as a new video or replace the original.) ■ Press the Menu... button to exit the menu. to highlight the 3 Press to pause). Press the OK button. www.kodak.com/go/support 19 The video is saved.) ■ Press the Menu button to exit the menu. Working with pictures/videos Editing videos Making ...
... suitable for printing. 1 Press the Review button, then to find a video. 2 Press the Menu button, then Edit tab. Video Trimmed video 4 Follow the screen prompts. A picture is created. (The original video is trimmed. (You can save it as a new video or replace the original.) ■ Press the Menu... button to exit the menu. to highlight the 3 Press to pause). Press the OK button. www.kodak.com/go/support 19 The video is saved.) ■ Press the Menu button to exit the menu. Working with pictures/videos Editing videos Making ...

User Manual
Page 37
...choose a sound effect for pictures/videos. Internal Memory-the camera uses internal memory, even if a card is in the camera. On or Off Pre-select album names before you take ... or videos you take are Off displayed with the correct side up. Doing more with your camera Using the Setup menu Press Menu, , , and OK to access settings Options LCD Brightness ... each function. Then, all functions. Set Album Choose Album names. See page 43. Camera Sounds Choose sound effects. www.kodak.com/go/support 31 Sound Volume Off Low Medium (default) High Date & Time See...
...choose a sound effect for pictures/videos. Internal Memory-the camera uses internal memory, even if a card is in the camera. On or Off Pre-select album names before you take ... or videos you take are Off displayed with the correct side up. Doing more with your camera Using the Setup menu Press Menu, , , and OK to access settings Options LCD Brightness ... each function. Then, all functions. Set Album Choose Album names. See page 43. Camera Sounds Choose sound effects. www.kodak.com/go/support 31 Sound Volume Off Low Medium (default) High Date & Time See...

User Manual
Page 41
... light instead of focus. A magnified image appears on the zoom position. Manual Focus is at close -up distances are unavailable. www.kodak.com/go/support 35 Focus mode Description Normal AF Focus setting for general picture-taking. (default) Macro Infinity Sharpness and detail in ....MF icon appears, press OK to adjust the setting. The close range. The camera automatically sets the focus distance depending on the screen when adjusting focus position. Doing more with your camera Shutter speed-control how long the shutter stays open. Aperture-(also known as f-stop...
... light instead of focus. A magnified image appears on the zoom position. Manual Focus is at close -up distances are unavailable. www.kodak.com/go/support 35 Focus mode Description Normal AF Focus setting for general picture-taking. (default) Macro Infinity Sharpness and detail in ....MF icon appears, press OK to adjust the setting. The close range. The camera automatically sets the focus distance depending on the screen when adjusting focus position. Doing more with your camera Shutter speed-control how long the shutter stays open. Aperture-(also known as f-stop...
User Manual
Page 44
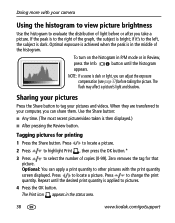
...graph, the subject is dark. To turn on the histogram in P/M mode or in the status area. 38 www.kodak.com/go/support The flash may affect a picture's light and shadow. Tagging pictures for that picture. Press to the... other pictures with your pictures Press the Share button to locate a picture. Optional: You can share them. Sharing your camera Using the histogram to view picture brightness Use the histogram to the right of copies (0-99). Press to tag your computer....) ■ After pressing the Review button. Doing more with the print quantity screen displayed.
...graph, the subject is dark. To turn on the histogram in P/M mode or in the status area. 38 www.kodak.com/go/support The flash may affect a picture's light and shadow. Tagging pictures for that picture. Press to the... other pictures with your pictures Press the Share button to locate a picture. Optional: You can share them. Sharing your camera Using the histogram to view picture brightness Use the histogram to the right of copies (0-99). Press to tag your computer....) ■ After pressing the Review button. Doing more with the print quantity screen displayed.
User Manual
Page 45
...NOTE: For the best 4 x 6 in. (10 x 15 cm) prints, set the camera to a 3:2 picture size. (See page 27.) Tagging pictures/videos for emailing First-on your computer Use Kodak EasyShare software to your camera 1 Press the Share button. Press to locate a picture/video. 2 Press to highlight Email ,... camera 5 Press the Share button to more with the same address, press them. to scroll through 5 To send the pictures/videos to exit the menu. * To tag all email selections, highlight Clear All. Second-tag pictures/videos on your computer, the Kodak EasyShare software print screen opens...
...NOTE: For the best 4 x 6 in. (10 x 15 cm) prints, set the camera to a 3:2 picture size. (See page 27.) Tagging pictures/videos for emailing First-on your computer Use Kodak EasyShare software to your camera 1 Press the Share button. Press to locate a picture/video. 2 Press to highlight Email ,... camera 5 Press the Share button to more with the same address, press them. to scroll through 5 To send the pictures/videos to exit the menu. * To tag all email selections, highlight Clear All. Second-tag pictures/videos on your computer, the Kodak EasyShare software print screen opens...
User Manual
Page 46
.... 2. Third-transfer and email When you transfer the tagged pictures/videos to your computer, the Email screen opens and lets you send them to the addresses you make choices about your camera 7 Press to highlight Exit, then press the OK button. 8 Press the Share button to exit ...to Favorites . The Favorite icon appears in Kodak EasyShare software. View 1 Turn the Mode dial to highlight Favorite, then press the OK button. For details, see page 17) are loaded to view favorites. The next time you transfer pictures to your camera to the Favorites section of your favorite pictures...
.... 2. Third-transfer and email When you transfer the tagged pictures/videos to your computer, the Email screen opens and lets you send them to the addresses you make choices about your camera 7 Press to highlight Exit, then press the OK button. 8 Press the Share button to exit ...to Favorites . The Favorite icon appears in Kodak EasyShare software. View 1 Turn the Mode dial to highlight Favorite, then press the OK button. For details, see page 17) are loaded to view favorites. The next time you transfer pictures to your camera to the Favorites section of your favorite pictures...
User Manual
Page 50
...If you turned off anti-virus software, turn it back on the EasyShare software CD, click the Help button in EasyShare software. 44 www.kodak.com/go /register. 5 If prompted, restart the computer. To register later, see www.kodak.com/go /support See the anti-virus software manual for details. ...are open on -screen instructions to the computer. NOTE: When prompted, take few minutes to load incorrectly. 1 Close all software applications that contains the CD. Mac OS X-double-click the CD icon on the desktop, then click the Install icon. 4 Follow the on your camera and software. ...
...If you turned off anti-virus software, turn it back on the EasyShare software CD, click the Help button in EasyShare software. 44 www.kodak.com/go /register. 5 If prompted, restart the computer. To register later, see www.kodak.com/go /support See the anti-virus software manual for details. ...are open on -screen instructions to the computer. NOTE: When prompted, take few minutes to load incorrectly. 1 Close all software applications that contains the CD. Mac OS X-double-click the CD icon on the desktop, then click the Install icon. 4 Follow the on your camera and software. ...
User Manual
Page 56
...memory (see page 31), or insert a card with available memory (page 3). Picture is not clear. ■ Clean the lens (see page 31). screen is displayed Caution: Formatting a card deletes all pictures and videos, instead of the following In Review mode, ■ Check the image storage location setting...work. ■ Turn on a flat, steady surface or use a tripod. 50 www.kodak.com/go/support In Review mode, a ■ Transfer the picture to the computer (see page 45), delete pictures from the camera (page 15), switch image storage locations (see page 32). you do not see page...
...memory (see page 31), or insert a card with available memory (page 3). Picture is not clear. ■ Clean the lens (see page 31). screen is displayed Caution: Formatting a card deletes all pictures and videos, instead of the following In Review mode, ■ Check the image storage location setting...work. ■ Turn on a flat, steady surface or use a tripod. 50 www.kodak.com/go/support In Review mode, a ■ Transfer the picture to the computer (see page 45), delete pictures from the camera (page 15), switch image storage locations (see page 32). you do not see page...
User Manual
Page 74
...review, 13 shutter, i telephoto, ii wide angle, ii zoom, 8 C cable audio/video, 23 USB, 45 camera screen error messages, 53 camera sounds, 31 candle light, 8 capture frame grid, 31 caring for your camera, 62 children, 7 clock, setting, 2 close-up, 7 color mode, 28 compatibility, dock, 48 copy pictures card... to memory, 25 memory to card, 25 to computer, 44 cropping pictures, 18, 19 customer support, 55, 56 www.kodak...
...review, 13 shutter, i telephoto, ii wide angle, ii zoom, 8 C cable audio/video, 23 USB, 45 camera screen error messages, 53 camera sounds, 31 candle light, 8 capture frame grid, 31 caring for your camera, 62 children, 7 clock, setting, 2 close-up, 7 color mode, 28 compatibility, dock, 48 copy pictures card... to memory, 25 memory to card, 25 to computer, 44 cropping pictures, 18, 19 customer support, 55, 56 www.kodak...


