

User Manual
Page 5
...the camera 2 Setting the language, date/time 2 Using an optional SD/SDHC or MMC card 3 2 Taking pictures/videos 4 Taking a picture 4 Capture modes 6 Using optical zoom 8 Using the flash 9 Using the self-timer 10 Taking panoramic pictures 11 Understanding the picture-taking icons 12 3 Working with... pictures/videos 13 Reviewing pictures/videos 13 Deleting pictures/videos 15 Using the menu button in Review 16 Adding sound tags 17 Cropping pictures 18 Using Kodak Perfect Touch technology 18 Editing videos 19 Running ...
...the camera 2 Setting the language, date/time 2 Using an optional SD/SDHC or MMC card 3 2 Taking pictures/videos 4 Taking a picture 4 Capture modes 6 Using optical zoom 8 Using the flash 9 Using the self-timer 10 Taking panoramic pictures 11 Understanding the picture-taking icons 12 3 Working with... pictures/videos 13 Reviewing pictures/videos 13 Deleting pictures/videos 15 Using the menu button in Review 16 Adding sound tags 17 Cropping pictures 18 Using Kodak Perfect Touch technology 18 Editing videos 19 Running ...
User Manual
Page 20
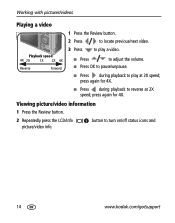
Working with pictures/videos Playing a video 1 Press the Review button. 2 Press to turn on/off status icons and 14 www.kodak.com/go/support Viewing picture/video information 1 Press the Review button. 2 Repeatedly press the LCD/Info picture/video info. Playback speed 4X 2X 1X 2X ...
Working with pictures/videos Playing a video 1 Press the Review button. 2 Press to turn on/off status icons and 14 www.kodak.com/go/support Viewing picture/video information 1 Press the Review button. 2 Repeatedly press the LCD/Info picture/video info. Playback speed 4X 2X 1X 2X ...
User Manual
Page 21
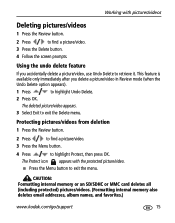
... SD/SDHC or MMC card deletes all (including protected) pictures/videos. (Formatting internal memory also deletes email addresses, album names, and favorites.) www.kodak.com/go/support 15 Working with the protected picture/video. ■ Press the Menu button to highlight Protect, then press OK. Using the undo delete feature If you...
... SD/SDHC or MMC card deletes all (including protected) pictures/videos. (Formatting internal memory also deletes email addresses, album names, and favorites.) www.kodak.com/go/support 15 Working with the protected picture/video. ■ Press the Menu button to highlight Protect, then press OK. Using the undo delete feature If you...
User Manual
Page 22
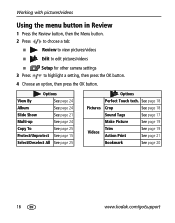
... See page 17 Make Picture See page 19 Trim Videos Action Print See page 19 See page 21 Bookmark See page 20 16 www.kodak.com/go/support Working with pictures/videos Using the menu button in Review 1 Press the Review button, then the Menu button. 2 Press to choose a ...tab: ■ Review to view pictures/videos ■ Edit to edit pictures/videos ■ 3 Press Setup for other camera settings to highlight a setting, then press the ...
... See page 17 Make Picture See page 19 Trim Videos Action Print See page 19 See page 21 Bookmark See page 20 16 www.kodak.com/go/support Working with pictures/videos Using the menu button in Review 1 Press the Review button, then the Menu button. 2 Press to choose a ...tab: ■ Review to view pictures/videos ■ Edit to edit pictures/videos ■ 3 Press Setup for other camera settings to highlight a setting, then press the ...
User Manual
Page 23
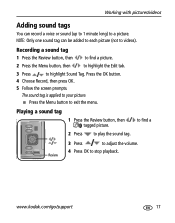
The sound tag is applied to your picture. ■ Press the Menu button to play the sound tag. www.kodak.com/go/support 17 Playing a sound tag 1 Press the Review button, then tagged picture. 2 Press to exit the menu. to find a picture. 2 Press the Menu ... a Review 3 Press to adjust the volume. 4 Press OK to highlight Sound Tag. Press the OK button. 4 Choose Record, then press OK. 5 Follow the screen prompts. Working with pictures/videos Adding sound tags You can be added to each picture (not to a picture. NOTE: Only one sound tag can record a voice or...
The sound tag is applied to your picture. ■ Press the Menu button to play the sound tag. www.kodak.com/go/support 17 Playing a sound tag 1 Press the Review button, then tagged picture. 2 Press to exit the menu. to find a picture. 2 Press the Menu ... a Review 3 Press to adjust the volume. 4 Press OK to highlight Sound Tag. Press the OK button. 4 Choose Record, then press OK. 5 Follow the screen prompts. Working with pictures/videos Adding sound tags You can be added to each picture (not to a picture. NOTE: Only one sound tag can record a voice or...

User Manual
Page 24
...the screen prompts to replace the original picture or to exit the menu. Press the OK 4 Press Telephoto (T) to zoom in a split screen. Working with pictures/videos Cropping pictures You can crop a picture so that only the desired portion of the 4 Press OK. The picture is previewed in...be cropped again.) ■ Press the Menu button to save the enhanced picture as a new one. to move the crop box. Using Kodak Perfect Touch technology Kodak Perfect Touch technology helps ensure better, brighter pictures. 1 Press the Review button, then to find a 2 Press the Menu button, then...
...the screen prompts to replace the original picture or to exit the menu. Press the OK 4 Press Telephoto (T) to zoom in a split screen. Working with pictures/videos Cropping pictures You can crop a picture so that only the desired portion of the 4 Press OK. The picture is previewed in...be cropped again.) ■ Press the Menu button to save the enhanced picture as a new one. to move the crop box. Using Kodak Perfect Touch technology Kodak Perfect Touch technology helps ensure better, brighter pictures. 1 Press the Review button, then to find a 2 Press the Menu button, then...
User Manual
Page 25
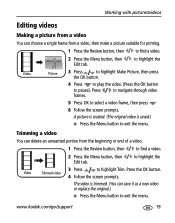
..., then to find a video. 2 Press the Menu button, then Edit tab. Press the OK button. Video Trimmed video 4 Follow the screen prompts. www.kodak.com/go/support 19 Working with pictures/videos Editing videos Making a picture from a video You can choose a single frame from the beginning or end of a video. 1 Press the...
..., then to find a video. 2 Press the Menu button, then Edit tab. Press the OK button. Video Trimmed video 4 Follow the screen prompts. www.kodak.com/go/support 19 Working with pictures/videos Editing videos Making a picture from a video You can choose a single frame from the beginning or end of a video. 1 Press the...
User Manual
Page 26
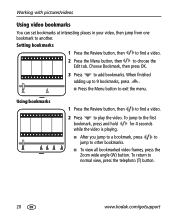
Setting bookmarks 1 Press the Review button, then to find a video. 2 Press to add bookmarks. Working with pictures/videos Using video bookmarks You can set bookmarks at interesting places in your video, then jump from one bookmark to choose the Edit ... for 4 seconds while the video is playing. ■ After you jump to a bookmark, press to jump to normal view, press the telephoto (T) button. 20 www.kodak.com/go/support Choose Bookmark, then press OK. 3 Press to play the video. Using bookmarks 1 Press the Review button, then to find a video. 2 Press the...
Setting bookmarks 1 Press the Review button, then to find a video. 2 Press to add bookmarks. Working with pictures/videos Using video bookmarks You can set bookmarks at interesting places in your video, then jump from one bookmark to choose the Edit ... for 4 seconds while the video is playing. ■ After you jump to a bookmark, press to jump to normal view, press the telephoto (T) button. 20 www.kodak.com/go/support Choose Bookmark, then press OK. 3 Press to play the video. Using bookmarks 1 Press the Review button, then to find a video. 2 Press the...
User Manual
Page 27
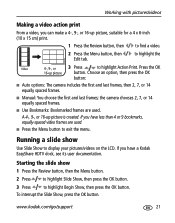
... highlight Begin Show, then press the OK button. www.kodak.com/go/support 21 Working with pictures/videos Making a video action print From a video, you have a Kodak EasyShare HDTV dock, see its user documentation. Choose an option, then press the OK button: ■ Auto options: The camera includes the first and last frames, then 2, 7, or...
... highlight Begin Show, then press the OK button. www.kodak.com/go/support 21 Working with pictures/videos Making a video action print From a video, you have a Kodak EasyShare HDTV dock, see its user documentation. Choose an option, then press the OK button: ■ Auto options: The camera includes the first and last frames, then 2, 7, or...

User Manual
Page 28
..., press and hold . 3 Press the OK button. The interval setting remains until you change it . The Loop feature remains until you change it . 22 www.kodak.com/go/support Running a continuous slide show loop When you press the OK button or until you turn on Loop, the slide show display interval.... You can set the display interval from 3-60 seconds. 1 On the Slide Show menu, press button. to highlight Begin Show, then press the OK button. Working with pictures/videos Changing the slide show is exhausted.
..., press and hold . 3 Press the OK button. The interval setting remains until you change it . The Loop feature remains until you change it . 22 www.kodak.com/go/support Running a continuous slide show loop When you press the OK button or until you turn on Loop, the slide show display interval.... You can set the display interval from 3-60 seconds. 1 On the Slide Show menu, press button. to highlight Begin Show, then press the OK button. Working with pictures/videos Changing the slide show is exhausted.
User Manual
Page 29
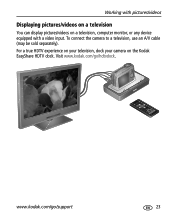
To connect the camera to a television, use an A/V cable (may be sold separately). For a true HDTV experience on your television, dock your camera on a television, computer monitor, or any device equipped with a video input. www.kodak.com/go /hdtvdock. Visit www.kodak.com/go /support 23 Working with pictures/videos Displaying pictures/videos on a television You can display pictures/videos on the Kodak EasyShare HDTV dock.
To connect the camera to a television, use an A/V cable (may be sold separately). For a true HDTV experience on your television, dock your camera on a television, computer monitor, or any device equipped with a video input. www.kodak.com/go /hdtvdock. Visit www.kodak.com/go /support 23 Working with pictures/videos Displaying pictures/videos on a television You can display pictures/videos on the Kodak EasyShare HDTV dock.
User Manual
Page 30
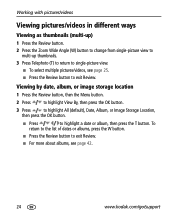
...button. 3 Press to highlight All (default), Date, Album, or Image Storage Location, then press the OK button. ■ Press to exit Review. Working with pictures/videos Viewing pictures/videos in different ways Viewing as thumbnails (multi-up) 1 Press the Review button. 2 Press the Zoom Wide Angle (W) ... multi-up thumbnails. 3 Press Telephoto (T) to return to single-picture view. ■ To select multiple pictures/videos, see page 42. 24 www.kodak.com/go/support To return to the list of dates or albums, press the W button. ■ Press the Review button to exit Review. &#...
...button. 3 Press to highlight All (default), Date, Album, or Image Storage Location, then press the OK button. ■ Press to exit Review. Working with pictures/videos Viewing pictures/videos in different ways Viewing as thumbnails (multi-up) 1 Press the Review button. 2 Press the Zoom Wide Angle (W) ... multi-up thumbnails. 3 Press Telephoto (T) to return to single-picture view. ■ To select multiple pictures/videos, see page 42. 24 www.kodak.com/go/support To return to the list of dates or albums, press the W button. ■ Press the Review button to exit Review. &#...
User Manual
Page 31
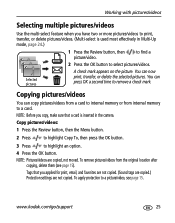
... card. NOTE: Pictures/videos are not copied. You can now print, transfer, or delete the selected pictures. www.kodak.com/go/support 25 A check mark appears on the picture. To remove pictures/videos from internal memory to internal memory ...the Menu button. 2 Press to highlight Copy To, then press the OK button. 3 Press to remove a check mark. Working with pictures/videos Selecting multiple pictures/videos Use the multi-select feature when you copy, make sure that you applied for print... to select pictures/videos. Tags that a card is used most effectively in the camera.
... card. NOTE: Pictures/videos are not copied. You can now print, transfer, or delete the selected pictures. www.kodak.com/go/support 25 A check mark appears on the picture. To remove pictures/videos from internal memory to internal memory ...the Menu button. 2 Press to highlight Copy To, then press the OK button. 3 Press to remove a check mark. Working with pictures/videos Selecting multiple pictures/videos Use the multi-select feature when you copy, make sure that you applied for print... to select pictures/videos. Tags that a card is used most effectively in the camera.
User Manual
Page 32
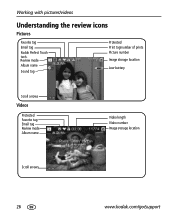
Review mode Album name Sound tag Protected Print tag/number of prints Picture number Image storage location Low battery Scroll arrows Videos Protected Favorite tag Email tag Review mode Album name Video length Video number Image storage location Scroll arrows 26 www.kodak.com/go/support Working with pictures/videos Understanding the review icons Pictures Favorite tag Email tag Kodak Perfect Touch tech.
Review mode Album name Sound tag Protected Print tag/number of prints Picture number Image storage location Low battery Scroll arrows Videos Protected Favorite tag Email tag Review mode Album name Video length Video number Image storage location Scroll arrows 26 www.kodak.com/go/support Working with pictures/videos Understanding the review icons Pictures Favorite tag Email tag Kodak Perfect Touch tech.
User Manual
Page 56
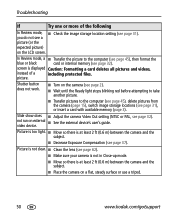
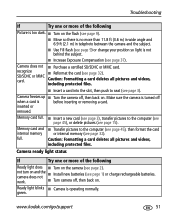
...Shutter button does not work. ■ Turn on the LCD screen. not run on a flat, steady surface or use a tripod. 50 www.kodak.com/go/support picture. Picture is not clear. ■ Clean the lens (see page 31). Slide show does ■ Adjust the camera Video Out setting (... Compensation (see page 31), or insert a card with available memory (page 3). you do not see a picture (or the expected picture) on the camera (see page 2). ■ Wait until the Ready light stops blinking red before attempting to take another picture. ■ Transfer pictures to the computer (...
...Shutter button does not work. ■ Turn on the LCD screen. not run on a flat, steady surface or use a tripod. 50 www.kodak.com/go/support picture. Picture is not clear. ■ Clean the lens (see page 31). Slide show does ■ Adjust the camera Video Out setting (... Compensation (see page 31), or insert a card with available memory (page 3). you do not see a picture (or the expected picture) on the camera (see page 2). ■ Wait until the Ready light stops blinking red before attempting to take another picture. ■ Transfer pictures to the computer (...
User Manual
Page 57
...pictures to the computer (see page 45), then format the card or internal memory (see page 37). camera does not work. ■ Turn camera off when a card is turned off , then back on. www.kodak.com/go/support 51 SD/SDHC or MMC card. not turn on . green. recognize ■ ...Reformat the card (see page 1) or charge rechargeable batteries. Camera ready light status If Try one or more than 11.8...
...pictures to the computer (see page 45), then format the card or internal memory (see page 37). camera does not work. ■ Turn camera off when a card is turned off , then back on. www.kodak.com/go/support 51 SD/SDHC or MMC card. not turn on . green. recognize ■ ...Reformat the card (see page 1) or charge rechargeable batteries. Camera ready light status If Try one or more than 11.8...
User Manual
Page 61
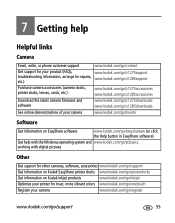
...) Get help with the Windows operating system and www.kodak.com/go/pcbasics working with digital pictures Other Get support for other cameras, software, accessories www.kodak.com/go/support Get information on Kodak EasyShare printer docks www.kodak.com/go/printerdocks Get information on Kodak inkjet products www.kodak.com/go/inkjet Optimize your printer for truer, more vibrant...
...) Get help with the Windows operating system and www.kodak.com/go/pcbasics working with digital pictures Other Get support for other cameras, software, accessories www.kodak.com/go/support Get information on Kodak EasyShare printer docks www.kodak.com/go/printerdocks Get information on Kodak inkjet products www.kodak.com/go/inkjet Optimize your printer for truer, more vibrant...

User Manual
Page 64
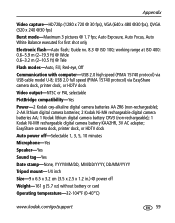
...& White, Sepia Sharpness-High, Normal, Low White balance-Auto, Daylight, Tungsten, Fluorescent, Open Shade Focus system-TTL-AF (through-the-lens auto focus); Center-weighted; Working range: 0.6 m (24 in.)-infinity @ wide normal 0.9 m (35.4 in.)-infinity @ telephoto normal 0.2-0.7 m (7.9-27.6 in.) @ wide macro 0.5-1.0 m (19... images with selectable +/- 0.3, 0.7, and 1.0 EV steps Capture modes-Smart Scene, P/M, High ISO, Digital Image Stabilization, SCN modes, Video Self-timer-2 seconds, 10 seconds, or 2-shot 58 www.kodak.com/go/support Multi-zone AF, and Center-zone AF; Multi-pattern;
...& White, Sepia Sharpness-High, Normal, Low White balance-Auto, Daylight, Tungsten, Fluorescent, Open Shade Focus system-TTL-AF (through-the-lens auto focus); Center-weighted; Working range: 0.6 m (24 in.)-infinity @ wide normal 0.9 m (35.4 in.)-infinity @ telephoto normal 0.2-0.7 m (7.9-27.6 in.) @ wide macro 0.5-1.0 m (19... images with selectable +/- 0.3, 0.7, and 1.0 EV steps Capture modes-Smart Scene, P/M, High ISO, Digital Image Stabilization, SCN modes, Video Self-timer-2 seconds, 10 seconds, or 2-shot 58 www.kodak.com/go/support Multi-zone AF, and Center-zone AF; Multi-pattern;
User Manual
Page 65
.../go/support 59 working range at ISO 400: 0.6-5.9 m (2-19.3 ft) @ Wide 0.6-3.2 m (2-10.5 ft) @ Tele Flash modes-Auto, Fill, Red-eye, Off Communication with computer-USB 2.0 high speed (PIMA 15740 protocol) via EasyShare camera dock, printer dock, or HDTV dock Video output-NTSC or PAL selectable PictBridge compatibility-Yes Power-2 Kodak oxy-alkaline digital camera batteries AA...
.../go/support 59 working range at ISO 400: 0.6-5.9 m (2-19.3 ft) @ Wide 0.6-3.2 m (2-10.5 ft) @ Tele Flash modes-Auto, Fill, Red-eye, Off Communication with computer-USB 2.0 high speed (PIMA 15740 protocol) via EasyShare camera dock, printer dock, or HDTV dock Video output-NTSC or PAL selectable PictBridge compatibility-Yes Power-2 Kodak oxy-alkaline digital camera batteries AA...

User Manual
Page 68
...and defects in cold weather, carry spare batteries and keep them warm. Contact a dealer of Kodak products for more information. ■ For digital camera disposal or recycling information, contact your camera in both materials and workmanship for at temperatures below 41° F (5° C). Wipe...any request for camera lenses. Retain the original dated sales receipt. Proof of the date of purchase will be available in the camera. ■ Battery performance is reduced at least 24 hours before loading batteries in your country. Appendix ■ Limit activities that do not work;
...and defects in cold weather, carry spare batteries and keep them warm. Contact a dealer of Kodak products for more information. ■ For digital camera disposal or recycling information, contact your camera in both materials and workmanship for at temperatures below 41° F (5° C). Wipe...any request for camera lenses. Retain the original dated sales receipt. Proof of the date of purchase will be available in the camera. ■ Battery performance is reduced at least 24 hours before loading batteries in your country. Appendix ■ Limit activities that do not work;


