
User Manual
Page 1
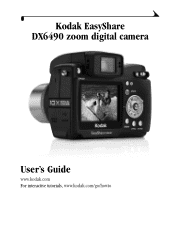
Kodak EasyShare DX6490 zoom digital camera User's Guide www.kodak.com For interactive tutorials, www.kodak.com/go/howto
Kodak EasyShare DX6490 zoom digital camera User's Guide www.kodak.com For interactive tutorials, www.kodak.com/go/howto

User Manual
Page 7
... Print 1 Package Contents 2 Charging the Battery 3 Loading the Battery 4 Attaching the Neck Strap and Lens Cap 4 Turning On the Camera 5 Setting the Date and Time 6 Changing the Display, EVF or LCD 7 Checking Camera and Picture Status 8 Inserting an SD/MMC Card 11 Choosing Internal Memory or SD/MMC Card 12 Important Battery... Landscape Pictures 22 Using the Auto Focus Framing Marks 23 Quickview-Reviewing the Picture Just Taken 24 Using the Optical Zoom 25 Using the Advanced Digital Zoom 25 vii
... Print 1 Package Contents 2 Charging the Battery 3 Loading the Battery 4 Attaching the Neck Strap and Lens Cap 4 Turning On the Camera 5 Setting the Date and Time 6 Changing the Display, EVF or LCD 7 Checking Camera and Picture Status 8 Inserting an SD/MMC Card 11 Choosing Internal Memory or SD/MMC Card 12 Important Battery... Landscape Pictures 22 Using the Auto Focus Framing Marks 23 Quickview-Reviewing the Picture Just Taken 24 Using the Optical Zoom 25 Using the Advanced Digital Zoom 25 vii
User Manual
Page 8
... 43 3 Taking Videos 45 Taking a Video 45 Quickview-Reviewing the Video Just Taken 46 Using the Optical Zoom 46 Changing Optional Video Settings 47 Eliminate Camera Noise During Recording 47 Setting Video Length 48 Pre-tagging for Album Names 49 Putting Yourself in the Video 50 viii
... 43 3 Taking Videos 45 Taking a Video 45 Quickview-Reviewing the Video Just Taken 46 Using the Optical Zoom 46 Changing Optional Video Settings 47 Eliminate Camera Noise During Recording 47 Setting Video Length 48 Pre-tagging for Album Names 49 Putting Yourself in the Video 50 viii

User Manual
Page 10
6 Customizing Your Camera Settings 67 To Access Setup Mode/Menus 67 Setup Menus 67 Returning to the Previous Menu 68 Changing the Default Print Quantity 68 Turning Off Quickview 68 Changing Advanced Digital Zoom 69 Turning Off the Shutter Sound 70 Turning Off the Mode Description 70 ...Setting Video Out 71 Selecting a Language 71 Formatting Internal Memory or Card 72 Viewing Camera Information 73 7 Installing the Software 75 Windows ...
6 Customizing Your Camera Settings 67 To Access Setup Mode/Menus 67 Setup Menus 67 Returning to the Previous Menu 68 Changing the Default Print Quantity 68 Turning Off Quickview 68 Changing Advanced Digital Zoom 69 Turning Off the Shutter Sound 70 Turning Off the Mode Description 70 ...Setting Video Out 71 Selecting a Language 71 Formatting Internal Memory or Card 72 Viewing Camera Information 73 7 Installing the Software 75 Windows ...
User Manual
Page 11
... Dock 86 Reviewing Pictures and Videos 87 Troubleshooting-Camera Dock 6000 87 Camera Dock 6000 Specifications 88 Using the AC Adapter to Power the Camera 88 Earlier Cameras and Docks 89 10 Troubleshooting 91 Camera Problems 91 Camera/Computer Communications 96 SD/MMC Cards and Internal Memory 98 Camera Screen Messages 99 Mode Light Status 102 11...
... Dock 86 Reviewing Pictures and Videos 87 Troubleshooting-Camera Dock 6000 87 Camera Dock 6000 Specifications 88 Using the AC Adapter to Power the Camera 88 Earlier Cameras and Docks 89 10 Troubleshooting 91 Camera Problems 91 Camera/Computer Communications 96 SD/MMC Cards and Internal Memory 98 Camera Screen Messages 99 Mode Light Status 102 11...
User Manual
Page 12
12 Appendix 109 Camera Specifications 109 Original Factory Settings 111 Upgrading Your Software and Firmware 112 Tips, Safety, Maintenance 113 Storage Capacities 114 Locating Pictures and Videos on a Card 115 Picture Naming Conventions 115 Power-Saving Features 116 FCC Compliance and Advisory 117 xii
12 Appendix 109 Camera Specifications 109 Original Factory Settings 111 Upgrading Your Software and Firmware 112 Tips, Safety, Maintenance 113 Storage Capacities 114 Locating Pictures and Videos on a Card 115 Picture Naming Conventions 115 Power-Saving Features 116 FCC Compliance and Advisory 117 xii
User Manual
Page 13
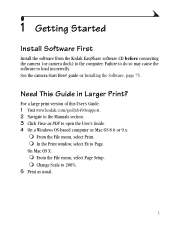
1 Getting Started Install Software First Install the software from the Kodak EasyShare software CD before connecting the camera (or camera dock) to Page. From the File menu, select Page Setup. ! See the camera Start Here! From the File menu, select Print. ! In the Print window, select Fit to the computer. Change Scale to open the User...
1 Getting Started Install Software First Install the software from the Kodak EasyShare software CD before connecting the camera (or camera dock) to Page. From the File menu, select Page Setup. ! See the camera Start Here! From the File menu, select Print. ! In the Print window, select Fit to the computer. Change Scale to open the User...
User Manual
Page 14
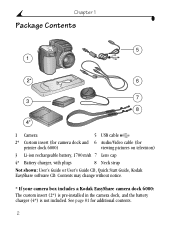
... 8 Neck strap Not shown: User's Guide or User's Guide CD, Quick Start Guide, Kodak EasyShare software CD. Chapter 1 Package Contents 5 1 2* 6 7 3 8 4* 1 Camera 5 USB cable 2* Custom insert (for camera dock and 6 Audio/Video cable (for additional contents. 2 Contents may change without notice. * If your camera box includes a Kodak EasyShare camera dock 6000: The custom insert (2*) is pre-installed in the...
... 8 Neck strap Not shown: User's Guide or User's Guide CD, Quick Start Guide, Kodak EasyShare software CD. Chapter 1 Package Contents 5 1 2* 6 7 3 8 4* 1 Camera 5 USB cable 2* Custom insert (for camera dock and 6 Audio/Video cable (for additional contents. 2 Contents may change without notice. * If your camera box includes a Kodak EasyShare camera dock 6000: The custom insert (2*) is pre-installed in the...
User Manual
Page 15
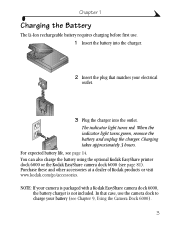
... 3 hours. Purchase these and other accessories at a dealer of Kodak products or visit www.kodak.com/go/accessories. You can also charge the battery using the optional Kodak EasyShare printer dock 6000 or the Kodak EasyShare camera dock 6000 (see page 14. NOTE: If your camera is packaged with a Kodak EasyShare camera dock 6000, the battery charger is not included. When...
... 3 hours. Purchase these and other accessories at a dealer of Kodak products or visit www.kodak.com/go/accessories. You can also charge the battery using the optional Kodak EasyShare printer dock 6000 or the Kodak EasyShare camera dock 6000 (see page 14. NOTE: If your camera is packaged with a Kodak EasyShare camera dock 6000, the battery charger is not included. When...
User Manual
Page 16
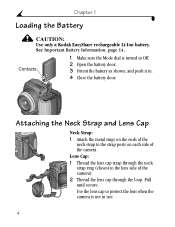
... ring (closest to the strap posts on the ends of the neck strap to the lens side of the camera. Pull until secure. Use the lens cap to protect the lens when the camera is turned to Off. 2 Open the battery door. 3 Orient the battery as shown, and push it in ...is not in . 4 Close the battery door. Attaching the Neck Strap and Lens Cap Neck Strap: 1 Attach the metal rings on each side of the camera). 2 Thread the lens cap through the loop. See Important Battery Information, page 14. Chapter 1 Loading the Battery CAUTION: Use only a Kodak EasyShare rechargeable Li-Ion battery.
... ring (closest to the strap posts on the ends of the neck strap to the lens side of the camera. Pull until secure. Use the lens cap to protect the lens when the camera is turned to Off. 2 Open the battery door. 3 Orient the battery as shown, and push it in ...is not in . 4 Close the battery door. Attaching the Neck Strap and Lens Cap Neck Strap: 1 Attach the metal rings on each side of the camera). 2 Thread the lens cap through the loop. See Important Battery Information, page 14. Chapter 1 Loading the Battery CAUTION: Use only a Kodak EasyShare rechargeable Li-Ion battery.
User Manual
Page 17
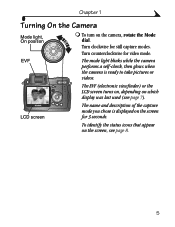
To turn on which display was last used (see page 8. 5 EVF The mode light blinks while the camera performs a self-check, then glows when the camera is displayed on the screen, see page 7). To identify the status icons that appear on the screen for still capture modes. Turn clockwise for 3 seconds....the capture mode you chose is ready to take pictures or videos. The EVF (electronic viewfinder) or the LCD screen turns on, depending on the camera, rotate the Mode dial. Chapter 1 Turning On the Camera Mode light, On position ! Turn counterclockwise for video mode.
To turn on which display was last used (see page 8. 5 EVF The mode light blinks while the camera performs a self-check, then glows when the camera is displayed on the screen, see page 7). To identify the status icons that appear on the screen for still capture modes. Turn clockwise for 3 seconds....the capture mode you chose is ready to take pictures or videos. The EVF (electronic viewfinder) or the LCD screen turns on, depending on the camera, rotate the Mode dial. Chapter 1 Turning On the Camera Mode light, On position ! Turn counterclockwise for video mode.
User Manual
Page 18
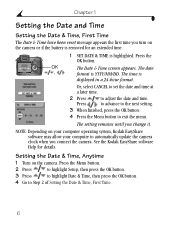
The setting remains until you connect the camera. See the Kodak EasyShare software Help for an extended time. 1 SET DATE & TIME is ...Time, First Time The Date & Time have been reset message appears the first time you turn on the camera or if the battery is removed for details. The date , format is highlighted. The time is displayed... Press the Menu button to automatically update the camera clock when you change it. NOTE: Depending on the camera. Setting the Date & Time, Anytime 1 Turn on your computer operating system, Kodak EasyShare software may allow your computer to exit the ...
The setting remains until you connect the camera. See the Kodak EasyShare software Help for an extended time. 1 SET DATE & TIME is ...Time, First Time The Date & Time have been reset message appears the first time you turn on the camera or if the battery is removed for details. The date , format is highlighted. The time is displayed... Press the Menu button to automatically update the camera clock when you change it. NOTE: Depending on the camera. Setting the Date & Time, Anytime 1 Turn on your computer operating system, Kodak EasyShare software may allow your computer to exit the ...
User Manual
Page 19
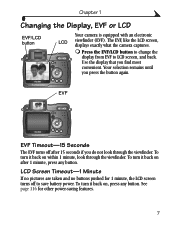
...-1 Minute If no pictures are taken and no buttons pushed for other power-saving features. 7 The EVF, like the LCD screen, displays exactly what the camera captures. ! To turn it back on after 15 seconds if you find most convenient. See page 116 for 1 minute, the LCD screen turns off after... within 1 minute, look through the viewfinder. To turn it back on , press any button. Chapter 1 Changing the Display, EVF or LCD EVF/LCD button Your camera is equipped with an electronic LCD viewfinder (EVF). Your selection remains until you press the button again.
...-1 Minute If no pictures are taken and no buttons pushed for other power-saving features. 7 The EVF, like the LCD screen, displays exactly what the camera captures. ! To turn it back on after 15 seconds if you find most convenient. See page 116 for 1 minute, the LCD screen turns off after... within 1 minute, look through the viewfinder. To turn it back on , press any button. Chapter 1 Changing the Display, EVF or LCD EVF/LCD button Your camera is equipped with an electronic LCD viewfinder (EVF). Your selection remains until you press the button again.
User Manual
Page 20
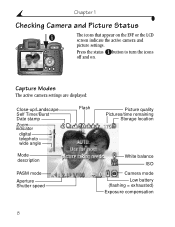
Chapter 1 Checking Camera and Picture Status The icons that appear on . Press the status button to turn the icons off and on the EVF or the LCD screen indicate the active camera and picture settings. Capture Modes The active camera settings are displayed: Close-up/Landscape Self Timer/Burst Date stamp Zoom indicator digital telephoto wide angle Mode description Flash PASM mode Aperture Shutter speed Picture quality Pictures/time remaining Storage location White balance ISO Camera mode Low battery (flashing = exhausted) Exposure compensation 8
Chapter 1 Checking Camera and Picture Status The icons that appear on . Press the status button to turn the icons off and on the EVF or the LCD screen indicate the active camera and picture settings. Capture Modes The active camera settings are displayed: Close-up/Landscape Self Timer/Burst Date stamp Zoom indicator digital telephoto wide angle Mode description Flash PASM mode Aperture Shutter speed Picture quality Pictures/time remaining Storage location White balance ISO Camera mode Low battery (flashing = exhausted) Exposure compensation 8
User Manual
Page 22
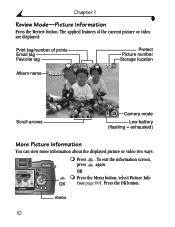
OR ! Press the Menu button, select Picture Info OK (see page 60). Press the OK button. Chapter 1 Review Mode-Picture Information Press the Review button. To exit the information screen, press again. Press . The applied features of the current picture or video are displayed: Print tag/number of prints Email tag Favorite tag Protect Picture number Storage location Album name Scroll arrows Camera mode Low battery (flashing = exhausted) More Picture Information You can view more information about the displayed picture or video two ways: ! menu 10
OR ! Press the Menu button, select Picture Info OK (see page 60). Press the OK button. Chapter 1 Review Mode-Picture Information Press the Review button. To exit the information screen, press again. Press . The applied features of the current picture or video are displayed: Print tag/number of prints Email tag Favorite tag Protect Picture number Storage location Album name Scroll arrows Camera mode Low battery (flashing = exhausted) More Picture Information You can view more information about the displayed picture or video two ways: ! menu 10
User Manual
Page 23
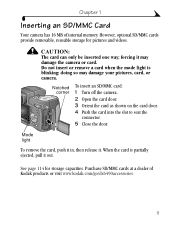
...door. 4 Push the card into the slot to seat the connector. 5 Close the door. Chapter 1 Inserting an SD/MMC Card Your camera has 16 MB of Kodak products or visit www.kodak.com/go/dx6490accessories. 11 Mode light To remove the card, push it in, then release it may damage your pictures, card..., or camera. When the card is blinking; forcing it . See page 114 for pictures and videos. doing so may damage the camera or card....
...door. 4 Push the card into the slot to seat the connector. 5 Close the door. Chapter 1 Inserting an SD/MMC Card Your camera has 16 MB of Kodak products or visit www.kodak.com/go/dx6490accessories. 11 Mode light To remove the card, push it in, then release it may damage your pictures, card..., or camera. When the card is blinking; forcing it . See page 114 for pictures and videos. doing so may damage the camera or card....
User Manual
Page 24
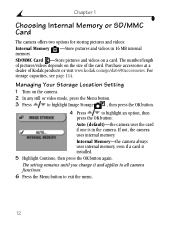
... capacities, see page 114. The setting remains until you change it and applies to all camera functions. 6 Press the Menu button to highlight an option, then press the OK button: Auto (default)-the camera uses the card if one is installed. 5 Highlight Continue, then press the OK button ...again. Purchase accessories at a dealer of the card. If not, the camera uses internal memory. SD/MMC Card -Store pictures and videos on the size of Kodak products or visit www.kodak.com/go/dx6490accessories. Internal Memory-the camera always uses internal memory, even if a card is in 16 MB internal...
... capacities, see page 114. The setting remains until you change it and applies to all camera functions. 6 Press the Menu button to highlight an option, then press the OK button: Auto (default)-the camera uses the card if one is installed. 5 Highlight Continue, then press the OK button ...again. Purchase accessories at a dealer of the card. If not, the camera uses internal memory. SD/MMC Card -Store pictures and videos on the size of Kodak products or visit www.kodak.com/go/dx6490accessories. Internal Memory-the camera always uses internal memory, even if a card is in 16 MB internal...
User Manual
Page 25
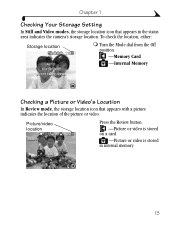
To check the location, either: Storage location ! Chapter 1 Checking Your Storage Setting In Still and Video modes, the storage location icon that appears with a picture indicates the location of the picture or video. Picture/video location Press the Review button. -Picture or video is stored on a card -Picture or video is stored in the status area indicates the camera's storage location. Turn the Mode dial from the Off position. -Memory Card -Internal Memory Checking a Picture or Video's Location In Review mode, the storage location icon that appears in internal memory 13
To check the location, either: Storage location ! Chapter 1 Checking Your Storage Setting In Still and Video modes, the storage location icon that appears with a picture indicates the location of the picture or video. Picture/video location Press the Review button. -Picture or video is stored on a card -Picture or video is stored in the status area indicates the camera's storage location. Turn the Mode dial from the Off position. -Memory Card -Internal Memory Checking a Picture or Video's Location In Review mode, the storage location icon that appears in internal memory 13
User Manual
Page 26
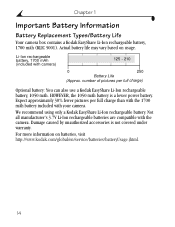
... may vary based on batteries, visit http://www.kodak.com/global/en/service/batteries/batteryUsage.jhtml. 14 Li-Ion rechargeable battery, 1700 mAh (included with camera) 125 - 210 0 250 Battery Life (Approx. Chapter 1 Important Battery Information Battery Replacement Types/Battery Life Your camera box contains a Kodak EasyShare Li-Ion rechargeable battery, 1700 mAh (KLIC 5001...
... may vary based on batteries, visit http://www.kodak.com/global/en/service/batteries/batteryUsage.jhtml. 14 Li-Ion rechargeable battery, 1700 mAh (included with camera) 125 - 210 0 250 Battery Life (Approx. Chapter 1 Important Battery Information Battery Replacement Types/Battery Life Your camera box contains a Kodak EasyShare Li-Ion rechargeable battery, 1700 mAh (KLIC 5001...
User Manual
Page 27
... metal objects, including coins. Battery Safety and Handling ! Purchase an optional Kodak EasyShare camera dock 6000 (see page 80). Battery performance is also a battery charger for the Li-Ion battery included with the Kodak EasyShare camera dock 6000 (see page 24 and page 46). - Carry spare batteries ...when using your camera. ! Do not discard cold batteries that quickly deplete battery power: - Do not allow ...
... metal objects, including coins. Battery Safety and Handling ! Purchase an optional Kodak EasyShare camera dock 6000 (see page 80). Battery performance is also a battery charger for the Li-Ion battery included with the Kodak EasyShare camera dock 6000 (see page 24 and page 46). - Carry spare batteries ...when using your camera. ! Do not discard cold batteries that quickly deplete battery power: - Do not allow ...


