
User Manual
Page 1
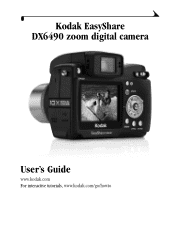
Kodak EasyShare DX6490 zoom digital camera User's Guide www.kodak.com For interactive tutorials, www.kodak.com/go/howto
Kodak EasyShare DX6490 zoom digital camera User's Guide www.kodak.com For interactive tutorials, www.kodak.com/go/howto

User Manual
Page 2
P/N 6B8596 Eastman Kodak Company 343 State Street Rochester, New York 14650 © Eastman Kodak Company, 2003 Kodak and EasyShare are simulated. All screen images are trademarks of Eastman Kodak Company.
P/N 6B8596 Eastman Kodak Company 343 State Street Rochester, New York 14650 © Eastman Kodak Company, 2003 Kodak and EasyShare are simulated. All screen images are trademarks of Eastman Kodak Company.
User Manual
Page 13
1 Getting Started Install Software First Install the software from the Kodak EasyShare software CD before connecting the camera (or camera dock) to load incorrectly. guide or Installing the Software, page 75. Need This Guide in Larger Print? From the File menu, select Print. ! Change Scale ... do so may cause the software to the computer. In the Print window, select Fit to the Manuals section. 3 Click View as usual. 1 See the camera Start Here! For a large print version of this User's Guide: 1 Visit www.kodak.com/go/dx6490support. 2 Navigate to Page.
1 Getting Started Install Software First Install the software from the Kodak EasyShare software CD before connecting the camera (or camera dock) to load incorrectly. guide or Installing the Software, page 75. Need This Guide in Larger Print? From the File menu, select Print. ! Change Scale ... do so may cause the software to the computer. In the Print window, select Fit to the Manuals section. 3 Click View as usual. 1 See the camera Start Here! For a large print version of this User's Guide: 1 Visit www.kodak.com/go/dx6490support. 2 Navigate to Page.
User Manual
Page 14
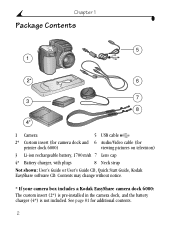
... 8 Neck strap Not shown: User's Guide or User's Guide CD, Quick Start Guide, Kodak EasyShare software CD. Chapter 1 Package Contents 5 1 2* 6 7 3 8 4* 1 Camera 5 USB cable 2* Custom insert (for camera dock and 6 Audio/Video cable (for additional contents. 2 Contents may change without notice. * If your camera box includes a Kodak EasyShare camera dock 6000: The custom insert (2*) is pre-installed in the...
... 8 Neck strap Not shown: User's Guide or User's Guide CD, Quick Start Guide, Kodak EasyShare software CD. Chapter 1 Package Contents 5 1 2* 6 7 3 8 4* 1 Camera 5 USB cable 2* Custom insert (for camera dock and 6 Audio/Video cable (for additional contents. 2 Contents may change without notice. * If your camera box includes a Kodak EasyShare camera dock 6000: The custom insert (2*) is pre-installed in the...
User Manual
Page 15
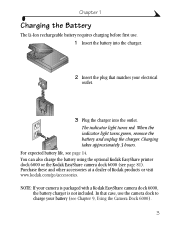
... Chapter 9, Using the Camera Dock 6000). 3 When the indicator light turns green, remove the battery and unplug the charger. In that matches your camera is packaged with a Kodak EasyShare camera dock 6000, the battery charger is not included. You can also charge the battery using the optional Kodak EasyShare printer dock 6000 or the Kodak EasyShare camera dock 6000 (see...
... Chapter 9, Using the Camera Dock 6000). 3 When the indicator light turns green, remove the battery and unplug the charger. In that matches your camera is packaged with a Kodak EasyShare camera dock 6000, the battery charger is not included. You can also charge the battery using the optional Kodak EasyShare printer dock 6000 or the Kodak EasyShare camera dock 6000 (see...
User Manual
Page 16
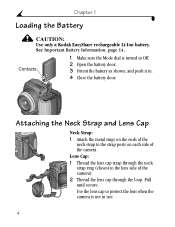
Chapter 1 Loading the Battery CAUTION: Use only a Kodak EasyShare rechargeable Li-Ion battery. Contacts 1 Make sure the Mode dial is turned to protect the lens when the camera is not in . 4 Close the battery door. Lens Cap: 1 Thread the lens cap strap through the neck strap ring (closest to the strap posts ...on each side of the camera). 2 Thread the lens cap through the loop. Attaching the Neck Strap and Lens Cap Neck Strap: 1 Attach the metal rings on the ends of...
Chapter 1 Loading the Battery CAUTION: Use only a Kodak EasyShare rechargeable Li-Ion battery. Contacts 1 Make sure the Mode dial is turned to protect the lens when the camera is not in . 4 Close the battery door. Lens Cap: 1 Thread the lens cap strap through the neck strap ring (closest to the strap posts ...on each side of the camera). 2 Thread the lens cap through the loop. Attaching the Neck Strap and Lens Cap Neck Strap: 1 Attach the metal rings on the ends of...
User Manual
Page 18
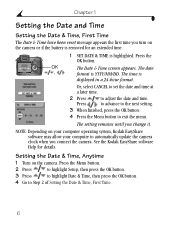
...& Time have been reset message appears the first time you turn on the camera or if the battery is removed for details. Setting the Date & Time, Anytime 1 Turn on your computer operating system, Kodak EasyShare software may allow your computer to Step 2 of Setting the Date & Time..., First Time. 6 See the Kodak EasyShare software Help for an extended time. 1 SET DATE & TIME is highlighted. The time...
...& Time have been reset message appears the first time you turn on the camera or if the battery is removed for details. Setting the Date & Time, Anytime 1 Turn on your computer operating system, Kodak EasyShare software may allow your computer to Step 2 of Setting the Date & Time..., First Time. 6 See the Kodak EasyShare software Help for an extended time. 1 SET DATE & TIME is highlighted. The time...
User Manual
Page 26
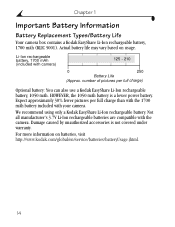
...1700 mAh battery included with the camera. We recommend using only a Kodak EasyShare Li-Ion rechargeable battery. For more information on usage. Expect approximately 30% fewer pictures per full charge) Optional battery: You can also use a Kodak EasyShare Li-Ion rechargeable battery, 1050...battery life may vary based on batteries, visit http://www.kodak.com/global/en/service/batteries/batteryUsage.jhtml. 14 Chapter 1 Important Battery Information Battery Replacement Types/Battery Life Your camera box contains a Kodak EasyShare Li-Ion rechargeable battery, 1700 mAh (KLIC 5001). ...
...1700 mAh battery included with the camera. We recommend using only a Kodak EasyShare Li-Ion rechargeable battery. For more information on usage. Expect approximately 30% fewer pictures per full charge) Optional battery: You can also use a Kodak EasyShare Li-Ion rechargeable battery, 1050...battery life may vary based on batteries, visit http://www.kodak.com/global/en/service/batteries/batteryUsage.jhtml. 14 Chapter 1 Important Battery Information Battery Replacement Types/Battery Life Your camera box contains a Kodak EasyShare Li-Ion rechargeable battery, 1700 mAh (KLIC 5001). ...
User Manual
Page 27
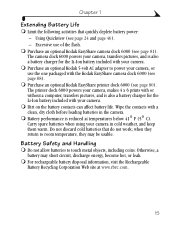
... a battery charger for the Li-Ion battery included with your camera in the camera. ! Purchase an optional Kodak EasyShare printer dock 6000 (see page 24 and page 46). - Carry spare batteries when using your camera. ! For rechargeable battery disposal information, visit the Rechargeable Battery Recycling... pictures, and is reduced at www.rbrc.com. 15 Battery Safety and Handling ! Using Quickview (see page 80). Purchase an optional Kodak EasyShare camera dock 6000 (see page 88). ! Dirt on the battery contacts can affect battery life. Otherwise, a battery may be usable. when...
... a battery charger for the Li-Ion battery included with your camera in the camera. ! Purchase an optional Kodak EasyShare printer dock 6000 (see page 24 and page 46). - Carry spare batteries when using your camera. ! For rechargeable battery disposal information, visit the Rechargeable Battery Recycling... pictures, and is reduced at www.rbrc.com. 15 Battery Safety and Handling ! Using Quickview (see page 80). Purchase an optional Kodak EasyShare camera dock 6000 (see page 88). ! Dirt on the battery contacts can affect battery life. Otherwise, a battery may be usable. when...

User Manual
Page 45
... x 18 cm); This setting remains until you change it. 33 Also for printing up to the 3:2 aspect ratio. Good (1.1 MP)-for printing up to the Kodak EasyShare printer dock 6000 and other printing solutions without cropping (see page 80). pictures are highest resolution and largest file size. for printing up to 8 x 10...
... x 18 cm); This setting remains until you change it. 33 Also for printing up to the 3:2 aspect ratio. Good (1.1 MP)-for printing up to the Kodak EasyShare printer dock 6000 and other printing solutions without cropping (see page 80). pictures are highest resolution and largest file size. for printing up to 8 x 10...
User Manual
Page 48
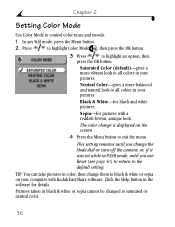
Sepia-for details. Click the Help button in the software for pictures with Kodak EasyShare software. Neutral Color-gives a more vibrant look to exit the menu. The color change is displayed on your pictures. or, if it was set while ... black & white or sepia on the screen. 4 Press the Menu button to all colors in color, then change the Mode dial or turn off the camera; Chapter 2 Setting Color Mode Use Color Mode to control color tones and moods. 1 In any Still mode, press the Menu button. 2 Press to highlight Color...
Sepia-for details. Click the Help button in the software for pictures with Kodak EasyShare software. Neutral Color-gives a more vibrant look to exit the menu. The color change is displayed on your pictures. or, if it was set while ... black & white or sepia on the screen. 4 Press the Menu button to all colors in color, then change the Mode dial or turn off the camera; Chapter 2 Setting Color Mode Use Color Mode to control color tones and moods. 1 In any Still mode, press the Menu button. 2 Press to highlight Color...
User Manual
Page 53
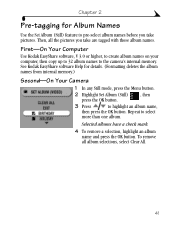
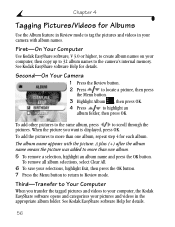
See Kodak EasyShare software Help for Album Names Use the Set Album (Still) feature to the camera's internal memory. Selected albums have a check mark. 4 To remove a selection, highlight an album name and press the OK button. To remove all the pictures ... (Formatting deletes the album names from internal memory.) Second-On Your Camera 1 In any Still mode, press the Menu button. 2 Highlight Set Album (Still) , then press the OK button. 3 Press to select more than one album. First-On Your Computer Use Kodak EasyShare software, V 3.0 or higher, to create album names on your ...
See Kodak EasyShare software Help for Album Names Use the Set Album (Still) feature to the camera's internal memory. Selected albums have a check mark. 4 To remove a selection, highlight an album name and press the OK button. To remove all the pictures ... (Formatting deletes the album names from internal memory.) Second-On Your Camera 1 In any Still mode, press the Menu button. 2 Highlight Set Album (Still) , then press the OK button. 3 Press to select more than one album. First-On Your Computer Use Kodak EasyShare software, V 3.0 or higher, to create album names on your ...
User Manual
Page 54
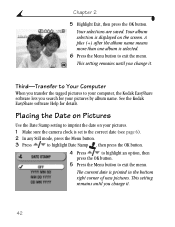
...camera clock is set to the correct date (see page 6). 2 In any Still mode, press the Menu button. 3 Press to highlight Date Stamp , then press the OK button. 4 Press to highlight an option, then press the OK button. 5 Press the Menu button to imprint the date on the screen. See the Kodak EasyShare... software Help for your computer, the Kodak EasyShare software lets you transfer the tagged pictures to exit the menu. Placing the Date on Pictures Use the Date Stamp ...
...camera clock is set to the correct date (see page 6). 2 In any Still mode, press the Menu button. 3 Press to highlight Date Stamp , then press the OK button. 4 Press to highlight an option, then press the OK button. 5 Press the Menu button to imprint the date on the screen. See the Kodak EasyShare... software Help for your computer, the Kodak EasyShare software lets you transfer the tagged pictures to exit the menu. Placing the Date on Pictures Use the Date Stamp ...
User Manual
Page 61
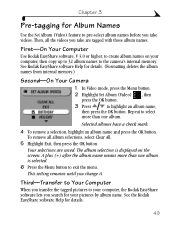
...mark. 4 To remove a selection, highlight an album name and press the OK button. See the Kodak EasyShare software Help for details. (Formatting deletes the album names from internal memory.) Second-On Your Camera 1 In Video mode, press the Menu button. 2 Highlight Set Album (Video) , then press ...(+) after the album name means more than one album. The album selection is selected. 6 Press the Menu button to the camera's internal memory. See Kodak EasyShare software Help for details. 49 This setting remains until you take are saved. Then, all album selections, select Clear All. ...
...mark. 4 To remove a selection, highlight an album name and press the OK button. See the Kodak EasyShare software Help for details. (Formatting deletes the album names from internal memory.) Second-On Your Camera 1 In Video mode, press the Menu button. 2 Highlight Set Album (Video) , then press ...(+) after the album name means more than one album. The album selection is selected. 6 Press the Menu button to the camera's internal memory. See Kodak EasyShare software Help for details. 49 This setting remains until you take are saved. Then, all album selections, select Clear All. ...
User Manual
Page 63
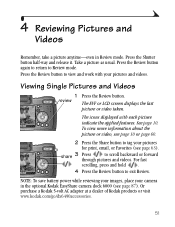
...videos. To view more information about the picture or video, see page 10 or page 60. 2 Press the Share button to tag your camera in Review mode. Press the Review button again to return to scroll backward or forward through pictures and videos. Viewing Single Pictures and Videos .../go/dx6490accessories. 51 share 3 Press to Review mode. 4 Reviewing Pictures and Videos Remember, take a picture anytime-even in the optional Kodak EasyShare camera dock 6000 (see page 87). Take a picture as usual. For fast scrolling, press and hold . 4 Press the Review button to view and...
...videos. To view more information about the picture or video, see page 10 or page 60. 2 Press the Share button to tag your camera in Review mode. Press the Review button again to return to scroll backward or forward through pictures and videos. Viewing Single Pictures and Videos .../go/dx6490accessories. 51 share 3 Press to Review mode. 4 Reviewing Pictures and Videos Remember, take a picture anytime-even in the optional Kodak EasyShare camera dock 6000 (see page 87). Take a picture as usual. For fast scrolling, press and hold . 4 Press the Review button to view and...
User Manual
Page 68
...name appears with album names. When the picture you transfer the tagged pictures and videos to your computer, the Kodak EasyShare software opens and categorizes your pictures and videos in your camera with the picture. To remove all album selections, select Clear All. 6 To save your computer, then ...32 album names to Review mode. First-On Your Computer Use Kodak EasyShare software, V 3.0 or higher, to create album names on your selections, highlight Exit, then press the OK button. 7 Press the Menu button to return to the camera's internal memory. To add the pictures to more than one...
...name appears with album names. When the picture you transfer the tagged pictures and videos to your computer, the Kodak EasyShare software opens and categorizes your pictures and videos in your camera with the picture. To remove all album selections, select Clear All. 6 To save your computer, then ...32 album names to Review mode. First-On Your Computer Use Kodak EasyShare software, V 3.0 or higher, to create album names on your selections, highlight Exit, then press the OK button. 7 Press the Menu button to return to the camera's internal memory. To add the pictures to more than one...
User Manual
Page 76
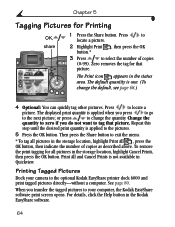
The default quantity is not available in the Kodak EasyShare software. 64 Repeat this step until the desired print quantity is applied when you transfer the tagged pictures to your camera to tag that picture. Print All and Cancel Prints is one. (To change the quantity. ...Change the quantity to zero if you do not want to the optional Kodak EasyShare printer dock 6000 and print tagged pictures directly-...
The default quantity is not available in the Kodak EasyShare software. 64 Repeat this step until the desired print quantity is applied when you transfer the tagged pictures to your camera to tag that picture. Print All and Cancel Prints is one. (To change the quantity. ...Change the quantity to zero if you do not want to the optional Kodak EasyShare printer dock 6000 and print tagged pictures directly-...
User Manual
Page 77
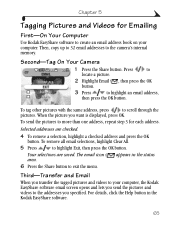
.... To remove all email selections, highlight Clear All. 5 Press to the camera's internal memory. The email icon area. To send the pictures to exit the menu. Selected addresses are saved. appears in the Kodak EasyShare software. 65 Press to locate a picture. 2 Highlight Email , then press...button to more than one address, repeat step 3 for Emailing First-On Your Computer Use Kodak EasyShare software to highlight an email address, then press the OK button. Second-Tag On Your Camera 1 Press the Share button. Chapter 5 Tagging Pictures and Videos for each address.
.... To remove all email selections, highlight Clear All. 5 Press to the camera's internal memory. The email icon area. To send the pictures to exit the menu. Selected addresses are saved. appears in the Kodak EasyShare software. 65 Press to locate a picture. 2 Highlight Email , then press...button to more than one address, repeat step 3 for Emailing First-On Your Computer Use Kodak EasyShare software to highlight an email address, then press the OK button. Second-Tag On Your Camera 1 Press the Share button. Chapter 5 Tagging Pictures and Videos for each address.
User Manual
Page 78
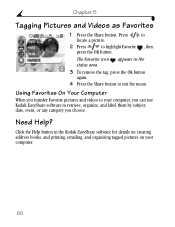
... and videos to retrieve, organize, and label them by subject, date, event, or any category you choose. to , then The Favorite icon appears in the Kodak EasyShare software for details on creating address books, and printing, emailing, and organizing tagged pictures on your computer, you can use... Kodak EasyShare software to your computer. 66 Click the Help button in the status area. 3 To remove the tag, press the OK button again. 4 Press the Share ...
... and videos to retrieve, organize, and label them by subject, date, event, or any category you choose. to , then The Favorite icon appears in the Kodak EasyShare software for details on creating address books, and printing, emailing, and organizing tagged pictures on your computer, you can use... Kodak EasyShare software to your computer. 66 Click the Help button in the status area. 3 To remove the tag, press the OK button again. 4 Press the Share ...
User Manual
Page 89
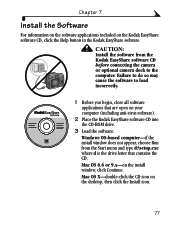
Mac OS X-double-click the CD icon on the Kodak EasyShare software CD, click the Help button in the Kodak EasyShare software. Chapter 7 Install the Software For information on the software applications included on the desktop, then click the Install icon. 77 Failure to do so ... d is the drive letter that are open on the install window, click Continue. Mac OS 8.6 or 9.x-on your computer (including anti-virus software). 2 Place the Kodak EasyShare software CD into the CD-ROM drive. 3 Load the software: Windows OS-based computer-if the install window does not appear, choose Run from the...
Mac OS X-double-click the CD icon on the Kodak EasyShare software CD, click the Help button in the Kodak EasyShare software. Chapter 7 Install the Software For information on the software applications included on the desktop, then click the Install icon. 77 Failure to do so ... d is the drive letter that are open on the install window, click Continue. Mac OS 8.6 or 9.x-on your computer (including anti-virus software). 2 Place the Kodak EasyShare software CD into the CD-ROM drive. 3 Load the software: Windows OS-based computer-if the install window does not appear, choose Run from the...


