
User Manual
Page 4
Back View Product Overview 8 9 10 11 12 13 7 14 6 15 5 16 4 32 1 Camera screen (LCD) 2 Share button (page 47) 3 OK button (press) 4 DC-In (3V) ,for optional AC adapter 5 4-way controller 6 Delete button 7 Viewfinder 8 Ready light 1 9 Self Timer/Burst button 10 Mode dial/Off (page 13, page 6) 11 Shutter button 12 Flash button 13 Zoom (Wide Angle/Telephoto) 14 Grip 15 Menu button 16 Review button ii
Back View Product Overview 8 9 10 11 12 13 7 14 6 15 5 16 4 32 1 Camera screen (LCD) 2 Share button (page 47) 3 OK button (press) 4 DC-In (3V) ,for optional AC adapter 5 4-way controller 6 Delete button 7 Viewfinder 8 Ready light 1 9 Self Timer/Burst button 10 Mode dial/Off (page 13, page 6) 11 Shutter button 12 Flash button 13 Zoom (Wide Angle/Telephoto) 14 Grip 15 Menu button 16 Review button ii
User Manual
Page 30
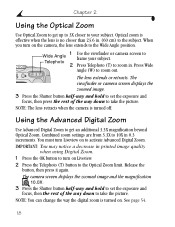
... Wide Angle position. You must turn Liveview on . Press Wide Angle (W) to zoom in 0.3 increments. Using the Advanced Digital Zoom Use Advanced Digital Zoom to get up to 3X closer to your subject. The viewfinder or camera screen displays the zoomed image. 3 Press the Shutter button half-way and hold to set the exposure and focus, then press...
... Wide Angle position. You must turn Liveview on . Press Wide Angle (W) to zoom in 0.3 increments. Using the Advanced Digital Zoom Use Advanced Digital Zoom to get up to 3X closer to your subject. The viewfinder or camera screen displays the zoomed image. 3 Press the Shutter button half-way and hold to set the exposure and focus, then press...
User Manual
Page 43
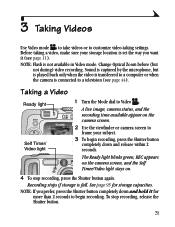
...and the Self Timer/Video light stays on the camera screen. 2 Use the viewfinder or camera screen to frame your storage location is set the way you prefer, press the Shutter button completely down and release within 2 seconds. Change Optical Zoom before (but is played back only when the ...video is transferred to a computer or when the camera is connected to customize video-taking a video, make sure your ...
...and the Self Timer/Video light stays on the camera screen. 2 Use the viewfinder or camera screen to frame your storage location is set the way you prefer, press the Shutter button completely down and release within 2 seconds. Change Optical Zoom before (but is played back only when the ...video is transferred to a computer or when the camera is connected to customize video-taking a video, make sure your ...

User Manual
Page 45
...Optional Video Settings In Video mode, press the Menu button to the Wide Angle position. The viewfinder or camera screen displays the zoomed image. 3 Press the Shutter button to zoom out. Wide Angle 1 Use the viewfinder or camera screen to Telephoto frame your subject. Press Wide Angle ...(W) to take the video. Optical zoom is effective when the lens is no...
...Optional Video Settings In Video mode, press the Menu button to the Wide Angle position. The viewfinder or camera screen displays the zoomed image. 3 Press the Shutter button to zoom out. Wide Angle 1 Use the viewfinder or camera screen to Telephoto frame your subject. Press Wide Angle ...(W) to take the video. Optical zoom is effective when the lens is no...
User Manual
Page 63
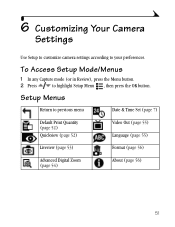
Setup Menus Return to highlight Setup Menu , then press the OK button. To Access Setup Mode/Menus 1 In any Capture mode (or in Review), press the Menu button. 2 Press to previous menu Date & Time Set (page 7) Default Print Quantity (page 52) Quickview (page 52) Video Out (page 55) Language (page 55) Liveview (page 53) Format (page 56) Advanced Digital Zoom (page 54) About (page 56) 51 6 Customizing Your Camera Settings Use Setup to customize camera settings according to your preferences.
Setup Menus Return to highlight Setup Menu , then press the OK button. To Access Setup Mode/Menus 1 In any Capture mode (or in Review), press the Menu button. 2 Press to previous menu Date & Time Set (page 7) Default Print Quantity (page 52) Quickview (page 52) Video Out (page 55) Language (page 55) Liveview (page 53) Format (page 56) Advanced Digital Zoom (page 54) About (page 56) 51 6 Customizing Your Camera Settings Use Setup to customize camera settings according to your preferences.

User Manual
Page 66
Pause (default)-digital zoom turns on after the Telephoto button is pressed to the optical zoom limit and held. None-disables digital zoom. 5 Press the Menu button to the optical zoom limit, released, then is pressed again. NOTE: Advanced Digital Zoom cannot be activated unless Liveview is on. 54 Chapter 6 Changing Advanced Digital Zoom You can customize the way the Advanced Digital Zoom turns on...
Pause (default)-digital zoom turns on after the Telephoto button is pressed to the optical zoom limit and held. None-disables digital zoom. 5 Press the Menu button to the optical zoom limit, released, then is pressed again. NOTE: Advanced Digital Zoom cannot be activated unless Liveview is on. 54 Chapter 6 Changing Advanced Digital Zoom You can customize the way the Advanced Digital Zoom turns on...
User Manual
Page 113
... ii A A/V out, iii, 44, 55 AA battery, installing, 4 about camera information, 56 picture, video, 46 AC adapter, 99 accessories battery, 97 buying, 87 camera dock, 63 MMC/SD card, 10 printer dock, 62 advanced digital zoom changing, 54 using, 18 albums, tagging pictures for, 27, 34, 41 alkaline... batteries, warning, 4 auto flash, 19 focus framing marks, 16 power-down, 99 Index B batteries loading, 4 replacement types, 97 battery charge via camera dock, 68 door location, iv extending life, 98 burst, ii, 22 button...
... ii A A/V out, iii, 44, 55 AA battery, installing, 4 about camera information, 56 picture, video, 46 AC adapter, 99 accessories battery, 97 buying, 87 camera dock, 63 MMC/SD card, 10 printer dock, 62 advanced digital zoom changing, 54 using, 18 albums, tagging pictures for, 27, 34, 41 alkaline... batteries, warning, 4 auto flash, 19 focus framing marks, 16 power-down, 99 Index B batteries loading, 4 replacement types, 97 battery charge via camera dock, 68 door location, iv extending life, 98 burst, ii, 22 button...
User Manual
Page 115
Index delete button, ii deleting by formatting, 56 during quickview, 17, 32 from internal memory, 39 from MMC/SD Card, 39 protecting pictures, videos, 41 digital zoom changing, 54 using, 18 displaying slide show, 43 disposal, recycling, 94 dock camera, 63 printer, 62 downloading pictures, 61, 69 E EasyShare software, 57 emailing pictures, videos, 49 error code... version, 56 flash settings, 19 unit, i focus framing marks, 16 folders, card, 96 formatting internal memory, 56 MMC/SD card, 56 G guidelines, battery, 97 H help camera dock, 71 software, 88 support, 87 web links, 87 I icons 103
Index delete button, ii deleting by formatting, 56 during quickview, 17, 32 from internal memory, 39 from MMC/SD Card, 39 protecting pictures, videos, 41 digital zoom changing, 54 using, 18 displaying slide show, 43 disposal, recycling, 94 dock camera, 63 printer, 62 downloading pictures, 61, 69 E EasyShare software, 57 emailing pictures, videos, 49 error code... version, 56 flash settings, 19 unit, i focus framing marks, 16 folders, card, 96 formatting internal memory, 56 MMC/SD card, 56 G guidelines, battery, 97 H help camera dock, 71 software, 88 support, 87 web links, 87 I icons 103
User Manual
Page 117
...dial, ii, 14 monitor, requirements, 57 N NTSC, video out setting, 55 O OK button, 6 online prints, ordering, 62 optical zoom, 18, 33 orientation sensor, 29 overview camera, ii camera modes, 14 P package contents camera, 3 camera dock, 63 PAL, video out setting, 55 pictures checking location, 12 copying, 45 date imprint...setting, 25 reviewing, 37 storage capacity, 95 tagging, 27, 34, 41 taking, modes, 14 transfer via camera dock, 69 transfer via USB cable, 61 power auto off, 99 camera, 6 camera dock, 65 switch, ii printer dock, 62 printing changing default quantity, 52 from a card, 62 optimizing...
...dial, ii, 14 monitor, requirements, 57 N NTSC, video out setting, 55 O OK button, 6 online prints, ordering, 62 optical zoom, 18, 33 orientation sensor, 29 overview camera, ii camera modes, 14 P package contents camera, 3 camera dock, 63 PAL, video out setting, 55 pictures checking location, 12 copying, 45 date imprint...setting, 25 reviewing, 37 storage capacity, 95 tagging, 27, 34, 41 taking, modes, 14 transfer via camera dock, 69 transfer via USB cable, 61 power auto off, 99 camera, 6 camera dock, 65 switch, ii printer dock, 62 printing changing default quantity, 52 from a card, 62 optimizing...
User Manual
Page 120
Index troubleshooting camera dock, 71 turning camera on and off, 6 U upgrading software, firmware, 94 URLs, Kodak web sites, 87 USB (universal serial bus) connection location, iii transferring pictures, 61 V video setting video out, 55 videos ...ii using camera screen, 15 viewing camera information, 56 picture, video information, 46 viewing picture after taking, 17, 37 magnified, 40 viewing video, after taking, 32 W white balance, 92 wide angle button, ii Windows installing software, 59 system requirements, 57 wrist strap, 5 wrist strap post, i Z zoom button, ii changing digital, 54 digital, 18...
Index troubleshooting camera dock, 71 turning camera on and off, 6 U upgrading software, firmware, 94 URLs, Kodak web sites, 87 USB (universal serial bus) connection location, iii transferring pictures, 61 V video setting video out, 55 videos ...ii using camera screen, 15 viewing camera information, 56 picture, video information, 46 viewing picture after taking, 17, 37 magnified, 40 viewing video, after taking, 32 W white balance, 92 wide angle button, ii Windows installing software, 59 system requirements, 57 wrist strap, 5 wrist strap post, i Z zoom button, ii changing digital, 54 digital, 18...


