User's Guide
Page 7
...Loading the Batteries 4 Attaching the Wrist Strap 5 Turning the Camera On and Off 6 Using the OK and Controller Buttons 6 Setting the Date and Time 8 Checking Camera Status 9 Camera Screen Icons 10 Inserting an SD/MMC Card 11 Choosing Internal Memory or SD/MMC Card 12 Important Battery Information 14 2 ...Taking Pictures 17 Take a Picture 17 Liveview-Framing with the Camera Screen 18 Quickview-Reviewing the Picture Just Taken 19 Using the Digital Zoom 20 Using the Flash 21 Changing...
...Loading the Batteries 4 Attaching the Wrist Strap 5 Turning the Camera On and Off 6 Using the OK and Controller Buttons 6 Setting the Date and Time 8 Checking Camera Status 9 Camera Screen Icons 10 Inserting an SD/MMC Card 11 Choosing Internal Memory or SD/MMC Card 12 Important Battery Information 14 2 ...Taking Pictures 17 Take a Picture 17 Liveview-Framing with the Camera Screen 18 Quickview-Reviewing the Picture Just Taken 19 Using the Digital Zoom 20 Using the Flash 21 Changing...
User's Guide
Page 9
... for Printing 48 Tagging Pictures and Videos for Emailing 49 Tagging Pictures and Videos as Favorites 50 Need Help 50 6 Customizing Your Camera Settings 51 To Access Setup Mode/Menus 51 Setup Menus 51 Changing the Default Print Quantity 52 Turning Off Quickview 52 Turning On... Liveview 53 Setting Video Out 53 Selecting a Language 54 Formatting Internal Memory or SD/MMC Card 55 Viewing Camera Information 55 7 Installing the Software 57 Windows System Requirements 57 Mac OS X System Requirements 58 Mac OS 8.6 and 9.x ...
... for Printing 48 Tagging Pictures and Videos for Emailing 49 Tagging Pictures and Videos as Favorites 50 Need Help 50 6 Customizing Your Camera Settings 51 To Access Setup Mode/Menus 51 Setup Menus 51 Changing the Default Print Quantity 52 Turning Off Quickview 52 Turning On... Liveview 53 Setting Video Out 53 Selecting a Language 54 Formatting Internal Memory or SD/MMC Card 55 Viewing Camera Information 55 7 Installing the Software 57 Windows System Requirements 57 Mac OS X System Requirements 58 Mac OS 8.6 and 9.x ...
User's Guide
Page 10
... 62 9 Using the Camera Dock 6000 63 Camera Dock 6000 Package Contents 63 Installing the Custom Camera Insert 64 Connecting the Camera Dock 6000 65 Installing the Rechargeable Battery 66 Docking the Camera 67 Charging the Battery ...68 Transferring Pictures With the Dock 69 Reviewing Pictures and Videos 70 Camera Dock 6000 Specifications 70 Troubleshooting-Camera Dock 6000 71 Earlier Cameras and Docks 71 10 Troubleshooting 73 Camera Problems 73 Camera/Computer Communications 77 SD/MMC Cards and Internal Memory 78 Camera Screen Messages 79 Camera...
... 62 9 Using the Camera Dock 6000 63 Camera Dock 6000 Package Contents 63 Installing the Custom Camera Insert 64 Connecting the Camera Dock 6000 65 Installing the Rechargeable Battery 66 Docking the Camera 67 Charging the Battery ...68 Transferring Pictures With the Dock 69 Reviewing Pictures and Videos 70 Camera Dock 6000 Specifications 70 Troubleshooting-Camera Dock 6000 71 Earlier Cameras and Docks 71 10 Troubleshooting 73 Camera Problems 73 Camera/Computer Communications 77 SD/MMC Cards and Internal Memory 78 Camera Screen Messages 79 Camera...
User's Guide
Page 22
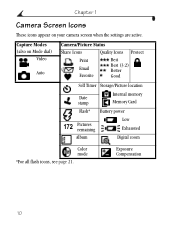
Exposure Compensation 10 Chapter 1 Camera Screen Icons These icons appear on Mode dial) Video Auto Camera/Picture Status Share Icons Quality Icons Protect Print Email Favorite Best Best (3:2) Better Good Self Timer Storage/Picture location Date stamp Internal memory Memory Card Flash* Battery power 172 Pictures remaining Low Exhausted Album Digital zoom Color mode *For all flash icons, see page 21. Capture Modes (also on your camera screen when the settings are active.
Exposure Compensation 10 Chapter 1 Camera Screen Icons These icons appear on Mode dial) Video Auto Camera/Picture Status Share Icons Quality Icons Protect Print Email Favorite Best Best (3:2) Better Good Self Timer Storage/Picture location Date stamp Internal memory Memory Card Flash* Battery power 172 Pictures remaining Low Exhausted Album Digital zoom Color mode *For all flash icons, see page 21. Capture Modes (also on your camera screen when the settings are active.
User's Guide
Page 23
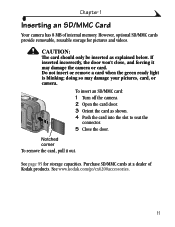
...card door. 3 Orient the card as explained below. Purchase SD/MMC cards at a dealer of internal memory. Notched corner To remove the card, pull it may damage your pictures, card, or camera. See page 95 for pictures and videos. If inserted incorrectly, the door won't close, and forcing ... as shown. 4 Push the card into the slot to seat the connector. 5 Close the door. doing so may damage the camera or card. Chapter 1 Inserting an SD/MMC Card Your camera has 8 MB of Kodak products. However, optional SD/MMC cards provide removable, reusable storage for storage capacities.
...card door. 3 Orient the card as explained below. Purchase SD/MMC cards at a dealer of internal memory. Notched corner To remove the card, pull it may damage your pictures, card, or camera. See page 95 for pictures and videos. If inserted incorrectly, the door won't close, and forcing ... as shown. 4 Push the card into the slot to seat the connector. 5 Close the door. doing so may damage the camera or card. Chapter 1 Inserting an SD/MMC Card Your camera has 8 MB of Kodak products. However, optional SD/MMC cards provide removable, reusable storage for storage capacities.
User's Guide
Page 24
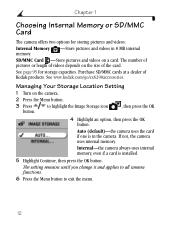
...the OK button. SD/MMC Card -Store pictures and videos on the size of Kodak products. See www.kodak.com/go/cx6200accessories. Managing Your Storage Location Setting 1 Turn on the camera. 2 Press the Menu button. 3 Press to exit the menu. 12 The ...number of pictures or length of videos depends on a card. See page 95 for storing pictures and videos: Internal Memory -Store pictures and videos in the camera. Internal-the camera...
...the OK button. SD/MMC Card -Store pictures and videos on the size of Kodak products. See www.kodak.com/go/cx6200accessories. Managing Your Storage Location Setting 1 Turn on the camera. 2 Press the Menu button. 3 Press to exit the menu. 12 The ...number of pictures or length of videos depends on a card. See page 95 for storing pictures and videos: Internal Memory -Store pictures and videos in the camera. Internal-the camera...
User's Guide
Page 25
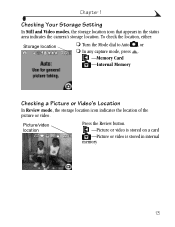
To check the location, either: Storage location ! Chapter 1 Checking Your Storage Setting In Still and Video modes, the storage location icon that appears in internal memory 13 Turn the Mode dial to Auto , or ! Picture/video location Press the Review button. -Picture or video is stored on a card -Picture or video is stored in the status area indicates the camera's storage location. In any capture mode, press . -Memory Card -Internal Memory Checking a Picture or Video's Location In Review mode, the storage location icon indicates the location of the picture or video.
To check the location, either: Storage location ! Chapter 1 Checking Your Storage Setting In Still and Video modes, the storage location icon that appears in internal memory 13 Turn the Mode dial to Auto , or ! Picture/video location Press the Review button. -Picture or video is stored on a card -Picture or video is stored in the status area indicates the camera's storage location. In any capture mode, press . -Memory Card -Internal Memory Checking a Picture or Video's Location In Review mode, the storage location icon indicates the location of the picture or video.

User's Guide
Page 39
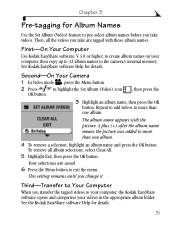
...those album names. See Kodak EasyShare software Help for Album Names Use the Set Album (Still) feature to highlight the Set Album (Still) icon , then press the OK button. 3 Highlight an album name, then press the OK button. Second-On Your Camera 1 In Auto mode ,...Chapter 2 Pre-tagging for details. First-On Your Computer Use Kodak EasyShare software, V 3.0 or higher, to more than one album is displayed on your album selection is selected. 6 Press the Menu button to the camera's internal memory. This setting remains until you take pictures. Selected albums are tagged...
...those album names. See Kodak EasyShare software Help for Album Names Use the Set Album (Still) feature to highlight the Set Album (Still) icon , then press the OK button. 3 Highlight an album name, then press the OK button. Second-On Your Camera 1 In Auto mode ,...Chapter 2 Pre-tagging for details. First-On Your Computer Use Kodak EasyShare software, V 3.0 or higher, to more than one album is displayed on your album selection is selected. 6 Press the Menu button to the camera's internal memory. This setting remains until you take pictures. Selected albums are tagged...
User's Guide
Page 43
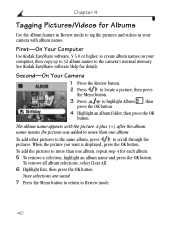
Second-On Your Camera 1 In Video mode , press the Menu button. 2 Press to highlight the Set Album (Video) icon OK button. , then press the 3 Highlight an album name, then press the OK button. To remove all the videos you change it. First-On Your Computer Use Kodak EasyShare software, V 3.0 or higher, to create ...-tagging for Album Names Use the Set Album (Video) feature to pre-select album names before you transfer the tagged videos to your computer, the Kodak EasyShare software opens and categorizes your computer, then copy up to 32 album names to the camera's internal memory.
Second-On Your Camera 1 In Video mode , press the Menu button. 2 Press to highlight the Set Album (Video) icon OK button. , then press the 3 Highlight an album name, then press the OK button. To remove all the videos you change it. First-On Your Computer Use Kodak EasyShare software, V 3.0 or higher, to create ...-tagging for Album Names Use the Set Album (Video) feature to pre-select album names before you transfer the tagged videos to your computer, the Kodak EasyShare software opens and categorizes your computer, then copy up to 32 album names to the camera's internal memory.
User's Guide
Page 51
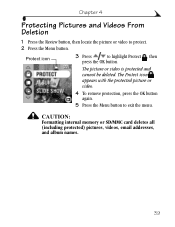
CAUTION: Formatting internal memory or SD/MMC card deletes all (including protected) pictures, videos, email addresses, and album names. 39 The picture or video is protected and cannot be deleted. The Protect icon appears with the protected picture or video. 4 To remove protection, press the OK button again. 5 Press the Menu button to highlight Protect , then press the OK button. Protect icon 3 Press to exit the menu. Chapter 4 Protecting Pictures and Videos From Deletion 1 Press the Review button, then locate the picture or video to protect. 2 Press the Menu button.
CAUTION: Formatting internal memory or SD/MMC card deletes all (including protected) pictures, videos, email addresses, and album names. 39 The picture or video is protected and cannot be deleted. The Protect icon appears with the protected picture or video. 4 To remove protection, press the OK button again. 5 Press the Menu button to highlight Protect , then press the OK button. Protect icon 3 Press to exit the menu. Chapter 4 Protecting Pictures and Videos From Deletion 1 Press the Review button, then locate the picture or video to protect. 2 Press the Menu button.
User's Guide
Page 52
...in your computer, then copy up to 32 album names to scroll through the pictures. First-On Your Computer Use Kodak EasyShare software, V 3.0 or higher, to create album names on your camera with the picture. The album name appears with album names. Chapter 4 Tagging Pictures/Videos for each album. 5 To... remove a selection, highlight an album name and press the OK button. To add other pictures to the same album, press to the camera's internal memory. When the picture you want is displayed, press the OK button. A plus (+) after the album name means the picture was added to more...
...in your computer, then copy up to 32 album names to scroll through the pictures. First-On Your Computer Use Kodak EasyShare software, V 3.0 or higher, to create album names on your camera with the picture. The album name appears with album names. Chapter 4 Tagging Pictures/Videos for each album. 5 To... remove a selection, highlight an album name and press the OK button. To add other pictures to the same album, press to the camera's internal memory. When the picture you want is displayed, press the OK button. A plus (+) after the album name means the picture was added to more...
User's Guide
Page 56
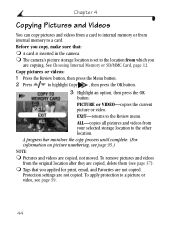
...current picture or video. A progress bar monitors the copy process until complete. (For information on picture numbering, see page 37). ! The camera's picture storage location is inserted in the camera. ! Tags that you copy, make sure that: ! EXIT-returns to a picture or video, see page 39. 44 Protection settings ...location after they are copied, not moved. Chapter 4 Copying Pictures and Videos You can copy pictures and videos from a card to internal memory or from internal memory to the other location. Pictures and videos are copied, delete them (see page 95.) NOTE: !
...current picture or video. A progress bar monitors the copy process until complete. (For information on picture numbering, see page 37). ! The camera's picture storage location is inserted in the camera. ! Tags that you copy, make sure that: ! EXIT-returns to a picture or video, see page 39. 44 Protection settings ...location after they are copied, not moved. Chapter 4 Copying Pictures and Videos You can copy pictures and videos from a card to internal memory or from internal memory to the other location. Pictures and videos are copied, delete them (see page 95.) NOTE: !

User's Guide
Page 61
... Press the Share button to exit the menu. Press to the camera's internal memory. To tag other pictures with the same address, press to more than one address, repeat step 3 for Emailing First-On Your Computer Use Kodak EasyShare software to the addresses you want is displayed, press the OK ...button. To remove all email selections, highlight Clear All. 5 Highlight Exit, then press the OK button. appears in the Kodak EasyShare software. 49 To send the pictures to scroll through the pictures. The email icon area. Third-Transfer and Email When you transfer the tagged...
... Press the Share button to exit the menu. Press to the camera's internal memory. To tag other pictures with the same address, press to more than one address, repeat step 3 for Emailing First-On Your Computer Use Kodak EasyShare software to the addresses you want is displayed, press the OK ...button. To remove all email selections, highlight Clear All. 5 Highlight Exit, then press the OK button. appears in the Kodak EasyShare software. 49 To send the pictures to scroll through the pictures. The email icon area. Third-Transfer and Email When you transfer the tagged...
User's Guide
Page 67
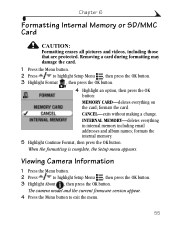
... CAUTION: Formatting erases all pictures and videos, including those that are protected. INTERNAL MEMORY-deletes everything on the card; When the formatting is complete, the Setup menu appears. The camera model and the current firmware version appear. 4 Press the Menu button to highlight... Menu , then press the OK button. 3 Highlight About , then press the OK button. formats the internal memory. 5 Highlight Continue Format, then press the OK button. Viewing Camera Information 1 Press the Menu button. 2 Press to exit the menu. 55 Removing a card during formatting may damage...
... CAUTION: Formatting erases all pictures and videos, including those that are protected. INTERNAL MEMORY-deletes everything on the card; When the formatting is complete, the Setup menu appears. The camera model and the current firmware version appear. 4 Press the Menu button to highlight... Menu , then press the OK button. 3 Highlight About , then press the OK button. formats the internal memory. 5 Highlight Continue Format, then press the OK button. Viewing Camera Information 1 Press the Menu button. 2 Press to exit the menu. 55 Removing a card during formatting may damage...
User's Guide
Page 86
...subject was blinking. 74 blocking the lens when objects away from the camera (page 37), switch storage locations (page 12), or insert a card with available memory (page 11). viewfinder or camera screen. Keep battery charged. pictures are corrupted. not pressed. taking ...pictures. The card or internal memory is while the ready light blinking. on the camera does not work. blinking red before attempting...
...subject was blinking. 74 blocking the lens when objects away from the camera (page 37), switch storage locations (page 12), or insert a card with available memory (page 11). viewfinder or camera screen. Keep battery charged. pictures are corrupted. not pressed. taking ...pictures. The card or internal memory is while the ready light blinking. on the camera does not work. blinking red before attempting...
User's Guide
Page 90
... Internal Memory Problem The camera does not recognize SD/MMC card. Make sure the camera is inserted or was inserted or removed. Wizard cannot Software is not properly inserted in camera. To uninstall, go to seat (page 11). Install EasyShare software (page 57). Turn the camera off when... inserting or removing a card. 78 camera dock, disconnect cable and (The Add New Hardware remove camera from dock). Card is installed Disconnect...
... Internal Memory Problem The camera does not recognize SD/MMC card. Make sure the camera is inserted or was inserted or removed. Wizard cannot Software is not properly inserted in camera. To uninstall, go to seat (page 11). Install EasyShare software (page 57). Turn the camera off when... inserting or removing a card. 78 camera dock, disconnect cable and (The Add New Hardware remove camera from dock). Card is installed Disconnect...
User's Guide
Page 91
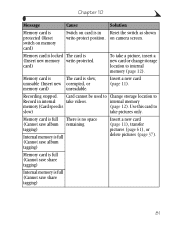
...setting (page 12). To restore addresses and albums, see Kodak EasyShare software Help.) Camera Screen Messages Message Cause Solution No images to the computer, then delete them from the camera. Memory card cannot another card) 79 Caution: Formatting erases be.... (Formatting internal memory also erases email addresses and album names. Caution: Formatting a card erases all pictures and videos, memory card or insert including protected files. location. another digital camera. other directory concern). Chapter 10 Problem Memory card full Cause Solution...
...setting (page 12). To restore addresses and albums, see Kodak EasyShare software Help.) Camera Screen Messages Message Cause Solution No images to the computer, then delete them from the camera. Memory card cannot another card) 79 Caution: Formatting erases be.... (Formatting internal memory also erases email addresses and album names. Caution: Formatting a card erases all pictures and videos, memory card or insert including protected files. location. another digital camera. other directory concern). Chapter 10 Problem Memory card full Cause Solution...

User's Guide
Page 92
... 10 Message Cause Solution Internal memory The camera internal Format the internal requires formatting memory is write-protected. Internal memory cannot be read (Please format internal memory) Caution: Formatting erases all pictures and videos, including protected files. (Formatting internal memory also erases email addresses and album names. To restore them, see Kodak EasyShare software Help.) Remove USB cable...
... 10 Message Cause Solution Internal memory The camera internal Format the internal requires formatting memory is write-protected. Internal memory cannot be read (Please format internal memory) Caution: Formatting erases all pictures and videos, including protected files. (Formatting internal memory also erases email addresses and album names. To restore them, see Kodak EasyShare software Help.) Remove USB cable...
User's Guide
Page 93
... (page 12). Recording stopped. Card cannot be used to Change storage location to internal memory (page 12). Chapter 10 Message Cause Solution Memory card is protected (Reset switch on memory card) Switch on camera screen. Insert a new card (page 11). Memory card is full There is in internal take videos. on card is no space...
... (page 12). Recording stopped. Card cannot be used to Change storage location to internal memory (page 12). Chapter 10 Message Cause Solution Memory card is protected (Reset switch on memory card) Switch on camera screen. Insert a new card (page 11). Memory card is full There is in internal take videos. on card is no space...

User's Guide
Page 94
...card in the camera's internal computer (page 61), memory. High camera The internal Leave the camera off for it back on. the camera to the is no more space Transfer pictures to operate. camera turns off .) camera is no more space Transfer pictures to the on the camera; Internal memory card There is ...insert card (page 11). 82 or the battery is the first time you Reset the clock (page 8). Memory card is full There is too high for temperature. (Camera temperature of time; or the battery has been removed for an extended period of the several minutes, then turn...
...card in the camera's internal computer (page 61), memory. High camera The internal Leave the camera off for it back on. the camera to the is no more space Transfer pictures to operate. camera turns off .) camera is no more space Transfer pictures to the on the camera; Internal memory card There is ...insert card (page 11). 82 or the battery is the first time you Reset the clock (page 8). Memory card is full There is too high for temperature. (Camera temperature of time; or the battery has been removed for an extended period of the several minutes, then turn...


