
User's Guide
Page 6
Product Overview Top and Bottom Views 12 3 1 Shutter button 2 Mode dial 3 Battery door 4 5 6 4 Tripod socket/locator, dock 6000 5 Dock connector 6 Locator, dock 6000 iv
Product Overview Top and Bottom Views 12 3 1 Shutter button 2 Mode dial 3 Battery door 4 5 6 4 Tripod socket/locator, dock 6000 5 Dock connector 6 Locator, dock 6000 iv
User's Guide
Page 7
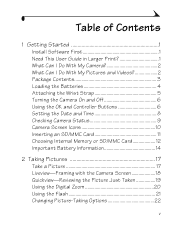
... First 1 Need This User Guide in Larger Print 1 What Can I Do With My Camera 2 What Can I Do With My Pictures and Videos 2 Package Contents 3 Loading the Batteries 4 Attaching the Wrist Strap 5 Turning the Camera On and Off 6 Using the OK and Controller Buttons 6 Setting the Date and Time ...Card 11 Choosing Internal Memory or SD/MMC Card 12 Important Battery Information 14 2 Taking Pictures 17 Take a Picture 17 Liveview-Framing with the Camera Screen 18 Quickview-Reviewing the Picture Just Taken 19 Using the Digital Zoom 20 Using the Flash 21 Changing Picture-Taking Options ...
... First 1 Need This User Guide in Larger Print 1 What Can I Do With My Camera 2 What Can I Do With My Pictures and Videos 2 Package Contents 3 Loading the Batteries 4 Attaching the Wrist Strap 5 Turning the Camera On and Off 6 Using the OK and Controller Buttons 6 Setting the Date and Time ...Card 11 Choosing Internal Memory or SD/MMC Card 12 Important Battery Information 14 2 Taking Pictures 17 Take a Picture 17 Liveview-Framing with the Camera Screen 18 Quickview-Reviewing the Picture Just Taken 19 Using the Digital Zoom 20 Using the Flash 21 Changing Picture-Taking Options ...
User's Guide
Page 10
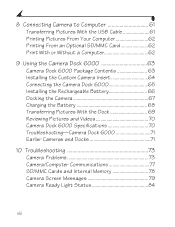
.../MMC Card 62 Print With or Without a Computer 62 9 Using the Camera Dock 6000 63 Camera Dock 6000 Package Contents 63 Installing the Custom Camera Insert 64 Connecting the Camera Dock 6000 65 Installing the Rechargeable Battery 66 Docking the Camera 67 Charging the Battery 68 Transferring Pictures With the Dock 69 Reviewing Pictures and Videos 70...
.../MMC Card 62 Print With or Without a Computer 62 9 Using the Camera Dock 6000 63 Camera Dock 6000 Package Contents 63 Installing the Custom Camera Insert 64 Connecting the Camera Dock 6000 65 Installing the Rechargeable Battery 66 Docking the Camera 67 Charging the Battery 68 Transferring Pictures With the Dock 69 Reviewing Pictures and Videos 70...
User's Guide
Page 15
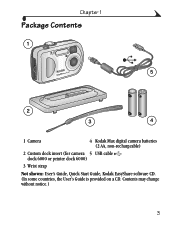
Contents may change without notice.) 3 Chapter 1 Package Contents 1 5 2 3 4 1 Camera 4 Kodak Max digital camera batteries (2 AA, non-rechargeable) 2 Custom dock insert (for camera 5 USB cable dock 6000 or printer dock 6000) 3 Wrist strap Not shown: User's Guide, Quick Start Guide, Kodak EasyShare software CD. (In some countries, the User's Guide is provided on a CD.
Contents may change without notice.) 3 Chapter 1 Package Contents 1 5 2 3 4 1 Camera 4 Kodak Max digital camera batteries (2 AA, non-rechargeable) 2 Custom dock insert (for camera 5 USB cable dock 6000 or printer dock 6000) 3 Wrist strap Not shown: User's Guide, Quick Start Guide, Kodak EasyShare software CD. (In some countries, the User's Guide is provided on a CD.
User's Guide
Page 16
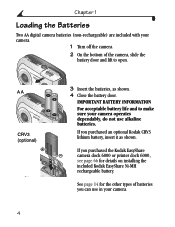
... camera. 4 IMPORTANT BATTERY INFORMATION For acceptable battery life and to open. See page 14 for details on installing the included Kodak EasyShare Ni-MH rechargeable battery. AA CRV3 (optional) - 3 Insert the batteries, as shown. Chapter 1 Loading the Batteries Two AA digital camera batteries (non-rechargeable) are included with your camera. 1 Turn off the camera. 2 On the bottom of batteries you can use in your camera...
... camera. 4 IMPORTANT BATTERY INFORMATION For acceptable battery life and to open. See page 14 for details on installing the included Kodak EasyShare Ni-MH rechargeable battery. AA CRV3 (optional) - 3 Insert the batteries, as shown. Chapter 1 Loading the Batteries Two AA digital camera batteries (non-rechargeable) are included with your camera. 1 Turn off the camera. 2 On the bottom of batteries you can use in your camera...
User's Guide
Page 20
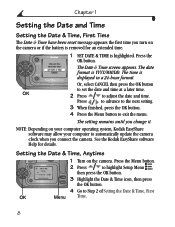
... & Time have been reset message appears the first time you change it. The setting remains until you turn on the camera or if the battery is removed for details. See the Kodak EasyShare software Help for an extended time. 1 SET DATE & TIME is highlighted. Press the Menu button. 2 Press to...Press to set the date and time at a later time. The date format is displayed in a 24-hour format. NOTE: Depending on the camera. Setting the Date & Time, Anytime 1 Turn on your computer operating system, Kodak EasyShare software may allow your computer to automatically update the...
... & Time have been reset message appears the first time you change it. The setting remains until you turn on the camera or if the battery is removed for details. See the Kodak EasyShare software Help for an extended time. 1 SET DATE & TIME is highlighted. Press the Menu button. 2 Press to...Press to set the date and time at a later time. The date format is displayed in a 24-hour format. NOTE: Depending on the camera. Setting the Date & Time, Anytime 1 Turn on your computer operating system, Kodak EasyShare software may allow your computer to automatically update the...
User's Guide
Page 22
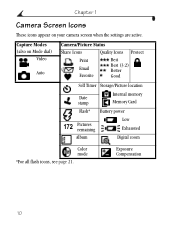
Chapter 1 Camera Screen Icons These icons appear on Mode dial) Video Auto Camera/Picture Status Share Icons Quality Icons Protect Print Email Favorite Best Best (3:2) Better Good Self Timer Storage/Picture location Date stamp Internal memory Memory Card Flash* Battery power 172 Pictures remaining Low Exhausted Album Digital zoom Color mode *For all flash icons, see page 21. Exposure Compensation 10 Capture Modes (also on your camera screen when the settings are active.
Chapter 1 Camera Screen Icons These icons appear on Mode dial) Video Auto Camera/Picture Status Share Icons Quality Icons Protect Print Email Favorite Best Best (3:2) Better Good Self Timer Storage/Picture location Date stamp Internal memory Memory Card Flash* Battery power 172 Pictures remaining Low Exhausted Album Digital zoom Color mode *For all flash icons, see page 21. Exposure Compensation 10 Capture Modes (also on your camera screen when the settings are active.

User's Guide
Page 26
..., use the following types of Pictures) * Included with camera) 100 - 140 0 500 Battery Life (Approx. CRV3 lithium battery 365 - 455 AA (2) lithium batteries Ni-MH rechargeable battery pack* (per charge) 265 - 365 165 - 205 AA (2) Ni-MH rechargeable batteries (per charge) 165 - 205 Kodak Max digital camera batteries, AA (2) (included with the Kodak EasyShare camera dock 6000 and printer dock 6000 We do...
..., use the following types of Pictures) * Included with camera) 100 - 140 0 500 Battery Life (Approx. CRV3 lithium battery 365 - 455 AA (2) lithium batteries Ni-MH rechargeable battery pack* (per charge) 265 - 365 165 - 205 AA (2) Ni-MH rechargeable batteries (per charge) 165 - 205 Kodak Max digital camera batteries, AA (2) (included with the Kodak EasyShare camera dock 6000 and printer dock 6000 We do...

User's Guide
Page 27
... optional Kodak EasyShare camera dock 6000 (see page 35) - Purchase an optional Kodak EasyShare printer dock 6000 (see page 19 and page 30). - For rechargeable battery disposal information, visit the Rechargeable Battery Recycling Corporation Web site at temperatures below 41° F (5° C). The camera dock 6000 powers your camera in the camera. ! Battery performance is also a battery charger for its included Kodak EasyShare Ni...
... optional Kodak EasyShare camera dock 6000 (see page 35) - Purchase an optional Kodak EasyShare printer dock 6000 (see page 19 and page 30). - For rechargeable battery disposal information, visit the Rechargeable Battery Recycling Corporation Web site at temperatures below 41° F (5° C). The camera dock 6000 powers your camera in the camera. ! Battery performance is also a battery charger for its included Kodak EasyShare Ni...
User's Guide
Page 29
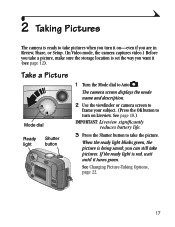
...Taking Options, page 22. 17 you want it (see page 12). If the ready light is being saved; See page 18.) IMPORTANT: Liveview significantly reduces battery life. 3 Press the Shutter button to Auto . Take a Picture Mode dial Ready Shutter light button 1 Turn the Mode dial to take the picture. 2... Taking Pictures The camera is ready to take pictures when you turn on -even if you are in Review, Share, or Setup. (In Video mode, the camera captures video.) Before you take a picture, make sure the storage location is set...
...Taking Options, page 22. 17 you want it (see page 12). If the ready light is being saved; See page 18.) IMPORTANT: Liveview significantly reduces battery life. 3 Press the Shutter button to Auto . Take a Picture Mode dial Ready Shutter light button 1 Turn the Mode dial to take the picture. 2... Taking Pictures The camera is ready to take pictures when you turn on -even if you are in Review, Share, or Setup. (In Video mode, the camera captures video.) Before you take a picture, make sure the storage location is set...
User's Guide
Page 30
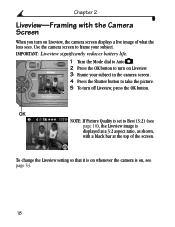
...is set to Best (3:2) (see page 53. 18 OK NOTE: If Picture Quality is displayed at the top of what the lens sees. Use the camera screen to take the picture. 5 To turn off Liveview, press the OK button. Chapter 2 Liveview-Framing with a black bar at a 3:2 aspect ...ratio, as shown, with the Camera Screen When you turn on Liveview, the camera screen displays a live image of the screen. IMPORTANT: Liveview significantly reduces battery life. 1 Turn the Mode dial to Auto . 2 Press the OK button to turn on Liveview....
...is set to Best (3:2) (see page 53. 18 OK NOTE: If Picture Quality is displayed at the top of what the lens sees. Use the camera screen to take the picture. 5 To turn off Liveview, press the OK button. Chapter 2 Liveview-Framing with a black bar at a 3:2 aspect ...ratio, as shown, with the Camera Screen When you turn on Liveview, the camera screen displays a live image of the screen. IMPORTANT: Liveview significantly reduces battery life. 1 Turn the Mode dial to Auto . 2 Press the OK button to turn on Liveview....
User's Guide
Page 31
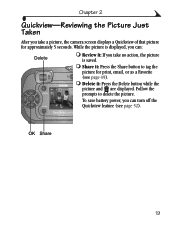
.... Review it: If you can : Delete ! While the picture is saved. ! Share it : Press the Delete button while the picture and are displayed. To save battery power, you take a picture, the camera screen displays a Quickview of that picture for print, email, or as a Favorite (see page 52).
.... Review it: If you can : Delete ! While the picture is saved. ! Share it : Press the Delete button while the picture and are displayed. To save battery power, you take a picture, the camera screen displays a Quickview of that picture for print, email, or as a Favorite (see page 52).
User's Guide
Page 47
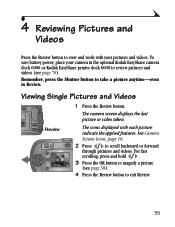
...Viewing Single Pictures and Videos 1 Press the Review button. Review The icons displayed with your camera in the optional Kodak EasyShare camera dock 6000 or Kodak EasyShare printer dock 6000 to review pictures and videos (see page 38). 4 Press the Review ...button to take a picture anytime-even in Review. 4 Reviewing Pictures and Videos Press the Review button to view and work with each picture indicate the applied features. To save battery...
...Viewing Single Pictures and Videos 1 Press the Review button. Review The icons displayed with your camera in the optional Kodak EasyShare camera dock 6000 or Kodak EasyShare printer dock 6000 to review pictures and videos (see page 38). 4 Press the Review ...button to take a picture anytime-even in Review. 4 Reviewing Pictures and Videos Press the Review button to view and work with each picture indicate the applied features. To save battery...

User's Guide
Page 54
Chapter 4 Running a Continuous Slide Show Loop When you change it. 42 The Loop setting remains until battery power is continuously repeated. 1 On the Slide Show menu, press to FPO: highlight LOOP highlight Loop, then press the OK button. 2 Highlight On, then press the OK button. When you start a slide show, it repeats until you cancel it by pressing the OK button or until you turn on Loop, the slide show is exhausted.
Chapter 4 Running a Continuous Slide Show Loop When you change it. 42 The Loop setting remains until battery power is continuously repeated. 1 On the Slide Show menu, press to FPO: highlight LOOP highlight Loop, then press the OK button. 2 Highlight On, then press the OK button. When you start a slide show, it repeats until you cancel it by pressing the OK button or until you turn on Loop, the slide show is exhausted.

User's Guide
Page 64
To save battery power, turn off Quickview. 1 Press the Menu button. 2 Press to highlight Setup Menu , ...page 19 and page 30). This setting remains until you take it . The picture is not displayed on the camera screen after you change it on the Share Print screen (page 47). Turning Off Quickview After you change it .... Chapter 6 Changing the Default Print Quantity The Default Print Quantity setting determines the value that is displayed on the camera screen for approximately 5 seconds (see the picture or video, press the Review button. This setting remains until you ...
To save battery power, turn off Quickview. 1 Press the Menu button. 2 Press to highlight Setup Menu , ...page 19 and page 30). This setting remains until you take it . The picture is not displayed on the camera screen after you change it on the Share Print screen (page 47). Turning Off Quickview After you change it .... Chapter 6 Changing the Default Print Quantity The Default Print Quantity setting determines the value that is displayed on the camera screen for approximately 5 seconds (see the picture or video, press the Review button. This setting remains until you ...

User's Guide
Page 65
... you change the Liveview default to On: 1 Press the Menu button. 2 Press to a television or other external device using an optional Kodak EasyShare printer dock 6000 and an audio/video cable (see page 18). To change it on (in Auto Mode The Liveview feature lets you connect...43). 1 Press the Menu button. 2 Press to turn Liveview off and on whenever the camera is Liveview Off. Press the OK button to highlight Setup Menu , then press the OK button. 3 Highlight the Video Out icon , then press the OK button. 53 IMPORTANT: Liveview significantly reduces battery life.
... you change the Liveview default to On: 1 Press the Menu button. 2 Press to a television or other external device using an optional Kodak EasyShare printer dock 6000 and an audio/video cable (see page 18). To change it on (in Auto Mode The Liveview feature lets you connect...43). 1 Press the Menu button. 2 Press to turn Liveview off and on whenever the camera is Liveview Off. Press the OK button to highlight Setup Menu , then press the OK button. 3 Highlight the Video Out icon , then press the OK button. 53 IMPORTANT: Liveview significantly reduces battery life.

User's Guide
Page 75
... power your camera alone. 63 Makes it easy to transfer pictures and videos to the camera. See www.kodak.com/go/cx6200accessories. Charges the included Kodak EasyShare Ni-MH rechargeable battery pack. (Install the battery pack in the camera for charging.) ! Camera Dock 6000 Package Contents 1 Camera dock 6000 (with your camera without the dock. 9 Using the Camera Dock 6000 The Kodak EasyShare camera dock...
... power your camera alone. 63 Makes it easy to transfer pictures and videos to the camera. See www.kodak.com/go/cx6200accessories. Charges the included Kodak EasyShare Ni-MH rechargeable battery pack. (Install the battery pack in the camera for charging.) ! Camera Dock 6000 Package Contents 1 Camera dock 6000 (with your camera without the dock. 9 Using the Camera Dock 6000 The Kodak EasyShare camera dock...

User's Guide
Page 78
... as illustrated. DO NOT FORCE IT. Chapter 9 Installing the Rechargeable Battery You received non-rechargeable batteries with the camera dock. 1 Open the battery door on the bottom of your camera dock 6000, replace the batteries with the Kodak EasyShare Ni-MH rechargeable battery pack that is not charged when you receive it and try again. See page 68 for...
... as illustrated. DO NOT FORCE IT. Chapter 9 Installing the Rechargeable Battery You received non-rechargeable batteries with the camera dock. 1 Open the battery door on the bottom of your camera dock 6000, replace the batteries with the Kodak EasyShare Ni-MH rechargeable battery pack that is not charged when you receive it and try again. See page 68 for...

User's Guide
Page 79
The Transfer light glows green when the camera is in the camera, the first battery charging light glows green. If a rechargeable battery is seated. NOTE: If the Kodak EasyShare Ni-MH rechargeable battery pack requires charging, charging begins (see page 68). 67 Foot Connector 3 Match the connector and alignment pins on the camera dock to the computer: Alignment pins...
The Transfer light glows green when the camera is in the camera, the first battery charging light glows green. If a rechargeable battery is seated. NOTE: If the Kodak EasyShare Ni-MH rechargeable battery pack requires charging, charging begins (see page 68). 67 Foot Connector 3 Match the connector and alignment pins on the camera dock to the computer: Alignment pins...

User's Guide
Page 80
... to extreme temperatures. If the battery requires charging, charging begins after a brief battery check. ! Rechargeable battery is not properly installed (see page 66). 68 Battery is not installed (see page 66). Chapter 9 Charging the Battery 1 Make sure the Kodak EasyShare Ni-MH rechargeable battery pack is fully charged. Battery is installed in the camera dock with the power on the...
... to extreme temperatures. If the battery requires charging, charging begins after a brief battery check. ! Rechargeable battery is not properly installed (see page 66). 68 Battery is not installed (see page 66). Chapter 9 Charging the Battery 1 Make sure the Kodak EasyShare Ni-MH rechargeable battery pack is fully charged. Battery is installed in the camera dock with the power on the...


