User Manual
Page 1
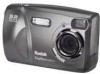
Kodak EasyShare CX4310 digital camera User's Guide Visit Kodak on the World Wide Web at www.kodak.com
Kodak EasyShare CX4310 digital camera User's Guide Visit Kodak on the World Wide Web at www.kodak.com

User Manual
Page 3
Camera Front 1 2 Product Overview 4 56 3 7a 7b ON OFF 1 Shutter button 2 Flash unit 3 On / Off switch 4 Self Timer light Camera Bottom 1 5 Viewfinder lens 6 Lens 7a USB connector 7b DC in connector 2 1 Camera Dock connector (door shown closed) 3 2 Tripod mount socket 3 Battery door i
Camera Front 1 2 Product Overview 4 56 3 7a 7b ON OFF 1 Shutter button 2 Flash unit 3 On / Off switch 4 Self Timer light Camera Bottom 1 5 Viewfinder lens 6 Lens 7a USB connector 7b DC in connector 2 1 Camera Dock connector (door shown closed) 3 2 Tripod mount socket 3 Battery door i

User Manual
Page 4
Camera Back Product Overview 12 3 45 6 7 8 9 10 11 12 13 1 Viewfinder 2 Ready light 3 LCD (Liquid Crystal Display) 4 Shutter button 5 4-way arrow / Zoom / OK buttons 6 Wrist strap post 7 Video out port 8 SD/MMC card door 9 Flash button 10 Share button 11 Delete button 12 Review button 13 Menu button ii
Camera Back Product Overview 12 3 45 6 7 8 9 10 11 12 13 1 Viewfinder 2 Ready light 3 LCD (Liquid Crystal Display) 4 Shutter button 5 4-way arrow / Zoom / OK buttons 6 Wrist strap post 7 Video out port 8 SD/MMC card door 9 Flash button 10 Share button 11 Delete button 12 Review button 13 Menu button ii

User Manual
Page 5
... This Guide in Large Print 1 Camera Package Contents 2 Attaching the Wrist Strap 3 Attaching the Lens Cap 3 Loading the Batteries 4 Turning the Camera On and Off 5 Using the 4-Way Arrow/Zoom/OK Button 5 Selecting a Language 6 Setting the Clock 7 Checking Camera Status 8 Inserting an SD/MMC ...Card 9 Choosing Internal Memory or SD/MMC Card 10 Camera Modes 11 Important Battery Information 12 2 Taking Pictures-Capture Mode 15 Take a Picture Anytime 15 ...
... This Guide in Large Print 1 Camera Package Contents 2 Attaching the Wrist Strap 3 Attaching the Lens Cap 3 Loading the Batteries 4 Turning the Camera On and Off 5 Using the 4-Way Arrow/Zoom/OK Button 5 Selecting a Language 6 Setting the Clock 7 Checking Camera Status 8 Inserting an SD/MMC ...Card 9 Choosing Internal Memory or SD/MMC Card 10 Camera Modes 11 Important Battery Information 12 2 Taking Pictures-Capture Mode 15 Take a Picture Anytime 15 ...
User Manual
Page 7
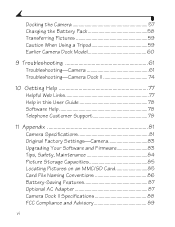
...the Print Quantity Default 42 Turning Off Quickview 43 Turning On Liveview 43 Setting Video Out 44 Formatting Memory or MMC/SD Card 45 Viewing Camera Information 46 6 Installing the Software 47 System Requirements 47 Install the Software 49 7 Connecting to the Computer 51 Important-Before You Connect 51...52 Printing Pictures from Your Computer 52 Printing from an SD/MMC Card 52 Print With or Without a Computer 52 8 Using the Optional Camera Dock II 53 Camera Dock Package Contents 53 Installing the Camera Insert 54 Connecting the Camera Dock 55 Installing the Battery Pack in the...
...the Print Quantity Default 42 Turning Off Quickview 43 Turning On Liveview 43 Setting Video Out 44 Formatting Memory or MMC/SD Card 45 Viewing Camera Information 46 6 Installing the Software 47 System Requirements 47 Install the Software 49 7 Connecting to the Computer 51 Important-Before You Connect 51...52 Printing Pictures from Your Computer 52 Printing from an SD/MMC Card 52 Print With or Without a Computer 52 8 Using the Optional Camera Dock II 53 Camera Dock Package Contents 53 Installing the Camera Insert 54 Connecting the Camera Dock 55 Installing the Battery Pack in the...
User Manual
Page 8
...Helpful Web Links 77 Help in this User Guide 78 Software Help 78 Telephone Customer Support 78 11 Appendix 81 Camera Specifications 81 Original Factory Settings-Camera 83 Upgrading Your Software and Firmware 83 Tips, Safety, Maintenance 84 Picture Storage Capacities 85 Locating Pictures on ...an MMC/SD Card 85 Card File Naming Conventions 86 Battery-Saving Features 87 Optional AC Adapter 87 Camera Dock II Specifications ...
...Helpful Web Links 77 Help in this User Guide 78 Software Help 78 Telephone Customer Support 78 11 Appendix 81 Camera Specifications 81 Original Factory Settings-Camera 83 Upgrading Your Software and Firmware 83 Tips, Safety, Maintenance 84 Picture Storage Capacities 85 Locating Pictures on ...an MMC/SD Card 85 Card File Naming Conventions 86 Battery-Saving Features 87 Optional AC Adapter 87 Camera Dock II Specifications ...

User Manual
Page 9
See Chapter 6, Installing the Software, or the Quick Start Guide for directions. For a large print version of this User's Guide: 1 Go to http://www.kodak.com/go/cx4310support. 2 Navigate to open the User's Guide. 4 On a Windows OS-based computer or Mac OS 8.6 or 9.x: ! From the File ... usual. 1 From the File menu, select Print. ! 1 Getting Started Install the Software First You must install the Kodak EasyShare software on your computer before you connect the camera to the computer or attempt to Page. Need This Guide in Large Print? In the Print window, select Fit to transfer...
See Chapter 6, Installing the Software, or the Quick Start Guide for directions. For a large print version of this User's Guide: 1 Go to http://www.kodak.com/go/cx4310support. 2 Navigate to open the User's Guide. 4 On a Windows OS-based computer or Mac OS 8.6 or 9.x: ! From the File ... usual. 1 From the File menu, select Print. ! 1 Getting Started Install the Software First You must install the Kodak EasyShare software on your computer before you connect the camera to the computer or attempt to Page. Need This Guide in Large Print? In the Print window, select Fit to transfer...
User Manual
Page 10
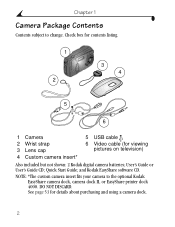
... purchasing and using a camera dock. 2 and Kodak EasyShare software CD. See page 53 for viewing pictures on television) Also included but not shown: 2 Kodak digital camera batteries; NOTE: *The custom camera insert fits your camera to change. User's Guide or User's Guide CD; Chapter 1 Camera Package Contents Contents subject to the optional Kodak EasyShare camera dock, camera dock II, or EasyShare printer dock 4000.
... purchasing and using a camera dock. 2 and Kodak EasyShare software CD. See page 53 for viewing pictures on television) Also included but not shown: 2 Kodak digital camera batteries; NOTE: *The custom camera insert fits your camera to change. User's Guide or User's Guide CD; Chapter 1 Camera Package Contents Contents subject to the optional Kodak EasyShare camera dock, camera dock II, or EasyShare printer dock 4000.
User Manual
Page 12
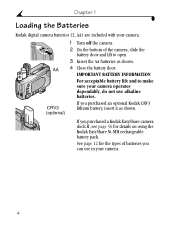
... to open. 3 Insert the AA batteries as shown. Chapter 1 Loading the Batteries Kodak digital camera batteries (2, AA) are included with your camera. 4 If you can use alkaline batteries. See page 12 for details on using the Kodak EasyShare Ni-MH rechargeable battery pack. If you purchased a Kodak EasyShare camera dock II, see page 56 for the types of the...
... to open. 3 Insert the AA batteries as shown. Chapter 1 Loading the Batteries Kodak digital camera batteries (2, AA) are included with your camera. 4 If you can use alkaline batteries. See page 12 for details on using the Kodak EasyShare Ni-MH rechargeable battery pack. If you purchased a Kodak EasyShare camera dock II, see page 56 for the types of the...

User Manual
Page 13
...press OK to scroll through your pictures. ON The ready light blinks green while the camera performs a self-check, then glows steady green when the camera is ready to the Off position. OFF 2 To turn off the camera, slide the On/Off switch to take pictures. Zoom-press to display the status ...bar. Check status-press to zoom in process. Chapter 1 Turning the Camera On and Off 1 Slide the On/Off switch to the On position. Navigate ...
...press OK to scroll through your pictures. ON The ready light blinks green while the camera performs a self-check, then glows steady green when the camera is ready to the Off position. OFF 2 To turn off the camera, slide the On/Off switch to take pictures. Zoom-press to display the status ...bar. Check status-press to zoom in process. Chapter 1 Turning the Camera On and Off 1 Slide the On/Off switch to the On position. Navigate ...
User Manual
Page 14
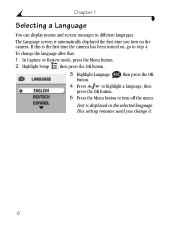
Chapter 1 Selecting a Language You can display menus and screen messages in the selected language. If this is the first time the camera has been turned on the camera. To change it. 6 Text is automatically displayed the first time you change the language after that: 1 In Capture or Review mode, press the Menu button...
Chapter 1 Selecting a Language You can display menus and screen messages in the selected language. If this is the first time the camera has been turned on the camera. To change it. 6 Text is automatically displayed the first time you change the language after that: 1 In Capture or Review mode, press the Menu button...

User Manual
Page 15
...is the first time the camera has been turned on the camera or if the battery is YYYY/MM/DD in a 24- hour format. 4 Press Press to step 4. Menu The date format is removed for details. 7 NOTE: Depending on your computer operating system, Kodak EasyShare software may allow your computer... to turn on , go to move through the fields. The setting remains until you connect the camera. To set the date and time after that: 1 In Capture or Review mode...
...is the first time the camera has been turned on the camera or if the battery is YYYY/MM/DD in a 24- hour format. 4 Press Press to step 4. Menu The date format is removed for details. 7 NOTE: Depending on your computer operating system, Kodak EasyShare software may allow your computer... to turn on , go to move through the fields. The setting remains until you connect the camera. To set the date and time after that: 1 In Capture or Review mode...
User Manual
Page 16
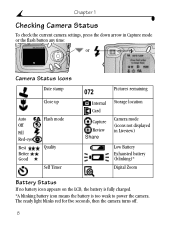
... Better Good Flash mode Quality Self Timer 072 Internal Card Capture Review Share Pictures remaining Storage location Camera mode (icons not displayed in Liveview) Low Battery Exhausted battery (blinking)* Digital Zoom Battery Status If no battery icon appears on the LCD, the battery is fully charged. ...*A blinking battery icon means the battery is too weak to power the camera. The ready light blinks red for five seconds, then the camera turns off. 8
... Better Good Flash mode Quality Self Timer 072 Internal Card Capture Review Share Pictures remaining Storage location Camera mode (icons not displayed in Liveview) Low Battery Exhausted battery (blinking)* Digital Zoom Battery Status If no battery icon appears on the LCD, the battery is fully charged. ...*A blinking battery icon means the battery is too weak to power the camera. The ready light blinks red for five seconds, then the camera turns off. 8

User Manual
Page 17
Do not insert or remove a card when the green ready light is partially ejected, pull it may damage the camera or card. When the card is blinking; Notched corner 1 Turn off the camera. 2 Open the card door. 3 Orient the card as shown. 4 Push the card into the slot to seat the ...connector. (To remove the card, push it in, then release it may damage your pictures, card, or camera. Purchase SD/MMC cards at a dealer of Kodak products or on our Web site at http://www.kodak.com/go/ cx4310accessories. 9 See page 85 for pictures. forcing it . it out.) 5 Close the door. Chapter...
Do not insert or remove a card when the green ready light is partially ejected, pull it may damage the camera or card. When the card is blinking; Notched corner 1 Turn off the camera. 2 Open the card door. 3 Orient the card as shown. 4 Push the card into the slot to seat the ...connector. (To remove the card, push it in, then release it may damage your pictures, card, or camera. Purchase SD/MMC cards at a dealer of Kodak products or on our Web site at http://www.kodak.com/go/ cx4310accessories. 9 See page 85 for pictures. forcing it . it out.) 5 Close the door. Chapter...
User Manual
Page 18
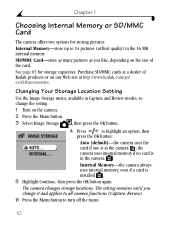
...5 Highlight Continue, then press the OK button again. The camera changes storage locations. the camera uses internal memory if no card is in the camera ; The setting remains until you like, depending on the size of Kodak products or on the camera. 2 Press the Menu button. 3 Select Image Storage ,...OK button. 4 Press to turn off the menu. 10 Purchase SD/MMC cards at http://www.kodak.com/go/ cx4310accessories. Chapter 1 Choosing Internal Memory or SD/MMC Card The camera offers two options for storage capacities. SD/MMC Card-store as many pictures as you change the setting...
...5 Highlight Continue, then press the OK button again. The camera changes storage locations. the camera uses internal memory if no card is in the camera ; The setting remains until you like, depending on the size of Kodak products or on the camera. 2 Press the Menu button. 3 Select Image Storage ,...OK button. 4 Press to turn off the menu. 10 Purchase SD/MMC cards at http://www.kodak.com/go/ cx4310accessories. Chapter 1 Choosing Internal Memory or SD/MMC Card The camera offers two options for storage capacities. SD/MMC Card-store as many pictures as you change the setting...
User Manual
Page 19
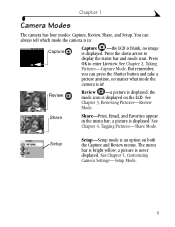
a picture is bright yellow; The menu bar is displayed. See Chapter 5, Customizing Camera Settings-Setup Mode. 11 See Chapter 2, Taking Pictures-Capture Mode. the mode icon is an option on the LCD. Setup Setup-Setup mode is displayed ... button and take a picture anytime, no image is in! Press the down arrow to enter Liveview. But remember, you can always tell which mode the camera is in the menu bar; Share Share-Print, Email, and Favorites appear in : Capture Capture -the LCD is blank, no matter what mode the...
a picture is bright yellow; The menu bar is displayed. See Chapter 5, Customizing Camera Settings-Setup Mode. 11 See Chapter 2, Taking Pictures-Capture Mode. the mode icon is an option on the LCD. Setup Setup-Setup mode is displayed ... button and take a picture anytime, no image is in! Press the down arrow to enter Liveview. But remember, you can always tell which mode the camera is in the menu bar; Share Share-Print, Email, and Favorites appear in : Capture Capture -the LCD is blank, no matter what mode the...
User Manual
Page 20
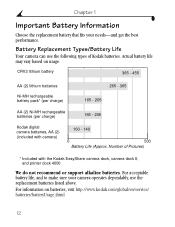
...Battery Life (Approx. Actual battery life may vary based on batteries, visit http://www.kodak.com/global/en/service/ batteries/batteryUsage.jhtml 12 Battery Replacement Types/Battery Life Your camera can use the replacement batteries listed above. CRV3 lithium battery 365 - 455 AA ...(per charge) 265 - 365 165 - 205 AA (2) Ni-MH rechargeable batteries (per charge) 165 - 205 Kodak digital camera batteries, AA (2) (included with the Kodak EasyShare camera dock, camera dock II, and printer dock 4000 We do not recommend or support alkaline batteries. For information on usage. For ...
...Battery Life (Approx. Actual battery life may vary based on batteries, visit http://www.kodak.com/global/en/service/ batteries/batteryUsage.jhtml 12 Battery Replacement Types/Battery Life Your camera can use the replacement batteries listed above. CRV3 lithium battery 365 - 455 AA ...(per charge) 265 - 365 165 - 205 AA (2) Ni-MH rechargeable batteries (per charge) 165 - 205 Kodak digital camera batteries, AA (2) (included with the Kodak EasyShare camera dock, camera dock II, and printer dock 4000 We do not recommend or support alkaline batteries. For information on usage. For ...
User Manual
Page 21
...) - Battery performance is also a battery charger for its included Kodak EasyShare Ni-MH rechargeable battery pack. ! Not all batteries perform well under these challenging conditions. ! Using Liveview (see page 52). Dirt on batteries. Do not allow batteries to power your camera (see page 27) - Digital cameras are demanding on the battery contacts can affect battery...
...) - Battery performance is also a battery charger for its included Kodak EasyShare Ni-MH rechargeable battery pack. ! Not all batteries perform well under these challenging conditions. ! Using Liveview (see page 52). Dirt on batteries. Do not allow batteries to power your camera (see page 27) - Digital cameras are demanding on the battery contacts can affect battery...
User Manual
Page 23
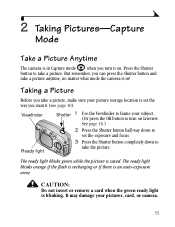
... the green ready light is in Capture mode when you turn on . Press the Shutter button to take a picture anytime, no matter what mode the camera is blinking. Viewfinder Ready light Shutter 1 Use the Viewfinder to frame your pictures, card, or...
... the green ready light is in Capture mode when you turn on . Press the Shutter button to take a picture anytime, no matter what mode the camera is blinking. Viewfinder Ready light Shutter 1 Use the Viewfinder to frame your pictures, card, or...

User Manual
Page 24
... on, see page 43. 16 use it is on whenever the camera is in the LCD. 4 Take the picture. 5 To turn off after one minute. Chapter 2 Liveview-Using the LCD to turn on Liveview, the LCD displays a ...
... on, see page 43. 16 use it is on whenever the camera is in the LCD. 4 Take the picture. 5 To turn off after one minute. Chapter 2 Liveview-Using the LCD to turn on Liveview, the LCD displays a ...


