

User's Guide
Page 4
Camera Back Product Overview 12 3 45 6 7 8 9 10 11 12 13 1 Viewfinder 2 Ready light 3 LCD (Liquid Crystal Display) 4 Shutter button 5 4-way arrow / Zoom / OK buttons 6 Wrist strap post 7 Video out port 8 MMC/SD card door 9 Flash button 10 Share button 11 Delete button 12 Review button 13 Menu button iv
Camera Back Product Overview 12 3 45 6 7 8 9 10 11 12 13 1 Viewfinder 2 Ready light 3 LCD (Liquid Crystal Display) 4 Shutter button 5 4-way arrow / Zoom / OK buttons 6 Wrist strap post 7 Video out port 8 MMC/SD card door 9 Flash button 10 Share button 11 Delete button 12 Review button 13 Menu button iv
User's Guide
Page 5
... KODAK EASYSHARE CX4300 Digital Camera 2 What Can I Do With My Digital Pictures 2 Camera Package Contents 3 Attaching the Wrist Strap 4 Attaching the Lens Cap 4 Loading the Batteries 5 Turning the Camera On... and Off 6 Using the 4-Way Arrow/Zoom/OK Button 6 Selecting a Language 7 Setting the Clock 8 Checking Camera... Status 9 Inserting an MMC/SD Card 10 Choosing Internal Memory or MMC/SD Card 11 Camera Modes 12 2 ...
... KODAK EASYSHARE CX4300 Digital Camera 2 What Can I Do With My Digital Pictures 2 Camera Package Contents 3 Attaching the Wrist Strap 4 Attaching the Lens Cap 4 Loading the Batteries 5 Turning the Camera On... and Off 6 Using the 4-Way Arrow/Zoom/OK Button 6 Selecting a Language 7 Setting the Clock 8 Checking Camera... Status 9 Inserting an MMC/SD Card 10 Choosing Internal Memory or MMC/SD Card 11 Camera Modes 12 2 ...
User's Guide
Page 6
Using the Flash 16 Using Digital Zoom 17 Changing Picture-Taking Options 18 3 Reviewing Pictures-Review Mode 25 To Enter Review Mode 25 To Access the Review Menus 26 Viewing Single Pictures 27 Viewing Multiple Pictures 27 Deleting Pictures 28 Magnifying Pictures 28 Protecting Pictures From Deletion 29 Running a Slide Show 29 ... My Pictures 35 To Access Share Mode/Menus 35 Tagging Pictures for Printing 36 Tagging Pictures for Emailing 37 Tagging Pictures as Favorites 38 5 Customizing Camera Settings-Setup Mode .......39 To Access Setup Mode/Menus 39 vi
Using the Flash 16 Using Digital Zoom 17 Changing Picture-Taking Options 18 3 Reviewing Pictures-Review Mode 25 To Enter Review Mode 25 To Access the Review Menus 26 Viewing Single Pictures 27 Viewing Multiple Pictures 27 Deleting Pictures 28 Magnifying Pictures 28 Protecting Pictures From Deletion 29 Running a Slide Show 29 ... My Pictures 35 To Access Share Mode/Menus 35 Tagging Pictures for Printing 36 Tagging Pictures for Emailing 37 Tagging Pictures as Favorites 38 5 Customizing Camera Settings-Setup Mode .......39 To Access Setup Mode/Menus 39 vi
User's Guide
Page 10
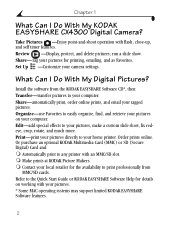
...Some MAC operating systems may support limited KODAK EASYSHARE Software features. 2 Refer to your computer. What Can I Do With My KODAK EASYSHARE CX4300 Digital Camera? m Make prints at KODAK Picture Makers. Chapter 1 What Can I Do With My Digital Pictures? Install the software from MMC/SD...printing, emailing, and as Favorites. Review -Display, protect, and delete pictures; Or purchase an optional KODAK Multimedia Card (MMC) or SD (Secure Digital) Card and: m Automatically print to print professionally from the KODAK EASYSHARE Software CD*, then: Transfer-transfer ...
...Some MAC operating systems may support limited KODAK EASYSHARE Software features. 2 Refer to your computer. What Can I Do With My KODAK EASYSHARE CX4300 Digital Camera? m Make prints at KODAK Picture Makers. Chapter 1 What Can I Do With My Digital Pictures? Install the software from MMC/SD...printing, emailing, and as Favorites. Review -Display, protect, and delete pictures; Or purchase an optional KODAK Multimedia Card (MMC) or SD (Secure Digital) Card and: m Automatically print to print professionally from the KODAK EASYSHARE Software CD*, then: Transfer-transfer ...

User's Guide
Page 14
ON The ready light blinks green while the camera performs a self-check, then glows steady green when the camera is ready to the Off position. OFF 2 To turn off the camera, slide the On/Off switch to take pictures. Using the 4-Way Arrow/Zoom/OK Button OK View ...28. 6 Check status-press to display multiple thumbnails. Navigate menus-press fields. Chapter 1 Turning the Camera On and Off 1 Slide the On/Off switch to magnify a picture in Review mode. The camera completes operations that are in or out when taking pictures. Zoom-press to scroll through your pictures....
ON The ready light blinks green while the camera performs a self-check, then glows steady green when the camera is ready to the Off position. OFF 2 To turn off the camera, slide the On/Off switch to take pictures. Using the 4-Way Arrow/Zoom/OK Button OK View ...28. 6 Check status-press to display multiple thumbnails. Navigate menus-press fields. Chapter 1 Turning the Camera On and Off 1 Slide the On/Off switch to magnify a picture in Review mode. The camera completes operations that are in or out when taking pictures. Zoom-press to scroll through your pictures....

User's Guide
Page 15
This setting remains until you turn off the menu. Text is the first time the camera has been turned on the camera. To change it. 7 If this is displayed in different languages. Chapter 1 Selecting a Language You can display menus and screen messages in... the selected language. The Language screen is automatically displayed the first time you change the language after that: 1 In Capture or Review mode, press...
This setting remains until you turn off the menu. Text is the first time the camera has been turned on the camera. To change it. 7 If this is displayed in different languages. Chapter 1 Selecting a Language You can display menus and screen messages in... the selected language. The Language screen is automatically displayed the first time you change the language after that: 1 In Capture or Review mode, press...
User's Guide
Page 16
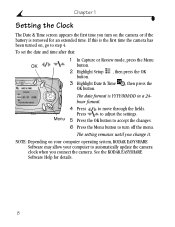
... Review mode, press the Menu OK button. 2 Highlight Setup , then press the OK button. 3 Highlight Date & Time , then press the OK button. The setting remains until you turn off the menu. Menu 4 Press Press to automatically update the camera clock when you connect the camera. See the KODAK EASYSHARE ... to accept the changes. 6 Press the Menu button to step 4. The date format is the first time the camera has been turned on your computer operating system, KODAK EASYSHARE Software may allow your computer to move through the fields. NOTE: Depending on , go to turn on the...
... Review mode, press the Menu OK button. 2 Highlight Setup , then press the OK button. 3 Highlight Date & Time , then press the OK button. The setting remains until you turn off the menu. Menu 4 Press Press to automatically update the camera clock when you connect the camera. See the KODAK EASYSHARE ... to accept the changes. 6 Press the Menu button to step 4. The date format is the first time the camera has been turned on your computer operating system, KODAK EASYSHARE Software may allow your computer to move through the fields. NOTE: Depending on , go to turn on the...
User's Guide
Page 17
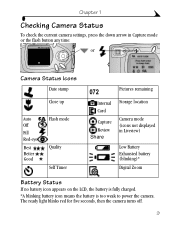
... Auto Off Fill Red-eye Best Better Good Flash mode Quality Self Timer 072 Internal Card Capture Review Share Pictures remaining Storage location Camera mode (icons not displayed in Liveview) Low Battery Exhausted battery (blinking)* Digital Zoom Battery Status If no battery icon appears on the LCD, the battery is fully charged. *A blinking...
... Auto Off Fill Red-eye Best Better Good Flash mode Quality Self Timer 072 Internal Card Capture Review Share Pictures remaining Storage location Camera mode (icons not displayed in Liveview) Low Battery Exhausted battery (blinking)* Digital Zoom Battery Status If no battery icon appears on the LCD, the battery is fully charged. *A blinking...

User's Guide
Page 19
... turn off the menu. 11 Changing Your Storage Location Setting Use the Image Storage menu, available in Capture and Review modes, to change it and applies to all camera functions (Capture, Review). 6 Press the Menu button to highlight an option, then press the OK button: Auto (default)-the...remains until you like, depending on the size of the card. The camera changes storage locations. the camera uses internal memory if no card is installed . 5 Highlight Continue, then press the OK button again. Purchase KODAK Multimedia Cards at Best quality) in the 16 MB internal memory. ...
... turn off the menu. 11 Changing Your Storage Location Setting Use the Image Storage menu, available in Capture and Review modes, to change it and applies to all camera functions (Capture, Review). 6 Press the Menu button to highlight an option, then press the OK button: Auto (default)-the...remains until you like, depending on the size of the card. The camera changes storage locations. the camera uses internal memory if no card is installed . 5 Highlight Continue, then press the OK button again. Purchase KODAK Multimedia Cards at Best quality) in the 16 MB internal memory. ...

User's Guide
Page 20
.... Press the down arrow to enter Liveview. a picture is displayed on both the Capture and Review menus. See Chapter 2, Taking Pictures-Capture Mode. See Chapter 5, Customizing Camera Settings-Setup Mode. 12 the mode icon is never displayed. Review Review -a picture is displayed. Share Share-Print, Email, and Favorites appear in ! See Chapter 4, Tagging Pictures...
.... Press the down arrow to enter Liveview. a picture is displayed on both the Capture and Review menus. See Chapter 2, Taking Pictures-Capture Mode. See Chapter 5, Customizing Camera Settings-Setup Mode. 12 the mode icon is never displayed. Review Review -a picture is displayed. Share Share-Print, Email, and Favorites appear in ! See Chapter 4, Tagging Pictures...
User's Guide
Page 23
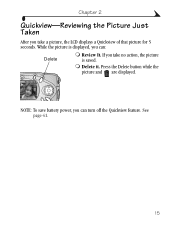
m Delete it. See page 41. 15 Chapter 2 Quickview-Reviewing the Picture Just Taken After you can : Delete m Review It. NOTE: To save battery power, you take no action, the picture is saved. Press the Delete button while the picture and are displayed. While the picture is displayed, you take a picture, the LCD displays a Quickview of that picture for 5 seconds. If you can turn off the Quickview feature.
m Delete it. See page 41. 15 Chapter 2 Quickview-Reviewing the Picture Just Taken After you can : Delete m Review It. NOTE: To save battery power, you take no action, the picture is saved. Press the Delete button while the picture and are displayed. While the picture is displayed, you take a picture, the LCD displays a Quickview of that picture for 5 seconds. If you can turn off the Quickview feature.
User's Guide
Page 26
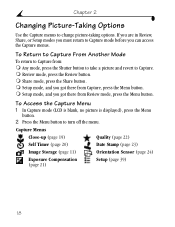
... : m Any mode, press the Shutter button to take a picture and revert to Capture. m Setup mode, and you got there from Review mode, press the Menu button. If you are in Review, Share, or Setup modes you must return to turn off the menu. Capture Menus Close-up (page 19) Quality (page 22...
... : m Any mode, press the Shutter button to take a picture and revert to Capture. m Setup mode, and you got there from Review mode, press the Menu button. If you are in Review, Share, or Setup modes you must return to turn off the menu. Capture Menus Close-up (page 19) Quality (page 22...

User's Guide
Page 32
NOTE: When your subject is displayed correct side up during Quickview and Review. You can turn it off so that pictures are displayed in the sky, on the ground, or when pointing down at small objects on as ...pictures of an object in their original orientation. This setting remains until you change it is above or below you rotate the camera to turn off the Orientation Sensor so that pictures are not rotated unnecessarily. 1 In Capture mode, press the Menu button. 2 Highlight Orientation , then press the...
NOTE: When your subject is displayed correct side up during Quickview and Review. You can turn it off so that pictures are displayed in the sky, on the ground, or when pointing down at small objects on as ...pictures of an object in their original orientation. This setting remains until you change it is above or below you rotate the camera to turn off the Orientation Sensor so that pictures are not rotated unnecessarily. 1 In Capture mode, press the Menu button. 2 Highlight Orientation , then press the...
User's Guide
Page 33
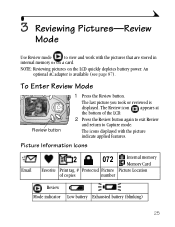
... page 87). Picture Information Icons 2 072 Internal memory Memory Card Email Favorite Print tag, # Protected Picture Picture Location of the LCD. 2 Press the Review button again to exit Review and return to view and work with the picture indicate applied features. The icons displayed with the pictures that are stored in internal...
... page 87). Picture Information Icons 2 072 Internal memory Memory Card Email Favorite Print tag, # Protected Picture Picture Location of the LCD. 2 Press the Review button again to exit Review and return to view and work with the picture indicate applied features. The icons displayed with the pictures that are stored in internal...

User's Guide
Page 34
Review Menus Magnify (page 28) Copy (page 32) Protect (page 29) Multi-up (page 27) Image Storage (page 11) Picture Information (page 33) Slide Show (page 29) Setup (page 39) 26 Chapter 3 To Access the Review Menus Use the Review menus to work with the pictures that are stored in internal memory or on a card. 1 Press the Review button. 2 Press the Menu button. 3 Press the Menu button to turn off the menus.
Review Menus Magnify (page 28) Copy (page 32) Protect (page 29) Multi-up (page 27) Image Storage (page 11) Picture Information (page 33) Slide Show (page 29) Setup (page 39) 26 Chapter 3 To Access the Review Menus Use the Review menus to work with the pictures that are stored in internal memory or on a card. 1 Press the Review button. 2 Press the Menu button. 3 Press the Menu button to turn off the menus.

User's Guide
Page 35
The camera displays the last picture that was taken or reviewed. 2 Press to display the previous or next row of the selected picture. Nine pictures (thumbnails) are displayed at once. 3 Navigate through the thumbnails one at.... 2 Press . Nine pictures (thumbnails) are displayed at a time. Viewing Multiple Pictures-Review Menu You can also view multiple pictures through the pictures. Review 3 Press to scroll backward or forward through the Review menu, Multi-up option. 1 Press the Review button, then press the Menu button. 2 Highlight Multi-up , then press the OK button. ...
The camera displays the last picture that was taken or reviewed. 2 Press to display the previous or next row of the selected picture. Nine pictures (thumbnails) are displayed at once. 3 Navigate through the thumbnails one at.... 2 Press . Nine pictures (thumbnails) are displayed at a time. Viewing Multiple Pictures-Review Menu You can also view multiple pictures through the pictures. Review 3 Press to scroll backward or forward through the Review menu, Multi-up option. 1 Press the Review button, then press the Menu button. 2 Highlight Multi-up , then press the OK button. ...

User's Guide
Page 36
Delete 2 Select a picture in single view or highlight a OK picture in multiple view, then press the Delete button. Review 3 Highlight an option, then press the OK button: PICTURE-deletes the displayed picture. remove protection before deleting (page 29). The... EXIT-exits the Delete screen. ALL-deletes all pictures from your current storage location. Chapter 3 Deleting Pictures 1 Press the Review button. Magnifying Pictures 1 Press the Review button, then press the OK button. NOTE: Protected pictures cannot be deleted; The Magnify icon and the magnification value are displayed...
Delete 2 Select a picture in single view or highlight a OK picture in multiple view, then press the Delete button. Review 3 Highlight an option, then press the OK button: PICTURE-deletes the displayed picture. remove protection before deleting (page 29). The... EXIT-exits the Delete screen. ALL-deletes all pictures from your current storage location. Chapter 3 Deleting Pictures 1 Press the Review button. Magnifying Pictures 1 Press the Review button, then press the OK button. NOTE: Protected pictures cannot be deleted; The Magnify icon and the magnification value are displayed...
User's Guide
Page 37
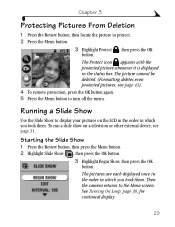
...on the LCD in the order in the status bar. Chapter 3 Protecting Pictures From Deletion 1 Press the Review button, then locate the picture to the Menu screen. Starting the Slide Show 1 Press the Review button, then press the Menu button. 2 Highlight Slide Show , then press the OK button. 3 ...Highlight Begin Show, then press the OK button. Then the camera returns to protect. 2 Press the Menu button. 3 Highlight Protect , then...
...on the LCD in the order in the status bar. Chapter 3 Protecting Pictures From Deletion 1 Press the Review button, then locate the picture to the Menu screen. Starting the Slide Show 1 Press the Review button, then press the Menu button. 2 Highlight Slide Show , then press the OK button. 3 ...Highlight Begin Show, then press the OK button. Then the camera returns to protect. 2 Press the Menu button. 3 Highlight Protect , then...

User's Guide
Page 39
... can now use the television screen to your pictures on video in setup.) The camera LCD turns off; NOTE: If you can run a slide show or display your television User's Guide for details on a television, computer monitor, or digital projector (any device equipped with a video input). NOTE: Ensure that you connect... slide show is correctly set to NTSC or PAL (see page 42). 1 Connect the video cable from the video out Video out port on the camera to the video in port on port the television. (Refer to review your pictures in single or multiple views, run a slide show , or do on the...
... can now use the television screen to your pictures on video in setup.) The camera LCD turns off; NOTE: If you can run a slide show or display your television User's Guide for details on a television, computer monitor, or digital projector (any device equipped with a video input). NOTE: Ensure that you connect... slide show is correctly set to NTSC or PAL (see page 42). 1 Connect the video cable from the video out Video out port on the camera to the video in port on port the television. (Refer to review your pictures in single or multiple views, run a slide show , or do on the...
User's Guide
Page 40
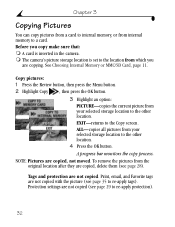
...11. Print, email, and Favorite tags are not copied (see page 28). NOTE: Pictures are not copied. m The camera's picture storage location is inserted in the camera. ALL-copies all pictures from your selected storage location to the other location. 4 Press the OK button. Protection settings are... internal memory to the Copy screen. Before you are copied, delete them (see page 29 to the other location. Copy pictures: 1 Press the Review button, then press the Menu button. 2 Highlight Copy , then press the OK button. 3 Highlight an option: PICTURE-copies the current picture from...
...11. Print, email, and Favorite tags are not copied (see page 28). NOTE: Pictures are not copied. m The camera's picture storage location is inserted in the camera. ALL-copies all pictures from your selected storage location to the other location. 4 Press the OK button. Protection settings are... internal memory to the Copy screen. Before you are copied, delete them (see page 29 to the other location. Copy pictures: 1 Press the Review button, then press the Menu button. 2 Highlight Copy , then press the OK button. 3 Highlight an option: PICTURE-copies the current picture from...


