Extended User Guide
Page 9
... your KODAK All-in -One Printer Home Center Software KODAK Home Center Software is connected to the Internet, then: 1. KODAK ESP C310 All-in -One Printer Software, unless you can use Home Center Software to: • scan • configure your printer • upgrade to the latest printer software ... browse, crop, enhance, and edit pictures • print and scan • configure your printer • upgrade to the latest printer software and firmware • order supplies • access the KODAK Tips and Projects Center • access this Extended User Guide On a computer with MAC OS)....
... your KODAK All-in -One Printer Home Center Software KODAK Home Center Software is connected to the Internet, then: 1. KODAK ESP C310 All-in -One Printer Software, unless you can use Home Center Software to: • scan • configure your printer • upgrade to the latest printer software ... browse, crop, enhance, and edit pictures • print and scan • configure your printer • upgrade to the latest printer software and firmware • order supplies • access the KODAK Tips and Projects Center • access this Extended User Guide On a computer with MAC OS)....
Extended User Guide
Page 11
... Start > Settings > Control Panel > Printers and Faxes. 2. Right-click your printer, and select Set as Default Printer. From the dock, open System Preferences. 2. KODAK ESP C310 All-in-One Printer Setting your printer as the default printer If you have more than one printer and your all-in -one printer is not the default printer, you connect your printer with a USB cable and...
... Start > Settings > Control Panel > Printers and Faxes. 2. Right-click your printer, and select Set as Default Printer. From the dock, open System Preferences. 2. KODAK ESP C310 All-in-One Printer Setting your printer as the default printer If you have more than one printer and your all-in -one printer is not the default printer, you connect your printer with a USB cable and...

Extended User Guide
Page 13
For example: If there are finished, select DONE, then press OK 6. When the confirmation message appears, press OK. www.kodak.com/go/aiosupport 7 Press to enter your network, select Rescan for available wireless networks within range. 5. NOTE: If the name of your network is turned ... your network in the bottom right of signal strength. Press OK after each character. On the control panel, press , , or to change your Security String. KODAK ESP C310 All-in-One Printer The Wi-Fi connectivity LED blinks as the printer searches for Wireless Networks, then press OK.
For example: If there are finished, select DONE, then press OK 6. When the confirmation message appears, press OK. www.kodak.com/go/aiosupport 7 Press to enter your network, select Rescan for available wireless networks within range. 5. NOTE: If the name of your network is turned ... your network in the bottom right of signal strength. Press OK after each character. On the control panel, press , , or to change your Security String. KODAK ESP C310 All-in-One Printer The Wi-Fi connectivity LED blinks as the printer searches for Wireless Networks, then press OK.
Extended User Guide
Page 15
... , or where to enter the generated PIN. b. c. a. c. Select one of two methods of the printer plus a number (for more information. www.kodak.com/go /aiodownloads. KODAK ESP C310 All-in -One Printer Software: a. Pressing a button Entering a PIN NOTE: You will have two minutes to install the software. Enter the PIN you received on -screen instructions to...
... , or where to enter the generated PIN. b. c. a. c. Select one of two methods of the printer plus a number (for more information. www.kodak.com/go /aiodownloads. KODAK ESP C310 All-in -One Printer Software: a. Pressing a button Entering a PIN NOTE: You will have two minutes to install the software. Enter the PIN you received on -screen instructions to...
Extended User Guide
Page 17
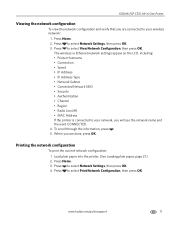
KODAK ESP C310 All-in-One Printer Viewing the network configuration To view the network configuration and verify that you are done, press OK. The wireless or Ethernet network settings appear on the LCD, including: • Printer Hostname • Connection • Speed • IP Address • IP Address ... connected to your network, you are connected to your wireless network: 1. Load plain paper into the printer. (See Loading plain paper, page 21.) 2. www.kodak.com/go/aiosupport 11 Press to select View Network Configuration, then press OK. Press Home. 2. Press to ...
KODAK ESP C310 All-in-One Printer Viewing the network configuration To view the network configuration and verify that you are done, press OK. The wireless or Ethernet network settings appear on the LCD, including: • Printer Hostname • Connection • Speed • IP Address • IP Address ... connected to your network, you are connected to your wireless network: 1. Load plain paper into the printer. (See Loading plain paper, page 21.) 2. www.kodak.com/go/aiosupport 11 Press to select View Network Configuration, then press OK. Press Home. 2. Press to ...
Extended User Guide
Page 18
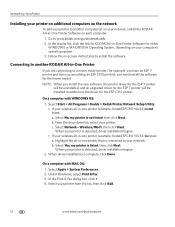
... computers on the network To add your printer to another KODAK All-in-One Printer If you are connecting to a newer model printer (for example, you have an ESP 7 printer and now you are adding an ESP C310 printer), you install the new software, the printer driver for the ESP 7 printer will be installed in -one printer that is detected, driver installation begins...
... computers on the network To add your printer to another KODAK All-in-One Printer If you are connecting to a newer model printer (for example, you have an ESP 7 printer and now you are adding an ESP C310 printer), you install the new software, the printer driver for the ESP 7 printer will be installed in -one printer that is detected, driver installation begins...
Extended User Guide
Page 19
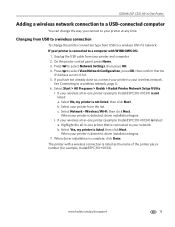
... Next. Unplug the USB cable from the list. On the printer control panel, press Home. 3. KODAK ESP C310 All-in-One Printer Adding a wireless network connection to a USB-connected computer You can change the printer connection type from USB to a wireless (Wi-Fi) network: If your printer is connected to your wireless network. When your wireless all...
... Next. Unplug the USB cable from the list. On the printer control panel, press Home. 3. KODAK ESP C310 All-in-One Printer Adding a wireless network connection to a USB-connected computer You can change the printer connection type from USB to a wireless (Wi-Fi) network: If your printer is connected to your wireless network. When your wireless all...

Extended User Guide
Page 23
This may take a few minutes. 8. KODAK ESP C310 All-in-One Printer Setting up Cloud Printing Registering your printer with a Google account to enable this feature. 1. You must register your printer with Google Cloud Print Your printer lets you have the latest version of Registering your Operating System, use the path below to select Cloud Printing Setup. - Make...
This may take a few minutes. 8. KODAK ESP C310 All-in-One Printer Setting up Cloud Printing Registering your printer with a Google account to enable this feature. 1. You must register your printer with Google Cloud Print Your printer lets you have the latest version of Registering your Operating System, use the path below to select Cloud Printing Setup. - Make...

Extended User Guide
Page 27
Move the paper-edge guides until they touch the paper. www.kodak.com/go/aiosupport 21 Make sure the left and far right positions, then insert the paper into the input tray. 3. Fan and stack the paper. 2. KODAK ESP C310 All-in the far left and right paper-edge guides are in -One Printer Loading plain paper The input tray capacity is 100 sheets of plain paper. To load plain paper: 1.
Move the paper-edge guides until they touch the paper. www.kodak.com/go/aiosupport 21 Make sure the left and far right positions, then insert the paper into the input tray. 3. Fan and stack the paper. 2. KODAK ESP C310 All-in the far left and right paper-edge guides are in -One Printer Loading plain paper The input tray capacity is 100 sheets of plain paper. To load plain paper: 1.
Extended User Guide
Page 29
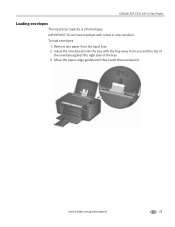
Move the paper-edge guides until they touch the envelope(s). www.kodak.com/go/aiosupport 23 Remove any paper from you and the top of the envelope against the right side of the tray. 3. Insert the envelope(s) into the tray with cutout or clear windows. IMPORTANT: Do not load envelopes with the flap away from the input tray. 2. KODAK ESP C310 All-in-One Printer Loading envelopes The input tray capacity is 20 envelopes. To load envelopes: 1.
Move the paper-edge guides until they touch the envelope(s). www.kodak.com/go/aiosupport 23 Remove any paper from you and the top of the envelope against the right side of the tray. 3. Insert the envelope(s) into the tray with cutout or clear windows. IMPORTANT: Do not load envelopes with the flap away from the input tray. 2. KODAK ESP C310 All-in-One Printer Loading envelopes The input tray capacity is 20 envelopes. To load envelopes: 1.

Extended User Guide
Page 30
...19) by rotating the paper manually as plain paper or two-sided photo paper. Click OK. 7. Press Start on the printer. 24 www.kodak.com/go/aiosupport Load paper into the input tray (top edge down and printed side away from the output tray, and follow...that can print two-sided documents on any size paper that KODAK ESP C310 Series AiO (or for a wireless connection, KodakESPC310+XXXX, where XXXX is a number) is on the back side). Open the document on your KODAK Printer. 4. When a message appears on your printer. Printing documents To print a document: 1. Select File >...
...19) by rotating the paper manually as plain paper or two-sided photo paper. Click OK. 7. Press Start on the printer. 24 www.kodak.com/go/aiosupport Load paper into the input tray (top edge down and printed side away from the output tray, and follow...that can print two-sided documents on any size paper that KODAK ESP C310 Series AiO (or for a wireless connection, KodakESPC310+XXXX, where XXXX is a number) is on the back side). Open the document on your KODAK Printer. 4. When a message appears on your printer. Printing documents To print a document: 1. Select File >...
Extended User Guide
Page 31
...Home. 2. Press to select a quantity, then press OK. 5. Select File > Print. 11. Press or to select a form. 4. KODAK ESP C310 All-in-One Printer Printing forms Printing two-sided documents from a computer with MAC OS To print two-sided documents from a computer with MAC OS: 1. Open the... document you ). 10. In the Print dialog box, make sure that Eastman Kodak Company KODAK ESP C310 AiO (or for a wireless connection, ...
...Home. 2. Press to select a quantity, then press OK. 5. Select File > Print. 11. Press or to select a form. 4. KODAK ESP C310 All-in-One Printer Printing forms Printing two-sided documents from a computer with MAC OS To print two-sided documents from a computer with MAC OS: 1. Open the... document you ). 10. In the Print dialog box, make sure that Eastman Kodak Company KODAK ESP C310 AiO (or for a wireless connection, ...

Extended User Guide
Page 33
...press OK. 6. Press or to select Find Photos, then press OK. 5. Finding pictures on a memory card Your printer can help you insert a memory card into the memory card slot on your printer, the pictures on the card appear on a memory card by Date menu, press to select Year, Month, or Day... (see Loading photo paper, page 22), and move the paper-edge guides until they touch the paper. To view these pictures, press OK. KODAK ESP C310 All-in-One Printer Viewing pictures on a memory card When you locate pictures on the LCD. Using default settings to print a picture To print a picture from a...
...press OK. 6. Press or to select Find Photos, then press OK. 5. Finding pictures on a memory card Your printer can help you insert a memory card into the memory card slot on your printer, the pictures on the card appear on a memory card by Date menu, press to select Year, Month, or Day... (see Loading photo paper, page 22), and move the paper-edge guides until they touch the paper. To view these pictures, press OK. KODAK ESP C310 All-in-One Printer Viewing pictures on a memory card When you locate pictures on the LCD. Using default settings to print a picture To print a picture from a...
Extended User Guide
Page 35
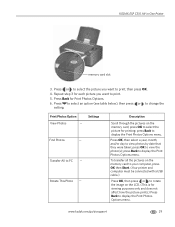
...Print Photos Options menu. Description Scroll through the pictures on the LCD. (This is for printing; www.kodak.com/go/aiosupport 29 Settings Find Photos -- press Back to change the setting. To transfer all the pictures... on the memory card to your computer, press OK then Start. (Your printer and computer must be connected with a USB cable.) Press OK, then press or to rotate the image on... for each picture you want to print, then press OK. 4. KODAK ESP C310 All-in-One Printer memory card slot 3. Print Photos Option View Photos --
...Print Photos Options menu. Description Scroll through the pictures on the LCD. (This is for printing; www.kodak.com/go/aiosupport 29 Settings Find Photos -- press Back to change the setting. To transfer all the pictures... on the memory card to your computer, press OK then Start. (Your printer and computer must be connected with a USB cable.) Press OK, then press or to rotate the image on... for each picture you want to print, then press OK. 4. KODAK ESP C310 All-in-One Printer memory card slot 3. Print Photos Option View Photos --
Extended User Guide
Page 37
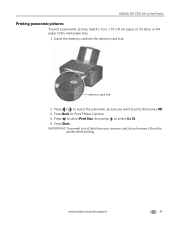
memory card slot 2. IMPORTANT: To prevent loss of data from your memory card, do not remove it from the printer while printing. Press or to select the panoramic picture you want to select 4 x 12. 5. Insert the memory card into the memory card slot. www.kodak.com/go/aiosupport 31 KODAK ESP C310 All-in-One Printer Printing panoramic pictures To print a panoramic picture, load 4 x 12 in. / 10 x 31 cm paper, or US letter or A4 paper in the main paper tray. 1. Press Back for Print Photos Options. 4. Press Start. Press to select Print Size, then press to print, then press OK. 3.
memory card slot 2. IMPORTANT: To prevent loss of data from your memory card, do not remove it from the printer while printing. Press or to select the panoramic picture you want to select 4 x 12. 5. Insert the memory card into the memory card slot. www.kodak.com/go/aiosupport 31 KODAK ESP C310 All-in-One Printer Printing panoramic pictures To print a panoramic picture, load 4 x 12 in. / 10 x 31 cm paper, or US letter or A4 paper in the main paper tray. 1. Press Back for Print Photos Options. 4. Press Start. Press to select Print Size, then press to print, then press OK. 3.

Extended User Guide
Page 39
... memory card into the memory card slot on your computer. 1. Press Start. 5. www.kodak.com/go/aiosupport 33 Press to select Transfer All to your computer. KODAK ESP C310 All-in-One Printer Transferring pictures to a computer You can transfer your image files from a memory card in the... printer to your computer with a USB cable. Follow the on-screen instructions on the printer. 2. NOTE: If you have large video...
... memory card into the memory card slot on your computer. 1. Press Start. 5. www.kodak.com/go/aiosupport 33 Press to select Transfer All to your computer. KODAK ESP C310 All-in-One Printer Transferring pictures to a computer You can transfer your image files from a memory card in the... printer to your computer with a USB cable. Follow the on-screen instructions on the printer. 2. NOTE: If you have large video...

Extended User Guide
Page 41
...8226; Web pages (URL must have an email address assigned by KODAK Email Print (see Registering your printer with Google Cloud Print, page 17), and your printer must end with KODAK Email Print Service, page 18). NOTE: If your printer has a photo paper tray, .jpg files attached to your device... device capable of the email. - Send the email to the main paper tray. Write your printer with .pdf, .doc, or .txt): - For the latest information on the URL address bar. - KODAK ESP C310 All-in-One Printer To print from a computer: Install the Chrome extension (plug in ) Web site.
...8226; Web pages (URL must have an email address assigned by KODAK Email Print (see Registering your printer with Google Cloud Print, page 17), and your printer must end with KODAK Email Print Service, page 18). NOTE: If your printer has a photo paper tray, .jpg files attached to your device... device capable of the email. - Send the email to the main paper tray. Write your printer with .pdf, .doc, or .txt): - For the latest information on the URL address bar. - KODAK ESP C310 All-in-One Printer To print from a computer: Install the Chrome extension (plug in ) Web site.
Extended User Guide
Page 43
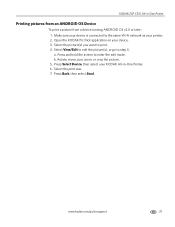
...hold the screen to step 5. Select View/Edit to edit the picture(s), or go /aiosupport 37 a. www.kodak.com/go to enter the edit mode. Make sure your KODAK All-in -One Printer Printing pictures from an ANDROID OS Device To print a picture from a device running ANDROID OS v2.0 or... later: 1. Press Select Device, then select your device is connected to print. 4. Press Back, then select Send. Select the print size. 7. KODAK ESP C310 All-in -One Printer. 6. Rotate, move, pan, zoom, or crop the picture. 5. b. Select the picture(s) you want to the same Wi-Fi network as your ...
...hold the screen to step 5. Select View/Edit to edit the picture(s), or go /aiosupport 37 a. www.kodak.com/go to enter the edit mode. Make sure your KODAK All-in -One Printer Printing pictures from an ANDROID OS Device To print a picture from a device running ANDROID OS v2.0 or... later: 1. Press Select Device, then select your device is connected to print. 4. Press Back, then select Send. Select the print size. 7. KODAK ESP C310 All-in -One Printer. 6. Rotate, move, pan, zoom, or crop the picture. 5. b. Select the picture(s) you want to the same Wi-Fi network as your ...

Extended User Guide
Page 45
...setting. The copy is the same size as the original. Reduces down in the right-front corner of the original size. Prints full color. KODAK ESP C310 All-in the paper tray, and automatically reduces or enlarges the original so that print. With Copy Document selected, press OK. 5. www...The number of copies that the copy fits on the scanner glass and the size of the original on the paper. Press Home. 4. The printer detects the size of the paper in -One Printer Adjusting the settings and copying a document To copy a document using settings other than the default settings: 1.
...setting. The copy is the same size as the original. Reduces down in the right-front corner of the original size. Prints full color. KODAK ESP C310 All-in the paper tray, and automatically reduces or enlarges the original so that print. With Copy Document selected, press OK. 5. www...The number of copies that the copy fits on the scanner glass and the size of the original on the paper. Press Home. 4. The printer detects the size of the paper in -One Printer Adjusting the settings and copying a document To copy a document using settings other than the default settings: 1.

Extended User Guide
Page 47
... to select Copy Size. 6. Lift the scanner lid, and place the document face down in -One Printer 2. With Copy Document selected, press OK. 5. Press Start to begin copying. Press Home. 4. www.kodak.com/go/aiosupport 41 KODAK ESP C310 All-in the right-front corner of the copy: 1. Press Start to select an enlargement or...
... to select Copy Size. 6. Lift the scanner lid, and place the document face down in -One Printer 2. With Copy Document selected, press OK. 5. Press Start to begin copying. Press Home. 4. www.kodak.com/go/aiosupport 41 KODAK ESP C310 All-in the right-front corner of the copy: 1. Press Start to select an enlargement or...


