User Manual
Page 4
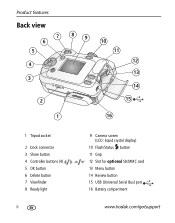
Product features Back view 7 6 5 4 3 2 1 89 10 11 12 13 14 15 16 1 Tripod socket 2 Dock connector 3 Share button 4 Controller buttons (4) 5 OK button 6 Delete button 7 Viewfinder 8 Ready light ii 9 Camera screen (LCD: liquid crystal display) 10 Flash/Status button 11 Grip 12 Slot for optional SD/MMC card 13 Menu button 14 Review button 15 USB (Universal Serial Bus) port 16 Battery compartment www.kodak.com/go/support
Product features Back view 7 6 5 4 3 2 1 89 10 11 12 13 14 15 16 1 Tripod socket 2 Dock connector 3 Share button 4 Controller buttons (4) 5 OK button 6 Delete button 7 Viewfinder 8 Ready light ii 9 Camera screen (LCD: liquid crystal display) 10 Flash/Status button 11 Grip 12 Slot for optional SD/MMC card 13 Menu button 14 Review button 15 USB (Universal Serial Bus) port 16 Battery compartment www.kodak.com/go/support
User Manual
Page 5
...Loading the batteries 1 Turning on the camera 2 Setting the date/time, first time 2 Setting the language and date/time, other times 3 Storing pictures on an SD or MMC card 3 2 Taking pictures and videos 4 Taking a picture 4 Using digital zoom 6 Using the flash 7 ...camera 18 Putting yourself in the picture or video 18 Running a slide show 19 Copying pictures and videos 20 Choosing a flash setting 22 Changing picture-taking settings 23 Customizing your camera 25 Viewing picture/video information 28 Pre-tagging for album names 28 Sharing your pictures 31 www.kodak.com/go/support...
...Loading the batteries 1 Turning on the camera 2 Setting the date/time, first time 2 Setting the language and date/time, other times 3 Storing pictures on an SD or MMC card 3 2 Taking pictures and videos 4 Taking a picture 4 Using digital zoom 6 Using the flash 7 ...camera 18 Putting yourself in the picture or video 18 Running a slide show 19 Copying pictures and videos 20 Choosing a flash setting 22 Changing picture-taking settings 23 Customizing your camera 25 Viewing picture/video information 28 Pre-tagging for album names 28 Sharing your pictures 31 www.kodak.com/go/support...

User Manual
Page 6
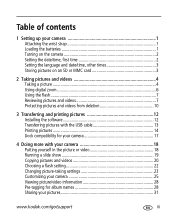
Table of contents 5 Troubleshooting 36 Camera problems 36 Camera/computer communications 40 LCD screen messages 41 Camera ready light status 44 6 Getting help 46 Helpful Web links 46 Software help 46 Telephone customer support 46 7 Appendix 49 Camera specifications 49 Storage capacities 52 Power-saving features 53 Important safety instructions 53 Battery information 55 Upgrading your software and firmware 56 Additional care and maintenance 56 Warranty...57 Regulatory compliance 59 iv www.kodak.com/go/support
Table of contents 5 Troubleshooting 36 Camera problems 36 Camera/computer communications 40 LCD screen messages 41 Camera ready light status 44 6 Getting help 46 Helpful Web links 46 Software help 46 Telephone customer support 46 7 Appendix 49 Camera specifications 49 Storage capacities 52 Power-saving features 53 Important safety instructions 53 Battery information 55 Upgrading your software and firmware 56 Additional care and maintenance 56 Warranty...57 Regulatory compliance 59 iv www.kodak.com/go/support

User Manual
Page 7
1 Setting up your camera Attaching the wrist strap Loading the batteries CRV3 lithium Ni-MH KAA2HR 2-AA lithium, Ni-MH, (non-rechargeable) (rechargeable) or oxy-alkaline AA For information on replacing batteries and extending battery life, see page 55. www.kodak.com/go/support 1
1 Setting up your camera Attaching the wrist strap Loading the batteries CRV3 lithium Ni-MH KAA2HR 2-AA lithium, Ni-MH, (non-rechargeable) (rechargeable) or oxy-alkaline AA For information on replacing batteries and extending battery life, see page 55. www.kodak.com/go/support 1

User Manual
Page 8
OK to change. for previous/next field. to accept. 2 www.kodak.com/go/support Setting up your camera Turning on the camera Setting the date/time, first time At the prompt, press OK.
OK to change. for previous/next field. to accept. 2 www.kodak.com/go/support Setting up your camera Turning on the camera Setting the date/time, first time At the prompt, press OK.

User Manual
Page 9
Storing pictures on an SD or MMC card Your camera has 16 MB of Kodak products or www.kodak.com/go/c310accessories or www.kodak.com/go/cd40accessories www.kodak.com/go/support 3 forcing it in this camera before taking pictures (see page 27). OK to change. If setting the date/time: to accept....damage. You can only be inserted one way; for the first time, format it may damage pictures, card, or camera. NOTE: We recommend Kodak SD and MMC cards. Setting up your camera Setting the language and date/time, other times 1 Press Menu. 2 to highlight Setup Menu then press OK. 3...
Storing pictures on an SD or MMC card Your camera has 16 MB of Kodak products or www.kodak.com/go/c310accessories or www.kodak.com/go/cd40accessories www.kodak.com/go/support 3 forcing it in this camera before taking pictures (see page 27). OK to change. If setting the date/time: to accept....damage. You can only be inserted one way; for the first time, format it may damage pictures, card, or camera. NOTE: We recommend Kodak SD and MMC cards. Setting up your camera Setting the language and date/time, other times 1 Press Menu. 2 to highlight Setup Menu then press OK. 3...

User Manual
Page 10
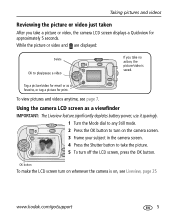
The camera does not record audio. Ready light 4 When the Ready light blinks green, the picture is being saved; Taking a video 1 Turn on camera. 2 Frame your subject in the viewfinder or LCD screen. 3 Press the Shutter button to take pictures. you can still take the picture. 2 Taking pictures and videos Taking a picture 1 Turn on camera. 2 Frame your subject in the viewfinder or LCD screen. 3 Press the Shutter button down and release, or press and hold for more than 2 seconds. To stop recording, press the Shutter button again. 4 www.kodak.com/go/support
The camera does not record audio. Ready light 4 When the Ready light blinks green, the picture is being saved; Taking a video 1 Turn on camera. 2 Frame your subject in the viewfinder or LCD screen. 3 Press the Shutter button to take pictures. you can still take the picture. 2 Taking pictures and videos Taking a picture 1 Turn on camera. 2 Frame your subject in the viewfinder or LCD screen. 3 Press the Shutter button down and release, or press and hold for more than 2 seconds. To stop recording, press the Shutter button again. 4 www.kodak.com/go/support
User Manual
Page 11
... OK button to turn on the camera screen. 3 Frame your subject in the camera screen. 4 Press the Shutter button to play/pause a video If you take a picture or video, the camera LCD screen displays a Quickview for...picture or video and are displayed: Delete OK to take the picture. 5 To turn on whenever the camera is saved. Tag a picture/video for print. OK button To make the LCD screen turn off the...video just taken After you take no action, the picture/video is on, see page 7. Using the camera LCD screen as a favorite, or tag a picture for email or as a viewfinder IMPORTANT: The ...
... OK button to turn on the camera screen. 3 Frame your subject in the camera screen. 4 Press the Shutter button to play/pause a video If you take a picture or video, the camera LCD screen displays a Quickview for...picture or video and are displayed: Delete OK to take the picture. 5 To turn on whenever the camera is saved. Tag a picture/video for print. OK button To make the LCD screen turn off the...video just taken After you take no action, the picture/video is on, see page 7. Using the camera LCD screen as a favorite, or tag a picture for email or as a viewfinder IMPORTANT: The ...

User Manual
Page 12
...Zoom: Telephoto Wide Flash Picture quality Pictures/video time remaining Image storage location Mode description Low battery Capture mode Exposure compensation Using digital zoom Use digital zoom in and out. 3 Press the Shutter button to take the picture. Zoom indicator To turn on the LCD screen,... then press to turn off digital zoom, from the lowest setting, press . The blue slider on . (See page 25.) 6 www.kodak.com/go/support IMPORTANT: You may notice a decrease in . NOTE: You cannot use digital zoom for an acceptable 4 x 6 in. (10 x 15 cm...
...Zoom: Telephoto Wide Flash Picture quality Pictures/video time remaining Image storage location Mode description Low battery Capture mode Exposure compensation Using digital zoom Use digital zoom in and out. 3 Press the Shutter button to take the picture. Zoom indicator To turn on the LCD screen,... then press to turn off digital zoom, from the lowest setting, press . The blue slider on . (See page 25.) 6 www.kodak.com/go/support IMPORTANT: You may notice a decrease in . NOTE: You cannot use digital zoom for an acceptable 4 x 6 in. (10 x 15 cm...

User Manual
Page 13
...) Next picture/video (during playback) 2 (previous/next) 1 Review (Press again to exit) To save battery power, use the optional Kodak EasyShare camera or printer dock. (See www.kodak.com/go/c310accessories or www.kodak.com/go /support 7 Press the button repeatedly to view and work with a black bar at the top of the screen. The active...
...) Next picture/video (during playback) 2 (previous/next) 1 Review (Press again to exit) To save battery power, use the optional Kodak EasyShare camera or printer dock. (See www.kodak.com/go/c310accessories or www.kodak.com/go /support 7 Press the button repeatedly to view and work with a black bar at the top of the screen. The active...
User Manual
Page 14
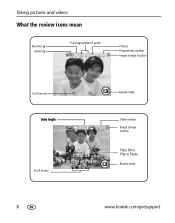
Taking pictures and videos What the review icons mean Favorite tag Email tag Print tag/number of prints Protect Picture/video number Image storage location Scroll arrows Video length Scroll arrows 8 Review mode Video number Image storage location Press OK to Play or Pause Review mode www.kodak.com/go/support
Taking pictures and videos What the review icons mean Favorite tag Email tag Print tag/number of prints Protect Picture/video number Image storage location Scroll arrows Video length Scroll arrows 8 Review mode Video number Image storage location Press OK to Play or Pause Review mode www.kodak.com/go/support
User Manual
Page 16
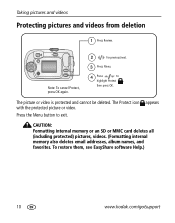
To restore them, see EasyShare software Help.) 10 www.kodak.com/go/support Press the Menu button to highlight Protect , then press OK. The picture or video is protected and cannot be deleted. appears CAUTION: Formatting internal memory ...
To restore them, see EasyShare software Help.) 10 www.kodak.com/go/support Press the Menu button to highlight Protect , then press OK. The picture or video is protected and cannot be deleted. appears CAUTION: Formatting internal memory ...
User Manual
Page 17
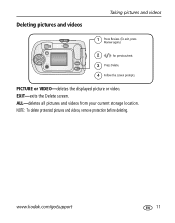
NOTE: To delete protected pictures and videos, remove protection before deleting. PICTURE or VIDEO-deletes the displayed picture or video. www.kodak.com/go/support 11 ALL-deletes all pictures and videos from your current storage location. EXIT-exits the Delete screen. Deleting pictures and videos Taking pictures and videos 1 Press Review. (To exit, press Review again.) 2 for previous/next. 3 Press Delete. 4 Follow the screen prompts.
NOTE: To delete protected pictures and videos, remove protection before deleting. PICTURE or VIDEO-deletes the displayed picture or video. www.kodak.com/go/support 11 ALL-deletes all pictures and videos from your current storage location. EXIT-exits the Delete screen. Deleting pictures and videos Taking pictures and videos 1 Press Review. (To exit, press Review again.) 2 for previous/next. 3 Press Delete. 4 Follow the screen prompts.

User Manual
Page 18
... the applications you turned off anti-virus software, turn it back on your computer (including anti-virus software). 2 Place the Kodak EasyShare software CD into the CD-ROM drive. 3 Load the software: Windows OS-if the install window does not appear, choose ...computer. 3 Transferring and printing pictures Installing the software CAUTION: Install Kodak EasyShare software before connecting the camera or optional dock to automatically install the most commonly used applications. To register later, visit www.kodak.com/go /support Windows OS-select Complete to the computer. See the anti-virus ...
... the applications you turned off anti-virus software, turn it back on your computer (including anti-virus software). 2 Place the Kodak EasyShare software CD into the CD-ROM drive. 3 Load the software: Windows OS-if the install window does not appear, choose ...computer. 3 Transferring and printing pictures Installing the software CAUTION: Install Kodak EasyShare software before connecting the camera or optional dock to automatically install the most commonly used applications. To register later, visit www.kodak.com/go /support Windows OS-select Complete to the computer. See the anti-virus ...

User Manual
Page 19
... the transfer process. Also available for an online tutorial on your computer. I Kodak EasyShare camera dock, Kodak EasyShare printer dock (see page 17) I Kodak multi-card reader, Kodak SD multimedia card reader-writer Purchase these Kodak products to transfer your pictures and videos. See your computer user's guide for ... end of the USB cable into the labeled USB port on connecting. Kodak EasyShare software opens on the camera. Transferring and printing pictures Transferring pictures with the USB cable 1 Turn off the camera. 2 Plug the labeled end of the USB cable (model U-8) into...
... the transfer process. Also available for an online tutorial on your computer. I Kodak EasyShare camera dock, Kodak EasyShare printer dock (see page 17) I Kodak multi-card reader, Kodak SD multimedia card reader-writer Purchase these Kodak products to transfer your pictures and videos. See your computer user's guide for ... end of the USB cable into the labeled USB port on connecting. Kodak EasyShare software opens on the camera. Transferring and printing pictures Transferring pictures with the USB cable 1 Turn off the camera. 2 Plug the labeled end of the USB cable (model U-8) into...

User Manual
Page 20
... or www.kodak.com/go/c310accessories or www.kodak.com/go /support Transferring and printing pictures Printing pictures Printing with a Kodak EasyShare printer dock Dock your printer user guide or www.kodak.com/go/c310accessories or www.kodak.com/go/cd40accessories for details.) 14 www.kodak.com/go /cd40accessories Direct printing with a PictBridge enabled printer Your camera is compatible...
... or www.kodak.com/go/c310accessories or www.kodak.com/go /support Transferring and printing pictures Printing pictures Printing with a Kodak EasyShare printer dock Dock your printer user guide or www.kodak.com/go/c310accessories or www.kodak.com/go/cd40accessories for details.) 14 www.kodak.com/go /cd40accessories Direct printing with a PictBridge enabled printer Your camera is compatible...

User Manual
Page 21
...Choose the number of paper. Index Print Print thumbnails of copies. Transferring and printing pictures Printing from a PictBridge enabled printer 1 Turn on the camera. If the printer is displayed. This option requires one or more sheets of copies. NOTE: During direct printing, pictures are found, a message... displayed.) If the menu interface turns off, press any button to redisplay it. 2 Press to the computer or printer. www.kodak.com/go/support 15 Turn on the printer. Choose the number of all pictures in internal memory, on a card, or in Favorites. To ...
...Choose the number of paper. Index Print Print thumbnails of copies. Transferring and printing pictures Printing from a PictBridge enabled printer 1 Turn on the camera. If the printer is displayed. This option requires one or more sheets of copies. NOTE: During direct printing, pictures are found, a message... displayed.) If the menu interface turns off, press any button to redisplay it. 2 Press to the computer or printer. www.kodak.com/go/support 15 Turn on the printer. Choose the number of all pictures in internal memory, on a card, or in Favorites. To ...

User Manual
Page 22
...for details. Ordering prints online Kodak EasyShare Gallery (www.kodakgallery.com) is not PictBridge enabled For details on printing pictures from your printer user's guide for professional printing. 16 www.kodak.com/go/support Printing from the camera and the printer. Transferring ...and printing pictures Disconnecting the camera from a PictBridge enabled printer 1 Turn off the camera and printer. 2 Disconnect the USB cable from an ...
...for details. Ordering prints online Kodak EasyShare Gallery (www.kodakgallery.com) is not PictBridge enabled For details on printing pictures from your printer user's guide for professional printing. 16 www.kodak.com/go/support Printing from the camera and the printer. Transferring ...and printing pictures Disconnecting the camera from a PictBridge enabled printer 1 Turn off the camera and printer. 2 Disconnect the USB cable from an ...

User Manual
Page 23
... Dock compatibility for your camera Kodak EasyShare dock I printer dock I printer dock plus I printer dock 6000 I camera dock 6000 Docking configuration Custom dock insert Kodak dock adapter kit D-22 Dock I others, including series 3 printer docks and camera docks Custom dock insert Dock I printer dock 4000 I camera dock II I LS420, LS443 camera dock Not compatible Purchase camera docks, printer docks...
... Dock compatibility for your camera Kodak EasyShare dock I printer dock I printer dock plus I printer dock 6000 I camera dock 6000 Docking configuration Custom dock insert Kodak dock adapter kit D-22 Dock I others, including series 3 printer docks and camera docks Custom dock insert Dock I printer dock 4000 I camera dock II I LS420, LS443 camera dock Not compatible Purchase camera docks, printer docks...

User Manual
Page 24
... is taken. NOTE: The video stops when you take the picture, record the video, or turn off the camera. 4 Doing more with your camera Putting yourself in the picture or video The Self Timer creates a 10- or 2-second delay between the time ...you are in the status area. 5 Place the camera on a flat surface or use a tripod. 6 Compose the scene. If the Self Timer is set at 10 seconds, the Self... Self Timer cancels after you press the Shutter button or when no storage space remains. 18 www.kodak.com/go/support
... is taken. NOTE: The video stops when you take the picture, record the video, or turn off the camera. 4 Doing more with your camera Putting yourself in the picture or video The Self Timer creates a 10- or 2-second delay between the time ...you are in the status area. 5 Place the camera on a flat surface or use a tripod. 6 Compose the scene. If the Self Timer is set at 10 seconds, the Self... Self Timer cancels after you press the Shutter button or when no storage space remains. 18 www.kodak.com/go/support


