
Extended user guide
Page 4
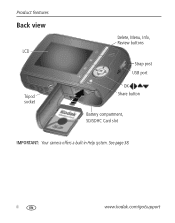
See page 38. ii www.kodak.com/go/support Product features Back view LCD Tripod socket Delete, Menu, Info, Review buttons Strap post USB port OK Share button Battery compartment, SD/SDHC Card slot IMPORTANT: Your camera offers a built-in Help system.
See page 38. ii www.kodak.com/go/support Product features Back view LCD Tripod socket Delete, Menu, Info, Review buttons Strap post USB port OK Share button Battery compartment, SD/SDHC Card slot IMPORTANT: Your camera offers a built-in Help system.
Extended user guide
Page 5
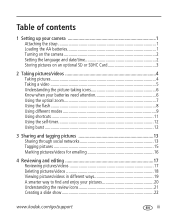
... the strap 1 Loading the AA batteries 1 Turning on the camera 2 Setting the language and date/time 2 Storing pictures on an optional SD or SDHC Card 3 2 Taking pictures/videos 4 Taking pictures 4 Taking a video 5 Understanding the picture-... 12 Using burst 12 3 Sharing and tagging pictures 13 Sharing through social networks 13 Tagging pictures 15 Marking pictures/videos for emailing 16 4 Reviewing and editing 17 Reviewing pictures/videos 17 Deleting pictures/videos 18 Viewing pictures/videos in different ways 19 A smarter way to find and enjoy your pictures 20 Understanding...
... the strap 1 Loading the AA batteries 1 Turning on the camera 2 Setting the language and date/time 2 Storing pictures on an optional SD or SDHC Card 3 2 Taking pictures/videos 4 Taking pictures 4 Taking a video 5 Understanding the picture-... 12 Using burst 12 3 Sharing and tagging pictures 13 Sharing through social networks 13 Tagging pictures 15 Marking pictures/videos for emailing 16 4 Reviewing and editing 17 Reviewing pictures/videos 17 Deleting pictures/videos 18 Viewing pictures/videos in different ways 19 A smarter way to find and enjoy your pictures 20 Understanding...
Extended user guide
Page 6
...review 24 Cropping pictures 24 Rotating pictures 25 Editing videos 26 Selecting multiple pictures/videos 27 Copying pictures/videos 27 5 Doing more with your camera... 28 Using the menu button to change settings 28 Using the Setup menu 32 6 Transferring, printing pictures 34 Download software, transferring pictures 34 Printing pictures 35 Marking your pictures for printing 37 7 Troubleshooting 38 Getting help from your camera... 38 Troubleshooting 39 Getting help on the Web 43 8 Appendix 44 Camera specifications 44 Care and maintenance 46...
...review 24 Cropping pictures 24 Rotating pictures 25 Editing videos 26 Selecting multiple pictures/videos 27 Copying pictures/videos 27 5 Doing more with your camera... 28 Using the menu button to change settings 28 Using the Setup menu 32 6 Transferring, printing pictures 34 Download software, transferring pictures 34 Printing pictures 35 Marking your pictures for printing 37 7 Troubleshooting 38 Getting help from your camera... 38 Troubleshooting 39 Getting help on the Web 43 8 Appendix 44 Camera specifications 44 Care and maintenance 46...
Extended user guide
Page 11
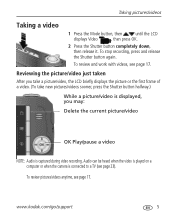
... Play/pause a video NOTE: Audio is connected to a TV (see page 23). To stop recording, press and release the Shutter button again. To review pictures/videos anytime, see page 17. Taking pictures/videos Taking a video 1 Press the Mode button, then until the LCD displays Video , then press ...OK. 2 Press the Shutter button completely down, then release it. www.kodak.com/go/support 5 Audio can be heard when the video is played on a computer or when the camera is captured during video recording. To review and work with videos, see page 17.
... Play/pause a video NOTE: Audio is connected to a TV (see page 23). To stop recording, press and release the Shutter button again. To review pictures/videos anytime, see page 17. Taking pictures/videos Taking a video 1 Press the Mode button, then until the LCD displays Video , then press ...OK. 2 Press the Shutter button completely down, then release it. www.kodak.com/go/support 5 Audio can be heard when the video is played on a computer or when the camera is captured during video recording. To review and work with videos, see page 17.
Extended user guide
Page 17
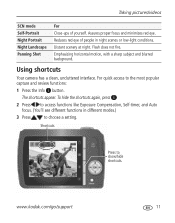
The shortcuts appear. Distant scenery at night. For quick access to show/hide shortcuts. www.kodak.com/go/support 11 Reduces red eye of yourself. Emphasizing horizontal motion, with a sharp subject and blurred background. To hide the shortcuts again...functions in night scenes or low-light conditions. Assures proper focus and minimizes red eye. Using shortcuts Your camera has a clean, uncluttered interface. Shortcuts Press to the most popular capture and review functions: 1 Press the Info button. Flash does not fire. Taking pictures/videos SCN mode Self-Portrait...
The shortcuts appear. Distant scenery at night. For quick access to show/hide shortcuts. www.kodak.com/go/support 11 Reduces red eye of yourself. Emphasizing horizontal motion, with a sharp subject and blurred background. To hide the shortcuts again...functions in night scenes or low-light conditions. Assures proper focus and minimizes red eye. Using shortcuts Your camera has a clean, uncluttered interface. Shortcuts Press to the most popular capture and review functions: 1 Press the Info button. Flash does not fire. Taking pictures/videos SCN mode Self-Portrait...

Extended user guide
Page 19
... picture. If it's your first time, a Help screen appears. 3 Press to the networking site(s) that you need to download KODAK Software. (See page 34.) 1 Press the Review button, then to share pictures on your computer, it will be sent to choose a social networking site, then press OK. www....kodak.com/go/support 13 The picture is displayed with the Share icon. Find a picture, then press and hold the Share button for about 1 second. When you chose. The camera...
... picture. If it's your first time, a Help screen appears. 3 Press to the networking site(s) that you need to download KODAK Software. (See page 34.) 1 Press the Review button, then to share pictures on your computer, it will be sent to choose a social networking site, then press OK. www....kodak.com/go/support 13 The picture is displayed with the Share icon. Find a picture, then press and hold the Share button for about 1 second. When you chose. The camera...
Extended user guide
Page 20
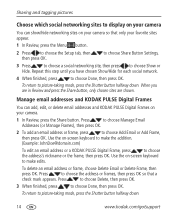
Sharing and tagging pictures Choose which social networking sites to display on your camera You can add, edit, or delete email addresses and KODAK PULSE Digital Frames on your camera so that a check mark appears. When you have chosen Show/Hide for each social network. 4 When finished, press to picture-... choose Done, then press OK. Use the on -screen keyboard to choose the address or frames, then press OK so that only your camera. 1 In Review, press the Share button. Press to make edits. Press to choose Delete, then press OK. 3 When finished, press to choose Add ...
Sharing and tagging pictures Choose which social networking sites to display on your camera You can add, edit, or delete email addresses and KODAK PULSE Digital Frames on your camera so that a check mark appears. When you have chosen Show/Hide for each social network. 4 When finished, press to picture-... choose Done, then press OK. Use the on -screen keyboard to choose the address or frames, then press OK so that only your camera. 1 In Review, press the Share button. Press to make edits. Press to choose Delete, then press OK. 3 When finished, press to choose Add ...

Extended user guide
Page 21
... can tag pictures with a keyword to make them easy to find, later. 1 Press the Review button, then to find a picture to tag. 2 Press the Menu button. When finished, press to choose OK, then press OK. www.kodak.com/go/support 15 Using the keyboard The keyboard appears when you need to add...
... can tag pictures with a keyword to make them easy to find, later. 1 Press the Review button, then to find a picture to tag. 2 Press the Menu button. When finished, press to choose OK, then press OK. www.kodak.com/go/support 15 Using the keyboard The keyboard appears when you need to add...

Extended user guide
Page 22
...Email, then press OK. 4 Press to more than one address, repeat step 4. IMPORTANT: Your camera offers a built-in Help system. Press to find an email address, then press OK. See page 38. 16 www.kodak.com/go/support To mark other pictures/videos with the same address, press , then press OK.... First, create a new email address. (See Using the keyboard, page 15.) 1 Press the Review button. When you to send the pictures/videos. To return...
...Email, then press OK. 4 Press to more than one address, repeat step 4. IMPORTANT: Your camera offers a built-in Help system. Press to find an email address, then press OK. See page 38. 16 www.kodak.com/go/support To mark other pictures/videos with the same address, press , then press OK.... First, create a new email address. (See Using the keyboard, page 15.) 1 Press the Review button. When you to send the pictures/videos. To return...
Extended user guide
Page 23
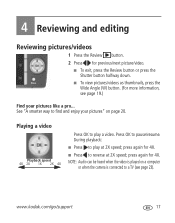
...; Press to play a video. NOTE: Audio can be heard when the video is connected to reverse at 2X speed; press again for 4X. www.kodak.com/go/support 17 press again for 4X. ■ Press to a TV (see page 19.) Find your pictures" on a computer or when the... camera is played on page 20. Press OK to play at 2X speed; See "A smarter way to find and enjoy your pictures like a pro... 4 Reviewing and editing Reviewing pictures/videos 1 Press the Review button. 2 Press for previous/next picture/video. ■ To ...
...; Press to play a video. NOTE: Audio can be heard when the video is connected to reverse at 2X speed; press again for 4X. www.kodak.com/go/support 17 press again for 4X. ■ Press to a TV (see page 19.) Find your pictures" on a computer or when the... camera is played on page 20. Press OK to play at 2X speed; See "A smarter way to find and enjoy your pictures like a pro... 4 Reviewing and editing Reviewing pictures/videos 1 Press the Review button. 2 Press for previous/next picture/video. ■ To ...
Extended user guide
Page 24
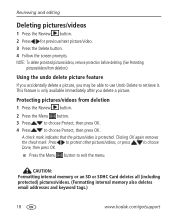
... or SDHC Card deletes all (including protected) pictures/videos. (Formatting internal memory also deletes email addresses and keyword tags.) 18 www.kodak.com/go/support This feature is protected. Press to protect other pictures/videos, or press to choose Done, then press OK. &#... 4 Follow the screen prompts. NOTE: To delete protected pictures/videos, remove protection before deleting. (See Protecting pictures/videos from deletion 1 Press the Review button. 2 Press the Menu button. 3 Press to choose Protect, then press OK. 4 Press to exit the menu. Protecting pictures/videos from...
... or SDHC Card deletes all (including protected) pictures/videos. (Formatting internal memory also deletes email addresses and keyword tags.) 18 www.kodak.com/go/support This feature is protected. Press to protect other pictures/videos, or press to choose Done, then press OK. &#... 4 Follow the screen prompts. NOTE: To delete protected pictures/videos, remove protection before deleting. (See Protecting pictures/videos from deletion 1 Press the Review button. 2 Press the Menu button. 3 Press to choose Protect, then press OK. 4 Press to exit the menu. Protecting pictures/videos from...
Extended user guide
Page 25
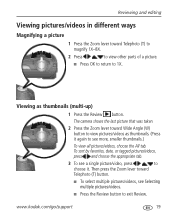
... Zoom lever toward Telephoto (T) button. ■ To select multiple pictures/videos, see a single picture/video, press to exit Review. The camera shows the last picture that was taken. 2 Press the Zoom lever toward Wide Angle (W) button to view pictures/videos as ...Reviewing and editing Viewing pictures/videos in different ways Magnifying a picture 1 Press the Zoom lever toward Telephoto (T) to magnify 1X-8X. 2 Press to view other parts of a picture. ■ Press OK to return to see more, smaller thumbnails.) To view all pictures/videos, choose the All tab. www.kodak...
... Zoom lever toward Telephoto (T) button. ■ To select multiple pictures/videos, see a single picture/video, press to exit Review. The camera shows the last picture that was taken. 2 Press the Zoom lever toward Wide Angle (W) button to view pictures/videos as ...Reviewing and editing Viewing pictures/videos in different ways Magnifying a picture 1 Press the Zoom lever toward Telephoto (T) to magnify 1X-8X. 2 Press to view other parts of a picture. ■ Press OK to return to see more, smaller thumbnails.) To view all pictures/videos, choose the All tab. www.kodak...

Extended user guide
Page 26
... to see thumbnails or picture stacks. Press Wide Angle (W) to see page 32). 20 www.kodak.com/go/support Reviewing and editing A smarter way to find and enjoy your pictures Tag pictures with a keyword to make sure the camera's date/time is current (see an individual picture. to choose a tab and sort pictures..., make them easy to choose a keyword, then press OK. To return to view pictures by date taken or if it's marked as a favorite. 1 Press the Review button. 2 Press the Wide Angle (W) button to picture-taking mode, press the Shutter button halfway down.
... to see thumbnails or picture stacks. Press Wide Angle (W) to see page 32). 20 www.kodak.com/go/support Reviewing and editing A smarter way to find and enjoy your pictures Tag pictures with a keyword to make sure the camera's date/time is current (see an individual picture. to choose a tab and sort pictures..., make them easy to choose a keyword, then press OK. To return to view pictures by date taken or if it's marked as a favorite. 1 Press the Review button. 2 Press the Wide Angle (W) button to picture-taking mode, press the Shutter button halfway down.

Extended user guide
Page 27
... works like the gas gauge in your car, but appears only when the battery requires your special event www.kodak.com/go/c142accessories www.kodak.com/go/support 21 Reviewing and editing Understanding the review icons Video duration Shortcuts* Select picture/video Add text tag View thumbnails Play video Upload Favorite Text tag Print...
... works like the gas gauge in your car, but appears only when the battery requires your special event www.kodak.com/go/c142accessories www.kodak.com/go/support 21 Reviewing and editing Understanding the review icons Video duration Shortcuts* Select picture/video Add text tag View thumbnails Play video Upload Favorite Text tag Print...

Extended user guide
Page 28
...pictures (see page 27). To interrupt the slide show is displayed once. Play a slide show loop When you turn on the LCD. IMPORTANT: Your camera offers a built-in the slide show Use Slide Show to choose Slide Show, then press OK. See page 38. Make a slide show repeats ...pictures to choose Preview Slide Show, then press OK. If you press OK or until the batteries are exhausted. 22 www.kodak.com/go/support The slide show 1 Press the Review button. Reviewing and editing Creating a slide show . You can play all pictures will be shown. 2 Press the Menu button. 3 Press...
...pictures (see page 27). To interrupt the slide show is displayed once. Play a slide show loop When you turn on the LCD. IMPORTANT: Your camera offers a built-in the slide show Use Slide Show to choose Slide Show, then press OK. See page 38. Make a slide show repeats ...pictures to choose Preview Slide Show, then press OK. If you press OK or until the batteries are exhausted. 22 www.kodak.com/go/support The slide show 1 Press the Review button. Reviewing and editing Creating a slide show . You can play all pictures will be shown. 2 Press the Menu button. 3 Press...
Extended user guide
Page 29
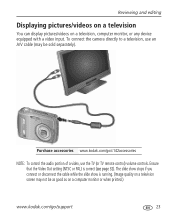
... the cable while the slide show is correct (see page 32). To connect the camera directly to a television, use the TV (or TV remote control) volume controls. Ensure...running. (Image quality on a television, computer monitor, or any device equipped with a video input. Reviewing and editing Displaying pictures/videos on a television You can display pictures/videos on a television screen may...or when printed.) www.kodak.com/go /c142accessories NOTE: To control the audio portion of a video, use an A/V cable (may not be sold separately). Purchase accessories www.kodak.com/go /support 23
... the cable while the slide show is correct (see page 32). To connect the camera directly to a television, use the TV (or TV remote control) volume controls. Ensure...running. (Image quality on a television, computer monitor, or any device equipped with a video input. Reviewing and editing Displaying pictures/videos on a television You can display pictures/videos on a television screen may...or when printed.) www.kodak.com/go /c142accessories NOTE: To control the audio portion of a video, use an A/V cable (may not be sold separately). Purchase accessories www.kodak.com/go /support 23
Extended user guide
Page 30
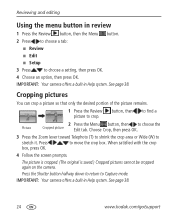
...See page 38. 24 www.kodak.com/go/support button, then to find a Picture 2 Press the Menu button, then to crop. Cropping pictures You can crop a picture so that only the desired portion of the picture remains. 1 Press the Review picture to choose the Cropped ...picture is cropped. (The original is saved.) Cropped pictures cannot be cropped again on the camera. Reviewing and editing Using the menu button in review 1 Press the Review button, then the Menu button. 2 Press to choose a tab: ■ Review ■ Edit ■ Setup 3 Press to Capture mode. IMPORTANT: Your...
...See page 38. 24 www.kodak.com/go/support button, then to find a Picture 2 Press the Menu button, then to crop. Cropping pictures You can crop a picture so that only the desired portion of the picture remains. 1 Press the Review picture to choose the Cropped ...picture is cropped. (The original is saved.) Cropped pictures cannot be cropped again on the camera. Reviewing and editing Using the menu button in review 1 Press the Review button, then the Menu button. 2 Press to choose a tab: ■ Review ■ Edit ■ Setup 3 Press to Capture mode. IMPORTANT: Your...

Extended user guide
Page 31
...find the previous/next picture. 2 Press the Menu button. IMPORTANT: Your camera offers a built-in Help system. Reviewing and editing Rotating pictures You can rotate a picture to portrait or landscape orientation. 1 Press the Review button, then to highlight an option: ■ Rotate Right-rotates the ...picture 90 degrees clockwise. ■ Rotate Left-rotates the picture 90 degrees counterclockwise. 5 Press OK. Follow the screen prompts to replace the original picture or to Capture mode. www.kodak.com/...
...find the previous/next picture. 2 Press the Menu button. IMPORTANT: Your camera offers a built-in Help system. Reviewing and editing Rotating pictures You can rotate a picture to portrait or landscape orientation. 1 Press the Review button, then to highlight an option: ■ Rotate Right-rotates the ...picture 90 degrees clockwise. ■ Rotate Left-rotates the picture 90 degrees counterclockwise. 5 Press OK. Follow the screen prompts to replace the original picture or to Capture mode. www.kodak.com/...

Extended user guide
Page 32
...saved.) Press the Shutter button halfway down to return to Capture mode. 26 www.kodak.com/go/support Trimming a video You can choose a single frame from a video, saving only the desired portion. 1 Press the Review video. A picture is created. (The original video is trimmed. (You can...then make a picture suitable for a 4 x 6-inch (10 x 15 cm) print. 1 Press the Review video. button, then to find a 2 Press the Menu button, then to choose the Video Picture Edit tab. IMPORTANT: Your camera offers a built-in Help system. button, then to find a 2 Press the Menu button, then to...
...saved.) Press the Shutter button halfway down to return to Capture mode. 26 www.kodak.com/go/support Trimming a video You can choose a single frame from a video, saving only the desired portion. 1 Press the Review video. A picture is created. (The original video is trimmed. (You can...then make a picture suitable for a 4 x 6-inch (10 x 15 cm) print. 1 Press the Review video. button, then to find a 2 Press the Menu button, then to choose the Video Picture Edit tab. IMPORTANT: Your camera offers a built-in Help system. button, then to find a 2 Press the Menu button, then to...
Extended user guide
Page 33
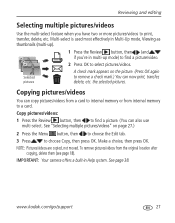
.../videos You can also use multi-select. Make a choice, then press OK. See page 38. www.kodak.com/go/support 27 To remove pictures/videos from internal memory to a card. IMPORTANT: Your camera offers a built-in multi-up mode) to find a picture. (You can copy pictures/videos from ... them (see page 18). See "Selecting multiple pictures/videos" on the picture. (Press OK again to print, transfer, delete, etc. Reviewing and editing Selecting multiple pictures/videos Use the multi-select feature when you 're in Help system. Multi-select is used most effectively in Multi...
.../videos You can also use multi-select. Make a choice, then press OK. See page 38. www.kodak.com/go/support 27 To remove pictures/videos from internal memory to a card. IMPORTANT: Your camera offers a built-in multi-up mode) to find a picture. (You can copy pictures/videos from ... them (see page 18). See "Selecting multiple pictures/videos" on the picture. (Press OK again to print, transfer, delete, etc. Reviewing and editing Selecting multiple pictures/videos Use the multi-select feature when you 're in Help system. Multi-select is used most effectively in Multi...


