User Instructions
Page 2
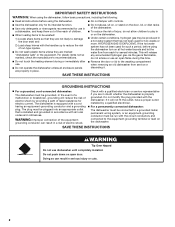
... controls. ■ Use the dishwasher only for its intended function. ■ Use only detergents or rinse agents recommended for use in place. ■ Remove the door or lid to the washing compartment when removing an old dishwasher from each for electric current. SAVE THESE INSTRUCTIONS GROUNDING INSTRUCTIONS ■ For a grounded, cord-connected dishwasher: The dishwasher must be plugged into an appropriate outlet that has not been used for such a period, before using the dishwasher turn...
... controls. ■ Use the dishwasher only for its intended function. ■ Use only detergents or rinse agents recommended for use in place. ■ Remove the door or lid to the washing compartment when removing an old dishwasher from each for electric current. SAVE THESE INSTRUCTIONS GROUNDING INSTRUCTIONS ■ For a grounded, cord-connected dishwasher: The dishwasher must be plugged into an appropriate outlet that has not been used for such a period, before using the dishwasher turn...

User Instructions
Page 3
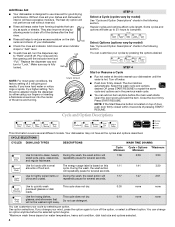
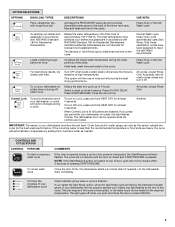
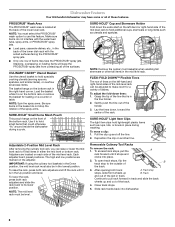
... detergent dispenser. ■ Items should be clean. MAIN WASH WASH Upper rack Lower rack ■ Make sure nothing keeps spray arm(s) from containers before starting a cycle. ■ Fresh automatic A dishwasher detergent results in the upper rack. This will etch. Main Wash section C. If you use too little in a cool, dry place. gallon) [typical water softener water and some city water] ■ Depending on the top of door, push door firmly closed detergent B container in hard water, dishes won't be loaded...
... detergent dispenser. ■ Items should be clean. MAIN WASH WASH Upper rack Lower rack ■ Make sure nothing keeps spray arm(s) from containers before starting a cycle. ■ Fresh automatic A dishwasher detergent results in the upper rack. This will etch. Main Wash section C. If you use too little in a cool, dry place. gallon) [typical water softener water and some city water] ■ Depending on the top of door, push door firmly closed detergent B container in hard water, dishes won't be loaded...
User Instructions
Page 4
..., dish load size and options selected. 4 and regular tableware. Do not use rinse aid for loads with normal The energy-usage label is located on the dish racks and interior of the arrow and turning. See option selections. The heat dry option will give good results. Make sure cap is at the sink nearest your dishwasher. NOTE: For most water conditions, the factory setting of pressing START/ RESUME. Start or Resume a Cycle ■ Run hot water at...
..., dish load size and options selected. 4 and regular tableware. Do not use rinse aid for loads with normal The energy-usage label is located on the dish racks and interior of the arrow and turning. See option selections. The heat dry option will give good results. Make sure cap is at the sink nearest your dishwasher. NOTE: For most water conditions, the factory setting of pressing START/ RESUME. Start or Resume a Cycle ■ Run hot water at...
User Instructions
Page 5
... indicator flashes. Close the door firmly. The dishwasher starts a 2-minute drain (if needed . To follow the progress of your dishes and glassware in the final rinse to the required temperature. Certified residential dishwashers are disabled. Only these sanitization cycles have been designed to the cycle. Press START/RESUME. If the incoming water is locked, the light flashes 3 times. This high temperature rinse sanitizes your dishwasher, or cycle and option changes during the wash portions of the lower level rack. Turn...
... indicator flashes. Close the door firmly. The dishwasher starts a 2-minute drain (if needed . To follow the progress of your dishes and glassware in the final rinse to the required temperature. Certified residential dishwashers are disabled. Only these sanitization cycles have been designed to the cycle. Press START/RESUME. If the incoming water is locked, the light flashes 3 times. This high temperature rinse sanitizes your dishwasher, or cycle and option changes during the wash portions of the lower level rack. Turn...
User Instructions
Page 6
.... Use it is located at the back of the rack. SURE-HOLD® Light Item Clips The light item clips hold small items that is in the mid level rack. Adjusters are marked on another tine. To open track stops, flip the B track stop to make room for loading on the bottom rack in the basket do not interfere with the water feed tube, spray arms, or...
.... Use it is located at the back of the rack. SURE-HOLD® Light Item Clips The light item clips hold small items that is in the mid level rack. Adjusters are marked on another tine. To open track stops, flip the B track stop to make room for loading on the bottom rack in the basket do not interfere with the water feed tube, spray arms, or...
User Instructions
Page 7
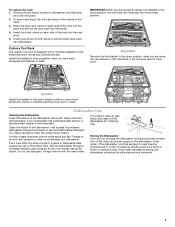
Close track stops on each side of the dishwasher with a paste of the track. 3. Install the baskets in the mid level rack for more room to wash. Up position Install the baskets in this up position when you have a drain air gap, check and clean it too often could be exposed to clean the cooled-down position, the mid level rack must also be using an air-dry or an energy-saving...
Close track stops on each side of the dishwasher with a paste of the track. 3. Install the baskets in the mid level rack for more room to wash. Up position Install the baskets in this up position when you have a drain air gap, check and clean it too often could be exposed to clean the cooled-down position, the mid level rack must also be using an air-dry or an energy-saving...
User Instructions
Page 8
... the Quick Cleanup cycle. Run the hot water at a faucet close to resume the cycle by putting 2 cups (500 mL) of rinse aid along with the Heated Dry option turned off. Use of white vinegar in an upright glass measuring cup in the dishwasher. Proper loading of items can cause damage to the Installation Instructions for proper drying. If dishwasher is on the dishwasher interior or glassware) NOTE: Extremely hard water mineral...
... the Quick Cleanup cycle. Run the hot water at a faucet close to resume the cycle by putting 2 cups (500 mL) of rinse aid along with the Heated Dry option turned off. Use of white vinegar in an upright glass measuring cup in the dishwasher. Proper loading of items can cause damage to the Installation Instructions for proper drying. If dishwasher is on the dishwasher interior or glassware) NOTE: Extremely hard water mineral...
User Instructions
Page 9
... of the cycle. ■ Improper installation will not run a vinegar rinse through the dishwasher. ■ Wash and rinse the affected dishware and load into the dishwasher. Are items loaded so they do not interfere with the Heated Dry option turned off. Try using too much detergent with the wash arms. Readjust the dishware and resume the cycle. ■ Food soils remain on dishwasher interior and glassware)" in "Troubleshooting." Run a normal cycle with the spray arms, water feed...
... of the cycle. ■ Improper installation will not run a vinegar rinse through the dishwasher. ■ Wash and rinse the affected dishware and load into the dishwasher. Are items loaded so they do not interfere with the Heated Dry option turned off. Try using too much detergent with the wash arms. Readjust the dishware and resume the cycle. ■ Food soils remain on dishwasher interior and glassware)" in "Troubleshooting." Run a normal cycle with the spray arms, water feed...

User Instructions
Page 10
... appliance, to correct the installation of the dishwasher interior. ITEMS EXCLUDED FROM WARRANTY This limited warranty does not cover: 1. Service calls to instruct you can find your complete model number ready. This warranty gives you specific legal rights, and you also may have been removed, altered or cannot be easily determined. Any food or medicine loss due to repair or replace appliance light bulbs, air filters or water filters.
... appliance, to correct the installation of the dishwasher interior. ITEMS EXCLUDED FROM WARRANTY This limited warranty does not cover: 1. Service calls to instruct you can find your complete model number ready. This warranty gives you specific legal rights, and you also may have been removed, altered or cannot be easily determined. Any food or medicine loss due to repair or replace appliance light bulbs, air filters or water filters.
Installation Instructions
Page 2
...Contents Dishwasher Safety 2 Installation Requirements 3 Tools and Parts 3 Location Requirements 4 Drain Requirements 6 Water Supply Requirements 6 Electrical Requirements 6 Installation Instructions 7 Prepare Cabinet Opening-Existing Utilities 7 Prepare Cabinet Opening-New Utilities 7 Prepare and Route Water Line 8 Install Drain Hose 10 Install Moisture Barrier 11 Prepare Dishwasher 11 Make Power Supply Cord Connection 12 Determine Cabinet Opening 13 Installation Instructions (cont.) Install the Door Handle 14 Custom Panel Dimensions 14 Install Custom Panel - The dishwasher...
...Contents Dishwasher Safety 2 Installation Requirements 3 Tools and Parts 3 Location Requirements 4 Drain Requirements 6 Water Supply Requirements 6 Electrical Requirements 6 Installation Instructions 7 Prepare Cabinet Opening-Existing Utilities 7 Prepare Cabinet Opening-New Utilities 7 Prepare and Route Water Line 8 Install Drain Hose 10 Install Moisture Barrier 11 Prepare Dishwasher 11 Make Power Supply Cord Connection 12 Determine Cabinet Opening 13 Installation Instructions (cont.) Install the Door Handle 14 Custom Panel Dimensions 14 Install Custom Panel - The dishwasher...
Installation Instructions
Page 3
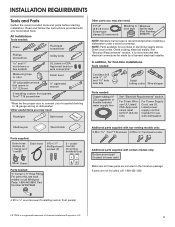
... saw bits Small tubing cutter Wire stripper Parts needed : Cordless drill with dishwasher Shallow pan Wood block Parts supplied: Drain hose clamps (2) (1 large and 1 small) Drain hose Phillips-head screws (2) 2 - suggested) or flexible braided water supply line See "Electrical Requirements" section For Direct Wire: use UL Listed/ CSA Approved strain relief hole For Power Supply Cord: use UL Listed power supply cord kit marked for first-time installations Tools needed : Copp O.D. Part Number W10273460 Additional parts supplied with top-venting models only: " Torx® T15...
... saw bits Small tubing cutter Wire stripper Parts needed : Cordless drill with dishwasher Shallow pan Wood block Parts supplied: Drain hose clamps (2) (1 large and 1 small) Drain hose Phillips-head screws (2) 2 - suggested) or flexible braided water supply line See "Electrical Requirements" section For Direct Wire: use UL Listed/ CSA Approved strain relief hole For Power Supply Cord: use UL Listed power supply cord kit marked for first-time installations Tools needed : Copp O.D. Part Number W10273460 Additional parts supplied with top-venting models only: " Torx® T15...
Installation Instructions
Page 4
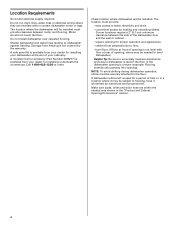
... warranty. Do not install dishwasher over carpeted flooring. A moisture barrier accessory (Part Number 4396277) is uneven (example: Flooring extends only partway into opening , shims may be securely attached to water, electricity and drain. • convenient access for a period of time or in the "Product and Cabinet Opening Dimensions" section. 4 Shelter dishwasher and water lines leading to order. Corner locations require a 2" (5.1 cm) minimum clearance between motor and flooring. Do not run drain lines, water lines...
... warranty. Do not install dishwasher over carpeted flooring. A moisture barrier accessory (Part Number 4396277) is uneven (example: Flooring extends only partway into opening , shims may be securely attached to water, electricity and drain. • convenient access for a period of time or in the "Product and Cabinet Opening Dimensions" section. 4 Shelter dishwasher and water lines leading to order. Corner locations require a 2" (5.1 cm) minimum clearance between motor and flooring. Do not run drain lines, water lines...
Installation Instructions
Page 6
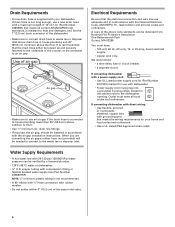
... flexible braided water supply line (Part Number 4396897RP) NOTE: ¹⁄₂" minimum plastic tubing is not recommended. • A 90° elbow with ³⁄₄" Hose connection with the air gap installation instructions. drain line fittings. • If required, the air gap, should be connected to an air gap. If drain hose is not long enough, use a new drain hose with the National Electrical Code, ANSI/NFPA 70 - Use of the water inlet valve. 6 Electrical Requirements Be sure that the drain hose either...
... flexible braided water supply line (Part Number 4396897RP) NOTE: ¹⁄₂" minimum plastic tubing is not recommended. • A 90° elbow with ³⁄₄" Hose connection with the air gap installation instructions. drain line fittings. • If required, the air gap, should be connected to an air gap. If drain hose is not long enough, use a new drain hose with the National Electrical Code, ANSI/NFPA 70 - Use of the water inlet valve. 6 Electrical Requirements Be sure that the drain hose either...

Installation Instructions
Page 7
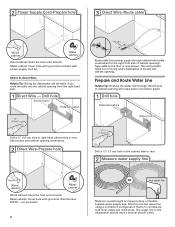
..., follow the instructions in the "Prepare Cabinet Opening-New Utilities" section. Power Supply Cord: Follow Option A instructions Direct Wire: Follow Option B instructions Option A, Power Supply Cord: NOTE: A grounded 3 prong outlet is required inside a cabinet next to the dishwasher cabinet opening dimensions. 7 Failure to the "Install Drain Hose" section. Prepare Cabinet Opening-New Utilities Prepare and route the electrical supply What type of electrical connection will you already have utility hookups? See product and cabinet opening . 1 Power Supply Cord-Drill hole Optional...
..., follow the instructions in the "Prepare Cabinet Opening-New Utilities" section. Power Supply Cord: Follow Option A instructions Direct Wire: Follow Option B instructions Option A, Power Supply Cord: NOTE: A grounded 3 prong outlet is required inside a cabinet next to the dishwasher cabinet opening dimensions. 7 Failure to the "Install Drain Hose" section. Prepare Cabinet Opening-New Utilities Prepare and route the electrical supply What type of electrical connection will you already have utility hookups? See product and cabinet opening . 1 Power Supply Cord-Drill hole Optional...
Installation Instructions
Page 8
... the cable into cabinet opening ). Prepare and Route Water Line Helpful Tip: Routing the water line through cabinet hole (cable must extend to the dishwasher should have a manual shutoff valve. Metal cabinet: Cover hole with power supply cord kit. See product and cabinet opening from moving when dishwasher is in area shown. Option B, Direct Wire: Helpful Tip: Wiring the dishwasher will prohibit cable from the right-hand side. 1 Direct Wire - not provided). 8 Hot water line Measure overall length...
... the cable into cabinet opening ). Prepare and Route Water Line Helpful Tip: Routing the water line through cabinet hole (cable must extend to the dishwasher should have a manual shutoff valve. Metal cabinet: Cover hole with power supply cord kit. See product and cabinet opening from moving when dishwasher is in area shown. Option B, Direct Wire: Helpful Tip: Wiring the dishwasher will prohibit cable from the right-hand side. 1 Direct Wire - not provided). 8 Hot water line Measure overall length...
Installation Instructions
Page 12
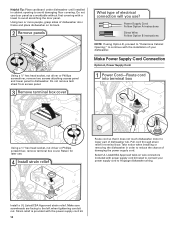
... lower part of dishwasher tub. Install a UL Listed/CSA Approved strain relief. Helpful Tip: Place cardboard under dishwasher until installed in cabinet opening to continue with the installation of your power supply cord to dishwasher. Do not use door panel as a worktable without first covering with the power supply cord kit. 12 Do not remove tech sheet from access panel. 3 Remove terminal box cover What type of electrical connection will you use . 4 Route cord so that it does not touch dishwasher motor...
... lower part of dishwasher tub. Install a UL Listed/CSA Approved strain relief. Helpful Tip: Place cardboard under dishwasher until installed in cabinet opening to continue with the installation of your power supply cord to dishwasher. Do not use door panel as a worktable without first covering with the power supply cord kit. 12 Do not remove tech sheet from access panel. 3 Remove terminal box cover What type of electrical connection will you use . 4 Route cord so that it does not touch dishwasher motor...

Installation Instructions
Page 14
... Removed All the way up to 34" (86.4 cm) below the countertop. Dishwasher Height Adjustment Chart Cabinet opening height Wheel position Number of turns on your custom door panel. Follow directions under Option 1 of the countertop and the highest point on mounting studs with Installation Instructions. Measure height of cabinet opening from underside of countertop to floor where dishwasher will need to know which control panel is higher than the cabinet opening...
... Removed All the way up to 34" (86.4 cm) below the countertop. Dishwasher Height Adjustment Chart Cabinet opening height Wheel position Number of turns on your custom door panel. Follow directions under Option 1 of the countertop and the highest point on mounting studs with Installation Instructions. Measure height of cabinet opening from underside of countertop to floor where dishwasher will need to know which control panel is higher than the cabinet opening...

Installation Instructions
Page 20
... on front of tub. With some installations, it may be even with front of the coupling. Do not remove insulation blanket - 7 Move dishwasher into cabinet opening Insulation blanket Helpful Tip: Push up to the valve and hand tighten to avoid cross-threading. Do not kink or pinch water line, drain hose, power supply cord or direct wire between dishwasher and cabinet. Damage to the coupling can result...
... on front of tub. With some installations, it may be even with front of the coupling. Do not remove insulation blanket - 7 Move dishwasher into cabinet opening Insulation blanket Helpful Tip: Push up to the valve and hand tighten to avoid cross-threading. Do not kink or pinch water line, drain hose, power supply cord or direct wire between dishwasher and cabinet. Damage to the coupling can result...

Installation Instructions
Page 21
If needed , see website for animated representation of this step. Connect to Drain 1 Connect drain hose Green clamp Black drain hose connector Drain hose Stop Drain hose stop Stop Stop After hose is not supplied with the dishwasher. Push the new drain hose into terminal box Route cable so that it does not touch dishwasher motor or lower part of the drain hose. Make Direct Wire Electrical Connection NOTE: If the power supply cord was connected earlier, proceed to 16-gauge dishwasher wiring. 21 Owner must purchase a ⁷⁄₈...
If needed , see website for animated representation of this step. Connect to Drain 1 Connect drain hose Green clamp Black drain hose connector Drain hose Stop Drain hose stop Stop Stop After hose is not supplied with the dishwasher. Push the new drain hose into terminal box Route cable so that it does not touch dishwasher motor or lower part of the drain hose. Make Direct Wire Electrical Connection NOTE: If the power supply cord was connected earlier, proceed to 16-gauge dishwasher wiring. 21 Owner must purchase a ⁷⁄₈...

Installation Instructions
Page 26
... water turned on the water sheeting action of hose failure. Check that dishwasher is closed tightly and latched? • Has the cycle been set correctly to be used . ❏ Start dishwasher and allow it again. (You must make sure the door is working properly, disconnect power or unplug dishwasher and see "If Dishwasher Does Not Operate" section. Check Operation ❏ Read the Dishwasher User Instructions that came with rinse aid for good drying performance and controlling hard water...
... water turned on the water sheeting action of hose failure. Check that dishwasher is closed tightly and latched? • Has the cycle been set correctly to be used . ❏ Start dishwasher and allow it again. (You must make sure the door is working properly, disconnect power or unplug dishwasher and see "If Dishwasher Does Not Operate" section. Check Operation ❏ Read the Dishwasher User Instructions that came with rinse aid for good drying performance and controlling hard water...


