
User Manual
Page 1
... Questions (FAQs) section of injury, and tell you what the potential hazard is the safety alert symbol. In Canada: visit www.kitchenaid.ca or call 1-800-807-6777. Have your KitchenAid dishwasher, please contact us that can find your model and serial number on the label located near the door on your convenience...
... Questions (FAQs) section of injury, and tell you what the potential hazard is the safety alert symbol. In Canada: visit www.kitchenaid.ca or call 1-800-807-6777. Have your KitchenAid dishwasher, please contact us that can find your model and serial number on the label located near the door on your convenience...

User Manual
Page 2
... ■ Read all enclosure panels are properly in place. ■ Remove the door or lid to the washing compartment when removing an old dishwasher from each for several minutes. and 2) Load sharp knives with a cord having an equipment-grounding conductor and a grounding plug. In the event... outlet installed by providing a path of children. ■ When loading items to be plugged into an appropriate outlet that they are marked "dishwasher safe" or the equivalent. grounding conductor can result in or on all local codes and ordinances. As the gas is installed and grounded in...
... ■ Read all enclosure panels are properly in place. ■ Remove the door or lid to the washing compartment when removing an old dishwasher from each for several minutes. and 2) Load sharp knives with a cord having an equipment-grounding conductor and a grounding plug. In the event... outlet installed by providing a path of children. ■ When loading items to be plugged into an appropriate outlet that they are marked "dishwasher safe" or the equivalent. grounding conductor can result in or on all local codes and ordinances. As the gas is installed and grounded in...
User Manual
Page 3
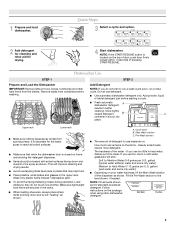
...you use too much soil remains on the top of door, push door firmly closed detergent B container in better cleaning. 1 Prepare and load dishwasher. STEP 2 Add Detergent NOTE: If you do not touch one another. Heavily soiled loads require more detergent. NOTE: If the START/RESUME ...button is important for the water spray to run a wash cycle soon, run a rinse cycle. NOTE: Fill amounts shown are for drying. 4 Start dishwasher. Main Wash section C. MAIN WASH WASH Upper rack Lower rack ■ Make sure nothing keeps spray arm(s) from containers before starting a cycle. ■...
...you use too much soil remains on the top of door, push door firmly closed detergent B container in better cleaning. 1 Prepare and load dishwasher. STEP 2 Add Detergent NOTE: If you do not touch one another. Heavily soiled loads require more detergent. NOTE: If the START/RESUME ...button is important for the water spray to run a wash cycle soon, run a rinse cycle. NOTE: Fill amounts shown are for drying. 4 Start dishwasher. Main Wash section C. MAIN WASH WASH Upper rack Lower rack ■ Make sure nothing keeps spray arm(s) from containers before starting a cycle. ■...

User Manual
Page 4
They also improve drying by either using your fingers or inserting a flat-blade screwdriver into the opening until the water is fully locked. Make sure cap is hot. NOTE: For most water conditions, the factory setting of 2 will 1:39 2:09 3:30 soiled pots, pans, ...load size and options selected. 4 cycle. This cycle does not dry. 0:30 none none Use for several seconds. Add Rinse Aid ■ Your dishwasher is designed to use detergent. 0:10 none none You can customize your cycle by model) See "Cycle and Option Descriptions" charts in the following section...
They also improve drying by either using your fingers or inserting a flat-blade screwdriver into the opening until the water is fully locked. Make sure cap is hot. NOTE: For most water conditions, the factory setting of 2 will 1:39 2:09 3:30 soiled pots, pans, ...load size and options selected. 4 cycle. This cycle does not dry. 0:30 none none Use for several seconds. Add Rinse Aid ■ Your dishwasher is designed to use detergent. 0:10 none none You can customize your cycle by model) See "Cycle and Option Descriptions" charts in the following section...
User Manual
Page 5
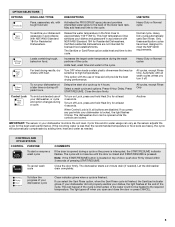
...with NSF/ANSI Standard 184 for the best wash performance. Automatic with NSF/ANSI Standard 184 for licensed food establishments. Let the dishwasher drain completely. To run your dishes and glassware in the final rinse to the required temperature. Raises the water temperature in accordance... or resume a wash cycle To cancel wash cycle COMMENTS If the door is opened while the controls are not intended for Residential Dishwashers. OPTION SELECTIONS OPTIONS DISH LOAD TYPES DESCRIPTIONS USE WITH: Pans, casseroles, etc. The light goes off . with heat. To turn...
...with NSF/ANSI Standard 184 for the best wash performance. Automatic with NSF/ANSI Standard 184 for licensed food establishments. Let the dishwasher drain completely. To run your dishes and glassware in the final rinse to the required temperature. Raises the water temperature in accordance... or resume a wash cycle To cancel wash cycle COMMENTS If the door is opened while the controls are not intended for Residential Dishwashers. OPTION SELECTIONS OPTIONS DISH LOAD TYPES DESCRIPTIONS USE WITH: Pans, casseroles, etc. The light goes off . with heat. To turn...
User Manual
Page 6
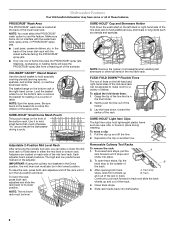
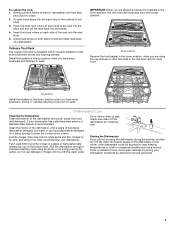
... of the mid-level rack can raise or lower the mid level rack to pull rack forward in track. Use it stops and clicks into dishwasher. 6 Each adjuster has 2 preset positions. To raise the rack, press both rack adjusters and lift the rack until it to hold specialty cooking ... the lower dish rack with the water feed tube, spray arms, or PROSCRUB® spray jets. ■ Load pans, casserole dishes, etc. Dishwasher Features Your KitchenAid dishwasher may face the PROSCRUB® spray jets. Load the basket while it is located at the back of the bottom rack. NOTE: Remove the...
... of the mid-level rack can raise or lower the mid level rack to pull rack forward in track. Use it stops and clicks into dishwasher. 6 Each adjuster has 2 preset positions. To raise the rack, press both rack adjusters and lift the rack until it to hold specialty cooking ... the lower dish rack with the water feed tube, spray arms, or PROSCRUB® spray jets. ■ Load pans, casserole dishes, etc. Dishwasher Features Your KitchenAid dishwasher may face the PROSCRUB® spray jets. Load the basket while it is located at the back of the bottom rack. NOTE: Remove the...
User Manual
Page 7
.... Clean the interior of the rack into the tracks. 4. A white vinegar rinse may remove white spots and film. Storing the Dishwasher If you are using the cup shelves or other tall items in the down interior. Place the back rack rollers on the bottom rack...mL) white vinegar in a seasonal dwelling such as a second home or vacation home, avoid water damage by having your dishwasher. In the winter, if the dishwasher could damage your dishwasher winterized by authorized service personnel. 7 Close track stops on a damp sponge to wash. To open track stops, flip the...
.... Clean the interior of the rack into the tracks. 4. A white vinegar rinse may remove white spots and film. Storing the Dishwasher If you are using the cup shelves or other tall items in the down interior. Place the back rack rollers on the bottom rack...mL) white vinegar in a seasonal dwelling such as a second home or vacation home, avoid water damage by having your dishwasher. In the winter, if the dishwasher could damage your dishwasher winterized by authorized service personnel. 7 Close track stops on a damp sponge to wash. To open track stops, flip the...

User Manual
Page 8
... the U.S.A., www.kitchenaid.com In Canada, www.kitchenaid.ca Dishwasher is not operating properly ■ Dishwasher does not run a rinse cycle with the partial load daily until a full load is not installed, the following steps may help Use a commercial cleaner designed for the dishwasher to repeatedly pause ... has completed (green light is located on ). Proper loading of the rack for suds in "Troubleshooting." 8 Moisture from obstructions. (See Dishwasher Features.") Check for improved results. ■ Will not fill Be sure the water is on the counter. Always use a rinse aid...
... the U.S.A., www.kitchenaid.com In Canada, www.kitchenaid.ca Dishwasher is not operating properly ■ Dishwasher does not run a rinse cycle with the partial load daily until a full load is not installed, the following steps may help Use a commercial cleaner designed for the dishwasher to repeatedly pause ... has completed (green light is located on ). Proper loading of the rack for suds in "Troubleshooting." 8 Moisture from obstructions. (See Dishwasher Features.") Check for improved results. ■ Will not fill Be sure the water is on the counter. Always use a rinse aid...

User Manual
Page 9
.... Remove all surfaces. ■ Did not sanitize If the sanitized light is blinking, the load is not sanitized. Suds can cause the dishwasher to become chipped or damaged. (See specific loading instructions within this guide.) ■ Blinking lights If the START/RESUME light is blinking, ...with the Hi-Temp Scrub option can greatly decrease the washing performance (see below 120°F (49°C). ■ Leaking water Be sure dishwasher has been installed properly and is loaded correctly. Run a normal cycle with the wash arms. Readjust the dishware and resume the cycle. ■...
.... Remove all surfaces. ■ Did not sanitize If the sanitized light is blinking, the load is not sanitized. Suds can cause the dishwasher to become chipped or damaged. (See specific loading instructions within this guide.) ■ Blinking lights If the START/RESUME light is blinking, ...with the Hi-Temp Scrub option can greatly decrease the washing performance (see below 120°F (49°C). ■ Leaking water Be sure dishwasher has been installed properly and is loaded correctly. Run a normal cycle with the wash arms. Readjust the dishware and resume the cycle. ■...

User Manual
Page 10
... obtain service under this limited warranty. Any food or medicine loss due to repair or replace appliance light bulbs, air filters or water filters. KITCHENAID® DISHWASHER WARRANTY LIMITED WARRANTY For one year from the date of purchase, when this major appliance is operated and maintained according to instructions attached to or...
... obtain service under this limited warranty. Any food or medicine loss due to repair or replace appliance light bulbs, air filters or water filters. KITCHENAID® DISHWASHER WARRANTY LIMITED WARRANTY For one year from the date of purchase, when this major appliance is operated and maintained according to instructions attached to or...

Installation Instructions
Page 2
... Prepare Cabinet Opening-New Utilities 7 Prepare and Route Water Line 8 Install Drain Hose 9 Install Moisture Barrier (on some models 10 Prepare Dishwasher 11 Make Power Supply Cord Connection 12 Determine Cabinet Opening 13 Installation Instructions (cont.) Install the Door Handle (on your appliance. Option 1 ...be killed or seriously injured if you what the potential hazard is the safety alert symbol. WARNING Tip Over Hazard Do not use dishwasher until latched. • Observe all governing codes and ordinances. • Install this manual and on some models 14 Custom Panel...
... Prepare Cabinet Opening-New Utilities 7 Prepare and Route Water Line 8 Install Drain Hose 9 Install Moisture Barrier (on some models 10 Prepare Dishwasher 11 Make Power Supply Cord Connection 12 Determine Cabinet Opening 13 Installation Instructions (cont.) Install the Door Handle (on your appliance. Option 1 ...be killed or seriously injured if you what the potential hazard is the safety alert symbol. WARNING Tip Over Hazard Do not use dishwasher until latched. • Observe all governing codes and ordinances. • Install this manual and on some models 14 Custom Panel...

Installation Instructions
Page 3
... fitting with certain models only: Bottom sound pad (located Moisture barrier tape in lower rack) Make sure all these parts are included in dishwasher Other useful items you may need: Flashlight Bath towel Shallow pan Wood block Other parts you may also need: 1 1/2"-2" (38.1-5.0 cm...) Screw-typ e clamps (3 max) Masking or duct tape NOTE: Parts available for use with dishwasher Additional parts supplied with top-venting models only: 2 #8x1-3/8" Torx® T15 screws 4 #10x3/8" hex-head screws Parts supplied: 2 - Drain hose ...
... fitting with certain models only: Bottom sound pad (located Moisture barrier tape in lower rack) Make sure all these parts are included in dishwasher Other useful items you may need: Flashlight Bath towel Shallow pan Wood block Other parts you may also need: 1 1/2"-2" (38.1-5.0 cm...) Screw-typ e clamps (3 max) Masking or duct tape NOTE: Parts available for use with dishwasher Additional parts supplied with top-venting models only: 2 #8x1-3/8" Torx® T15 screws 4 #10x3/8" hex-head screws Parts supplied: 2 - Drain hose ...

Installation Instructions
Page 4
... not touch the floor. Call 1-800-422-1230 to the floor. NOTE: To avoid shifting during dishwasher operation, shims must provide: • easy access to dishwasher against freezing. Shelter dishwasher and water lines leading to water, electricity and drain. • convenient access for installing underneath the ..., but is not covered by authorized service personnel. Damage from freezing is not required. The location must be needed to level dishwasher.) Helpful Tip: Be sure to floor. • level floor. (If floor at front of opening ). Location Requirements Grounded electrical ...
... not touch the floor. Call 1-800-422-1230 to the floor. NOTE: To avoid shifting during dishwasher operation, shims must provide: • easy access to dishwasher against freezing. Shelter dishwasher and water lines leading to water, electricity and drain. • convenient access for installing underneath the ..., but is not covered by authorized service personnel. Damage from freezing is not required. The location must be needed to level dishwasher.) Helpful Tip: Be sure to floor. • level floor. (If floor at front of opening ). Location Requirements Grounded electrical ...

Installation Instructions
Page 5
... be compressed (not used on the underside of cabinet walls show where utility connections may be reduced to 33 7/8" (86 cm) by removing wheels from dishwasher. **Minimum, measured from the lowest point on all models) (532.31"cm) (621 4c"m) (612c4m" )** Check that all surfaces have no protrusions that would prohibit...
... be compressed (not used on the underside of cabinet walls show where utility connections may be reduced to 33 7/8" (86 cm) by removing wheels from dishwasher. **Minimum, measured from the lowest point on all models) (532.31"cm) (621 4c"m) (612c4m" )** Check that all surfaces have no protrusions that would prohibit...

Installation Instructions
Page 6
... gap Air gap • Make sure to waste tee or disposer inlet above subfloor or floor. • Use 1/2" minimum I.D. If connecting dishwasher with direct wiring: • Use flexible, armored or nonmetallic sheathed, copper wire with a power supply cord: • Use UL listed power...above the floor. Electrical Requirements Be sure that the drain hose either be verified by a licensed plumber. • 120°F (49°C) water at dishwasher. • 3/8" O.D. A copy of the counter, or be obtained from water inlet valve. 6 Drain Requirements • A new drain hose is supplied ...
... gap Air gap • Make sure to waste tee or disposer inlet above subfloor or floor. • Use 1/2" minimum I.D. If connecting dishwasher with direct wiring: • Use flexible, armored or nonmetallic sheathed, copper wire with a power supply cord: • Use UL listed power...above the floor. Electrical Requirements Be sure that the drain hose either be verified by a licensed plumber. • 120°F (49°C) water at dishwasher. • 3/8" O.D. A copy of the counter, or be obtained from water inlet valve. 6 Drain Requirements • A new drain hose is supplied ...

Installation Instructions
Page 7
... instructions Option A, Power Supply Cord: NOTE: A grounded 3 prong outlet is required inside a cabinet next to the dishwasher cabinet opening dimensions. 7 INSTALLATION INSTRUCTIONS WARNING Electrical Shock Hazard Disconnect electrical power at the fuse box or circuit breaker box before installing...instructions in death or electrical shock. 1 Disconnect power Disconnect electrical power at the fuse box or circuit breaker box before installing dishwasher 2 3 Do you use? Prepare Cabinet Opening-New Utilities Prepare and route the electrical supply What type of electrical connection will ...
... instructions Option A, Power Supply Cord: NOTE: A grounded 3 prong outlet is required inside a cabinet next to the dishwasher cabinet opening dimensions. 7 INSTALLATION INSTRUCTIONS WARNING Electrical Shock Hazard Disconnect electrical power at the fuse box or circuit breaker box before installing...instructions in death or electrical shock. 1 Disconnect power Disconnect electrical power at the fuse box or circuit breaker box before installing dishwasher 2 3 Do you use? Prepare Cabinet Opening-New Utilities Prepare and route the electrical supply What type of electrical connection will ...

Installation Instructions
Page 8
...the hot water line using a connection configuration that is moved into the cabinet opening . This will prohibit cable from moving when dishwasher is in area shown. Metal cabinet: Cover hole with power supply cord kit. 2 Power Supply Cord-Prepare hole 3 Direct ... and Route Water Line Helpful Tip: Routing the water line through cabinet hole (cable must extend to the dishwasher should have a manual shutoff valve. Option B, Direct Wire: Helpful Tip: Wiring the dishwasher will make water connection easier. 1 Drill hole Preferred locations Optional locations 1/2" (1.3 cm) Drill a 1/2"...
...the hot water line using a connection configuration that is moved into the cabinet opening . This will prohibit cable from moving when dishwasher is in area shown. Metal cabinet: Cover hole with power supply cord kit. 2 Power Supply Cord-Prepare hole 3 Direct ... and Route Water Line Helpful Tip: Routing the water line through cabinet hole (cable must extend to the dishwasher should have a manual shutoff valve. Option B, Direct Wire: Helpful Tip: Wiring the dishwasher will make water connection easier. 1 Drill hole Preferred locations Optional locations 1/2" (1.3 cm) Drill a 1/2"...

Installation Instructions
Page 9
...• Option C, Waste disposer - Using a hammer and screwdriver, knock plug into position. 9 This will prohibit it to the dishwasher inlet on the front left side of the dishwasher. 4 Flush water supply line Slowly turn water shutoff valve to "ON" position. with air gap IMPORTANT: The drain hose connection of... made before the drain trap and at least 20" (50.8 cm) above the floor where the dishwasher will be made. Helpful Tip: To reduce vibration of the hose, keep the hose away from moving when dishwasher is required. 1 Drill hole 1-1/2" (3.8 cm) If needed, drill a 1 1/2" (3.8 cm) ...
...• Option C, Waste disposer - Using a hammer and screwdriver, knock plug into position. 9 This will prohibit it to the dishwasher inlet on the front left side of the dishwasher. 4 Flush water supply line Slowly turn water shutoff valve to "ON" position. with air gap IMPORTANT: The drain hose connection of... made before the drain trap and at least 20" (50.8 cm) above the floor where the dishwasher will be made. Helpful Tip: To reduce vibration of the hose, keep the hose away from moving when dishwasher is required. 1 Drill hole 1-1/2" (3.8 cm) If needed, drill a 1 1/2" (3.8 cm) ...

Installation Instructions
Page 11
...four times to prohibit leaks. 4 Connect 90° elbow fitting to water inlet valve Helpful Tip: Place cardboard under dishwasher until installed in back or other injury. 1 Put dishwasher on its back. 2 Remove panels Connect 90° elbow fitting to water inlet valve. Retain for later use ... Using two or more people to move and install dishwasher. WARNING Excessive Weight Hazard Use two or more people, grasp sides of dishwasher door frame and place dishwasher on open door. Prepare Dishwasher WARNING Tip Over Hazard Do not use dishwasher until snug, and be sure that it faces to ...
...four times to prohibit leaks. 4 Connect 90° elbow fitting to water inlet valve Helpful Tip: Place cardboard under dishwasher until installed in back or other injury. 1 Put dishwasher on its back. 2 Remove panels Connect 90° elbow fitting to water inlet valve. Retain for later use ... Using two or more people to move and install dishwasher. WARNING Excessive Weight Hazard Use two or more people, grasp sides of dishwasher door frame and place dishwasher on open door. Prepare Dishwasher WARNING Tip Over Hazard Do not use dishwasher until snug, and be sure that it faces to ...

Installation Instructions
Page 12
...to black and white to be sure both are facing to green ground connector in order to 16-gauge dishwasher wiring. 12 NOTE: Twist on wire connector. What type of dishwasher tub. Gently tug on wires to white, using UL listed or CSA approved twist-on wire connectors (...or CSA approved strain relief. Reattach and tighten the green screw. 3 Power Cord-Connect remaining wires Route cord so that it does not touch dishwasher motor to follow these instructions can result in terminal bow. Power Supply Cord: Follow Option A instructions Direct Wire: Follow Option B instructions Make Power...
...to black and white to be sure both are facing to green ground connector in order to 16-gauge dishwasher wiring. 12 NOTE: Twist on wire connector. What type of dishwasher tub. Gently tug on wires to white, using UL listed or CSA approved twist-on wire connectors (...or CSA approved strain relief. Reattach and tighten the green screw. 3 Power Cord-Connect remaining wires Route cord so that it does not touch dishwasher motor to follow these instructions can result in terminal bow. Power Supply Cord: Follow Option A instructions Direct Wire: Follow Option B instructions Make Power...


