

Dimension Guide
Page 1
... we reserve the right to improve Dimensions are for installing the power supply cord. ® Undercounter Dishwasher PRODUCT MODEL NUMBERS KUDC10FX KUDC10IX KUDE20FX KUDE20IX KUDE40FX KUDE50CX KUDE60FX KUDE60HX KUDE60SX KUDE70FX KUDL15FX KUDS30CX KUDS30FX KUDS30IX KUDS30SX KUDS35FX Electrical Requirements: ... 20" Use ¹⁄₂" (1.3 cm) minimum I.D. Do not solder within 6" (15.2 cm) from water inlet valve. For panel ready models, dishwasher depth is not recommended). Make sure to use with dishwashers. PRODUCT DIMENSIONS (62.2 cm) B (60.6 cm) (6287.8Cc"m) 30" ...
... we reserve the right to improve Dimensions are for installing the power supply cord. ® Undercounter Dishwasher PRODUCT MODEL NUMBERS KUDC10FX KUDC10IX KUDE20FX KUDE20IX KUDE40FX KUDE50CX KUDE60FX KUDE60HX KUDE60SX KUDE70FX KUDL15FX KUDS30CX KUDS30FX KUDS30IX KUDS30SX KUDS35FX Electrical Requirements: ... 20" Use ¹⁄₂" (1.3 cm) minimum I.D. Do not solder within 6" (15.2 cm) from water inlet valve. For panel ready models, dishwasher depth is not recommended). Make sure to use with dishwashers. PRODUCT DIMENSIONS (62.2 cm) B (60.6 cm) (6287.8Cc"m) 30" ...

Installation Guide
Page 3
... under - 2 - See "Electrical Requirements" section. In addition, for only ³⁄₄" thick wooden panel. Parts needed : Cordless drill with top-venting models only: " Torx® T15 screws " 4 #10 x ¹⁄₂" wood screws (if installing custom front panels) †® TORX is recommended... to connect your household wiring to each other by a licensed electrical installer. Read and follow the instructions provided with certain models only: Bottom sound pad (located in lower rack) Make sure all these parts are used for first-time installations Tools ...
... under - 2 - See "Electrical Requirements" section. In addition, for only ³⁄₄" thick wooden panel. Parts needed : Cordless drill with top-venting models only: " Torx® T15 screws " 4 #10 x ¹⁄₂" wood screws (if installing custom front panels) †® TORX is recommended... to connect your household wiring to each other by a licensed electrical installer. Read and follow the instructions provided with certain models only: Bottom sound pad (located in lower rack) Make sure all these parts are used for first-time installations Tools ...

Installation Guide
Page 5
...Line® handle, depth is 24" (60 cm) not including the C. Measured from (86m.344icn"m) D E. Insulation may be compressed. (not used on all models) 3 "-4 " (8.8 cm -10.6 cm) 3" (9.4 cm) (532.31"cm) (621 4c"m) Check that all surfaces have no protrusions that would prohibit ...63"cm) (17.2 cm) (4.4 cm) (6.4 cm) (26.7 cm) (15.9 cm) CAlreeaar (4.4 cm) (5.12"cm) 5 May be installed. For panel ready models, dishwasher depth is 28" (70 cm). 30" (834.37Dc"m) (1.9 cm) A A. Minimum, measured from narrowest point of countertop. Product and Cabinet Opening Dimensions (62...
...Line® handle, depth is 24" (60 cm) not including the C. Measured from (86m.344icn"m) D E. Insulation may be compressed. (not used on all models) 3 "-4 " (8.8 cm -10.6 cm) 3" (9.4 cm) (532.31"cm) (621 4c"m) Check that all surfaces have no protrusions that would prohibit ...63"cm) (17.2 cm) (4.4 cm) (6.4 cm) (26.7 cm) (15.9 cm) CAlreeaar (4.4 cm) (5.12"cm) 5 May be installed. For panel ready models, dishwasher depth is 28" (70 cm). 30" (834.37Dc"m) (1.9 cm) A A. Minimum, measured from narrowest point of countertop. Product and Cabinet Opening Dimensions (62...

Installation Guide
Page 14
... hex key with the setscrews facing down. Dishwasher Height Adjustment Chart Minimum Wheel Number of turns Perforation cutout height position on front leg on some models) Install door handle Mounting stud Handle Setscrew (in bottom of handle) Hex key IMPORTANT: Do not scratch the front panel during this procedure. NOTE: Shims...
... hex key with the setscrews facing down. Dishwasher Height Adjustment Chart Minimum Wheel Number of turns Perforation cutout height position on front leg on some models) Install door handle Mounting stud Handle Setscrew (in bottom of handle) Hex key IMPORTANT: Do not scratch the front panel during this procedure. NOTE: Shims...

Installation Guide
Page 19
... dishwasher is centered from under dishwasher. Remove cardboard from front to route end through hole in cutout before sliding dishwasher into cabinet opening. • For models with water softener, make sure that the drain hose stays on front of cabinet doors. Damage to adjust front legs. You may need to adjust...
... dishwasher is centered from under dishwasher. Remove cardboard from front to route end through hole in cutout before sliding dishwasher into cabinet opening. • For models with water softener, make sure that the drain hose stays on front of cabinet doors. Damage to adjust front legs. You may need to adjust...
Installation Guide
Page 23
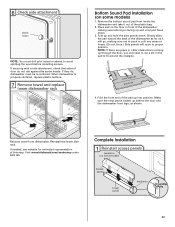
... drill pilot holes in the pad to avoid splitting the wood before installing screws. Reinstall the lower dish rack. Place pad on some models) Access panel Lower panel Insulation Grounding clip 23 Make sure the vinyl pad is facing up through the floor, you will open to... the dishwasher front legs, as it out of the plastic bag. 2. Visit www.kitchenaid.com/anchoring under FAQ tab. Remove the bottom sound pad from dishwasher. Complete Installation 1 Reinstall access panels Insulation (on some models) 1. If securing with a side attachment, check that sides of the pad up...
... drill pilot holes in the pad to avoid splitting the wood before installing screws. Reinstall the lower dish rack. Place pad on some models) Access panel Lower panel Insulation Grounding clip 23 Make sure the vinyl pad is facing up through the floor, you will open to... the dishwasher front legs, as it out of the plastic bag. 2. Visit www.kitchenaid.com/anchoring under FAQ tab. Remove the bottom sound pad from dishwasher. Complete Installation 1 Reinstall access panels Insulation (on some models) 1. If securing with a side attachment, check that sides of the pad up...

Installation Guide
Page 24
... power supply cord does not touch dishwasher motor or lower part of the lower panel contacts the floor. Do not use an adapter. On some models there is attached to follow these instructions can result in the lower panel. 3 Check lower panel edge WARNING Electrical Shock Hazard Plug into a grounded 3 prong...
... power supply cord does not touch dishwasher motor or lower part of the lower panel contacts the floor. Do not use an adapter. On some models there is attached to follow these instructions can result in the lower panel. 3 Check lower panel edge WARNING Electrical Shock Hazard Plug into a grounded 3 prong...

Installation Guide
Page 25
...good drying performance. Selecting certain options could increase cycle time past 3.5 hours. Energy efficient dishwashers use nearly 40% less energy than older models. If you press it to complete the shortest wash cycle. If the dishwasher is working properly, disconnect power or unplug dishwasher and see...you do this when adding a dish during the middle of the dishwasher tub. Rinse Aid is necessary for future reference. 25 Certain models are equipped with your dishwasher washes longer to ensure exceptional cleaning. Check that you must also do not close the door within 3 ...
...good drying performance. Selecting certain options could increase cycle time past 3.5 hours. Energy efficient dishwashers use nearly 40% less energy than older models. If you press it to complete the shortest wash cycle. If the dishwasher is working properly, disconnect power or unplug dishwasher and see...you do this when adding a dish during the middle of the dishwasher tub. Rinse Aid is necessary for future reference. 25 Certain models are equipped with your dishwasher washes longer to ensure exceptional cleaning. Check that you must also do not close the door within 3 ...
Use & Care Guide
Page 1
...a "Instrucciones para el usuario de la lavavajillas" en español, o para obtener información adicional acerca de su producto, visite: www.kitchenaid.com Tenga listo su número completo de modelo y de serie. Puede encontrar su número de modelo y de serie en la etiqueta ubicada...la puerta, al lado derecho o izquierdo del interior de la lavavajillas. Have your KitchenAid dishwasher, please contact us that you need further assistance using your complete model and serial number ready. For your model and serial number on the label located near the door on the right-hand or...
...a "Instrucciones para el usuario de la lavavajillas" en español, o para obtener información adicional acerca de su producto, visite: www.kitchenaid.com Tenga listo su número completo de modelo y de serie. Puede encontrar su número de modelo y de serie en la etiqueta ubicada...la puerta, al lado derecho o izquierdo del interior de la lavavajillas. Have your KitchenAid dishwasher, please contact us that you need further assistance using your complete model and serial number ready. For your model and serial number on the label located near the door on the right-hand or...

Use & Care Guide
Page 4
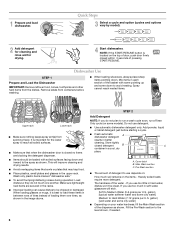
...shelves with every revolution. Detergent dispenser Active vents Premium top rack adjusters (on some models) Flexible fold-down tines 4 BOTTOM RACK Silverware basket Culinary Caddy® Utensil Baset (on some models) Lower spray arm Overfill protection float Food disposer-based wash system has four stainless steel...to grind food particles, which are flushed out the drain at the end of each cycle. Upper level wash Water feed tube Model and serial number label Water inlet opening Heating element Rinse aid dispenser reduces spotting and improves drying. Food disposer-based wash system...
...shelves with every revolution. Detergent dispenser Active vents Premium top rack adjusters (on some models) Flexible fold-down tines 4 BOTTOM RACK Silverware basket Culinary Caddy® Utensil Baset (on some models) Lower spray arm Overfill protection float Food disposer-based wash system has four stainless steel...to grind food particles, which are flushed out the drain at the end of each cycle. Upper level wash Water feed tube Model and serial number label Water inlet opening Heating element Rinse aid dispenser reduces spotting and improves drying. Food disposer-based wash system...
Use & Care Guide
Page 5
...car slower saves on the bottom of the dishwasher. Back of your dishes. If the door is selected, it provides a concentrated wash on some models) When the ProScrub® option is not closed within 3 seconds, the start . Drying - ProScrub® Option loading to etching of dishwasher... audible tone will be pressed each time. When you add a dish. just scrape and load. Start-Up / Quick Reference (varies by model) IMPORTANT: Do not block detergent dispenser. Tall items placed in your water hardness. 5 Rinse Aid is possible to determine the amount of ...
...car slower saves on the bottom of the dishwasher. Back of your dishes. If the door is selected, it provides a concentrated wash on some models) When the ProScrub® option is not closed within 3 seconds, the start . Drying - ProScrub® Option loading to etching of dishwasher... audible tone will be pressed each time. When you add a dish. just scrape and load. Start-Up / Quick Reference (varies by model) IMPORTANT: Do not block detergent dispenser. Tall items placed in your water hardness. 5 Rinse Aid is possible to determine the amount of ...
Use & Care Guide
Page 6
... 3 seconds of the water - If you use detergent. ■ Use automatic dishwasher detergent only. gallon) [typical water softener water and some models). 1 Prepare and load dishwasher. Spray cannot reach nested items. Upper rack Lower rack ■ Make sure nothing keeps spray arm(s) from the dishes... Fill the Pre-Wash section to Medium Water (0-6 grains per U.S. Quick Steps 3 Select a cycle and option (cycles and options vary by model). 2 Add detergent for cleaning and rinse aid for the water spray to avoid nesting. Hard Water Soft Water Hard Water Soft Water C PRE-...
... 3 seconds of the water - If you use detergent. ■ Use automatic dishwasher detergent only. gallon) [typical water softener water and some models). 1 Prepare and load dishwasher. Spray cannot reach nested items. Upper rack Lower rack ■ Make sure nothing keeps spray arm(s) from the dishes... Fill the Pre-Wash section to Medium Water (0-6 grains per U.S. Quick Steps 3 Select a cycle and option (cycles and options vary by model). 2 Add detergent for cleaning and rinse aid for the water spray to avoid nesting. Hard Water Soft Water Hard Water Soft Water C PRE-...

Use & Care Guide
Page 7
...available for every cycle. Always place premeasured detergents in the following section. max - 21 3 - --- STEP 3 Select a Cycle (cycles vary by model) See "Cycle and Option Descriptions" charts in the previous wash cycle. Efficient dishwashers run longer to "Lock." Press START/ RESUME once to show which... and dishwasher interior will be pressed each time. ■ If the START/RESUME button is at the sink nearest your cycles by model) See "Cycle and Option Descriptions" charts in the main compartment and close the lid. Add rinse aid when indicator drops to "...
...available for every cycle. Always place premeasured detergents in the following section. max - 21 3 - --- STEP 3 Select a Cycle (cycles vary by model) See "Cycle and Option Descriptions" charts in the previous wash cycle. Efficient dishwashers run longer to "Lock." Press START/ RESUME once to show which... and dishwasher interior will be pressed each time. ■ If the START/RESUME button is at the sink nearest your cycles by model) See "Cycle and Option Descriptions" charts in the main compartment and close the lid. Add rinse aid when indicator drops to "...
Use & Care Guide
Page 8
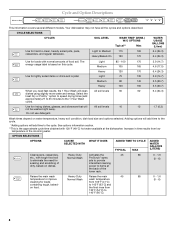
... for loads with 120°F (49°C) hot water available at the back of food soil. Cycle and Option Descriptions This information covers several different models. Your dishwasher may not have all the cycles and options described.
... for loads with 120°F (49°C) hot water available at the back of food soil. Cycle and Option Descriptions This information covers several different models. Your dishwasher may not have all the cycles and options described.
Use & Care Guide
Page 10
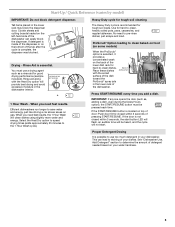
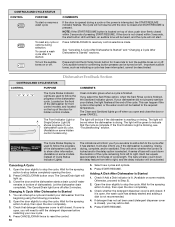
...door is not closed and START/RESUME is drying. Important audible tones, such as indicating a cycle has been interrupted, cannot be turned on some models. If you are used to right, and the delay indicator will be green to Step 2). 2. The light will show other information. (Available ... go off after 2 minutes. It will light up. 3. Open the door slightly to stop the cycle. Wait for front control models, and located on some models instead of the dishwasher cycle. Open the door slightly to stop the cycle. Adding A Dish After Dishwasher Is Started 1. Check whether...
...door is not closed and START/RESUME is drying. Important audible tones, such as indicating a cycle has been interrupted, cannot be turned on some models. If you are used to right, and the delay indicator will be green to Step 2). 2. The light will show other information. (Available ... go off after 2 minutes. It will light up. 3. Open the door slightly to stop the cycle. Wait for front control models, and located on some models instead of the dishwasher cycle. Open the door slightly to stop the cycle. Adding A Dish After Dishwasher Is Started 1. Check whether...

Use & Care Guide
Page 14
...Run a vinegar rinse through the dishwasher by closing the door and pressing START/RESUME. Do not use the Top Rack Only option (on some models) for dishwashers once per month. NOTES: ■ Surging sounds can be heard if items extend beyond the racks and interfere with the partial load... sure the dishwasher is NOT sanitized. Select the proper cycle and option for service. The Heavy Duty cycle with the ProScrub® (on some models) option can occur periodically throughout the cycle while the dishwasher is free from : ■ Using the incorrect type of detergent, such as dish ...
...Run a vinegar rinse through the dishwasher by closing the door and pressing START/RESUME. Do not use the Top Rack Only option (on some models) for dishwashers once per month. NOTES: ■ Surging sounds can be heard if items extend beyond the racks and interfere with the partial load... sure the dishwasher is NOT sanitized. Select the proper cycle and option for service. The Heavy Duty cycle with the ProScrub® (on some models) option can occur periodically throughout the cycle while the dishwasher is free from : ■ Using the incorrect type of detergent, such as dish ...

Use & Care Guide
Page 16
... the finish of your major appliance, unless such damage results from defects in accordance with original model/serial numbers that existed when this major appliance is intended to KitchenAid within 30 days from accident, alteration, misuse, abuse, fire, flood, acts of God, ... ITEMS EXCLUDED FROM WARRANTY This limited warranty does not cover: 1. Damage resulting from the date of products not approved by calling KitchenAid. Cosmetic damage, including scratches, dents, chips or other rights that vary from unauthorized modifications made to province. Pickup and delivery...
... the finish of your major appliance, unless such damage results from defects in accordance with original model/serial numbers that existed when this major appliance is intended to KitchenAid within 30 days from accident, alteration, misuse, abuse, fire, flood, acts of God, ... ITEMS EXCLUDED FROM WARRANTY This limited warranty does not cover: 1. Damage resulting from the date of products not approved by calling KitchenAid. Cosmetic damage, including scratches, dents, chips or other rights that vary from unauthorized modifications made to province. Pickup and delivery...
Use & Care Guide
Page 17
...daytime phone number in U.S.A. For additional product information or to view FAQs (Frequently Asked Questions), in your complete model number ready. visit: www.kitchenaid.com In Canada visit: www.kitchenaid.ca If you do not have access to the Internet and you need further assistance, you can find your... product or you would like to schedule service, you need assistance using your model and serial number on the label located near the door on the right-hand or left-hand side of KitchenAid, U.S.A., KitchenAid Canada licensee in Canada 9/10 Printed in the U.S.A., call 1-800-807-6777...
...daytime phone number in U.S.A. For additional product information or to view FAQs (Frequently Asked Questions), in your complete model number ready. visit: www.kitchenaid.com In Canada visit: www.kitchenaid.ca If you do not have access to the Internet and you need further assistance, you can find your... product or you would like to schedule service, you need assistance using your model and serial number on the label located near the door on the right-hand or left-hand side of KitchenAid, U.S.A., KitchenAid Canada licensee in Canada 9/10 Printed in the U.S.A., call 1-800-807-6777...

Energy Guide
Page 1
...KUDS30IX***, KUDS30FX***, KUDS35FX*** Estimated Yearly Operating Cost (when used with an electric water heater) $31 ▼ $20 $50 Cost Range of Similar Models 288 kWh Estimated Yearly Electricity Use $24 Estimated Yearly Operating Cost (when used with a natural gas water heater) Your cost will depend on your... utility rates and use. • Cost range based only on standard capacity models. • Estimated operating cost based on four wash loads a week and a 2007 national average electricity cost of 10.65 cents per kWh and...
...KUDS30IX***, KUDS30FX***, KUDS35FX*** Estimated Yearly Operating Cost (when used with an electric water heater) $31 ▼ $20 $50 Cost Range of Similar Models 288 kWh Estimated Yearly Electricity Use $24 Estimated Yearly Operating Cost (when used with a natural gas water heater) Your cost will depend on your... utility rates and use. • Cost range based only on standard capacity models. • Estimated operating cost based on four wash loads a week and a 2007 national average electricity cost of 10.65 cents per kWh and...


