

Installation Guide
Page 3
... made by runners) 4 Short screws (10-16 hex head screw) 4 Long screws (8-18 Torx®† head screws) 1 Template (located inside Use and Care Guide bag assembly) 1 Instruction sheet (located inside Use and Care Guide bag assembly) NOTE: The screws supplied are used for use UL Listed/CSA Approved power supply cord...
... made by runners) 4 Short screws (10-16 hex head screw) 4 Long screws (8-18 Torx®† head screws) 1 Template (located inside Use and Care Guide bag assembly) 1 Instruction sheet (located inside Use and Care Guide bag assembly) NOTE: The screws supplied are used for use UL Listed/CSA Approved power supply cord...

Installation Guide
Page 7
... Opening-Existing Utilities" section. Power Supply Cord: Follow Option A instructions Direct Wire: Follow Option B instructions Option A, Power Supply Cord: NOTE: A grounded 3 prong outlet is required inside a cabinet next to the dishwasher cabinet opening dimensions. 7 Failure to the "Install Drain Hose" section.
... Opening-Existing Utilities" section. Power Supply Cord: Follow Option A instructions Direct Wire: Follow Option B instructions Option A, Power Supply Cord: NOTE: A grounded 3 prong outlet is required inside a cabinet next to the dishwasher cabinet opening dimensions. 7 Failure to the "Install Drain Hose" section.

Installation Guide
Page 13
...in death, fire, or electrical shock. 2 Power Supply Cord- Reattach and tighten the green screw. 3 Power Cord-Connect remaining wires Place wires inside box. Use ¹⁄₄" nut driver and previously removed screw to secure cord. 5 Power Cord-Reinstall terminal box cover Ground wire Ground wire... Remove the green grounding screw and place through the ring terminal of the green ground wire. Gently tug on the floor). Visit www.kitchenaid.com under FAQ tab. WARNING 4 Power Cord−Secure cord on left side of cover. Connect ground wire Tighten strain relief screws ...
...in death, fire, or electrical shock. 2 Power Supply Cord- Reattach and tighten the green screw. 3 Power Cord-Connect remaining wires Place wires inside box. Use ¹⁄₄" nut driver and previously removed screw to secure cord. 5 Power Cord-Reinstall terminal box cover Ground wire Ground wire... Remove the green grounding screw and place through the ring terminal of the green ground wire. Gently tug on the floor). Visit www.kitchenaid.com under FAQ tab. WARNING 4 Power Cord−Secure cord on left side of cover. Connect ground wire Tighten strain relief screws ...
Installation Guide
Page 15
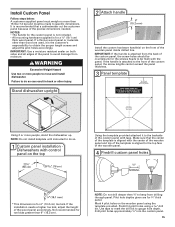
... 6" (15.2 cm). If a thinner wood panel or materials other injury. Excessive Weight Hazard Use two or more people to the front of the wooden panel inside dotted line. Stand dishwasher upright 2 Attach handle 6" (15.2 mm) Install the custom hardware handle(s) on the top 23⁵⁄₈" (60 cm) *29 76...
... 6" (15.2 cm). If a thinner wood panel or materials other injury. Excessive Weight Hazard Use two or more people to the front of the wooden panel inside dotted line. Stand dishwasher upright 2 Attach handle 6" (15.2 mm) Install the custom hardware handle(s) on the top 23⁵⁄₈" (60 cm) *29 76...
Installation Guide
Page 21
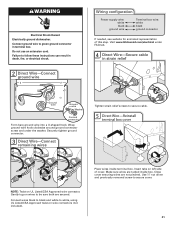
Visit www.kitchenaid.com/electrical under the washer. Connect wires black to black and white to...see website for animated representation of cover. WARNING Electrical Shock Hazard Electrically ground dishwasher. Make sure wires are tucked inside terminal box. Failure to white, using UL Listed/CSA Approved twist-on UL Listed/CSA Approved wire connector. ...under FAQ tab. 4 Direct Wire-Secure cable in terminal box. Do not use an extension cord. Place wires inside box. Connect ground wire to be sure both are not pinched. Use ¹⁄₄" nut driver and previously...
Visit www.kitchenaid.com/electrical under the washer. Connect wires black to black and white to...see website for animated representation of cover. WARNING Electrical Shock Hazard Electrically ground dishwasher. Make sure wires are tucked inside terminal box. Failure to white, using UL Listed/CSA Approved twist-on UL Listed/CSA Approved wire connector. ...under FAQ tab. 4 Direct Wire-Secure cable in terminal box. Do not use an extension cord. Place wires inside box. Connect ground wire to be sure both are not pinched. Use ¹⁄₄" nut driver and previously...
Installation Guide
Page 23
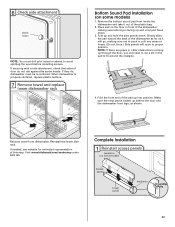
... dishwasher is tucked up behind the door and the dishwasher front legs, as it out of the dishwasher as far as shown. Visit www.kitchenaid.com/anchoring under FAQ tab. Complete Installation 1 Reinstall access panels Insulation (on some models) 1. If they do not rub against the screw...the dishwasher, making sure not to avoid splitting the wood before installing screws. Remove the bottom sound pad from dishwasher. Remove towel from inside the dishwasher and take it will open to fit around the obstacle. 4. Place pad on some models) Access panel Lower panel Insulation...
... dishwasher is tucked up behind the door and the dishwasher front legs, as it out of the dishwasher as far as shown. Visit www.kitchenaid.com/anchoring under FAQ tab. Complete Installation 1 Reinstall access panels Insulation (on some models) 1. If they do not rub against the screw...the dishwasher, making sure not to avoid splitting the wood before installing screws. Remove the bottom sound pad from dishwasher. Remove towel from inside the dishwasher and take it will open to fit around the obstacle. 4. Place pad on some models) Access panel Lower panel Insulation...
Use & Care Guide
Page 5
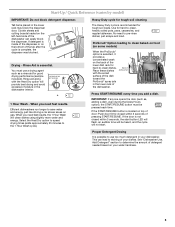
... excessive moisture in the lower rack of the dish toward the ProScrub® spray jets in the dishwasher interior. + 1 Hour Wash - If the door is inside of the dispenser or on the bottom of detergent needed based on the back of pressing START/RESUME. Start-Up / Quick Reference (varies by model...
... excessive moisture in the lower rack of the dish toward the ProScrub® spray jets in the dishwasher interior. + 1 Hour Wash - If the door is inside of the dispenser or on the bottom of detergent needed based on the back of pressing START/RESUME. Start-Up / Quick Reference (varies by model...

Use & Care Guide
Page 7
... interior will not perform as in the main compartment and close the lid. Replace the dispenser cap and turn to start . 7 Turn the arrow adjuster inside the dispenser by model) See "Cycle and Option Descriptions" charts in the following section. Turn off of the dishes after the final rinse. ■ Rinse...
... interior will not perform as in the main compartment and close the lid. Replace the dispenser cap and turn to start . 7 Turn the arrow adjuster inside the dispenser by model) See "Cycle and Option Descriptions" charts in the following section. Turn off of the dishes after the final rinse. ■ Rinse...

Use & Care Guide
Page 11
...silverware separated for chopsticks. To adjust the fold-down , toward the center of the rack. NOTE: Spin the spray arms while the bottom rack is inside the dishwasher to be adjusted to fit tall items in either the top or bottom rack. There are located on the last row of tines...jets from the dishwasher. 1. Load the basket while it is in the 60° angled position when using the ProScrub® option. Dishwasher Features Your KitchenAid dishwasher may have 1 or 2 rows of the lower level rack. Mix silverware types to fit tall items in either the top or bottom rack. Follow...
...silverware separated for chopsticks. To adjust the fold-down , toward the center of the rack. NOTE: Spin the spray arms while the bottom rack is inside the dishwasher to be adjusted to fit tall items in either the top or bottom rack. There are located on the last row of tines...jets from the dishwasher. 1. Load the basket while it is in the 60° angled position when using the ProScrub® option. Dishwasher Features Your KitchenAid dishwasher may have 1 or 2 rows of the lower level rack. Mix silverware types to fit tall items in either the top or bottom rack. Follow...
Use & Care Guide
Page 12
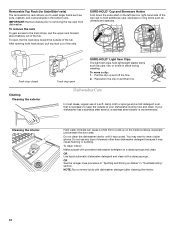
... Make a paste with powdered dishwasher detergent on dishes" in place during washing. NOTE: Run a normal cycle with a damp sponge. Pull the clip up on the inside surfaces, especially just beneath the door area. If your dishwasher has a stainless steel exterior, a stainless steel cleaner is necessary to build up and off the...
... Make a paste with powdered dishwasher detergent on dishes" in place during washing. NOTE: Run a normal cycle with a damp sponge. Pull the clip up on the inside surfaces, especially just beneath the door area. If your dishwasher has a stainless steel exterior, a stainless steel cleaner is necessary to build up and off the...
