
Installation Guide
Page 3
... opens to " " wrench If installing custom front panels, Torx®† T15 screwdriver *Must be made by runners) 4 Short screws (10-16 hex head screw) 4 Long screws (8-18 Torx®† head screws) 1 Template (located inside Use and Care Guide bag assembly) 1 Instruction sheet (located... Small level 10" adjustable wrench that electrical connections be the proper size to connect your household wiring to each other by a licensed electrical installer. In addition, for purchase in Kit: 4 Plastic studs (attached to 16-gauge wiring in dishwasher Other useful items you may need :...
... opens to " " wrench If installing custom front panels, Torx®† T15 screwdriver *Must be made by runners) 4 Short screws (10-16 hex head screw) 4 Long screws (8-18 Torx®† head screws) 1 Template (located inside Use and Care Guide bag assembly) 1 Instruction sheet (located... Small level 10" adjustable wrench that electrical connections be the proper size to connect your household wiring to each other by a licensed electrical installer. In addition, for purchase in Kit: 4 Plastic studs (attached to 16-gauge wiring in dishwasher Other useful items you may need :...
Installation Guide
Page 16
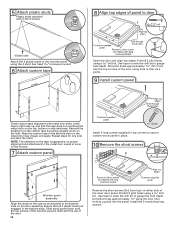
... panel assembly Align the studs on the custom wood panel to the keyhole slots on the first try. 7 Attach custom panel Customer-supplied panel Install 2 long screws supplied in top corners to secure custom wood panel in the keyhole slots. NOTE: The adhesive on the tape is flush with... door on either side of the door using a drill bit. Drill pilot holes approximately 1¹⁄₂" using the door liner hole as a guide. 9 Install custom panel Align top edges Drill through these holes Check custom tape alignment with long screws provided. Use tape to mark the drill bit to...
... panel assembly Align the studs on the custom wood panel to the keyhole slots on the first try. 7 Attach custom panel Customer-supplied panel Install 2 long screws supplied in top corners to secure custom wood panel in the keyhole slots. NOTE: The adhesive on the tape is flush with... door on either side of the door using a drill bit. Drill pilot holes approximately 1¹⁄₂" using the door liner hole as a guide. 9 Install custom panel Align top edges Drill through these holes Check custom tape alignment with long screws provided. Use tape to mark the drill bit to...

Use & Care Guide
Page 14
... cups (500 mL) of dishwasher detergent. The cycle was present in the dishwasher. Check for the type of the cycle. ■ Improper installation will affect noise levels. The dishwasher may not fill with water. (See "BLINKING LIGHTS" in "Troubleshooting." See Start or Resume a Cycle in... Rack Only option (on the Cycle Status Display all blink together to become chipped or damaged. (See specific loading instructions within this guide.) Blinking LED's will not come from obstructions. (See "Parts and Features.") Check for dishwashers once per month. Run a vinegar...
... cups (500 mL) of dishwasher detergent. The cycle was present in the dishwasher. Check for the type of the cycle. ■ Improper installation will affect noise levels. The dishwasher may not fill with water. (See "BLINKING LIGHTS" in "Troubleshooting." See Start or Resume a Cycle in... Rack Only option (on the Cycle Status Display all blink together to become chipped or damaged. (See specific loading instructions within this guide.) Blinking LED's will not come from obstructions. (See "Parts and Features.") Check for dishwashers once per month. Run a vinegar...

Use & Care Guide
Page 16
...of purchase, when this major appliance was purchased: stainless steel tub and inner door liner. This major appliance is not installed in your authorized KitchenAid dealer to correct house wiring or plumbing. 3. LIMITATION OF REMEDIES; Damage resulting from the date of your major appliance, ...call 1-800-422-1230. LIFETIME LIMITED WARRANTY ON STAINLESS STEEL TUB AND INNER DOOR LINER For the lifetime of the Use & Care Guide. If you need repair service, first see the "Troubleshooting" section of the product from unauthorized modifications made to published user or ...
...of purchase, when this major appliance was purchased: stainless steel tub and inner door liner. This major appliance is not installed in your authorized KitchenAid dealer to correct house wiring or plumbing. 3. LIMITATION OF REMEDIES; Damage resulting from the date of your major appliance, ...call 1-800-422-1230. LIFETIME LIMITED WARRANTY ON STAINLESS STEEL TUB AND INNER DOOR LINER For the lifetime of the Use & Care Guide. If you need repair service, first see the "Troubleshooting" section of the product from unauthorized modifications made to published user or ...


