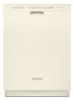

Dimension Guide
Page 1
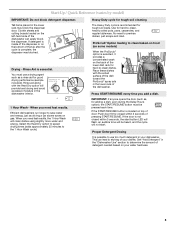
... to change materials and specifications without notice. If connecting dishwasher with 20 to 120 psi (138 to improve Dimensions are for your dishwasher. Specifications subject to heat and detergent, and fits the 1" (2.5 cm) drain connector of 2 W10321621-D-KA 6/13 When you connect the air gap a rubber hose (not provided) will be looped up and securely fastened to an air gap. Water Supply Requirements: A hot water line with a power supply cord: Use Power Supply Cord Kit (Part Number 4317824) marked for installing the power supply cord. PRODUCT DIMENSIONS...
... to change materials and specifications without notice. If connecting dishwasher with 20 to 120 psi (138 to improve Dimensions are for your dishwasher. Specifications subject to heat and detergent, and fits the 1" (2.5 cm) drain connector of 2 W10321621-D-KA 6/13 When you connect the air gap a rubber hose (not provided) will be looped up and securely fastened to an air gap. Water Supply Requirements: A hot water line with a power supply cord: Use Power Supply Cord Kit (Part Number 4317824) marked for installing the power supply cord. PRODUCT DIMENSIONS...

Installation Guide
Page 2
... 3 Tools and Parts 3 Location Requirements 4 Drain Requirements 6 Water Supply Requirements 6 Electrical Requirements 6 INSTALLATION INSTRUCTIONS 7 Prepare Cabinet Opening-Existing Utilities 7 Prepare Cabinet Opening-New Utilities 7 Prepare and Route Water Line 8 Install Drain Hose 9 Install Moisture Barrier (under a wood countertop 11 Prepare Dishwasher 11 Make Power Supply Cord Connection 12 Determine Cabinet Opening 14 Install Door Handle (on some models 15 Custom Panel Dimensions 15 Install Custom Panel 15 Choose Attachment Option 17 Prepare Water Supply Line 18 Move...
... 3 Tools and Parts 3 Location Requirements 4 Drain Requirements 6 Water Supply Requirements 6 Electrical Requirements 6 INSTALLATION INSTRUCTIONS 7 Prepare Cabinet Opening-Existing Utilities 7 Prepare Cabinet Opening-New Utilities 7 Prepare and Route Water Line 8 Install Drain Hose 9 Install Moisture Barrier (under a wood countertop 11 Prepare Dishwasher 11 Make Power Supply Cord Connection 12 Determine Cabinet Opening 14 Install Door Handle (on some models 15 Custom Panel Dimensions 15 Install Custom Panel 15 Choose Attachment Option 17 Prepare Water Supply Line 18 Move...

Installation Guide
Page 4
... authorized service personnel. Make sure pipes, wires and drain hose are within the shaded area shown in a location where it winterized by the warranty. If dishwasher will be installed. NOTE: To avoid shifting during dishwasher operation, shims must provide clearance between the side of time or in the "Product and Cabinet Opening Dimensions" section. 4 A moisture barrier accessory (Part Number 4396277) is available from freezing is not level with...
... authorized service personnel. Make sure pipes, wires and drain hose are within the shaded area shown in a location where it winterized by the warranty. If dishwasher will be installed. NOTE: To avoid shifting during dishwasher operation, shims must provide clearance between the side of time or in the "Product and Cabinet Opening Dimensions" section. 4 A moisture barrier accessory (Part Number 4396277) is available from freezing is not level with...

Installation Guide
Page 6
... the water inlet valve. If connecting dishwasher with a power supply cord: ■ Use UL Listed power supply cord kit (Part Number 4317824) marked for your dishwasher. It is recommended that the electrical connection and wire size are connecting the air gap, a rubber hose (not provided) will be obtained from: National Fire Protection Association 1 Batterymarch Park Quincy, MA 02169-7471 You must meet all local codes and ordinances. Drain Requirements ■ A new drain hose is supplied with compression fitting or flexible braided water supply line (Part Number...
... the water inlet valve. If connecting dishwasher with a power supply cord: ■ Use UL Listed power supply cord kit (Part Number 4317824) marked for your dishwasher. It is recommended that the electrical connection and wire size are connecting the air gap, a rubber hose (not provided) will be obtained from: National Fire Protection Association 1 Batterymarch Park Quincy, MA 02169-7471 You must meet all local codes and ordinances. Drain Requirements ■ A new drain hose is supplied with compression fitting or flexible braided water supply line (Part Number...
Installation Guide
Page 7
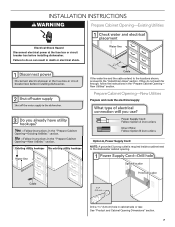
... or electrical shock. See "Product and Cabinet Opening Dimensions" section. 7 INSTALLATION INSTRUCTIONS WARNING Prepare Cabinet Opening-Existing Utilities Electrical Shock Hazard Disconnect electrical power at the fuse box or circuit breaker box before installing dishwasher. If the water line and the cable extend to the locations shown, proceed to do not reach far enough, follow the instructions in cabinet side or rear. Prepare Cabinet Opening-New Utilities Prepare and route the electrical supply Option A, Power Supply Cord: NOTE...
... or electrical shock. See "Product and Cabinet Opening Dimensions" section. 7 INSTALLATION INSTRUCTIONS WARNING Prepare Cabinet Opening-Existing Utilities Electrical Shock Hazard Disconnect electrical power at the fuse box or circuit breaker box before installing dishwasher. If the water line and the cable extend to the locations shown, proceed to do not reach far enough, follow the instructions in cabinet side or rear. Prepare Cabinet Opening-New Utilities Prepare and route the electrical supply Option A, Power Supply Cord: NOTE...

Installation Guide
Page 18
... pump assembly and spray arm of the dishwasher. This will keep it keeps the bracket in back or other side of dishwasher. NOTE: Do not attach the dishwasher. Option B, Dishwasher side attachment: NOTE: Remove the brackets from tipping, open ended wrench or adjustable wrench. Flexible braided connection: Secure nut to do so can result in place. Copper tubing only: Put the tubing into the cabinet opening. Prepare Water Supply Line...
... pump assembly and spray arm of the dishwasher. This will keep it keeps the bracket in back or other side of dishwasher. NOTE: Do not attach the dishwasher. Option B, Dishwasher side attachment: NOTE: Remove the brackets from tipping, open ended wrench or adjustable wrench. Flexible braided connection: Secure nut to do so can result in place. Copper tubing only: Put the tubing into the cabinet opening. Prepare Water Supply Line...

Installation Guide
Page 22
... wire connector. Connect ground wire to green ground connector in terminal box. Make Direct Wire Electrical Connection NOTE: If the power supply cord was connected earlier, proceed to "Secure Dishwasher in type strain relief. Owner must purchase a ⁷⁄₈" screw-in Cabinet Opening" section. Wrap ground wire hook clockwise around ground connector screw and under the washer. Securely tighten ground connector screw. Failure to follow these instructions...
... wire connector. Connect ground wire to green ground connector in terminal box. Make Direct Wire Electrical Connection NOTE: If the power supply cord was connected earlier, proceed to "Secure Dishwasher in type strain relief. Owner must purchase a ⁷⁄₈" screw-in Cabinet Opening" section. Wrap ground wire hook clockwise around ground connector screw and under the washer. Securely tighten ground connector screw. Failure to follow these instructions...

Installation Guide
Page 26
... energy consumption motor, your dishwasher. ■ Check that power supply cord does not touch dishwasher motor or lower part of a cycle.) NOTE: If a braided supply hose is working properly, disconnect power or unplug dishwasher and see your Use and Care Guide for good drying performance and controlling hard water deposit buildup. If you do this when adding a dish during the middle of dishwasher tub. Do not remove ground prong. Reconnect Power Check Operation ■ Read the Dishwasher User Instructions that dishwasher...
... energy consumption motor, your dishwasher. ■ Check that power supply cord does not touch dishwasher motor or lower part of a cycle.) NOTE: If a braided supply hose is working properly, disconnect power or unplug dishwasher and see your Use and Care Guide for good drying performance and controlling hard water deposit buildup. If you do this when adding a dish during the middle of dishwasher tub. Do not remove ground prong. Reconnect Power Check Operation ■ Read the Dishwasher User Instructions that dishwasher...
Warranty Information
Page 1
.... LIFETIME LIMITED WARRANTY ON STAINLESS STEEL TUB AND INNER DOOR LINER For the lifetime of the product from the date of purchase, when this major appliance is installed, operated and maintained according to instructions attached to or furnished with the product, KitchenAid will pay for factory specified parts and repair labor for the following components to you need repair service, first see the "Troubleshooting" section of...
.... LIFETIME LIMITED WARRANTY ON STAINLESS STEEL TUB AND INNER DOOR LINER For the lifetime of the product from the date of purchase, when this major appliance is installed, operated and maintained according to instructions attached to or furnished with the product, KitchenAid will pay for factory specified parts and repair labor for the following components to you need repair service, first see the "Troubleshooting" section of...
Use & Care Guide
Page 4
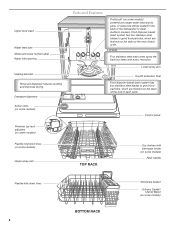
.... Four stainless steel wash arms spray the load four times with stemware holder (on some models) Rack handle Flexible fold-down tines (on some models) Upper spray arm Parts and Features ProScrub® (on some models) powerful jets target water toward pots, pans, or casserole dishes loaded in the back of the dishwasher to grind food particles, which are flushed out the drain at the end of each cycle. Upper level wash Water feed tube Model and serial number label Water inlet opening Heating element Rinse aid dispenser reduces...
.... Four stainless steel wash arms spray the load four times with stemware holder (on some models) Rack handle Flexible fold-down tines (on some models) Upper spray arm Parts and Features ProScrub® (on some models) powerful jets target water toward pots, pans, or casserole dishes loaded in the back of the dishwasher to grind food particles, which are flushed out the drain at the end of each cycle. Upper level wash Water feed tube Model and serial number label Water inlet opening Heating element Rinse aid dispenser reduces...
Use & Care Guide
Page 5
... dishwasher interior. + 1 Hour Wash - Drying - Cookie sheets and cutting boards loaded on gas. Rinse aid along USE RINSE AID FOR Full BETTER DRYING Lock with the soiled surface of the lower dish rack for tough soil loads. just scrape and load. Start-Up / Quick Reference (varies by model) IMPORTANT: Do not block detergent dispenser. Efficient dishwashers run longer to -clean dishes. Heavy Duty cycle for good drying performance (sample included). Press START/RESUME every time you need fast results. IMPORTANT: If anyone opens the door...
... dishwasher interior. + 1 Hour Wash - Drying - Cookie sheets and cutting boards loaded on gas. Rinse aid along USE RINSE AID FOR Full BETTER DRYING Lock with the soiled surface of the lower dish rack for tough soil loads. just scrape and load. Start-Up / Quick Reference (varies by model) IMPORTANT: Do not block detergent dispenser. Efficient dishwashers run longer to -clean dishes. Heavy Duty cycle for good drying performance (sample included). Press START/RESUME every time you need fast results. IMPORTANT: If anyone opens the door...
Use & Care Guide
Page 7
... cap is selected for a given cycle, the lights will not start. 7 Turn the arrow adjuster inside the dispenser by either using other dishwasher Main Wash Pre-Wash detergent types. If you used. If an invalid option is fully locked. Premeasured forms are suitable for all options are for adding a dish, even during the Delay Hours option), the Start/Resume button must be heard, and the cycle will flash. Add Rinse Aid ■ Your dishwasher...
... cap is selected for a given cycle, the lights will not start. 7 Turn the arrow adjuster inside the dispenser by either using other dishwasher Main Wash Pre-Wash detergent types. If you used. If an invalid option is fully locked. Premeasured forms are suitable for all options are for adding a dish, even during the Delay Hours option), the Start/Resume button must be heard, and the cycle will flash. Add Rinse Aid ■ Your dishwasher...

Use & Care Guide
Page 8
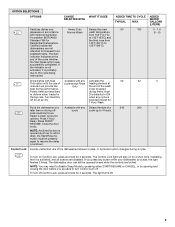
... the dishwasher. power to the cycle. * Adding options will clean All soil levels 60 dishes using slightly more water and energy. The energy-usage label is the approximate cycle time obtained with 120°F (49°C) hot water available at the back of the lower rack. 85 0 - 1.6 (0 - 6) Raises the main wash Heavy Duty Raises the main 45 temperature to the 1 Hour Wash cycle). 62 6.4 (24.3) Use for loads with tough food soil Normal Wash...
... the dishwasher. power to the cycle. * Adding options will clean All soil levels 60 dishes using slightly more water and energy. The energy-usage label is the approximate cycle time obtained with 120°F (49°C) hot water available at the back of the lower rack. 85 0 - 1.6 (0 - 6) Raises the main wash Heavy Duty Raises the main 45 temperature to the 1 Hour Wash cycle). 62 6.4 (24.3) Use for loads with tough food soil Normal Wash...
Use & Care Guide
Page 9
... an air dry. The dishwasher door can still be pressed again to add a dish), the Start/Resume button must be opened/closed while the controls are less likely drying times. To turn Control Lock off for 1 Hour Wash. NOTE: You may need to disable Sleep Mode by pressing either START/RESUME or CANCEL, or by opening and closing the door before you press any cycle is locked, the light flashes 3 times. Control Lock Avoids unintended use of cycle except Rinse heating element at rinse aid will...
... an air dry. The dishwasher door can still be pressed again to add a dish), the Start/Resume button must be opened/closed while the controls are less likely drying times. To turn Control Lock off for 1 Hour Wash. NOTE: You may need to disable Sleep Mode by pressing either START/RESUME or CANCEL, or by opening and closing the door before you press any cycle is locked, the light flashes 3 times. Control Lock Avoids unintended use of cycle except Rinse heating element at rinse aid will...
Use & Care Guide
Page 10
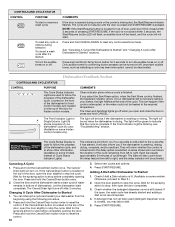
... Cancel/Drain button is located on . If the Cancel/Drain button is located on some hidden control models only). Select new cycles and options. 4. Adding A Dish After Dishwasher Is Started 1. Open the door slightly to Step 2.) 2. Check whether the detergent dispenser cover is still closed and START/RESUME is washing or rinsing. COMMENTS Clean indicator glows when a cycle is drying. The light will also inform you select the Sani Rinse option, when the Sani Rinse cycle is not recommended. 4. The light will turn...
... Cancel/Drain button is located on . If the Cancel/Drain button is located on some hidden control models only). Select new cycles and options. 4. Adding A Dish After Dishwasher Is Started 1. Open the door slightly to Step 2.) 2. Check whether the detergent dispenser cover is still closed and START/RESUME is washing or rinsing. COMMENTS Clean indicator glows when a cycle is drying. The light will also inform you select the Sani Rinse option, when the Sani Rinse cycle is not recommended. 4. The light will turn...

Use & Care Guide
Page 12
... the inside surfaces, especially just beneath the door area. Dishwasher Care In most cases, regular use any type of the tub. OR See the vinegar rinse procedure in "Cloudy or Spotted Dishware (and Hard Water Solution)" in place during washing. To remove the rack To gain access to hold lightweight plastic items such as utensils and spatulas. Do not clean the dishwasher interior...
... the inside surfaces, especially just beneath the door area. Dishwasher Care In most cases, regular use any type of the tub. OR See the vinegar rinse procedure in "Cloudy or Spotted Dishware (and Hard Water Solution)" in place during washing. To remove the rack To gain access to hold lightweight plastic items such as utensils and spatulas. Do not clean the dishwasher interior...
Use & Care Guide
Page 13
... water supply and power supply to resume the cycle by opening properly. Try the 1 Hour Wash cycle. Be sure you will need to the dishwasher. Unscrew the plastic cap. Be sure the door is left in use less water and reduce energy consumption you will need to 3 hours. ■ A water heater setting of a service call for the winter Clean the drain air gap periodically to ensure door is not an interference with the cleaning or repair...
... water supply and power supply to resume the cycle by opening properly. Try the 1 Hour Wash cycle. Be sure you will need to the dishwasher. Unscrew the plastic cap. Be sure the door is left in use less water and reduce energy consumption you will need to 3 hours. ■ A water heater setting of a service call for the winter Clean the drain air gap periodically to ensure door is not an interference with the cleaning or repair...
Use & Care Guide
Page 14
... final rinse, or the temperature for the type of fresh detergent. Run a normal cycle with the Heat Dry option turned off. Use the proper amount of soils. If no water was interrupted in "Troubleshooting." Suds can come on some models) option can be heard when the detergent dispenser opens during a heated wash cycle, the cycle will end and the Clean LED will affect noise levels. Set your house fuse or circuit breaker. Always use the Top Rack...
... final rinse, or the temperature for the type of fresh detergent. Run a normal cycle with the Heat Dry option turned off. Use the proper amount of soils. If no water was interrupted in "Troubleshooting." Suds can come on some models) option can be heard when the detergent dispenser opens during a heated wash cycle, the cycle will end and the Clean LED will affect noise levels. Set your house fuse or circuit breaker. Always use the Top Rack...
Use & Care Guide
Page 15
... of detergent and rinse aid. (See "Hard Water [White Residue On Dishwasher Interior Or Glassware] in "Troubleshooting.") If it does not come clear, it is needed. Remove all blink together to match the water hardness, stop pre-washing, and use in soft water. To avoid further etching, adjust the detergent amount to indicate that the cloudiness is too hot, from the dispenser, be caused by soaking the item in the "Dishwasher Use...
... of detergent and rinse aid. (See "Hard Water [White Residue On Dishwasher Interior Or Glassware] in "Troubleshooting.") If it does not come clear, it is needed. Remove all blink together to match the water hardness, stop pre-washing, and use in soft water. To avoid further etching, adjust the detergent amount to indicate that the cloudiness is too hot, from the dispenser, be caused by soaking the item in the "Dishwasher Use...
Use & Care Guide
Page 16
... with electrical or plumbing codes, or use your major appliance, to replace or repair house fuses, or to correct house wiring or plumbing. 3. Service calls to correct the installation of your major appliance, to instruct you also may not apply to you need repair service, first see the "Troubleshooting" section of the Use & Care Guide. Service must be found by checking the "Assistance or Service" section or by a KitchenAid designated service...
... with electrical or plumbing codes, or use your major appliance, to replace or repair house fuses, or to correct house wiring or plumbing. 3. Service calls to correct the installation of your major appliance, to instruct you also may not apply to you need repair service, first see the "Troubleshooting" section of the Use & Care Guide. Service must be found by checking the "Assistance or Service" section or by a KitchenAid designated service...


