

Dimension Guide
Page 1
..., use a new drain hose with 20 to 120 psi (138 to house plumbing lower than 20" Use ¹⁄₂" (1.3 cm) minimum I.D. Instructions packed with ³⁄₄" N.P.T. Water Supply Requirements: A hot water line with a maximum length of 12' (3.7 m) (Part No. 3385556) that... fitting or flexible braided water supply line (¹⁄₂" minimum plastic tubing is connected to 862 kPa) water pressure. For panel ready models, dishwasher depth is recommended. Specifications subject to the waste tee or disposer inlet. Use a U.L.-listed or CSA-approved conduit...
..., use a new drain hose with 20 to 120 psi (138 to house plumbing lower than 20" Use ¹⁄₂" (1.3 cm) minimum I.D. Instructions packed with ³⁄₄" N.P.T. Water Supply Requirements: A hot water line with a maximum length of 12' (3.7 m) (Part No. 3385556) that... fitting or flexible braided water supply line (¹⁄₂" minimum plastic tubing is connected to 862 kPa) water pressure. For panel ready models, dishwasher depth is recommended. Specifications subject to the waste tee or disposer inlet. Use a U.L.-listed or CSA-approved conduit...

Installation Guide
Page 2
... Hose 10 Install Moisture Barrier 11 Prepare Dishwasher 11 Make Power Supply Cord Connection 12 Determine Cabinet Opening 13 Installation Instructions (cont.) Install the Door Handle 14 Custom Panel Dimensions 14 Install Custom Panel 15 Choose Attachment Option 17 Move Dishwasher Into Cabinet Opening 17 Connect to Water Supply 19 Connect to Drain...
... Hose 10 Install Moisture Barrier 11 Prepare Dishwasher 11 Make Power Supply Cord Connection 12 Determine Cabinet Opening 13 Installation Instructions (cont.) Install the Door Handle 14 Custom Panel Dimensions 14 Install Custom Panel 15 Choose Attachment Option 17 Move Dishwasher Into Cabinet Opening 17 Connect to Water Supply 19 Connect to Drain...

Installation Guide
Page 3
..." wrench If installing custom front panels, Torx®† T15 screwdriver *Must be made by runners) 4 Short screws (10-16 hex head screw) 4 Long screws (8-18 Torx®† head screws) 1 Template (located inside Use and Care Guide bag assembly) 1 Instruction sheet (located inside Use and ...: Bottom sound pad (located in lower rack) Make sure all these parts are included in the literature package. Read and follow the instructions provided with and 1¹⁄₂" hole saw bits Small tubing cutter Wire stripper Shallow pan Wood block Parts supplied: Drain hose Drain...
..." wrench If installing custom front panels, Torx®† T15 screwdriver *Must be made by runners) 4 Short screws (10-16 hex head screw) 4 Long screws (8-18 Torx®† head screws) 1 Template (located inside Use and Care Guide bag assembly) 1 Instruction sheet (located inside Use and ...: Bottom sound pad (located in lower rack) Make sure all these parts are included in the literature package. Read and follow the instructions provided with and 1¹⁄₂" hole saw bits Small tubing cutter Wire stripper Shallow pan Wood block Parts supplied: Drain hose Drain...

Installation Guide
Page 12
... or removing the dishwasher in cabinet opening to avoid damaging floor covering. Make sure screwheads are facing to avoid scratching the door panel. Make Power Supply Cord Connection Option A, Power Supply Cord: 1 Power Cord-Route cord into terminal box Using a ¹&#...nut driver or Phillips screwdriver, remove 2 screws attaching access panel and lower panel to 16-gauge dishwasher wiring. Pull cord through strain relief in terminal bow. Power Supply Cord: Follow Option A instructions Direct Wire: Follow Option B instructions NOTE: If using Option B, proceed to "Determine Cabinet ...
... or removing the dishwasher in cabinet opening to avoid damaging floor covering. Make sure screwheads are facing to avoid scratching the door panel. Make Power Supply Cord Connection Option A, Power Supply Cord: 1 Power Cord-Route cord into terminal box Using a ¹&#...nut driver or Phillips screwdriver, remove 2 screws attaching access panel and lower panel to 16-gauge dishwasher wiring. Pull cord through strain relief in terminal bow. Power Supply Cord: Follow Option A instructions Direct Wire: Follow Option B instructions NOTE: If using Option B, proceed to "Determine Cabinet ...

Installation Guide
Page 14
... is 33³⁄₄" (85.7 cm), a section in bottom of handle) Hex key IMPORTANT: Do not scratch the front panel during this procedure. NOTE: Shims must be securely attached to floor to the same height. Place handle on the top 23⁵⁄...needed in the area shown to bring the dishwasher up to fit into the cabinet opening - Custom Panel Dimensions Custom panel dimensions-Dishwashers with control panel on mounting studs with Installation Instructions. Remove the door handle and hardware bag containing the setscrews and hex key from "Dishwasher Height Adjustment...
... is 33³⁄₄" (85.7 cm), a section in bottom of handle) Hex key IMPORTANT: Do not scratch the front panel during this procedure. NOTE: Shims must be securely attached to floor to the same height. Place handle on the top 23⁵⁄...needed in the area shown to bring the dishwasher up to fit into the cabinet opening - Custom Panel Dimensions Custom panel dimensions-Dishwashers with control panel on mounting studs with Installation Instructions. Remove the door handle and hardware bag containing the setscrews and hex key from "Dishwasher Height Adjustment...
Installation Guide
Page 15
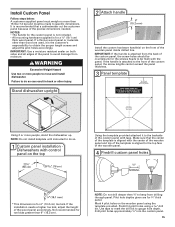
... two or more people, stand the dishwasher up. Stand dishwasher upright 2 Attach handle 6" (15.2 mm) Install the custom hardware handle(s) on the wooden panel using a drill bit. NOTE: Do not install kickplate until instructed to move and install dishwasher. If the installation needs a higher toe kick, adjust the height of the wooden...
... two or more people, stand the dishwasher up. Stand dishwasher upright 2 Attach handle 6" (15.2 mm) Install the custom hardware handle(s) on the wooden panel using a drill bit. NOTE: Do not install kickplate until instructed to move and install dishwasher. If the installation needs a higher toe kick, adjust the height of the wooden...

Installation Guide
Page 24
.... Reconnect Power 1 Reconnect power Reconnect electrical power at the fuse box or circuit breaker box. Failure to the lower panel. Do not remove ground prong. Do not use an adapter. Adjust if necessary. 4 Tighten screws Plug into a grounded 3 prong outlet... is insulation on the lower panel. 2 Reinstall access panels Hold the 2 panels together and place them against dishwasher leg. Do not use an extension cord. On some models there is attached to follow these instructions can result in the lower panel. 3 Check lower panel edge WARNING Electrical Shock Hazard...
.... Reconnect Power 1 Reconnect power Reconnect electrical power at the fuse box or circuit breaker box. Failure to the lower panel. Do not remove ground prong. Do not use an adapter. Adjust if necessary. 4 Tighten screws Plug into a grounded 3 prong outlet... is insulation on the lower panel. 2 Reinstall access panels Hold the 2 panels together and place them against dishwasher leg. Do not use an extension cord. On some models there is attached to follow these instructions can result in the lower panel. 3 Check lower panel edge WARNING Electrical Shock Hazard...
Use & Care Guide
Page 2
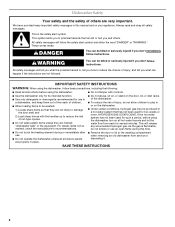
...its intended function. ■ Use only detergents or rinse agents recommended for use . ■ Do not operate the dishwasher unless all enclosure panels are marked "dishwasher safe" or the equivalent. For plastic items not so marked, check the manufacturer's recommendations. ■ Do not abuse..., sit on, or stand on your appliance. IMPORTANT SAFETY INSTRUCTIONS WARNING: When using the dishwasher turn on the dishwasher. ■ Under certain conditions, hydrogen gas may be killed or seriously injured if...
...its intended function. ■ Use only detergents or rinse agents recommended for use . ■ Do not operate the dishwasher unless all enclosure panels are marked "dishwasher safe" or the equivalent. For plastic items not so marked, check the manufacturer's recommendations. ■ Do not abuse..., sit on, or stand on your appliance. IMPORTANT SAFETY INSTRUCTIONS WARNING: When using the dishwasher turn on the dishwasher. ■ Under certain conditions, hydrogen gas may be killed or seriously injured if...


